inux 中nginx 的安装
##序言
Nginx是lgor Sysoev为俄罗斯访问量第二的rambler.ru站点设计开发的。从2004年发布至今,凭借开源的力量,已经接近成熟与完善。
Nginx功能丰富,可作为HTTP服务器,也可作为反向代理服务器,邮件服务器。支持FastCGI、SSL、Virtual Host、URL Rewrite、Gzip等功能。并且支持很多第三方的模块扩展。
Nginx的稳定性、功能集、示例配置文件和低系统资源的消耗让他后来居上,在全球活跃的网站中有12.18%的使用比率,大约为2220万个网站。
牛逼吹的差不多啦,如果你还不过瘾,你可以百度百科或者一些书上找到这样的夸耀,比比皆是。
Nginx常用功能
1、Http代理,反向代理:作为web服务器最常用的功能之一,尤其是反向代理。

Nginx在做反向代理时,提供性能稳定,并且能够提供配置灵活的转发功能。Nginx可以根据不同的正则匹配,采取不同的转发策略,比如图片文件结尾的走文件服务器,动态页面走web服务器,只要你正则写的没问题,又有相对应的服务器解决方案,你就可以随心所欲的玩。并且Nginx对返回结果进行错误页跳转,异常判断等。如果被分发的服务器存在异常,他可以将请求重新转发给另外一台服务器,然后自动去除异常服务器。
2、负载均衡
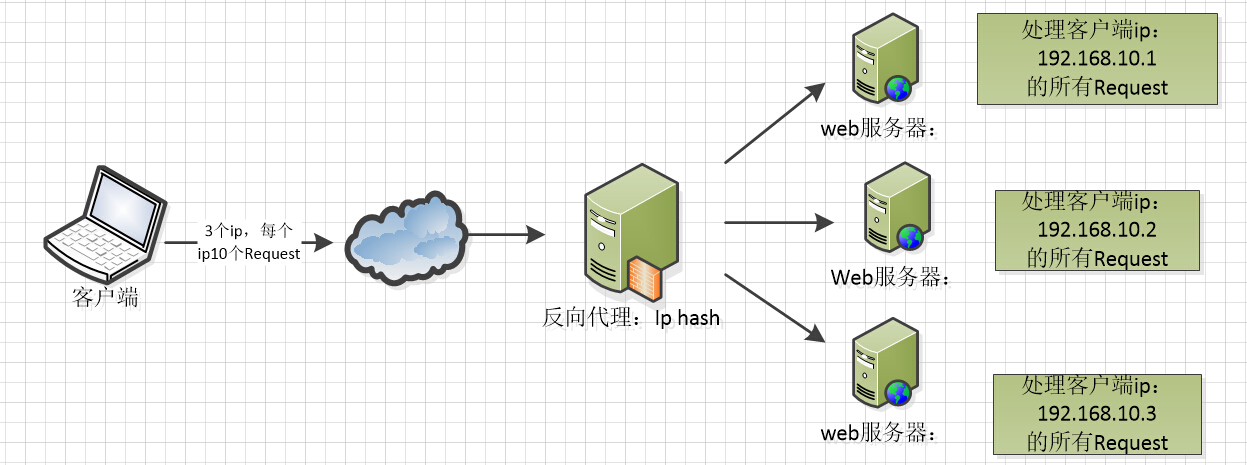
Nginx提供的负载均衡策略有2种:内置策略和扩展策略。内置策略为轮询,加权轮询,Ip hash。扩展策略,就天马行空,只有你想不到的没有他做不到的啦,你可以参照所有的负载均衡算法,给他一一找出来做下实现。上3个图,理解这三种负载均衡算法的实现


3、web缓存
Nginx可以对不同的文件做不同的缓存处理,配置灵活,并且支持FastCGI_Cache,主要用于对FastCGI的动态程序进行缓存。配合着第三方的ngx_cache_purge,对制定的URL缓存内容可以的进行增删管理。
4、Nginx相关地址
源码:https://trac.nginx.org/nginx/browser
官网:http://www.nginx.org/
Nginx安装
安装依赖库
- 安装gcc模块, 安装Nginx前,必须先确保安装了gcc环境。那么何为gcc?它是 Linux 下默认的 C/C++ 编译器,大部分 Linux 发行版中都是默认安装的。命令行输入
gcc -v,如果显示命令未找到或command not found,则代表没有安装gcc,需要安装上。 yum install gcc-c++ - 安装prce模块: PCRE(Perl Compatible Regular Expressions)是一个Perl库,包括 perl 兼容的正则表达式库。nginx的http模块使用pcre来解析正则表达式,所以需要在linux上安装pcre库。 地址 : http://www.pcre.org/
//下载`wget
https://ftp.pcre.org/pub/pcre/pcre-8.37.tar.gz
//解压
tar -zxvf pcre-8.37.tar.gz
//然后,进入包,配置:
./configure
//安装
make && make install - 安装openssl模块,OpenSSL 是一个强大的安全套接字层密码库,囊括主要的密码算法、常用的密钥和证书封装管理功能及SSL协议,并提供丰富的应用程序供测试或其它目的使用。 nginx不仅支持http协议,还支持https(即在ssl协议上传输http),所以需要在linux安装openssl库。地址: http://www.openssl.org/
//下载
 wget https://www.openssl.org/source/openssl-1.1.0e.tar.gz
// 解压
 tar -zxvf openssl-1.1.0e.tar.gz
//然后,进入包,配置:
./configure
//安装
make && make install - 安装gzip 模块, zlib库提供了很多种压缩和解压缩的方式,nginx使用zlib对http包的内容进行gzip,所以需要在linux上安装zlib库。 地址 http://www.zlib.net/
//下载
wget http://prdownloads.sourceforge.net/libpng/zlib-1.2.11.tar.gz?download
//解压
tar -zxvf zlib-1.2.11.tar.gz?download
// 然后,进入包,配置:
./configure
//安装
make && make install
也可以 yum安装
yum install -y pcre pcre-devel
yum install -y openssl openssl-devel
yum install -y zlib zlib-devel
安装Nginx并启动
//创建一个文件夹
cd /usr/local/
mkdir server
cd server/
//下载 :
wget http://nginx.org/download/nginx-1.7.8.tar.gz
//解压
tar -xvf nginx-1.7.8.tar.gz
//创建目录
mkdir nginx
//>>安装一个第三方模块,可以打印输出一些东西,一般用于调试nginx的参数时使用(也可以不安装)
//>>创建一个模块目录 用于放第三方模块 mkdir nginx-module
//>>进入目录: cd nginx-module
//>>下载: wget https://github.com/openresty/echo-nginx-module/archive/v0.60.tar.gz
//>>解压: tar zxvf v0.60.tar.gz echo-nginx-module-0.60
//进入安装目录
cd nginx-1.7.8
//配置
./configure --prefix=/usr/local/server/nginx --add-module=/usr/local/server/nginx-module/echo-nginx-module-0.60 --with-debug
源码的安装一般由有这三个步骤:配置(configure)、编译(make)、安装(make install)

一般在编译前加上一句:

./configure --prefix=/xxx/xxx

其中–prefix选项就是配置安装的路径,如果不配置该选项,安装后可执行文件默认放在/usr/local/bin,库文件默认放在/usr/local/lib,配置文件默认放在/usr/local/etc,其它的资源文件放在/usr/local/share,比较分散。

为了便于集中管理某个软件的各种文件,可以配置–prefix,如:

./configure --prefix=/usr/local/server/nginx

可以把所有资源文件放在/usr/local/server/nginx的路径中,就不会分散了。

// 编译安装

make && make install

//进入启动目录

cd ..

cd nginx/sbin/

//启动

./nginx

//这个时候可以访问本机IP了
配置Nginx
打开配置文件

vi /usr/local/nginx/conf/nginx.conf
后面详细介绍一下配置文件
user www www;
worker_processes 2; #设置值和CPU核心数一致
error_log /usr/local/webserver/nginx/logs/nginx_error.log crit; #日志位置和日志级别
pid /usr/local/webserver/nginx/nginx.pid;
#Specifies the value for maximum file descriptors that can be opened by this process.
worker_rlimit_nofile 65535;
events
{
use epoll;
worker_connections 65535;
}
http
{
include mime.types;
default_type application/octet-stream;
log_format main 'remote_addr - remote_user [time_local] "request" '
'status body_bytes_sent "$http_referer" '
'"http_user_agent" http_x_forwarded_for';#charset gb2312;
server_names_hash_bucket_size 128;
client_header_buffer_size 32k;
large_client_header_buffers 4 32k;
client_max_body_size 8m;sendfile on;
tcp_nopush on;
keepalive_timeout 60;
tcp_nodelay on;
fastcgi_connect_timeout 300;
fastcgi_send_timeout 300;
fastcgi_read_timeout 300;
fastcgi_buffer_size 64k;
fastcgi_buffers 4 64k;
fastcgi_busy_buffers_size 128k;
fastcgi_temp_file_write_size 128k;
gzip on;
gzip_min_length 1k;
gzip_buffers 4 16k;
gzip_http_version 1.0;
gzip_comp_level 2;
gzip_types text/plain application/x-javascript text/css application/xml;
gzip_vary on;#limit_zone crawler $binary_remote_addr 10m;
#下面是server虚拟主机的配置
server
{
listen 80;#监听端口
server_name localhost;#域名
index index.html index.htm index.php;
root /usr/local/webserver/nginx/html;#站点目录
location ~ ..(php|php5)?$
{
#fastcgi_pass unix:/tmp/php-cgi.sock;
fastcgi_pass 127.0.0.1:9000;
fastcgi_index index.php;
include fastcgi.conf;
}
location ~ ..(gif|jpg|jpeg|png|bmp|swf|ico)$
{
expires 30d;access_log off;
} location ~ .*\.(js|css)?$ { expires 15d;access_log off;
} access_log off;}
}
Nginx 常用命令
nginx -s reload            # 重新载入配置文件

nginx -s reopen            # 重启 Nginx

nginx -s stop              # 停止 Nginx

nginx -t                   # 检查配置文件nginx.conf

nginx -s quit              #优雅停止nginx,有连接时会等连接请求完成再杀死worker进程

nginx -v            	   #查看版本

nginx  -c filename  	   #指定配置文件

nginx -h           		   # 查看帮助信息

nginx -s reopen      	   #重新打开日志文件,一般用于切割日志
本文由 小马哥 创作,采用 知识共享署名4.0 国际许可协议进行许可
本站文章除注明转载/出处外,均为本站原创或翻译,转载前请务必署名