最近遇到一个问题腾讯云服务器在配置弹性网卡时需要手动配置路由,如果路由配置错误远程连接的服务器会立马断开,需要重启后再次连接远程SSH,另外因Linux操作系统发行版本不一样,版本新旧程度不一也会有部分没有配置网卡的情况,当前对新手配置的体验不是很好,经过几番折腾也写了一个脚本来适配各种情况,截止到目前已经适配这几种Linux发行版本CentOS7.5-8.4、 TencentOS、OpencloudOS和Ubuntu等操作系统发行版本。脚本搞定后还可以通过tat-agent来批量下发服务器,并执行操作,让用户特别新手无需登录服务器,输入配置弹性绑卡的关键步骤就可以自动配置好,以下来介绍一下配置过程。
首先说一下腾讯云弹性网卡的应用场景,它主要应用在内外网分离与灾备等场景,应用还是比较广泛,以下为我购买腾讯云云服务器的环境:
- 腾讯云云服务器
- Linux CentOS_7.5
- 申请了一块辅助网卡
- 主网卡两个内网IP ,辅助网卡三个内网IP
详细见以下截图。

以下为自动配置脚本。
#!/bin/bash # encoding=utf8 # 2023.4.17 # debug #set -xSet up a default search path.
PATH="/sbin:/usr/sbin:/bin:/usr/bin"
export PATHget ip
get_ip(){
IPADDR="127.0.0.1"
DEFAULT=$1 if [ x"$DEFAULT" == "x" ];then
DEFAULT=eth0
fiifconfig $DEFAULT 2>&1 > /dev/null if [ $? -eq 0 ];then IPADDR=`ifconfig $DEFAULT 2> /dev/null | grep inet | grep -v inet6 | awk '{print $2}'` fi echo $IPADDR}
format system_name
get_system_os(){
SYSTEM_OS="No supported system"if [ -e /etc/issue ];then cat /etc/issue | grep -E "Ubuntu (22|20|18|16|14)" 2>&1 > /dev/null if [ $? -eq 0 ];then SYSTEM_OS="ubuntu" echo $SYSTEM_OS exit 0 fi fi if [ -e /etc/redhat-release ];then cat /etc/redhat-release | grep -E "CentOS Stream release (9|8)" 2>&1 > /dev/null if [ $? -eq 0 ];then SYSTEM_OS="centos_stream_release_9_8" echo $SYSTEM_OS exit 0 fi cat /etc/redhat-release | grep -E "CentOS Linux release 8.(0|2|3|4)" 2>&1 > /dev/null if [ $? -eq 0 ];then SYSTEM_OS="CentOS_Linux_release_8_0_4" echo $SYSTEM_OS exit 0 fi cat /etc/redhat-release | grep -E "CentOS Linux release 7.(5|6|7|8|9)" 2>&1 > /dev/null if [ $? -eq 0 ];then SYSTEM_OS="CentOS_Linux_release_5_9" echo $SYSTEM_OS exit 0 fi cat /etc/redhat-release | grep -E "TencentOS Server release (3.1|2.4|2.6|2.2|1.2)" 2>&1 > /dev/null if [ $? -eq 0 ];then SYSTEM_OS="TencentOS_release_3_1_2_2" echo $SYSTEM_OS exit 0 fi cat /etc/redhat-release | grep "OpenCloudOS release 8.6" 2>&1 > /dev/null if [ $? -eq 0 ];then SYSTEM_OS="opencloudos_release" echo $SYSTEM_OS exit 0 fi fi echo $SYSTEM_OS exit 1}
INPUT
ENI=$1 IPADDRES=$2 STORAGE=$3
if [ -z "ENI" ] || [ -z "IPADDRES" ];then
echo "Usages: Ethernet(eth1、eth0) ipddress(ipv4) storage
pre-work:
chmod +x enc_set.sh
doc:https://cloud.tencent.com/document/product/576/18535
example:
./enc_set.sh eth1 192.168.1.7 # 设置辅助网卡主IP
./enc_set.sh eth1 192.168.1.8 # 设置辅助网卡辅助IP
./enc_set.sh eth0 192.168.1.10 # 设置主网卡辅助IP
./enc_set.sh eth0 192.168.1.10 true # 写入rc.local 重启服务器时依然配置依然生效"
exit 1
fiCheck Param
ifconfig $ENI 2>&1 > /dev/null
if [ $? -ne 0 ];then
echo "Ethernet "$ENI" not exists!"
exit 1
fiecho $IPADDRES | egrep -oE "[0-9]{1,3}.[0-9]{1,3}.[0-9]{1,3}.[0-9]{1,3}" 2>&1 > /dev/null
if [ $? -ne 0 ];then
echo "Your ip address format $IPADDRES error"
exit 1
fiCheck ENV
system_os=
get_system_osif [ "$system_os" == "No supported system" ];then
echo "No supported system OS"
exit 1
fiSet ETH
ip address show ENI | grep IPADDRES 2>&1 > /dev/null
if [ $? -ne 0 ];then
ip addr add IPADDRES dev ENI
fiip address show $ENI | grep DOWN 2>&1 > /dev/null
if [ $? -eq 0 ];then
ifconfig $ENI up
fiCentOS set route rule
supportsystem_os_array=(centos_stream_release_9_8 CentOS_Linux_release_8_0_4 CentOS_Linux_release_5_9 TencentOS_release_3_1_2_2 opencloudos_release ubuntu)
for (( i = 0 ; i < ${#supportsystem_os_array[@]} ; i++ )) do
if [ $system_os == ${supportsystem_os_array[$i]} ];then if [ $ENI != "eth0" ];then # ======= 设置辅助网卡主IP路由 ======== # 判断是否为主IP if [ $IPADDRES == `get_ip "$ENI"` ];then # 设置默认路由 ip route add default dev eth1 via $IPADDRES table 20 2> /dev/null # 设置回报 ip rule add from $IPADDRES table 20 2> /dev/null echo "runCommand:ip route add default dev eth1 via $IPADDRES table 20" echo "runCommand:ip rule add from $IPADDRES table 20" if [ x"$STORAGE" != "x" ];then [ -e /etc/rc.local ] && echo "/sbin/ip route add default dev eth1 via $IPADDRES table 20 2>&1 > /dev/null" >> /etc/rc.local [ -e /etc/rc.local ] && echo "/sbin/ip rule add from $IPADDRES table 20 2>&1 > /dev/null" >> /etc/rc.local fi else # ======= 设置辅助网卡辅助IP路由 ======== ip rule add from $IPADDRES table 20 echo "runCommand:ip rule add from $IPADDRES table 20" if [ x"$STORAGE" != "x" ];then [ -e /etc/rc.local ] && echo "/sbin/ip rule add from $IPADDRES table 20 2>&1 > /dev/null" >> /etc/rc.local fi fi else # ======= 设置主网卡辅助IP路由 ======== ip rule add from $IPADDRES table 10 ip route add default dev eth0 via $IPADDRES table 10 2> /dev/null echo "runCommand:ip rule add from $IPADDRES table 10" echo "runCommand:ip route add default dev eth0 via $IPADDRES table 10" if [ x"$STORAGE" != "x" ];then [ -e /etc/rc.local ] && echo "/sbin/ip rule add from $IPADDRES table 10 2>&1 > /dev/null" >> /etc/rc.local [ -e /etc/rc.local ] && echo "/sbin/ip route add default dev eth0 via $IPADDRES table 10 2>&1 > /dev/null" >> /etc/rc.local fi fi fidone
echo "Success..."
exit 0
脚本使用方法,两种:
方式一,登陆服务器,并将脚本复制到远程服务器,执行以下命令。
12345 | # chmod +x enc_set.sh# ./enc_set.sh eth1 10.0.1.118 # 首先配置辅助网卡(eth1)的主IP # ./enc_set.sh eth1 10.0.1.20 # 再次配置辅助网卡内网IP # ./enc_set.sh eth1 10.0.1.59 # 再次配置辅助网卡内网IP# ./enc_set.sh eth0 10.0.1.103 # 最后配置主网卡内网IP |
|---|
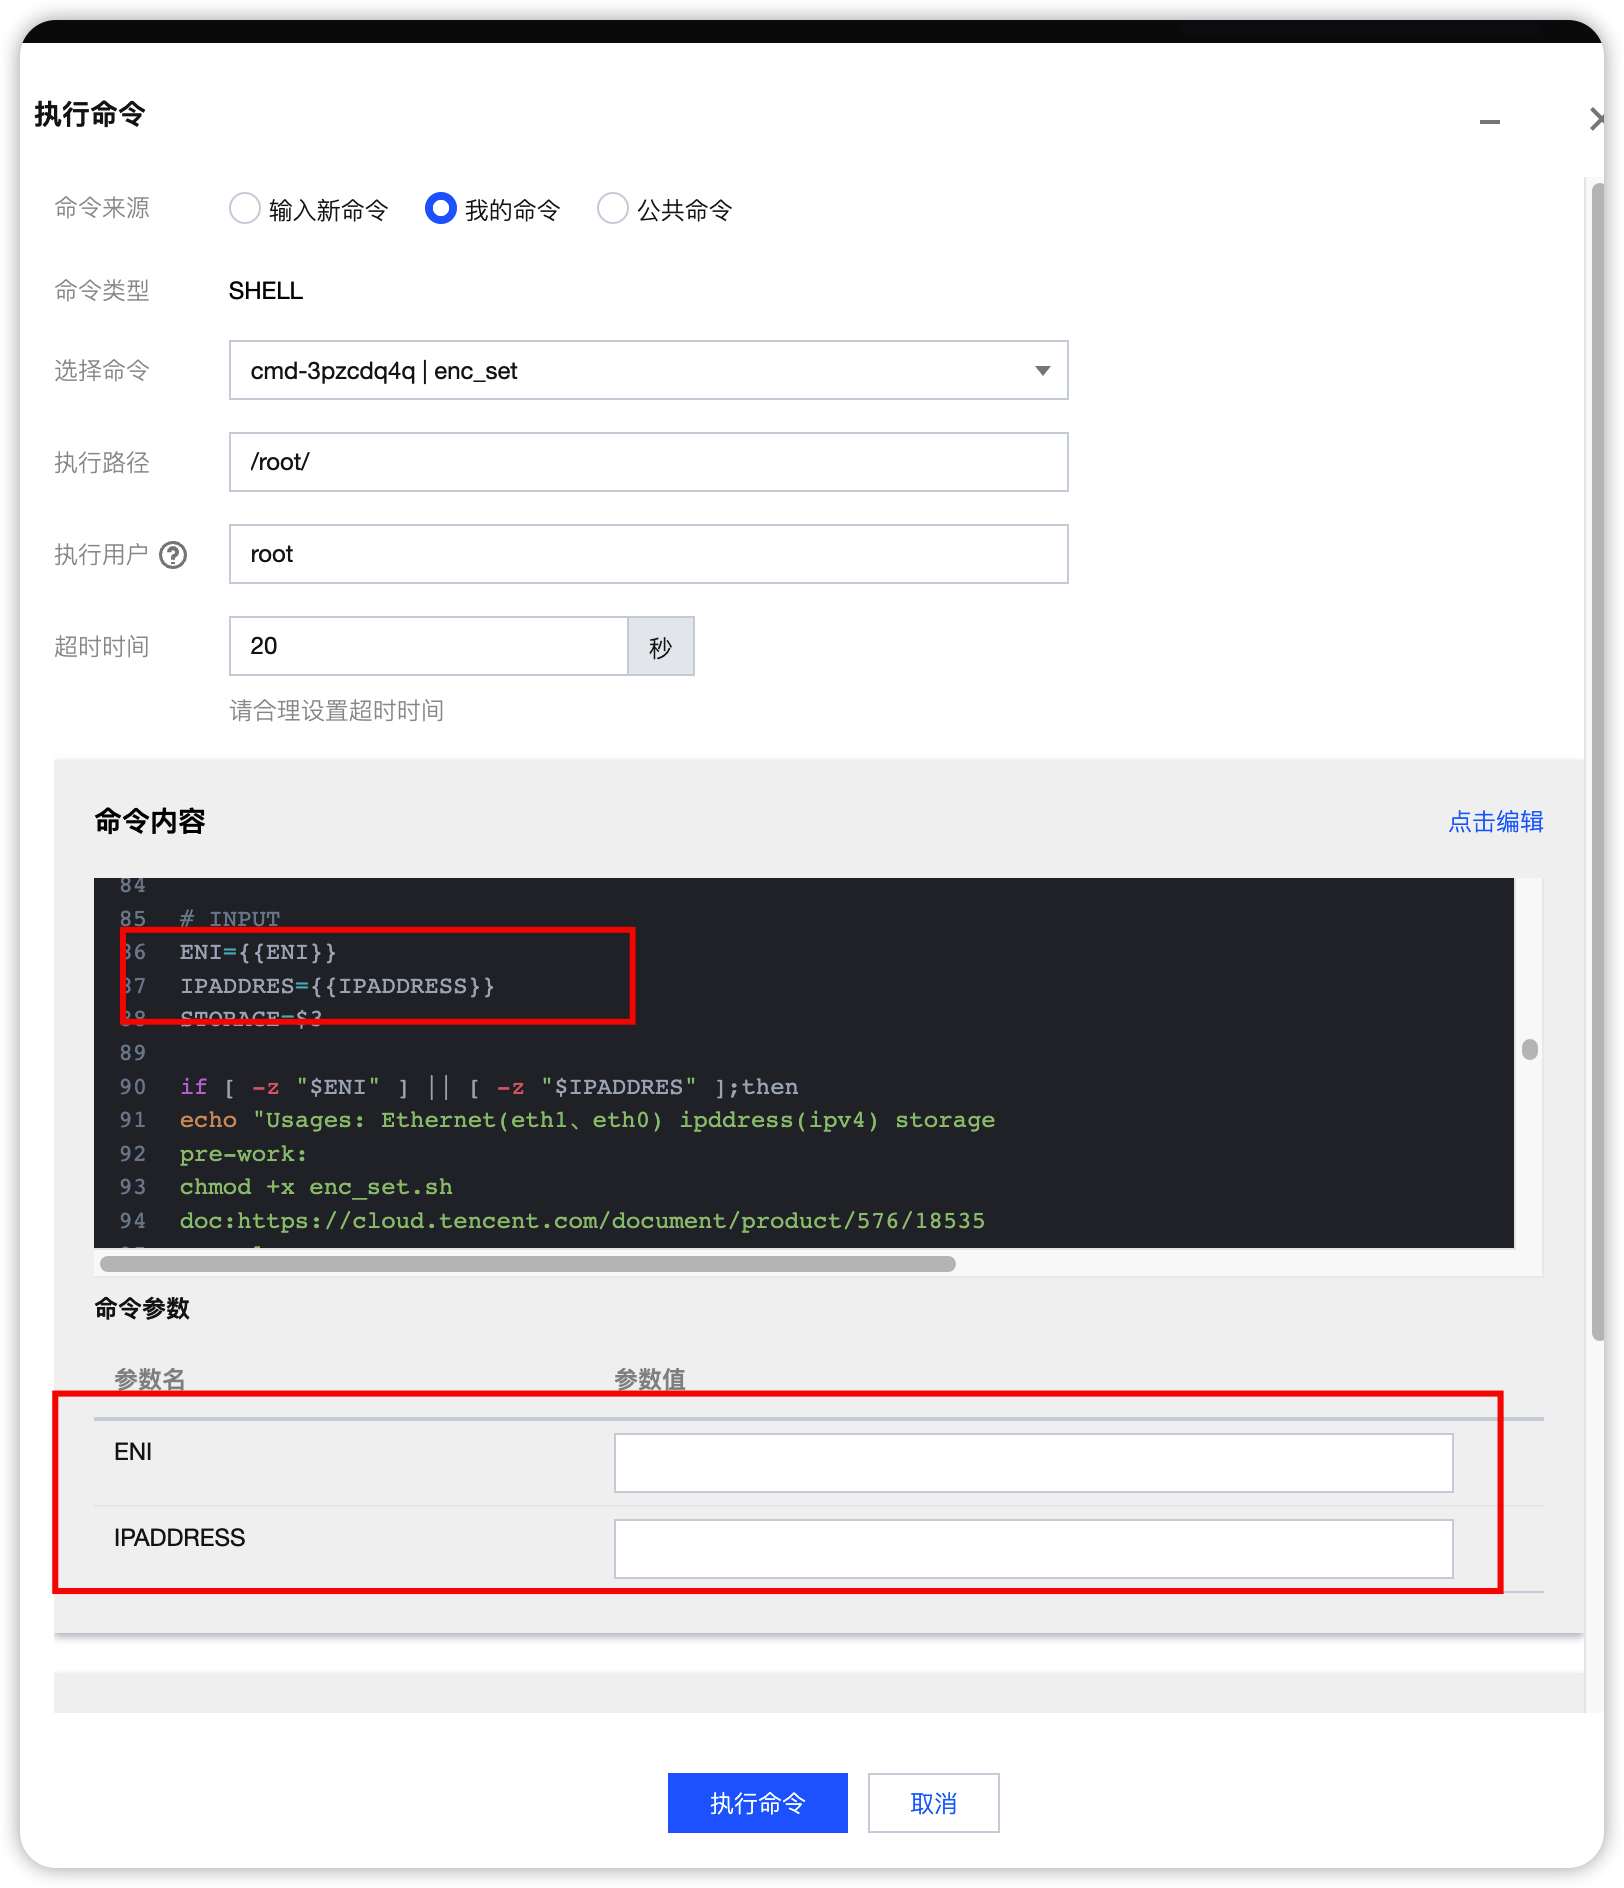
方式二,通过tat-agent,如以下截图,用户可以直接通过web端执行命令,并下发到服务器。
最后,配置弹性网卡时如果购买了公网弹性EIP,同时推荐公网弹性EIP绑定到辅助网卡的主内网IP(网卡:eth1 ,IP:10.0.1.118) ,这时需要通过加内网10.0.1.118的路由,才能让公网弹性EIP正常访问,也就是以上介绍的内容。