Nginx简介
近年来,Nginx在国内取得了突飞猛进的发展,很多门户网站开始提供Nginx解决方案。Nginx是一款开源的高性能HTTP服务器和反向代理服务器,同时支持IMAP/POP3代理服务。由俄罗斯设计师在2002年开发,2004年发布第一个版本。Nginx以其高性能,高可用,丰富的功能模块,简单明了的配置文档以及占用较低系统资源而著称。其采用最新的网络I/O模型,支持高达50000个并发连接。
Nginx 是一个安装非常的简单、配置文件非常简洁、Bug非常少的服务器。Nginx 启动容易,并且几乎可以做到7*24不间断运行,即使运行数个月也不需要重新启动。在不间断服务的情况下还可以进行软件版本的升级。
Nginx 同时也是一个非常优秀的邮件代理服务器(最早开发这个产品的目的之一也是作为邮件代理服务器),Last.fm 描述了成功并且美妙的使用经验。
Nginx软件的安装及指令
Nginx软件包使用源码编译安装。需要提前将其依赖包进行安装。
- 安装依赖包
[root@cc]# yum -y insstall gcc gcc-c++ make pcre pcre-devel openssl zlib - 源码包编译安装Nginx,在官网下载http://nginx.org
[root@cc]# tar -xf nginx-1.8.0.tar.gz -C /usr/local/ //解包 [root@cc]# cd /usr/local/nginx-1.8.0 [root@cc]# ./configure --with-http_ssl_module //配置 [root@cc]# make //编译 [root@cc]# make install //安装 - 将nginx程序做个软连接,方便执行
[root@cc]# ln -s /usr/local/nginx/sbin/nginx /usr/sbin //连接
Nginx软件包采用的是模块化的设计,模块分为内置模块和第三方模块。
Nginx服务器安装好之后,程序的主目录在/usr/local/nginx下,该目录下分别为conf(主配置文件目录),html(网页根目录),logs(日志文件目录),sbin(主程序目录)。Nginx默认无执行脚本,需要手动输入命令来管理。常用的命令如下:
- 启动主程序
[root@cc]# nginx - 关闭主程序
[root@cc]# nginx -s stop - 重载nginx配置
[root@cc]# nginx -s reload
配置文件解析
nginx主配置文件为/usr/local/nginx/conf/nginx.conf,配置文件包括全局,event,http,server设置。event主要用来定义Nginx工作模式,http提供Web功能,server用来设置虚拟主机,server必须位于http内部,一个配置文件可以由多个server,一个server表示一个虚拟主机。虚拟主机包括三种类型:基于域名的虚拟主机,基于IP的虚拟主机,基于端口的虚拟主机。
[root@cc]# vim /usr/local/nginx/conf/nginx.conf #user nobody; //设置用户和组 worker_processes 1; //启动子进程,通过 ps -aux | grep nginx #error_log logs/error.log; //错误日志文件,以及日志级别 #error_log logs/error.log notice; #error_log logs/error.log info;#pid logs/nginx.pid; //进程号 events { <em style="font-style:italic">//工作模式,每个进程可以处理的连接数</em> worker_connections 1024; } http { include mime.types; <em style="font-style:italic">//为文件类型定义文件</em> default_type application/octet-stream; <em style="font-style:italic">//默认文件类型 </em> #log_format main '$remote_addr - $remote_user [$time_local] "$request" <em style="font-style:italic">//创建访问日志</em> #'$status $body_bytes_sent "$http_referer" ' #'"$http_user_agent" "$http_x_forwarded_for"'; #access_log logs/access.log main; sendfile on; #tcp_nopush on; #keepalive_timeout 0; keepalive_timeout 65; <em style="font-style:italic">//保持连接的超时时间 </em> #gzip on; <em style="font-style:italic">//是否启用压缩功能</em> server { <em style="font-style:italic">//定义虚拟主机</em> listen 80; <em style="font-style:italic">//监听端口</em> server_name localhost; <em style="font-style:italic">//主机名</em> #charset koi8-r; #access_log logs/host.access.log main; location / { <em style="font-style:italic">//对URL进行匹配,支持正则</em> root html; index index.html index.htm; } #error_page 404 /404.html; <em style="font-style:italic">//设置错误代码对应的错误页面</em> # redirect server error pages to the static page /50x.html # error_page 500 502 503 504 /50x.html; location = /50x.html { root html; } # proxy the PHP scripts to Apache listening on 127.0.0.1:80 # #location ~ \.php$ { <em style="font-style:italic">//若用户访问的是动态页面,则nginx找主机的9000端口,即交给php处理,</em> <em style="font-style:italic">//通过proxy_pass实现代理功能</em> # proxy_pass http://127.0.0.1; #} # pass the PHP scripts to FastCGI server listeningon #17.0.0.1:9000 # #location ~ \.php$ { # root html; # fastcgi_pass 127.0.0.1:9000; # fastcgi_index index.php; #fastcgi_param SCRIPT_FILENAME /scripts$fastcgi_script_name; # include fastcgi_params; #} # deny access to .htaccess files, if Apache's document root # concurs with nginx's one # #location ~ /\.ht { # deny all; #} } # another virtual host using mix of IP-, name-, #and port-based configuration # #server { <em style="font-style:italic">//定义另一个虚拟主机</em> # listen 8000; # listen somename:8080; # server_name somename alias another.alias; # location / { # root html; # index index.html index.htm; # } #} # HTTPS server # #server { <em style="font-style:italic">//定义https安全网页</em> # listen 443 ssl; # server_name localhost; # ssl_certificate cert.pem; # ssl_certificate_key cert.key; # ssl_session_cache shared:SSL:1m; # ssl_session_timeout 5m; # ssl_ciphers HIGH:!aNULL:!MD5; # ssl_prefer_server_ciphers on; # location / { # root html; # index index.html index.htm; # } #} }
Nginx基本应用
- 搭建Nginx服务器
- Nginx配置用户认证登陆网页
- Nginx配置加密网站
- Nginx虚拟站点
Nginx高级应用
1. Nginx反向代理实现集群负载均衡
Nginx除了可以作为HTTP后端服务器之外,还是一个高效的反向代理服务器。在负载均衡的架构中,Nginx可以为我们提供非常稳定且高效的基于七层的负载均衡解决方案。可以根据轮询,IP哈希,URL哈希的方式调度后端真实服务器,也支持对后端服务器的健康检查功能。
2. Nginx地址重写规则
地址重写rewrite的概念:
—获得一个来访的URL请求,然后改写成服务器可以处理的另一个URL过程
语法:
rewrite regex replacement [选项]
优势:
—缩短URL,隐藏实际路径提高安全性
—易于用户认证和键入
—易于被搜索引擎收录
用途:
—当网站文件移动或者文件目录名称发生改变时,出于SEO(搜索引擎优化)需要,你需要保持旧的URL。
—网站改版,或者网站导航和连接发生改变,为了持续持有源连接带来的流量,需要保持旧的URL。
Nginx基本应用实例
1. 搭建Nginx服务器
在IP地址为192.168.4.5的主机上安装部署Nginx服务。
方案:使用2台RHEL7虚拟机,其中一台作为Nginx服务器(192.168.4.5)、另外一台作为测试用的Linux客户机(192.168.4.100),如图1所示。

操作:配置文件无需更改,直接启动服务。
[root@cc]# nginx                                            //启动服务

[root@cc]# nginx -s reload                                  //重载配置
客户端访问:
[root@cc]# firefox http://192.168.4.5
访问结果如图2:

2. 配置网站用户认证访问
操作:在配置文件里添加用户认证模块,操作如下:
[root@cc]# vim /usr/local/nginx/conf/nginx.conf

#charset koi8-r;

//支持中文字符

auth_basic "Please input name and password to login:";   //提示信息

auth_basic_user_file pass.txt;

//帐号密码文件

[root@cc]# nginx -s reload                                    //重载配置

[root@cc]# htpasswd -cm /usr/loca/nginx/conf/pass.txt Mayweis

//生成密码文件

New password:

Re-type new password:

//Adding password for user Maiweis      输入两遍密码
客户端访问:
[root@cc]# firefox http://192.168.4.5
访问结果如图3:

3.Nginx虚拟主机
要求:配置基于域名的Nginx虚拟主机
操作:操作如下:
1.搭建一个DNS服务器
[root@cc]# yum -y install bind bind-chroot //安装软件包
[root@cc]# vim /etc/named.conf //修改主配置文件
options {
directory "/var/named";
};zone "bb.com" { //bb.com域
type master;
file "bb.com.zone";
};
zone "cc.com" { //cc.com域
type master;
file "cc.com.zone";
};
[root@cc]# named-checkconf
//检查语法错误,无错误,无输出
[root@cc]# cp -p /var/named/named.localhost bb.com.zone
//复制一个bb.com.zone 在去修改
[root@cc]# cp -p /var/named/named.localhost cc.com.zone
//复制一个cc.com.zone 在去修改
[root@cc]# vim /var/named/bb.com.zone
//修改bb.com域的地址库文件,增加下面的代码
@ IN NS ns.bb.com.
ns IN A 192.168.4.5
www IN A 192.168.4.5
[root@cc]# vim /var/named/cc.com.zone
//修改cc.com域的地址库文件,增加下面的代码
@ IN NS ns.cc.com.
ns IN A 192.168.4.5
www IN A 192.168.4.5
[root@cc]# named-checkzone bb.com bb.com.zone //检查语法错误
zone bb.com/IN: loaded serial 0
OK
[root@cc]# systemctl restart named //重启named服务
客户端配置DNS服务器:
[root@cc]# vim /etc/resolv.conf

nameserver 192.168.4.5

//指定192.168.4.5为本机的DNS域名解析服务器
客户端测试DNS解析:
[root@cc]# host www.bb.com

www.bb.com has address 192.168.4.5

[root@cc]# host www.cc.com

www.cc.com has address 192.168.4.5
2.修改Nginx配置文件,添加第二个虚拟主机,操作如下:
[root@cc]# vim /usr/local/nginx/conf/nginx.conf
server {
listen 80;
server_name www.cc.com;location / { root cc; index index.html index.htm; } }
[root@cc]# mkdir /usr/local/nginx/cc
//创建www.cc.com的网页根目录
[root@cc]# echo "www.bb.com" >/usr/local/nginx/html/index.html //制作主页
[root@cc]# echo "www.cc.com" >/usr/local/nginx/cc/index.html //制作主页
客户端测试:
[root@cc]# curl http://www.bb.com

www.bb.com

[root@cc]# curl http://www.cc.com

www.cc.com
4.Nginx加密网站部署
要求:配置Nginx加密网站
操作:操作如下:
[root@cc]# vim /usr/local/nginx/conf/nginx.conf
server {
listen 443 ssl; //监听https的443端口
server_name www.bb.com;ssl_certificate cert.pem; //证书 ssl_certificate_key cert.key; //私钥 location / { root html; index index.html index.htm; } }
[root@cc]# nginx -s reload
客户端去访问:
[root@cc]# firefox https://www.bb.com //访问时输入https
访问结果如下:

点击我已充分了解可能的风险 最终结果如下: www.bb.com
Nginx高级应用实例
1.Nginx反向代理实现负载均衡 要求:配置Nginx反向代理实现服务器负载均衡。 —后端Web服务器两台,可以使用httpd实现 —Nginx采用轮询的方式调用后端Web服务器 —两台Web服务器的权重要求设置为不同的值 —最大失败次数为1,失败超时时间为30秒
方案:反向代理负载均衡拓扑结构如图4:

操作:操作如下:
- 准备两个后端的Apache服务器,提供http服务。web1的ip地址为192.168.2.100,web2的ip地址为192.168.2.200。配置web1的http服务操作如下:
[root@cc]# yum -y install httpd //装包 [root@cc]# echo "web1" > /var/www/html/index.html //配置主页 [root@cc]# systemctl restart httpd //启服务 [root@cc]# netstat -antup | grep 80 //检查监听端口 - web2的配置如下:
[root@cc]# yum -y install httpd //装包 [root@cc]# echo "web2" > /var/www/html/index.html //配置主页 [root@cc]# systemctl restart httpd //启服务 [root@cc]# netstat -antup | grep 80 //检查监听端口 - 在代理服务器上配置Nginx反向代理服务器,操作如下:
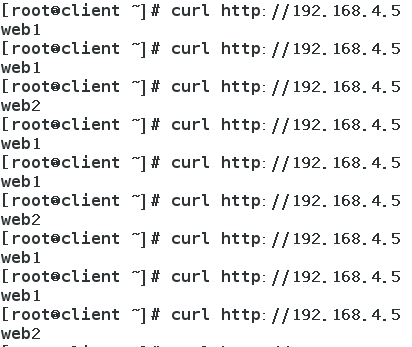
[root@cc]# vim /usr/local/nginx/conf/nginx.conf ... http { upstream webs { //定义web集群 server 192.168.2.100 weight=2 max_fails=2 fail_timeout=10; server 192.168.2.200 max_fails=2 fail_timeout=10; //最大失败数2,失败超时时间10s,192.168.2.100权重为2 } location / { //网页根目录 root html; proxy_pass http://webs; //指定为代理服务器 index index.html index.htm; } } [root@cc]# nginx -s reload //重载配置客户端测试反向代理负载均衡,效果如图5:

2.Nginx地址重写规则案例
- a.html---->b.html
操作如下:
[root@cc]# vim /usr/local/nginx/conf/nginx.conf rewrite a.html /b.html; //加在server里 [root@cc]# echo "BBB" > /usr/local/nginx/html/b.html [root@cc]# nginx -s reload客户端访问:[root@cc]# firefox http://192.168.4.5/a.html结果如下:

2.访问192.168.4.5.跳转到www.qq.com
操作如下:[root@cc]# vim /usr/local/nginx/conf/nginx.conf rewrite ^/ http://www.qq.com ; //加在server里 [root@cc]# nginx -s reload
客户端访问:[root@cc]# firefox http://192.168.4.5/
结果如下:

3.根据用户不同的浏览器,访问相同页面,返回不同的结果 firefox http://192.168.4.5 返回firefox curl http://192.168.4.5 返回curl 操作如下:
[root@cc]# vim /usr/local/nginx/conf/nginx.conf
if($http_user_agent ~ firefox){
        rewrite ^/(.*) /firefox/$1;
        }                        ;                    //加在server里
if($http_user_agent ~ curl){
        rewrite ^/(.*) /curl/$1;
        }
[root@cc]# mkdir /usr/local/nginx/html/{firefox,curl}  //创建目录
[root@cc]# echo "firefox" >/usr/local/nginx/firefox/test.html//部署主页
[root@cc]# echo "curl" > /usr/local/nginx/curl/test.html
[root@cc]# nginx -s reload
客户端访问:
[root@cc]# firefox http://192.168.4.5/
firefox
[root@cc]# firefox http://192.168.4.5/
curl
4.如果文件不存在,则调转到首页 操作如下:
[root@cc]# vim /usr/local/nginx/conf/nginx.conf
if(!-e $request_filename){
        rewrite ^/ http://192.168.4.5/;
        }                        ;                    //加在server里
[root@cc]# nginx -s reload
客户端访问: 客户端访问:
[root@cc]# firefox http://192.168.4.5/dsad //随便输入文件名
结果如下:

rewrite语法选项详解: rewrite regex replacement [选项] 选项:break , last, redirect, permanent —break:停止执行其他的重写规则,完成本次请求 —last:停止执行其他重写规则,根据URL继续搜索其他location,地址栏不改变 —redirect :302临时重定向,地址栏改变,爬虫不更新URL —permanent:301永久重定向,地址栏改变,爬虫更新URL
Nginx总结
Nginx是一个轻量级的web服务器,同样起web 服务,比apache 占用更少的内存及资源,功能很强大,应用也很广泛。高度模块化的设计,编写模块相对简单。目前越来越受到人们的喜爱。