云服务器DIY Win10自定义镜像,简单操作的话,用2012R2/2016/2019公共镜像(不要选2022)随便哪个买台cvm,然后挂个10G的数据盘,从微软官网下载win10 iso到数据盘。
server2016→ win10企业版
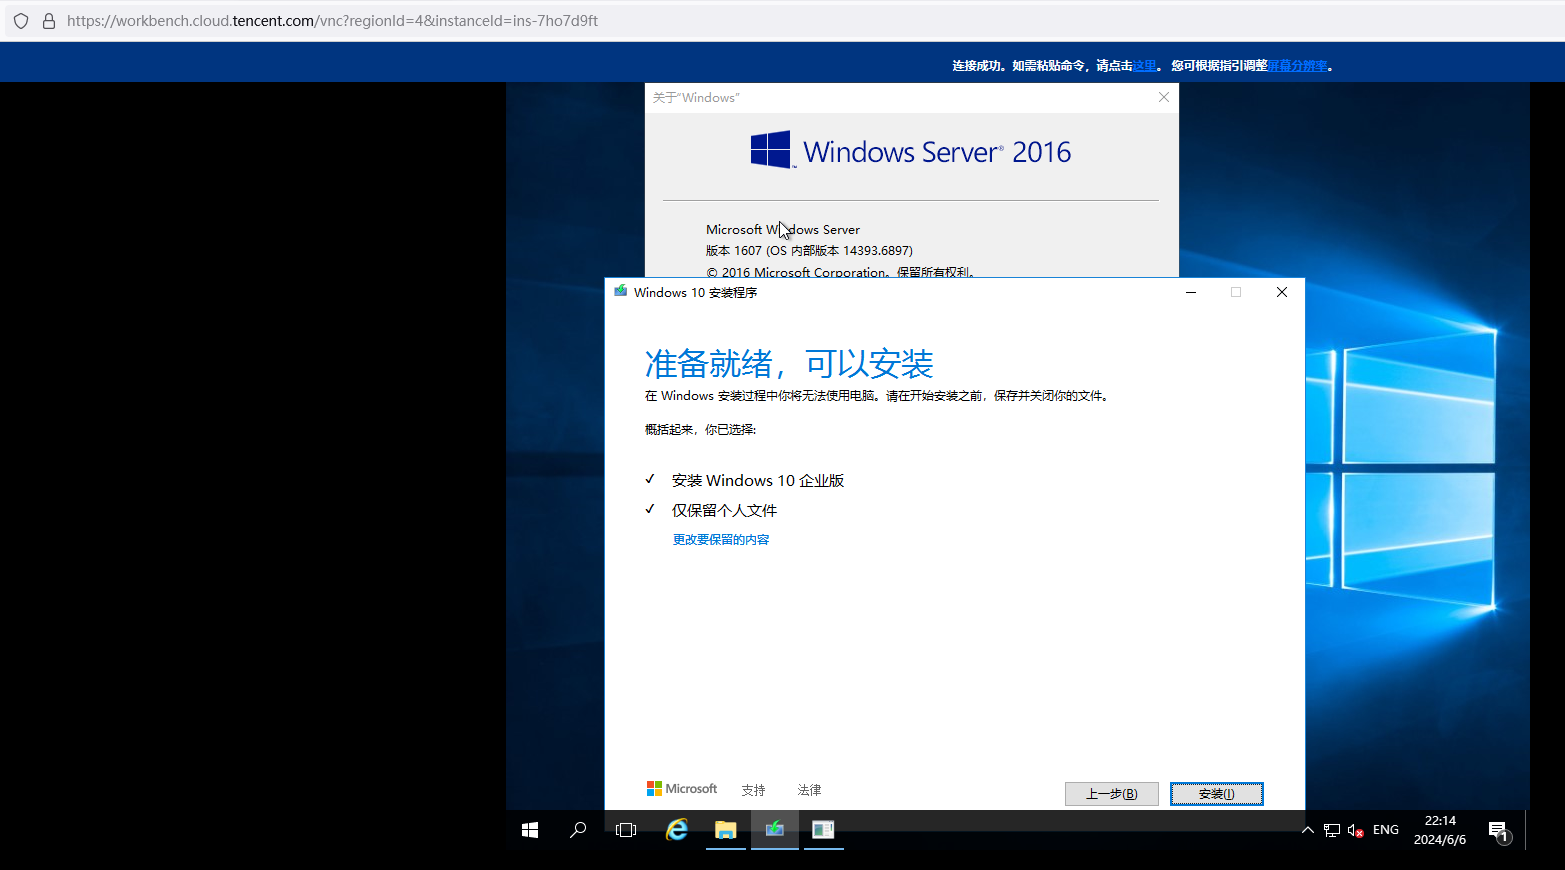
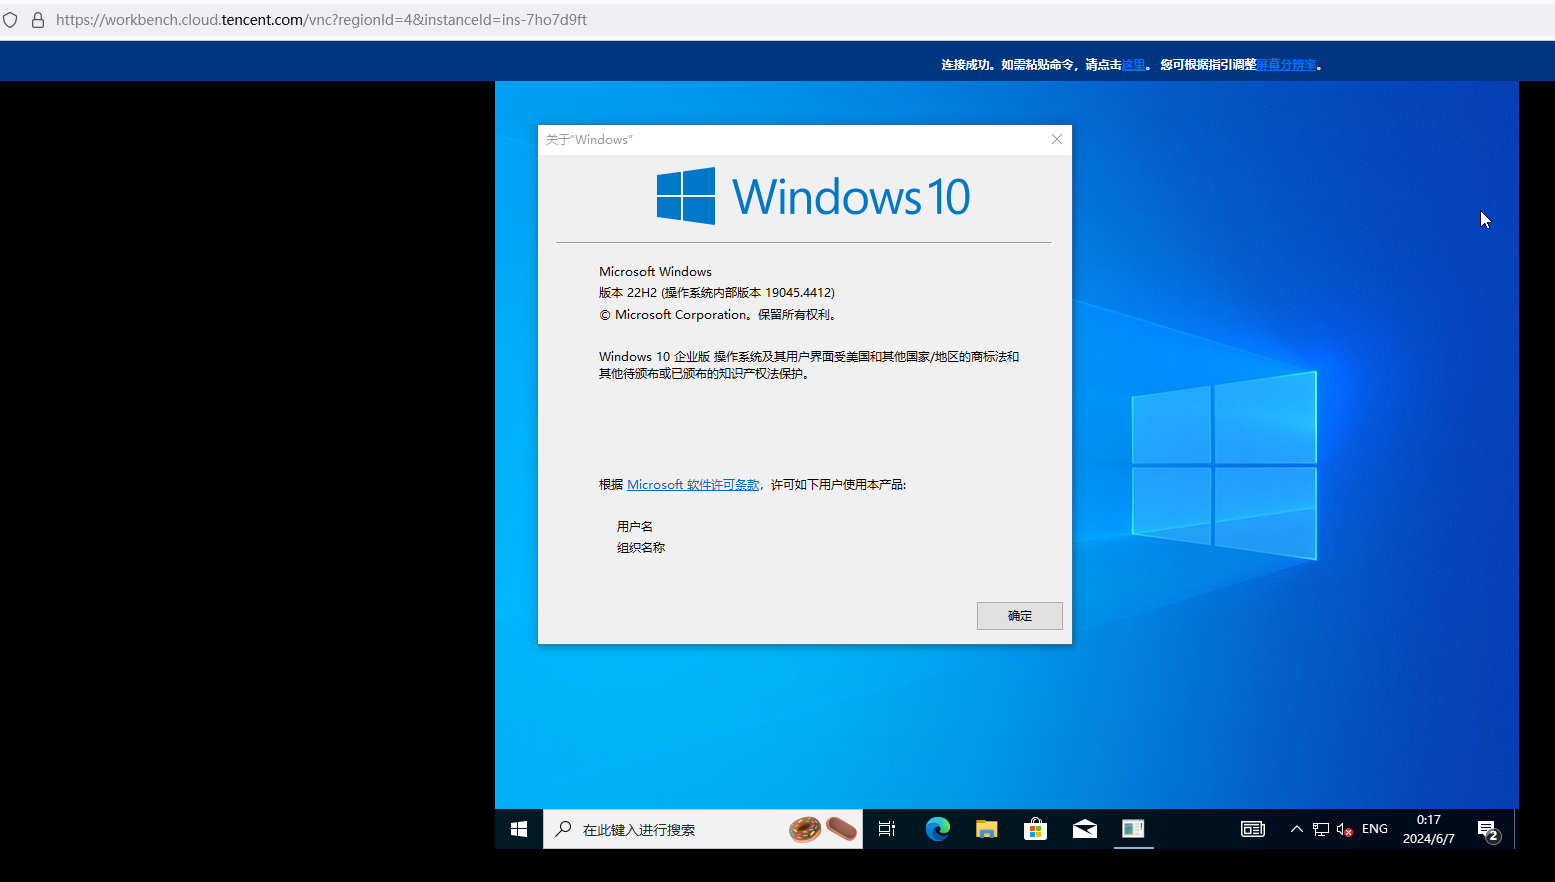
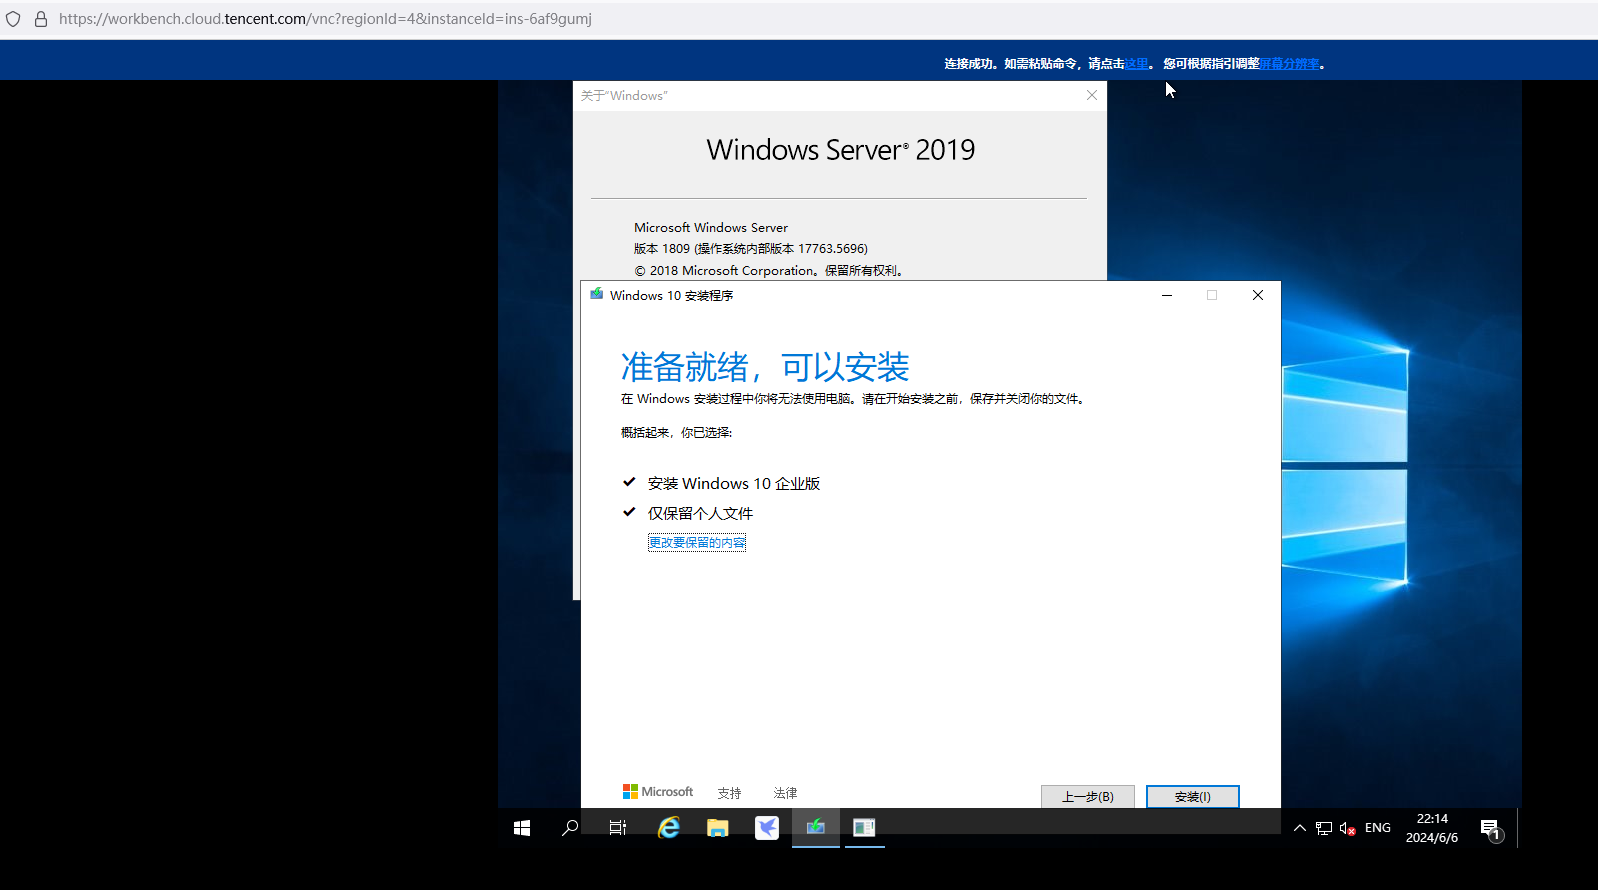
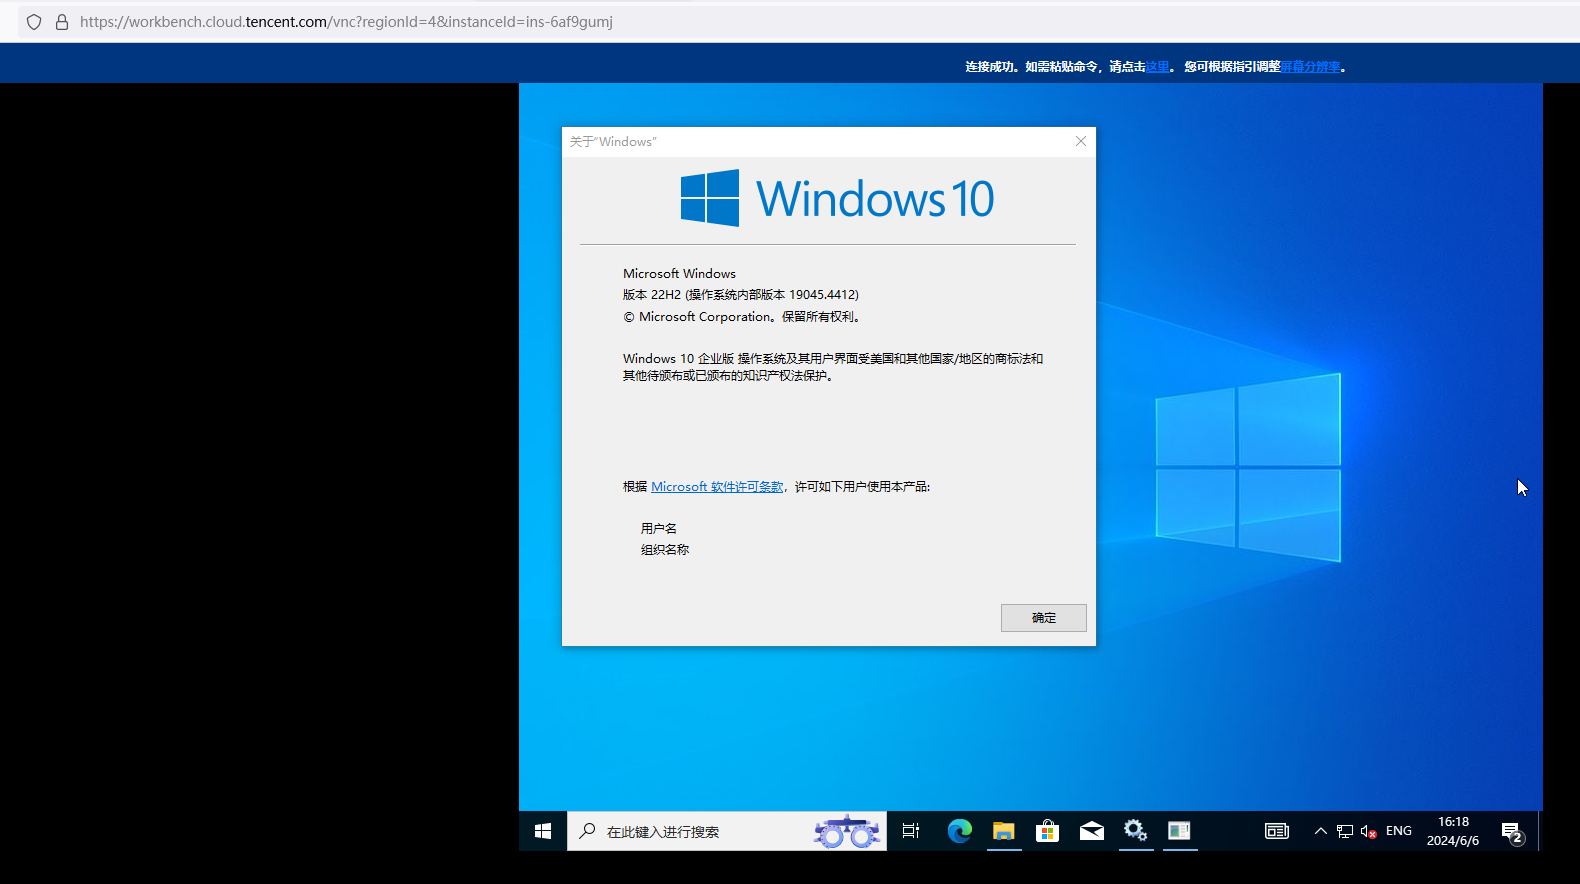
server2019→ win10企业版
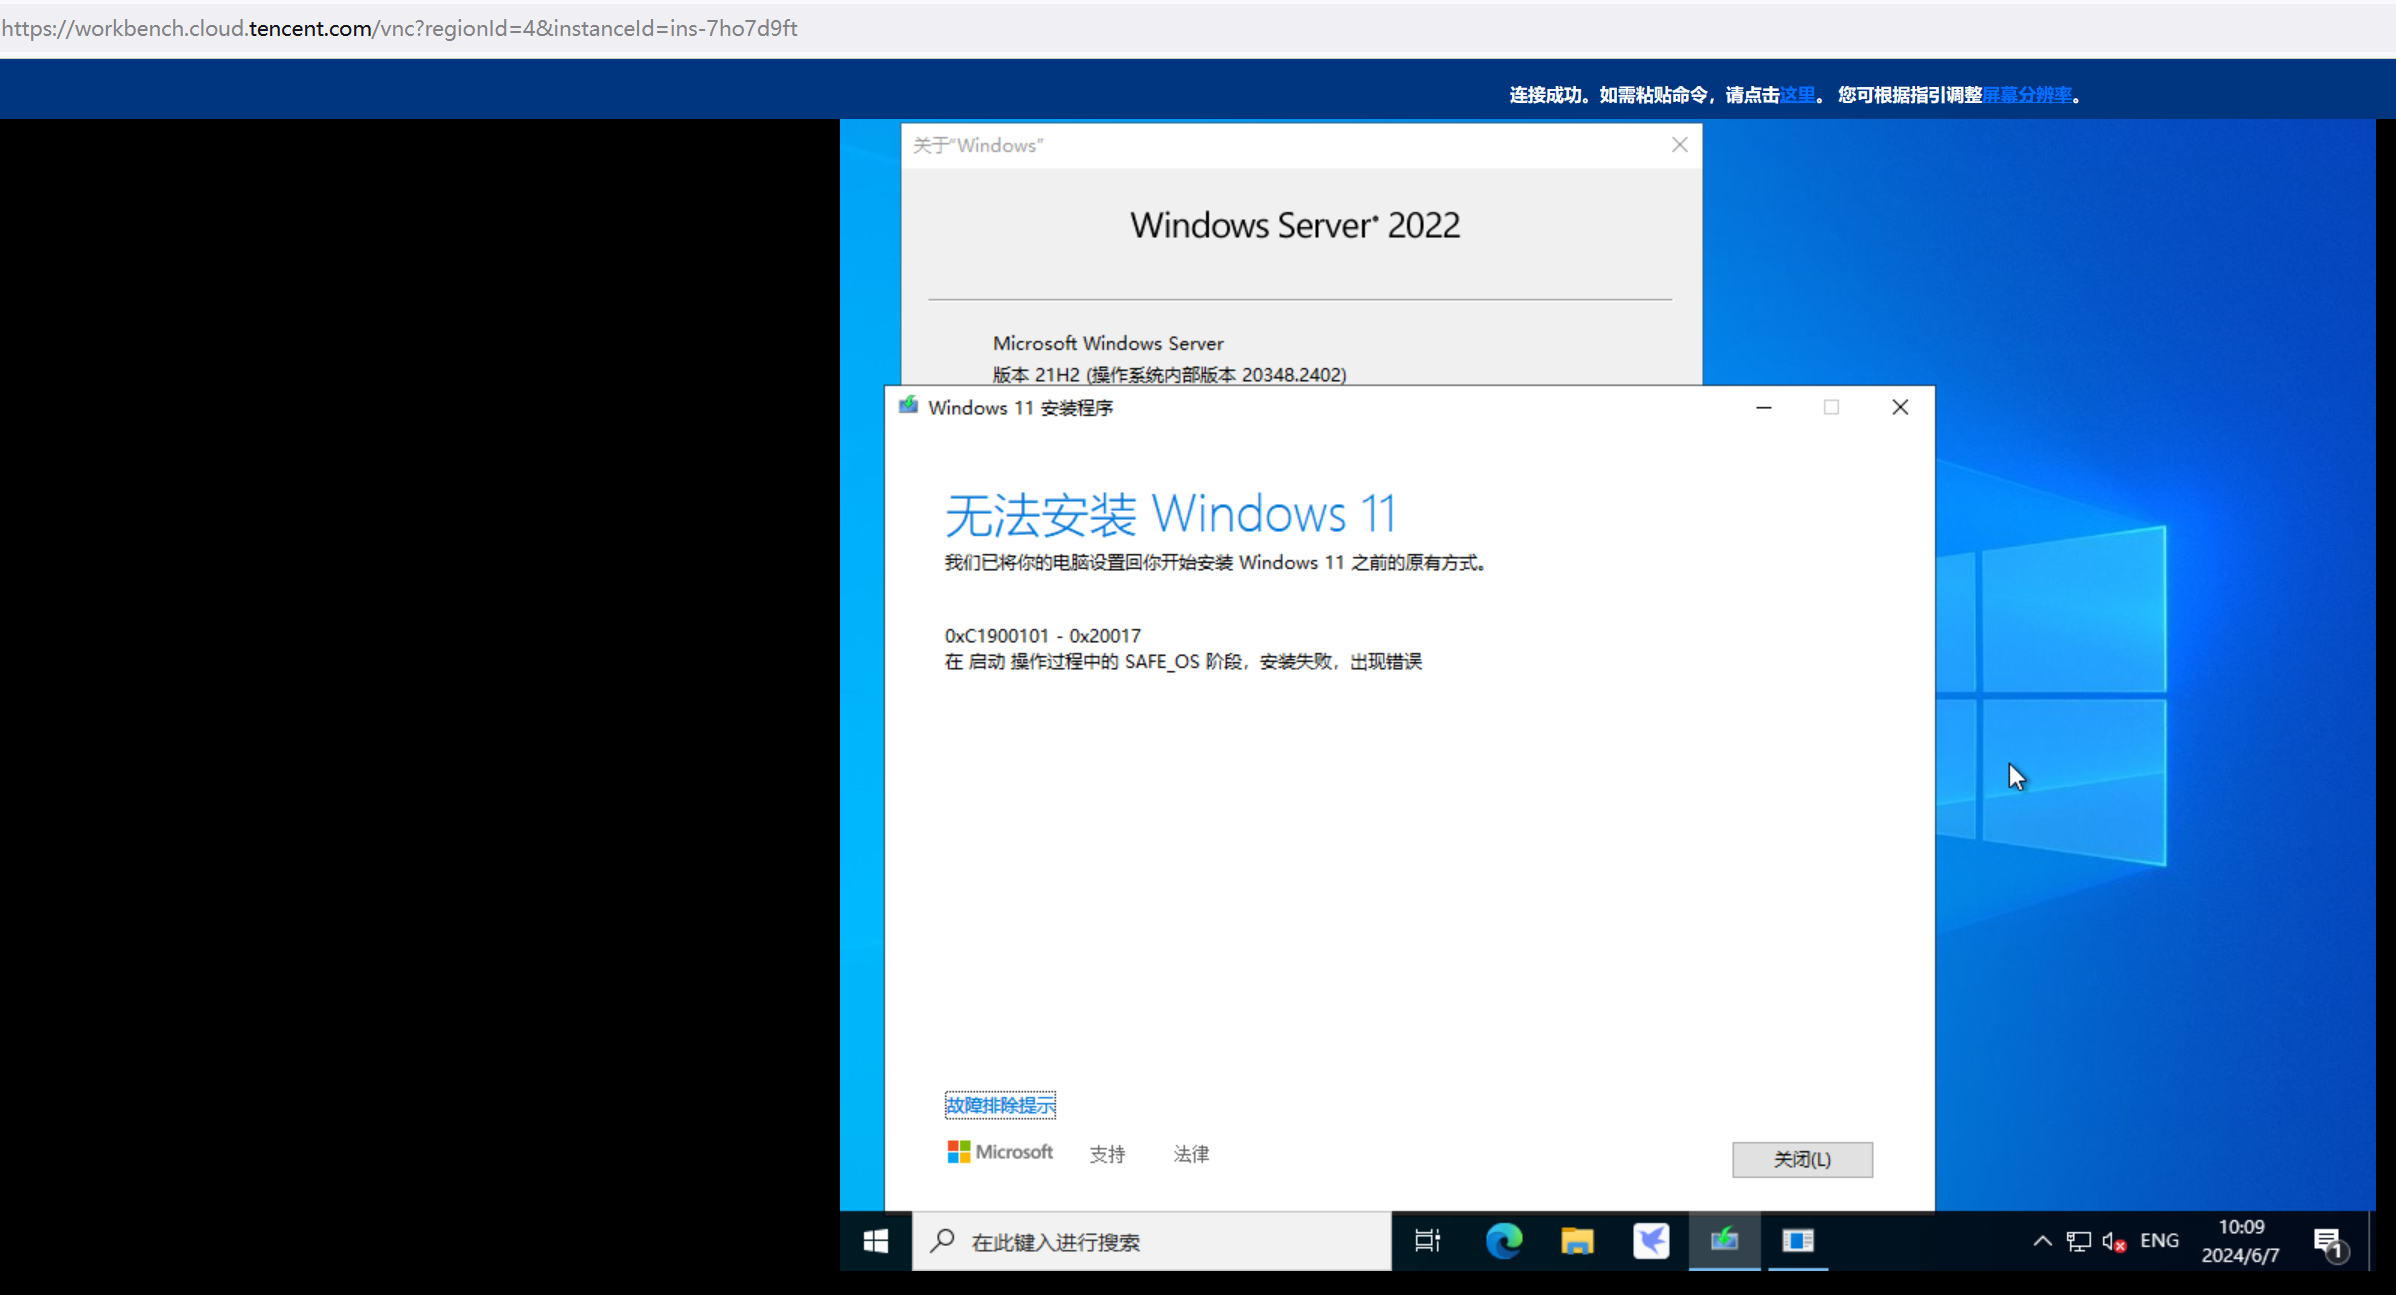
server2022直接用win10、win11原版iso就地升级,最终都会出现0xC1900101 - 0x20017的问题,就是winre.wim没有集成虚拟化驱动使得recovery mode不识别硬盘导致的。
https://www.microsoft.com/zh-cn/software-download/windows10
https://www.microsoft.com/zh-cn/software-download/windows11

也可以从别的地方下载,但需要确保安全性,以下这些我经常用,但微软官网的是最安全的,唯一不好的是,微软官网貌似只提供家庭版。
https://www.xitongku.com/
https://msdn.sjjzm.com/
https://msdn.itellyou.cn/
https://next.itellyou.cn/
https://www.uupdump.cn/
https://cnman.github.io/windowsserver.html

https://cnman.github.io/windows.html

https://cnman.github.io/sqlserver.html
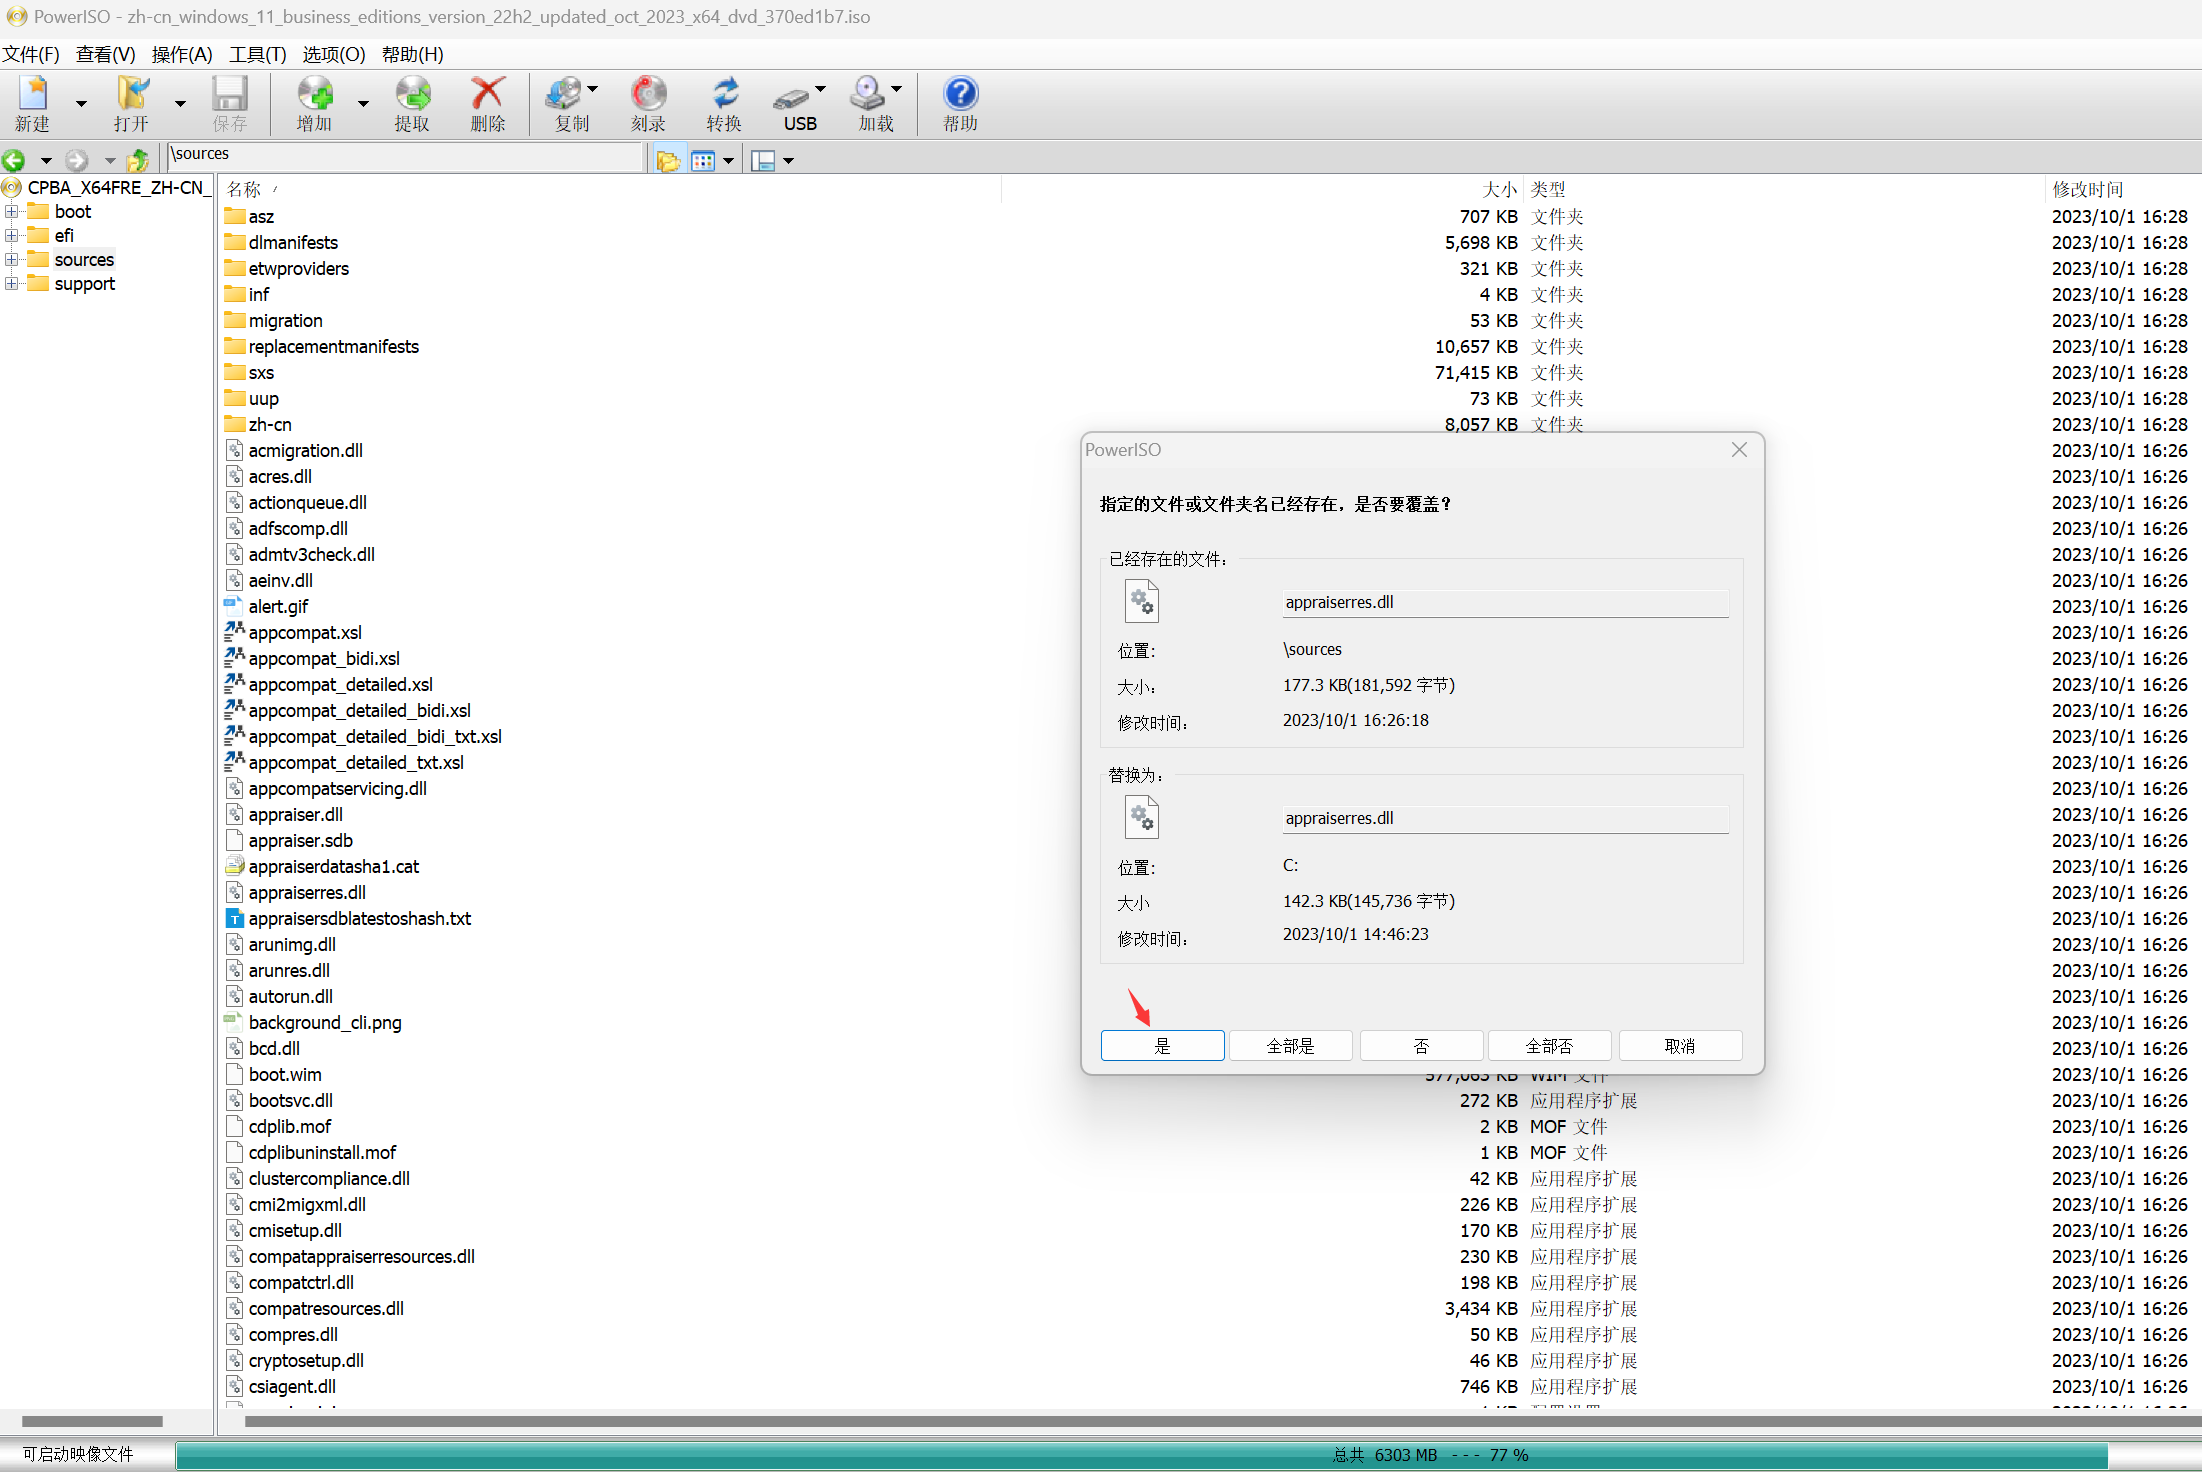
下载好iso后,双击打开iso运行其中的setup.exe安装win10覆盖当前server系统的系统即可,完事做个自定义镜像使用。如果想通过这种方式安装win11,需要修改 ISO 镜像,偷天换日:找到 Win10 ISO 里sources目录下 的 appraiserres.dll 文件,替换到Win11 ISO 的同位置。完成后,需要使用第三方工具(比如UltraISO、PowerISO等)重新创建 ISO 镜像,然后运行setup.exe。
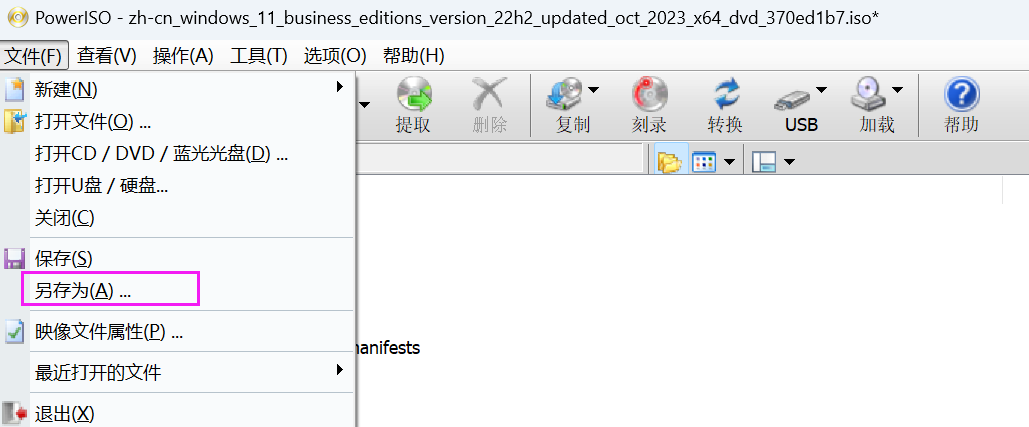
重新创建 ISO很简单,用UltraISO/PowerISO打开原ISO,然后把要替换的文件拖到目标位置替换,然后另存为新的ISO文件即可。
3种方法让win11 iso跳过硬件检测,让普通机器也能安装win11,前面提到的只是其中1种,具体参考:
https://cloud.tencent.com/developer/article/2404867
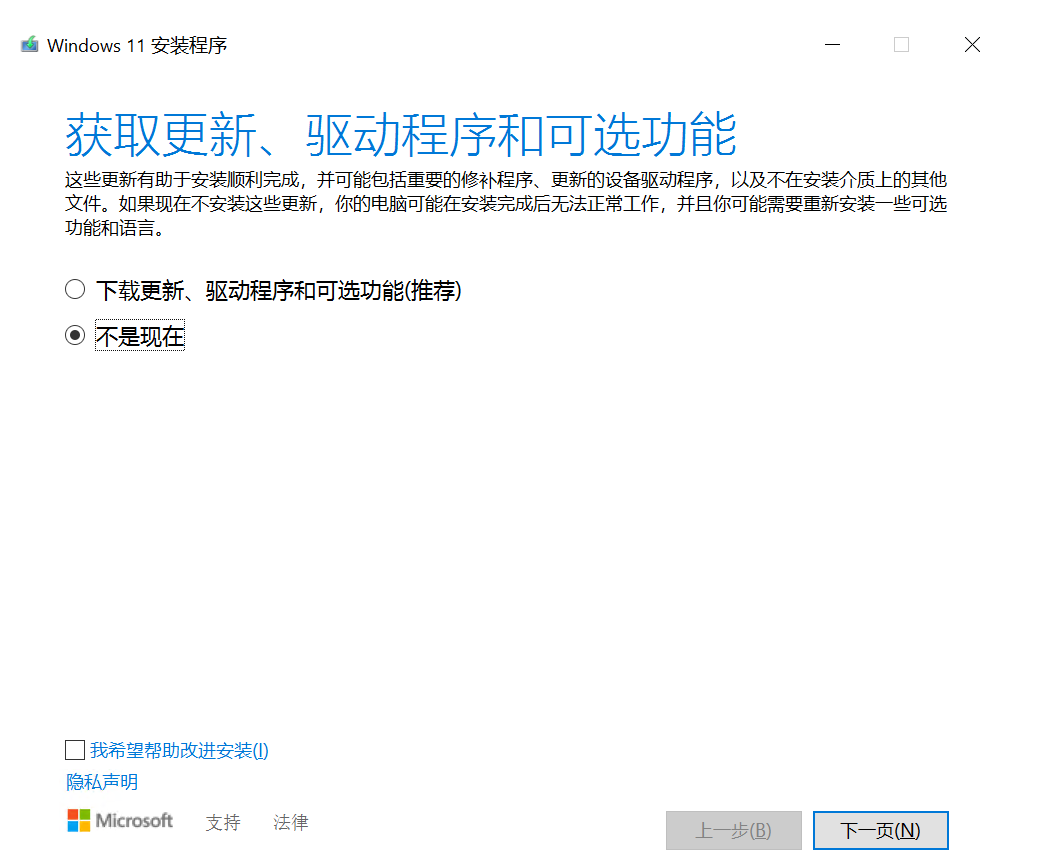
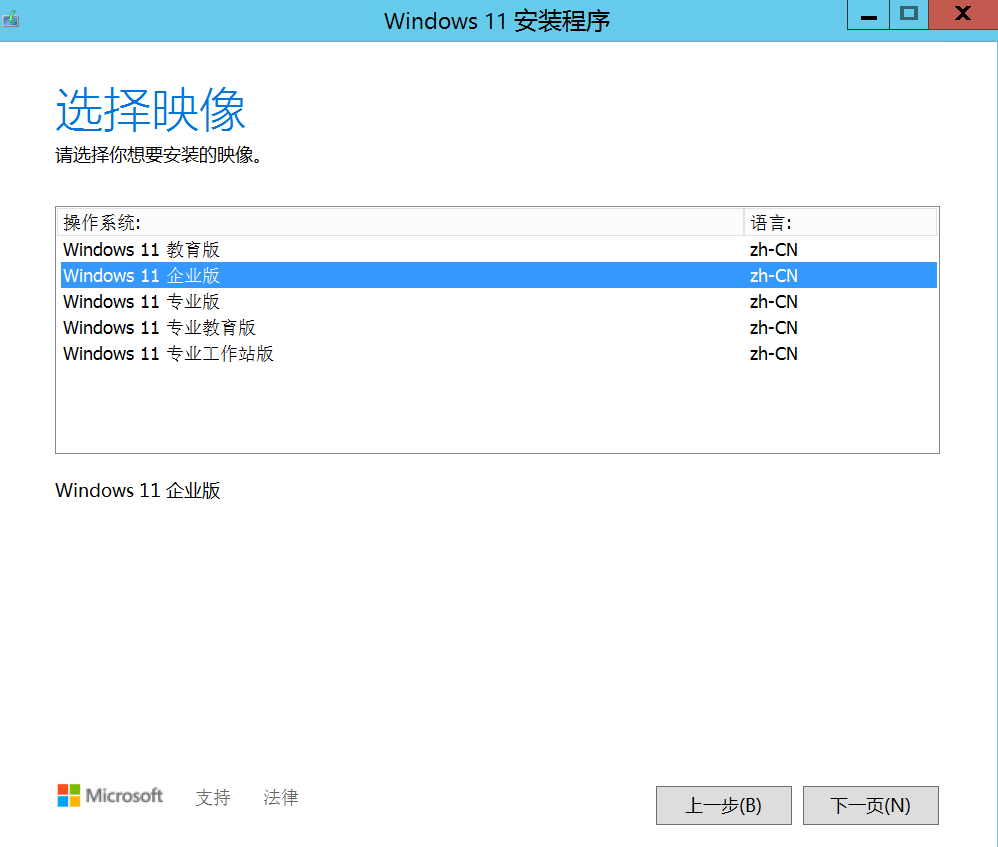
运行setup.exe安装过程中,注意这几个处
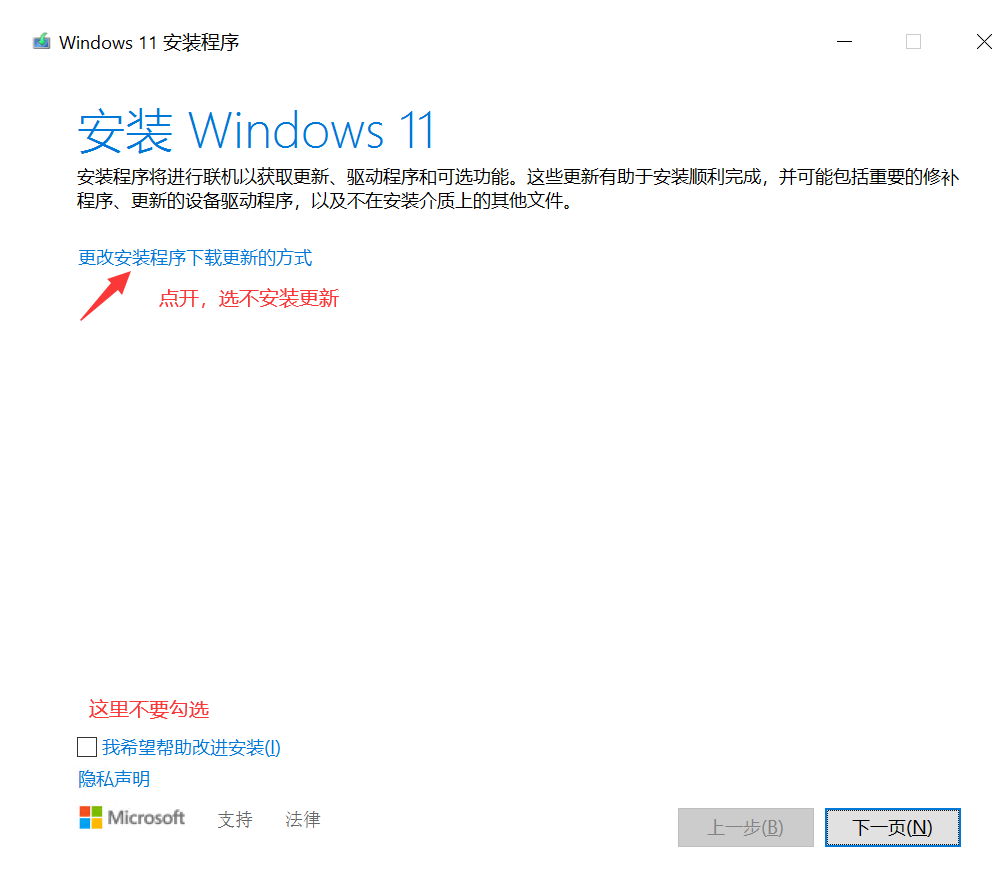
选企业版或专业工作站版
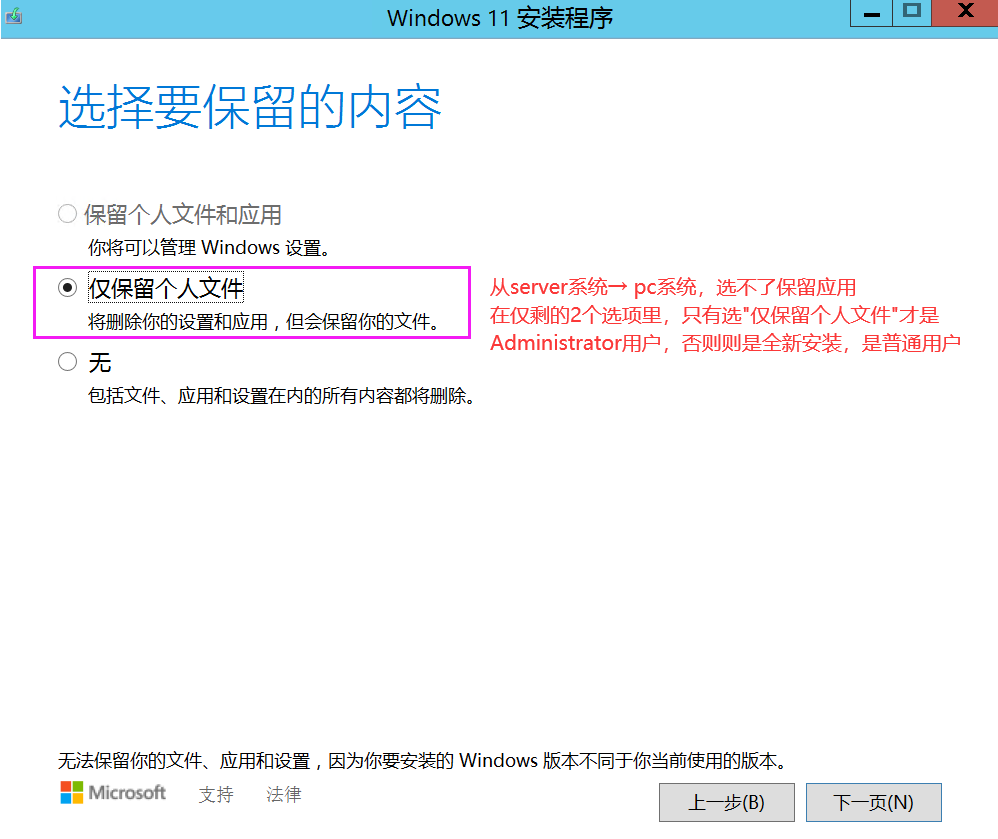
系统可能会自动重启几次,需要全程在vnc观察进度,不要看黑屏就贸然重启机器,这样会损坏安装过程,比如
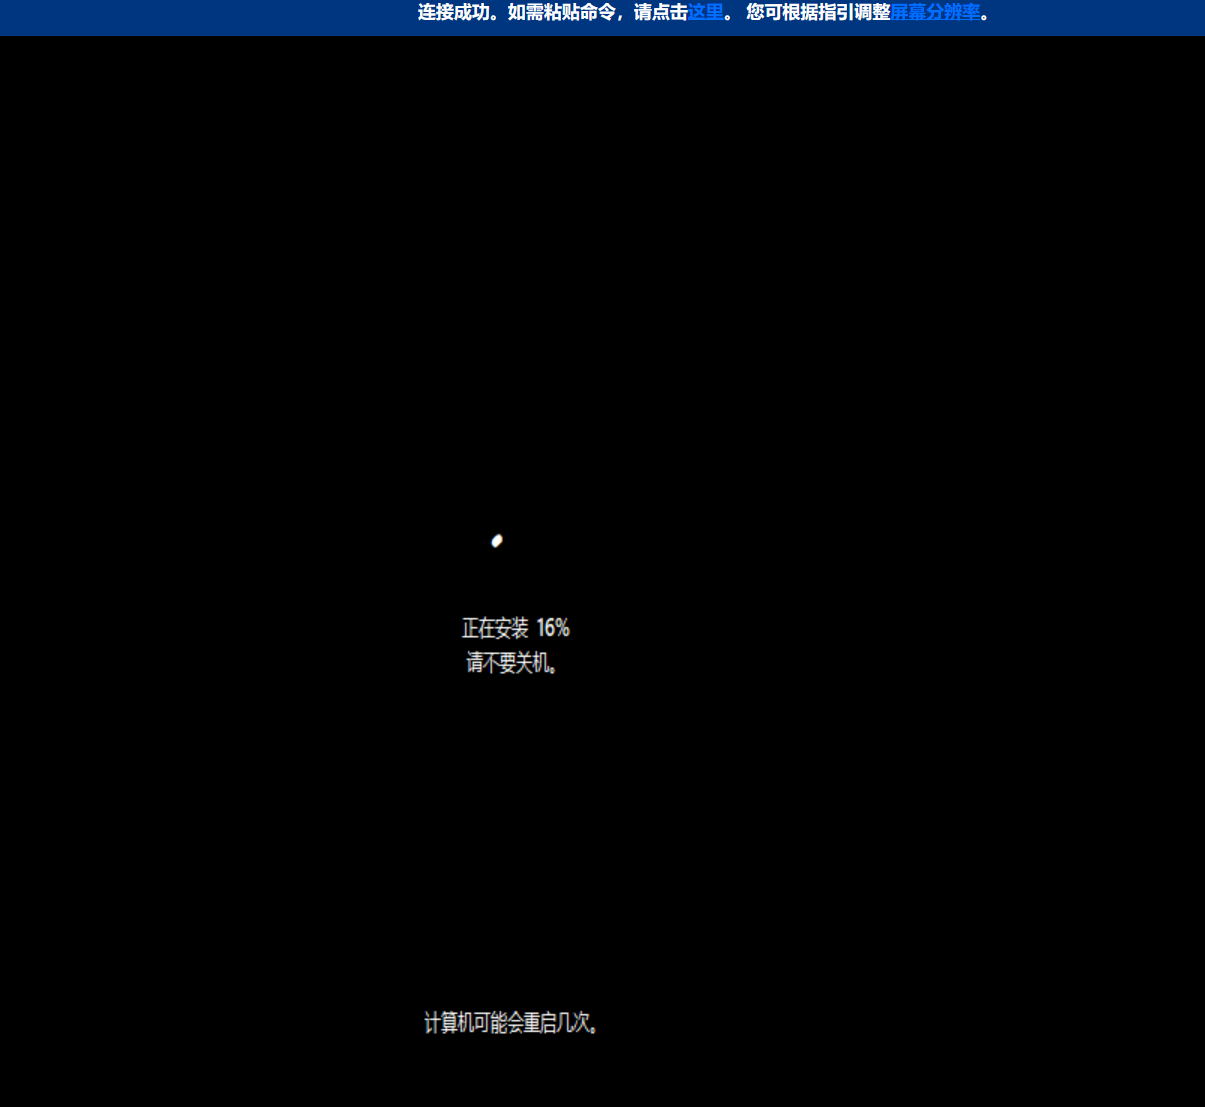
这里有一个4分钟的录屏介绍:https://cloud.tencent.com/developer/video/79020
Windows就地升级系统后如何恢复网络和远程
https://cloud.tencent.com/developer/article/2400772
做个Windows镜像初版简单,优化注意事项挺多的,以下知识点扩展不一定是必须的,根据个人所需选用
禁止下载的文件带安全锁定
reg add "HKCU\SOFTWARE\Microsoft\Windows\CurrentVersion\Policies\Attachments" /v SaveZoneInformation /t REG_DWORD /d 1 /f 2>&1 > $null

reg add "HKLM\SOFTWARE\Microsoft\Windows\CurrentVersion\Policies\Attachments" /v SaveZoneInformation /t REG_DWORD /d 1 /f 2>&1 > $null
远程的时候,选择在本地播放、在本地录制音频,录制页签没有音频设备这样来解决
经研究,远程录制音频方面的体验,微软把NT10整了3类:

server2016-2022,默认不支持,配置远程桌面会话主机可支持

win10(专业版/企业版/工作站版),默认如果不支持,那就组策略配置远程桌面会话主机→ 设备和资源重定向→ 启用音视频播放重定向和录制重定向后可支持

win11(专业版/企业版/工作站版),默认就支持
有显卡的windows机器如果担心显卡驱动自动更新影响稳定性,可以设置系统更新排除更新驱动程序
reg add "HKLM\Software\Policies\Microsoft\Windows\WindowsUpdate"  /v "ExcludeWUDriversInQualityUpdate" /d 1 /t REG_DWORD /f

reg add "HKLM\Software\Microsoft\PolicyManager\default\Update"  /v "ExcludeWUDriversInQualityUpdate" /d 1 /t REG_DWORD /f
HKEY_LOCAL_MACHINE\SOFTWARE\NVIDIA Corporation\Global\CoProcManager\AutoDownload,它是用于控制 NVIDIA 协处理器驱动程序的自动下载的。如果您不需要控制 NVIDIA 协处理器驱动程序的自动下载,可以将 AutoDownload 的值设置为 0 来禁用它。
reg add "HKCU\SOFTWARE\NVIDIA Corporation\Global\GFExperience" /v "NotifyNewDisplayUpdates" /t REG_DWORD /d 0 /f

reg add "HKEY_LOCAL_MACHINE\SOFTWARE\NVIDIA Corporation\Global\CoProcManager" /v "AutoDownload" /t REG_DWORD /d 0 /f
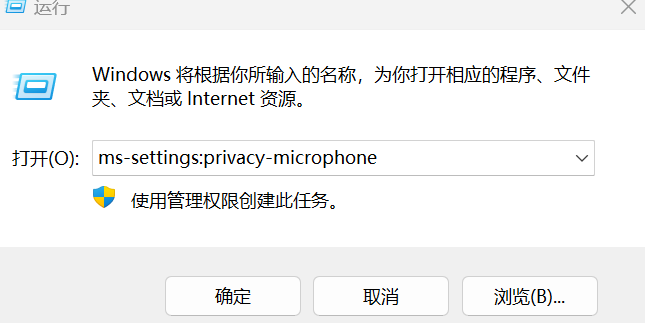
安装虚拟声卡后在vnc会话中录音,发现录不了的时候检查下麦克风权限
运行这个命令开启麦克风访问权限
ms-settings:privacy-microphone其他ms-settings命令了解一下:https://cloud.tencent.com/developer/article/2329408

缓解vnc鼠标拖影
reg add "HKEY_CURRENT_USER\Control Panel\Mouse" /v "MouseSpeed" /t REG_DWORD /d 0 /f

reg add "HKEY_USERS.DEFAULT\Control Panel\Mouse" /v "MouseSpeed" /t REG_DWORD /d 0 /f
启用WinRM
winrm quickconfig -q 2>&1> null;winrm quickconfig -q -force 2>&1> null;netstat -ano|findstr :5985;

reg delete "HKLM\SOFTWARE\Policies\Microsoft\Windows\WinRM" /f 2>$null

stop-service mpssvc 2>&1 > $null

winrm quickconfig -q 2>&1 > $null

winrm quickconfig -q -force 2>&1 > $null

restart-service winrm 2>&1 > $null

#Set-Item WSMan:localhost\client\trustedhosts -value * -force 2>&1 > $null

winrm set winrm/config/client '@{TrustedHosts="*"}' 2>&1 > $null

#netstat -ato|findstr :5985
禁止vnc锁屏
powercfg -s 8c5e7fda-e8bf-4a96-9a85-a6e23a8c635c

powercfg -x -monitor-timeout-dc 0

powercfg -x -monitor-timeout-ac 0

reg add "HKLM\SOFTWARE\Policies\Microsoft\Windows\Personalization" /v "NoLockScreen" /d 1 /t REG_DWORD /f

reg add "HKLM\SOFTWARE\Microsoft\Windows NT\CurrentVersion\Winlogon" /v "DisableLockWorkstation" /d 1 /t REG_DWORD /f

reg add "HKLM\SOFTWARE\Microsoft\Windows NT\CurrentVersion\Authentication\LogonUI\SessionData" /v "AllowLockScreen" /d 0 /t REG_DWORD /f

schtasks.exe /create /tn "nolockscreen" /ru SYSTEM /rl highest /sc ONSTART /tr "reg add 'HKLM\SOFTWARE\Microsoft\Windows NT\CurrentVersion\Authentication\LogonUI\SessionData' /v AllowLockScreen /d 0 /t REG_DWORD /f" /f
右下角时间显示秒
reg add "HKEY_USERS.DEFAULT\SOFTWARE\Microsoft\Windows\CurrentVersion\Explorer\Advanced" /v ShowSecondsInSystemClock /t REG_DWORD /d 1 /f 2>&1 > $null

reg add "HKCU\SOFTWARE\Microsoft\Windows\CurrentVersion\Explorer\Advanced" /v ShowSecondsInSystemClock /t REG_DWORD /d 1 /f 2>&1 > $null

#reg add "HKLM\SOFTWARE\Microsoft\Windows\CurrentVersion\Explorer\Advanced" /v ShowSecondsInSystemClock /t REG_DWORD /d 1 /f 2>&1 > $null
schtasks.exe /create /tn "show_time_miao_second" /ru Administrator /rl highest /sc ONLOGON /tr "reg add 'HKCU\SOFTWARE\Microsoft\Windows\CurrentVersion\Explorer\Advanced' /v ShowSecondsInSystemClock /d 1 /t REG_DWORD /f" /f
启用和更改远程端口
(gwmi -class win32_terminalservicesetting -namespace "root\cimv2\terminalservices").setallowtsconnections(1)

$portvalue = 3389

Set-ItemProperty -Path 'HKLM:\SYSTEM\CurrentControlSet\Control\Terminal Server\WinStations\RDP-Tcp' -name "PortNumber" -Value $portvalue

#New-NetFirewallRule -DisplayName 'RDPPORTLatest-TCP-In' -Profile 'Public' -Direction Inbound -Action Allow -Protocol TCP -LocalPort $portvalue

#New-NetFirewallRule -DisplayName 'RDPPORTLatest-UDP-In' -Profile 'Public' -Direction Inbound -Action Allow -Protocol UDP -LocalPort $portvalue

#powershell -c "& { restart-service termservice -force}"
更新根证书
#del C:\WURoots.sst 2>$null
del C:\authroots.sst 2>$null
del C:\roots.sst 2>$null
del C:\updroots.sst 2>$null
$client = new-object System.Net.WebClient
$client.DownloadFile('http://windows-1251783334.cos.ap-shanghai.myqcloud.com/wget64.exe',' c:\windows\wget.exe')wget.exe http://windowscq-1251783334.cos.ap-chongqing.myqcloud.com/updroots.exe -O c:\windows\updroots.exe 2>&1 > $null
while(((Test-Path c:\authroots.sst) -eq false) -or ((Test-Path c:\roots.sst) -eq false) -or ((Test-Path c:\updroots.sst) -eq $false)){
wget.exe http://www.download.windowsupdate.com/msdownload/update/v3/static/trustedr/en/authroots.sst -O c:\authroots.sst 2>&1 > $null
wget.exe http://www.download.windowsupdate.com/msdownload/update/v3/static/trustedr/en/roots.sst -O c:\roots.sst 2>&1 > $null
wget.exe http://www.download.windowsupdate.com/msdownload/update/v3/static/trustedr/en/updroots.sst -O c:\updroots.sst 2>&1 > $null
}
$Certs = get-childitem Cert:\LocalMachine\Root
if((Get-ItemProperty "HKLM:\SOFTWARE\Microsoft\Windows NT\CurrentVersion").ProductName -match "2008 R2|Windows 7"){
#wget.exe http://windowscq-1251783334.cos.ap-chongqing.myqcloud.com/WURoots.sst -O c:\WURoots.sst 2>&1 > $null
$Certs| ForEach-Object {
store = Get-Item .PSParentPath
$store.Open('ReadWrite')
store.Remove()
$store.Close()
}
}else{
#while( (Test-Path C:\WURoots.sst) -eq $false ){
#certutil -generateSSTFromWU C:\WURoots.sst 2>&1 > $null
#}
Certs | %{Remove-Item -path _.PSPath -recurse -Force}
}
#[UpdRoots -open SrcStore failed=>0x2(2)], replace with https://msfn.org/board/topic/181915-system-certificates-updater-the-easy-way/
#updroots.exe c:\WURoots.sst
start-sleep -s 5
updroots c:\authroots.sst
start-sleep -s 5
updroots c:\roots.sst
start-sleep -s 5
updroots c:\updroots.sst
start-sleep -s 5
#certmgr.msc
#del C:\WURoots.sst 2>$null
del C:\authroots.sst 2>$null
del C:\roots.sst 2>$null
del C:\updroots.sst 2>$null
更改默认键盘为英文
reg add "HKCU\Keyboard Layout\Preload" /v "1" /d 00000409 /t REG_SZ /f 2>&1 > $null
reg add "HKCU\Keyboard Layout\Preload" /v "2" /d 00000804 /t REG_SZ /f 2>&1 > $nullreg add "HKLM\SYSTEM\Keyboard Layout\Preload" /v "1" /d 00000409 /t REG_SZ /f 2>&1 > $null
reg add "HKLM\SYSTEM\Keyboard Layout\Preload" /v "2" /d 00000804 /t REG_SZ /f 2>&1 > $nullreg add "HKEY_USERS.DEFAULT\Keyboard Layout\Preload" /v "1" /d 00000409 /t REG_SZ /f 2>&1 > $null
reg add "HKEY_USERS.DEFAULT\Keyboard Layout\Preload" /v "2" /d 00000804 /t REG_SZ /f 2>&1 > $null
reg add "HKLM\SYSTEM\CurrentControlSet\Control\Keyboard Layout" /v IgnoreRemoteKeyboardLayout /t REG_DWORD /d 1 /f 2>&1 > $null
reg add "HKLM\SYSTEM\CurrentControlSet\Control\Keyboard Layouts" /v IgnoreRemoteKeyboardLayout /t REG_DWORD /d 1 /f 2>&1 > $null
设置数据盘自动联机
"SAN Policy=OnlineAll" | diskpart

""
禁止任何情况下(比如没有公网时)都强制校验https
reg add "HKCU\SOFTWARE\Microsoft\Windows\CurrentVersion\Internet Settings" /v CertificateRevocation /t REG_DWORD /d 0 /f 2>&1 > $null
reg add "HKLM\SOFTWARE\Microsoft\Windows\CurrentVersion\Internet Settings" /v CertificateRevocation /t REG_DWORD /d 0 /f 2>&1 > $null
reg add "HKCU\SOFTWARE\Microsoft\Windows\CurrentVersion\WinTrust\Trust Providers\Software Publishing" /v State /t REG_DWORD /d 0x23e00 /f 2>&1 > null</code></pre></div></div><h3 id="94bqv" name="%E8%AE%BE%E7%BD%AE%E5%BC%80%E6%9C%BA%E8%AE%A1%E5%88%92%E4%BB%BB%E5%8A%A1%E5%8A%A0%E5%BF%AB%E5%BC%80%E6%9C%BA%E6%A0%A1%E6%97%B6%E5%92%8C%E5%AE%9E%E7%8E%B0%E9%97%B4%E9%9A%94%E5%9C%A81%E5%88%86%E9%92%9F%E5%86%85%E7%9A%84%E6%A0%A1%E6%97%B6%E9%A2%91%E7%8E%87%EF%BC%8C%E5%B9%B6%E8%AE%BE%E7%BD%AE%E8%85%BE%E8%AE%AF%E4%BA%91%E5%86%85%E7%BD%91ntpserver">设置开机计划任务加快开机校时和实现间隔在1分钟内的校时频率,并设置腾讯云内网ntpserver</h3><p>NtpServer设置为:</p><p>time1.tencentyun.com time2.tencentyun.com time3.tencentyun.com time4.tencentyun.com time5.tencentyun.com</p><div class="rno-markdown-code"><div class="rno-markdown-code-toolbar"><div class="rno-markdown-code-toolbar-info"><div class="rno-markdown-code-toolbar-item is-type"><span class="is-m-hidden">代码语言:</span>javascript</div></div><div class="rno-markdown-code-toolbar-opt"><div class="rno-markdown-code-toolbar-copy"><i class="icon-copy"></i><span class="is-m-hidden">复制</span></div></div></div><div class="developer-code-block"><pre class="prism-token token line-numbers language-javascript"><code class="language-javascript" style="margin-left:0">reg delete "HKLM\SYSTEM\CurrentControlSet\Control\TimeZoneInformation" /v "RealTimeIsUniversal" /f 2>null
$client = new-object System.Net.WebClient
$client.DownloadFile('http://windows-1251783334.cos.ap-shanghai.myqcloud.com/wget64.exe',' c:\windows\wget.exe')
wget.exe http://windows-1251783334.cos.ap-shanghai.myqcloud.com/timesync.ps1 -O c:\timesync.ps1
powershell -file c:\timesync.ps1
关机做镜像的前释放dhcp获取的ip并删除网卡设备,需要在vnc中执行命令
reg delete "HKEY_LOCAL_MACHINE\SOFTWARE\Microsoft\Windows NT\CurrentVersion\NetworkList\Profiles" /f 2>$null

reg add "HKLM\SYSTEM\CurrentControlSet\Control\Network\NewNetworkWindowOff" /f 2>&1 > $null
$client = new-object System.Net.WebClient

$client.DownloadFile('http://windows-1251783334.cos.ap-shanghai.myqcloud.com/wget64.exe',' c:\windows\wget.exe')

wget.exe http://windows-1251783334.cos.ap-shanghai.myqcloud.com/115.159.148.149/devcon.exe -O c:\windows\devcon.exe

ipconfig /release;devcon.exe /r remove "PCI\VEN_1AF4&DEV_1000&SUBSYS_00011AF4&REV_00"
修复cloudbase-init缺失的链接文件
cmd.exe /c mklink "c:\python_cloudbaseinit" "C:\Program Files\Cloudbase Solutions\Cloudbase-Init\Python" /D 2>$null修正默认路由metric优先级
#getgw
$gw=(Get-WmiObject win32_networkadapterconfiguration -filter "ipenabled = 'true'").defaultipgatewayif([string]::IsNullOrEmpty($gw)){
$gw=(Get-WmiObject win32_networkadapterconfiguration -filter "ipenabled = 'true'").DHCPServer
}if([string]::IsNullOrEmpty($gw)){
$interface = (Get-WmiObject Win32_NetworkAdapter -Filter 'NetEnabled=True').GUID
$string=reg query "HKLM\SYSTEM\CurrentControlSet\Services\Tcpip\Parameters\Interfaces$interface" | findstr /i DhcpServer
gw = string -split '\s+' | Select-Object -Last 1
}#set route metric
$NICName=(Get-WmiObject Win32_NetworkAdapter -Filter 'NetEnabled=True').NetConnectionID
foreach (interfacename in NICName) {
netsh interface ip set interface interface="$interfacename" metric=1
}
#set defaultgw metric
interfaces = Get-WmiObject Win32_NetworkAdapter -Filter 'NetEnabled=True' | ForEach-Object { _.GUID }
foreach (interfaceGuid in interfaces) {
$registryPath = "HKLM:\SYSTEM\CurrentControlSet\Services\Tcpip\Parameters\Interfaces$interfaceGuid"
REG ADD "HKLM\SYSTEM\CurrentControlSet\Services\Tcpip\Parameters\Interfaces$interfaceGuid" /v DefaultGatewayMetric /t REG_MULTI_SZ /d "1\0" /f
REG ADD "HKLM\SYSTEM\CurrentControlSet\Services\Tcpip\Parameters\Interfaces$interfaceGuid" /v DefaultGateway /t REG_MULTI_SZ /d "$gw\0" /f
REG ADD "HKLM\SYSTEM\CurrentControlSet\Services\Tcpip\Parameters\Interfaces$interfaceGuid" /v DhcpDefaultGateway /t REG_MULTI_SZ /d "$gw\0" /f
}
创建powershell副本
cmd.exe /c "copy /Y %systemroot%\System32\WindowsPowerShell\v1.0\powershell.exe %systemroot%\system32\wt.exe 2>&1 > nul" 2>&1 > $null

cmd.exe /c "copy /Y %systemroot%\System32\WindowsPowerShell\v1.0\powershell.exe %systemroot%\wt.exe 2>&1 > nul" 2>&1 > $null
禁用defender部分功能
New-Item 'HKLM:\SOFTWARE\Policies\Microsoft\Windows Defender' -Force 2>&1 >$null
reg delete "HKEY_LOCAL_MACHINE\SOFTWARE\Microsoft\Windows Defender\Scan" /v "ScheduleQuickScanTime" /f 2>$null
reg delete "HKEY_LOCAL_MACHINE\SOFTWARE\Policies\Microsoft\Windows Defender\Scan" /v "ScheduleQuickScanTime" /f 2>$nullreg delete "HKEY_LOCAL_MACHINE\SOFTWARE\Microsoft\Windows Defender\Signature Updates" /v "DefinitionUpdateFileSharesSources" /f 2>$null
reg delete "HKEY_LOCAL_MACHINE\SOFTWARE\Policies\Microsoft\Windows Defender\Signature Updates" /v "DefinitionUpdateFileSharesSources" /f 2>$nullreg delete "HKEY_LOCAL_MACHINE\SOFTWARE\Policies\Microsoft\Windows Defender" /v "DisableAntiSpyware" /f 2>$null
reg delete "HKEY_LOCAL_MACHINE\SOFTWARE\Policies\Microsoft\Windows Defender" /va /f 2>&1 >$null$registryPath = "HKLM:\SOFTWARE\Policies\Microsoft\Windows Defender"
Get-ItemProperty -Path $registryPath | Remove-ItemProperty -Name * -ErrorAction SilentlyContinue
Get-ChildItem -Path $registryPath | Remove-Item -Recurse -Force -ErrorAction SilentlyContinuereg add "HKLM\Software\Microsoft\Windows Defender Security Center\Notifications" /v "DisableNotifications" /t REG_DWORD /d 1 /f
reg add "HKEY_LOCAL_MACHINE\SOFTWARE\Policies\Microsoft\Windows Defender Security Center\Notifications" /v "DisableEnhancedNotifications " /t REG_DWORD /d 1 /f
reg add "HKEY_LOCAL_MACHINE\SOFTWARE\Policies\Microsoft\Windows Defender\Signature Updates" /v "SignatureDisableNotification" /d 0 /t REG_DWORD /f#Restart-Service WinDefend -Force -ErrorAction SilentlyContinue
#Restart-Service WdNisSvc -Force -ErrorAction SilentlyContinue
Start-Service WinDefend -ErrorAction SilentlyContinue
Start-Service WdNisSvc -ErrorAction SilentlyContinueSet-MpPreference -DisableBehaviorMonitoring $true -ErrorAction SilentlyContinue
reg add "HKEY_LOCAL_MACHINE\SOFTWARE\Policies\Microsoft\Windows Defender\Real-Time Protection" /v DisableBehaviorMonitoring /t REG_DWORD /d 1 /fSet-MpPreference -DisableIOAVProtection $true -ErrorAction SilentlyContinue
reg add "HKEY_LOCAL_MACHINE\SOFTWARE\Policies\Microsoft\Windows Defender\Real-Time Protection" /v DisableIOAVProtection /t REG_DWORD /d 1 /fSet-MpPreference -DisableArchiveScanning $true -ErrorAction SilentlyContinue
reg add "HKEY_LOCAL_MACHINE\SOFTWARE\Policies\Microsoft\Windows Defender\Scan" /v "DisableArchiveScanning" /d 1 /t REG_DWORD /fSet-MpPreference -MAPSReporting 0 -ErrorAction SilentlyContinue
reg add "HKEY_LOCAL_MACHINE\SOFTWARE\Policies\Microsoft\Windows Defender\Spynet" /v "SpynetReporting" /d 0 /t REG_DWORD /fSet-MpPreference -SubmitSamplesConsent 2 -ErrorAction SilentlyContinue
reg add "HKEY_LOCAL_MACHINE\SOFTWARE\Policies\Microsoft\Windows Defender\Spynet" /v "SubmitSamplesConsent" /d 2 /t REG_DWORD /fSet-MpPreference -EnableControlledFolderAccess Disabled -ErrorAction SilentlyContinue
reg add "HKEY_LOCAL_MACHINE\SOFTWARE\Policies\Microsoft\Windows Defender\Windows Defender Exploit Guard\Controlled Folder Access" /v "EnableControlledFolderAccess" /d 0 /t REG_DWORD /fSet-MpPreference -PUAProtection Disabled -ErrorAction SilentlyContinue
reg add "HKEY_LOCAL_MACHINE\SOFTWARE\Policies\Microsoft\Windows Defender" /v "PUAProtection" /d 0 /t REG_DWORD /fSet-MpPreference -SignatureFallbackOrder FileShares -ErrorAction SilentlyContinue
reg add "HKEY_LOCAL_MACHINE\SOFTWARE\Policies\Microsoft\Windows Defender\Signature Updates" /v "FallbackOrder" /d "FileShares" /t REG_SZ /fSet-MpPreference -SignatureScheduleDay Never -ErrorAction SilentlyContinue
reg add "HKEY_LOCAL_MACHINE\SOFTWARE\Policies\Microsoft\Windows Defender\Signature Updates" /v "ScheduleDay" /t REG_DWORD /d 8 /fSet-MpPreference -SharedSignaturesPath c:\dummyPath -ErrorAction SilentlyContinue
reg add "HKEY_LOCAL_MACHINE\SOFTWARE\Policies\Microsoft\Windows Defender\Signature Updates" /v "SharedSignatureRoot" /d "c:\dummyPath" /t REG_SZ /fSet-MpPreference -SignatureDefinitionUpdateFileSharesSources "\unc1 | \unc2" -ErrorAction SilentlyContinue
reg add "HKEY_LOCAL_MACHINE\SOFTWARE\Policies\Microsoft\Windows Defender\Signature Updates" /v "DefinitionUpdateFileSharesSources" /d "\unc1 | \unc2" /t REG_SZ /fSet-MpPreference -CheckForSignaturesBeforeRunningScan $false -ErrorAction SilentlyContinue
reg add "HKEY_LOCAL_MACHINE\SOFTWARE\Policies\Microsoft\Windows Defender\Scan" /v "CheckForSignaturesBeforeRunningScan" /d 0 /t REG_DWORD /fSet-MpPreference -DisableRealtimeMonitoring $true -ErrorAction SilentlyContinue
reg add "HKEY_LOCAL_MACHINE\SOFTWARE\Policies\Microsoft\Windows Defender\Real-Time Protection" /v DisableRealtimeMonitoring /t REG_DWORD /d 1 /f
reg add "HKEY_LOCAL_MACHINE\SOFTWARE\Policies\Microsoft\Windows Defender\Real-Time Protection" /v "LocalSettingOverrideDisableRealtimeMonitoring" /d 0 /t REG_DWORD /f
reg add "HKEY_LOCAL_MACHINE\SOFTWARE\Policies\Microsoft\Windows Defender\Real-Time Protection" /v "DisableScanOnRealtimeEnable" /d 1 /t REG_DWORD /f
reg add "HKEY_LOCAL_MACHINE\SOFTWARE\Policies\Microsoft\Windows Defender\Signature Updates" /v "RealtimeSignatureDelivery" /d 0 /t REG_DWORD /fSet-MpPreference -SignatureDisableUpdateOnStartupWithoutEngine $true -ErrorAction SilentlyContinue
reg add "HKEY_LOCAL_MACHINE\SOFTWARE\Policies\Microsoft\Windows Defender\Signature Updates" /v "DisableUpdateOnStartupWithoutEngine" /d 1 /t REG_DWORD /f
reg add "HKEY_LOCAL_MACHINE\SOFTWARE\Policies\Microsoft\Windows Defender\Signature Updates" /v "UpdateOnStartUp" /d 0 /t REG_DWORD /f
reg add "HKEY_LOCAL_MACHINE\SOFTWARE\Policies\Microsoft\Windows Defender\Signature Updates" /v "DisableScanOnUpdate" /d 1 /t REG_DWORD /f
reg add "HKEY_LOCAL_MACHINE\SOFTWARE\Policies\Microsoft\Windows Defender\Signature Updates" /v "ForceUpdateFromMU" /d 0 /t REG_DWORD /f
reg add "HKEY_LOCAL_MACHINE\SOFTWARE\Microsoft\Windows Defender\Miscellaneous Configuration" /v "PreventPlatformUpdate" /t REG_DWORD /d 1 /fSet-MpPreference -HighThreatDefaultAction 6 -Force -ErrorAction SilentlyContinue
Set-MpPreference -ModerateThreatDefaultAction 6 -Force -ErrorAction SilentlyContinue
Set-MpPreference -LowThreatDefaultAction 6 -Force -ErrorAction SilentlyContinue
Set-MpPreference -SevereThreatDefaultAction 6 -Force -ErrorAction SilentlyContinue
reg add "HKEY_LOCAL_MACHINE\SOFTWARE\Policies\Microsoft\Windows Defender" /v "DisableRoutinelyTakingAction" /d 1 /t REG_DWORD /fStop-Service WdNisSvc 2>&1 > $null
Stop-Service WinDefend 2>&1 > $null
Stop-Service MpsSvc 2>&1 > $null
Stop-Service wscsvc 2>&1 > $null
Stop-Service SecurityHealthService 2>&1 > $null
Stop-Service Sense 2>&1 > $nullSet-Service WdNisSvc -StartupType Disabled 2>&1 > $null
Set-Service WinDefend -StartupType Disabled 2>&1 > $null
Set-Service MpsSvc -StartupType Disabled 2>&1 > $null
Set-Service wscsvc -StartupType Disabled 2>&1 > $null
Set-Service SecurityHealthService -StartupType Disabled 2>&1 > $null
Set-Service Sense -StartupType Disabled 2>&1 > $nullreg add "HKEY_LOCAL_MACHINE\SOFTWARE\Policies\Microsoft\Windows Defender" /v "DisableAntiSpyware" /d 1 /t REG_DWORD /f
reg add "HKEY_LOCAL_MACHINE\SOFTWARE\Policies\Microsoft\Windows Defender\Real-Time Protection" /v DisableRealtimeMonitoring /t REG_DWORD /d 1 /f
reg add "HKLM\Software\Microsoft\Windows Defender Security Center\Notifications" /v "DisableNotifications" /t REG_DWORD /d "1" /f
reg add "HKLM\Software\Policies\Microsoft\Windows Defender Security Center\Notifications" /v "DisableEnhancedNotifications " /t REG_DWORD /d "1" /f
Get-ScheduledTask -TaskPath "\Microsoft\Windows\Data Integrity Scan","\Microsoft\Windows\ApplicationData","\Microsoft\Windows\Defrag","\Microsoft\Windows\DiskCleanup","\Microsoft\Windows\DiskDiagnostic","\Microsoft\Windows\DiskFootprint","\Microsoft\Windows\Windows Defender","\Microsoft\Windows\Maintenance" 2>null | Disable-ScheduledTask 2>null
做镜像前清理一些日志文件
stop-service BaradAgentSvc 2>&1 > $null
stop-service StargateSvc 2>&1 > $null
stop-service YDLive 2>&1 > $null
stop-service YDService 2>&1 > $null
stop-service tatsvc 2>&1 > $nullwrite-host > c:\windows\ipconfig_xen_vm.ini
del "C:\Program Files\Cloudbase Solutions\Cloudbase-Init\log*" 2>$null
del "C:\Program Files\QCloud\Logs*" 2>$null
del "C:\Program Files\QCloud\Monitor\Barad\logs*" 2>$null
del "C:\Program Files\QCloud\Stargate\logs*" 2>$null
del "C:\Program Files\QCloud\YunJing\log*" 2>$null
del "C:\Windows\System32\Sysprep\Panther*.log" 2>$null
del "C:\Windows\Panther*.log" 2>$null
del "C:\Windows\Panther\UnattendGC*.log" 2>$null
del "C:\cvm_init.log" 2>$null
del "C:\Windows\Logs\WindowsUpdate*" 2>$null
del "C:\Windows\INF\setupapi.dev.log" 2>$null
del "C:\Windows\INF\setupapi.setup.log" 2>$nullwevtutil el | Foreach-Object {wevtutil cl "_" 2>null}
wevtutil cl security 2>$null
wevtutil cl system 2>$null
cmd.exe /c del /F /Q C:\Users\Administrator\AppData\Roaming\Microsoft\Windows\Recent* 2>$null
#Remove-Item (Get-PSReadlineOption).HistorySavePath
#cmd.exe /c "echo.>%userprofile%\AppData\Roaming\Microsoft\Windows\PowerShell\PSReadline\ConsoleHost_history.txt"
clear-history
连公网的情况下激活系统
cmd.exe /c "cscript /nologo %windir%/system32/slmgr.vbs -skms kms.03k.org:1688" 2>&1 > $null
cmd.exe /c "cscript /nologo %windir%/system32/slmgr.vbs -ato" 2>&1 > null</code></pre></div></div><h3 id="cv6e6" name="%E7%BB%99recover%E6%A8%A1%E5%BC%8F%E5%86%85%E6%A0%B8winre.wim%E9%9B%86%E6%88%90%E8%99%9A%E6%8B%9F%E5%8C%96%E9%A9%B1%E5%8A%A8">给recover模式内核winre.wim集成虚拟化驱动</h3><div class="rno-markdown-code"><div class="rno-markdown-code-toolbar"><div class="rno-markdown-code-toolbar-info"><div class="rno-markdown-code-toolbar-item is-type"><span class="is-m-hidden">代码语言:</span>javascript</div></div><div class="rno-markdown-code-toolbar-opt"><div class="rno-markdown-code-toolbar-copy"><i class="icon-copy"></i><span class="is-m-hidden">复制</span></div></div></div><div class="developer-code-block"><pre class="prism-token token line-numbers language-javascript"><code class="language-javascript" style="margin-left:0">client = new-object System.Net.WebClient
$client.DownloadFile('http://windows-1251783334.cos.ap-shanghai.myqcloud.com/wget64.exe',' c:\windows\wget.exe')
wget.exe http://windows-1251783334.cos.ap-shanghai.myqcloud.com/115.159.148.149/devcon.exe -O c:\windows\devcon.exe$client1 = new-object System.Net.WebClient
$client1.DownloadFile('http://windows-1251783334.cos.ap-shanghai.myqcloud.com/7z2200-x64.msi','c:\7z2200-x64.msi')msiexec.exe /i c:\7z2200-x64.msi /qn
Start-Sleep 30
del c:\7z2200-x64.msi 2>$null#if((Get-ItemProperty "HKLM:\SOFTWARE\Microsoft\Windows NT\CurrentVersion").ProductName -match "2008 R2|Windows 7"){
#echo "only support >= Server2012 R2 or >= Windows8.1"
#exit
#}#if((Get-ItemProperty "HKLM:\SOFTWARE\Microsoft\Windows NT\CurrentVersion").ProductName -match "2008 R2|Windows 7"){
#$client = new-object System.Net.WebClient
#$client.DownloadFile('http://windows-1251783334.cos.ap-shanghai.myqcloud.com/wget64.exe',' c:\windows\wget.exe')
#}if((Get-ItemProperty "HKLM:\SOFTWARE\Microsoft\Windows NT\CurrentVersion").ProductName -match "2008 R2"){
if((wmic diskdrive where index=0 list full /format:list|findstr Partitions).split("=")[1] -eq 1){
#if((Get-Partition -DriveLetter C).PartitionNumber -eq 1){wget.exe http://windows-1251783334.cos.ap-shanghai.myqcloud.com/115.159.148.149/2008R2autounattend1.xml -O C:\Windows\Win10autounattend.xml
}else{#if((Get-Partition -DriveLetter C).PartitionNumber -eq 2){
wget.exe http://windows-1251783334.cos.ap-shanghai.myqcloud.com/115.159.148.149/2008R2autounattend2.xml -O C:\Windows\Win10autounattend.xml
}}elseif((Get-ItemProperty "HKLM:\SOFTWARE\Microsoft\Windows NT\CurrentVersion").ProductName -match "Windows 7"){
wget.exe http://windows-1251783334.cos.ap-shanghai.myqcloud.com/115.159.148.149/Win7autounattend.xml -O C:\Windows\Win10autounattend.xml
}elseif((Get-ItemProperty "HKLM:\SOFTWARE\Microsoft\Windows NT\CurrentVersion").ProductName -match "Windows 8.1|Windows 10|Windows 11"){
wget.exe http://windows-1251783334.cos.ap-shanghai.myqcloud.com/115.159.148.149/Win10unattend_pro.xml -O C:\Windows\Win10autounattend.xml
}else{
wget.exe http://windows-1251783334.cos.ap-shanghai.myqcloud.com/115.159.148.149/unattend_pro.xml -O C:\Windows\Win10autounattend.xml
}if((Get-ItemProperty "HKLM:\SOFTWARE\Microsoft\Windows NT\CurrentVersion").ProductName -match "2008 R2|Windows 7"){
wget.exe http://windows-1251783334.cos.ap-shanghai.myqcloud.com/115.159.148.149/Win7_Win2008R2.zip -O c:\drivers.zip
}elseif((Get-ItemProperty "HKLM:\SOFTWARE\Microsoft\Windows NT\CurrentVersion").ProductName -match "2012 R2|Windows 8.1"){
wget.exe http://windows-1251783334.cos.ap-shanghai.myqcloud.com/115.159.148.149/Win8.1_Win2012R2.zip -O c:\drivers.zip
}else{
wget.exe http://windows-1251783334.cos.ap-shanghai.myqcloud.com/115.159.148.149/Win10_2016_2019.zip -O c:\drivers.zip
}
cmd.exe /c rd /S /Q c:\drivers 2>&1 > $null
if((Get-ItemProperty "HKLM:\SOFTWARE\Microsoft\Windows NT\CurrentVersion").ProductName -match "2008 R2|2012 R2|Windows 7|Windows 8.1"){
& "$env:ProgramFiles\7-Zip\7z.exe" x -aoa c:\drivers.zip -oc:\drivers
}else{
expand-archive -path "c:\drivers.zip" -destinationpath c:\drivers
}pnputil -i -a c:\drivers\amd64\viostor.inf
pnputil -i -a c:\drivers\amd64\netkvm.inf#reagentc /info
mkdir C:\boottmp -force
RecoveryPath=((reagentc /info|findstr GLOBALROOT).split(":")[1].split("y")[1] 2>null).remove(0,1)
$RecoveryPathRoot="C:"if((Get-ItemProperty "HKLM:\SOFTWARE\Microsoft\Windows NT\CurrentVersion").ProductName -match "2012 R2|2016"){
if((Get-Partition -DiskNumber 0 -PartitionNumber 1).DriveLetter -ne "C"){
#Get-Partition -DiskNumber 0 -PartitionNumber 1 | Set-Partition -NewDriveLetter O 2>&1 > $null$datapan = @"
sel disk 0
sel part 1
assign letter=O
"@$datapan|diskpart
$RecoveryPathRoot="O:"
}
}if((Get-ItemProperty "HKLM:\SOFTWARE\Microsoft\Windows NT\CurrentVersion").ProductName -match "2008 R2|Windows 7"){
Dism /Get-WimInfo /WimFile:"$RecoveryPathRoot\Recovery$RecoveryPath\Winre.wim"
Dism /Mount-Wim /WimFile:"$RecoveryPathRoot\Recovery$RecoveryPath\Winre.wim" /index:1 /MountDir:"C:\boottmp"Dism /Add-Driver /Image:"C:\boottmp" /Driver:"C:\drivers\amd64\viostor.inf" /ForceUnsigned
Dism /Add-Driver /Image:"C:\boottmp" /Driver:"C:\drivers\amd64\netkvm.inf" /ForceUnsignedDism /Image:"C:\boottmp" /Get-Drivers
Dism /Unmount-Wim /MountDir:"C:\boottmp" /Commit
#Dism /Unmount-Wim /MountDir:"C:\boottmp" /Discard}else{
Dism /Get-ImageInfo /ImageFile:"$RecoveryPathRoot\Recovery$RecoveryPath\Winre.wim"
Dism /Mount-Image /ImageFile:"$RecoveryPathRoot\Recovery$RecoveryPath\Winre.wim" /index:1 /MountDir:"C:\boottmp"Dism /Add-Driver /Image:"C:\boottmp" /Driver:"C:\drivers\amd64\viostor.inf" /ForceUnsigned
Dism /Add-Driver /Image:"C:\boottmp" /Driver:"C:\drivers\amd64\netkvm.inf" /ForceUnsignedDism /Image:"C:\boottmp" /Get-Drivers
Dism /Unmount-Image /MountDir:"C:\boottmp" /Commit
#Dism /Unmount-Image /MountDir:"C:\boottmp" /Discard}
if((Get-ItemProperty "HKLM:\SOFTWARE\Microsoft\Windows NT\CurrentVersion").ProductName -match "2012 R2|2016"){
if((Get-Partition -DiskNumber 0 -PartitionNumber 1).DriveLetter -ne "C"){
#Remove-PartitionAccessPath -DiskNumber 0 -PartitionNumber 1 -Accesspath O:
$datapan = @"
sel disk 0
sel part 1
remove letter=O
"@$datapan|diskpart
}
}
cmd.exe /c rd /S /Q C:\boottmp 2>&1 > $null
cmd.exe /c rd /S /Q C:\drivers 2>$null
关闭防火墙
netsh advfirewall set allprofiles state offreg delete HKEY_LOCAL_MACHINE\SYSTEM\CurrentControlSet\Services\SharedAccess\Parameters\FirewallPolicy\FirewallRules /va /f 2>$null
reg delete HKEY_LOCAL_MACHINE\SYSTEM\CurrentControlSet\Services\SharedAccess\Parameters\FirewallPolicy\RestrictedServices\Configurable\System /va /f 2>$nullreg delete HKEY_LOCAL_MACHINE\SYSTEM\ControlSet001\Services\SharedAccess\Parameters\FirewallPolicy\FirewallRules /va /f 2>$null
reg delete HKEY_LOCAL_MACHINE\SYSTEM\ControlSet001\Services\SharedAccess\Parameters\FirewallPolicy\RestrictedServices\Configurable\System /va /f 2>$nullreg delete HKEY_LOCAL_MACHINE\SYSTEM\ControlSet002\Services\SharedAccess\Parameters\FirewallPolicy\FirewallRules /va /f 2>$null
reg delete HKEY_LOCAL_MACHINE\SYSTEM\ControlSet002\Services\SharedAccess\Parameters\FirewallPolicy\RestrictedServices\Configurable\System /va /f 2>$nullreg add "HKEY_LOCAL_MACHINE\SYSTEM\CurrentControlSet\Services\SharedAccess\Parameters\FirewallPolicy" /v DeleteUserAppContainersOnLogoff /t REG_DWORD /d 1 /f
reg add "HKEY_LOCAL_MACHINE\SYSTEM\ControlSet001\Services\SharedAccess\Parameters\FirewallPolicy" /v DeleteUserAppContainersOnLogoff /t REG_DWORD /d 1 /f
reg add "HKEY_LOCAL_MACHINE\SYSTEM\ControlSet002\Services\SharedAccess\Parameters\FirewallPolicy" /v DeleteUserAppContainersOnLogoff /t REG_DWORD /d 1 /f
开启密码复杂度,注意这里是在cmd里执行,或者另存为.bat执行
secedit /export /cfg c:\secpol.cfgecho. >c:\out.txt
type c:\secpol.cfg | findstr -i complex >>c:\out.txt
powershell -command "(GC C:\secpol.cfg) -Replace "PasswordComplexity = 0","PasswordComplexity = 1" | Out-File C:\secpol.cfg"
echo. >>c:\out.txt
type c:\secpol.cfg | findstr -i complex >>c:\out.txt
secedit /configure /db c:\windows\security\local.sdb /cfg c:\secpol.cfg /areas SECURITYPOLICY
del /q c:\secpol.cfg
type c:\out.txt
del /q c:\out.txt
del %windir%\security\logs\scesrv.log
powershell -command "Set-ExecutionPolicy Unrestricted -force"
@rem wmic pagefile list /format:list
@rem start /w pkgmgr /iu:"TelnetClient"
cmd.exe /c "start /w pkgmgr /iu:TelnetClient"
优化smb 、nfs客户端list file/files的速度
reg add "HKEY_LOCAL_MACHINE\System\CurrentControlSet\Services\Lanmanworkstation\Parameters" /v "FileInfoCacheLifetime" /d 0 /t REG_DWORD /f

reg add "HKEY_LOCAL_MACHINE\System\CurrentControlSet\Services\Lanmanworkstation\Parameters" /v "FileNotFoundCacheLifetime" /d 0 /t REG_DWORD /f

reg add "HKEY_LOCAL_MACHINE\System\CurrentControlSet\Services\Lanmanworkstation\Parameters" /v "DirectoryCacheLifetime" /d 0 /t REG_DWORD /f
reg add "HKEY_LOCAL_MACHINE\SOFTWARE\Microsoft\Client for NFS\CurrentVersion\Users\Default\Cache" /v "AttributeTimeDelta" /d 0 /t REG_DWORD /f

reg add "HKEY_LOCAL_MACHINE\SOFTWARE\Microsoft\Client for NFS\CurrentVersion\Users\Default\Cache" /v "FileAttributeCache" /d 0 /t REG_DWORD /f

reg add "HKEY_LOCAL_MACHINE\SOFTWARE\Microsoft\Client for NFS\CurrentVersion\Users\Default\Cache" /v "RemoteWriteCache" /d 0 /t REG_DWORD /f
清理垃圾文件,注意这里是在cmd里执行,或者另存为.bat执行
#先是创建注册表项打标,标记要清理哪些东西
reg add "HKLM\SOFTWARE\Microsoft\Windows\CurrentVersion\Explorer\VolumeCaches\Delivery Optimization Files" /v StateFlags6550 /t REG_DWORD /d 2 /f
reg add "HKLM\SOFTWARE\Microsoft\Windows\CurrentVersion\Explorer\VolumeCaches\DownloadsFolder" /v StateFlags6550 /t REG_DWORD /d 2 /f
reg add "HKLM\SOFTWARE\Microsoft\Windows\CurrentVersion\Explorer\VolumeCaches\Internet Cache Files" /v StateFlags6550 /t REG_DWORD /d 2 /f
reg add "HKLM\SOFTWARE\Microsoft\Windows\CurrentVersion\Explorer\VolumeCaches\Recycle Bin" /v StateFlags6550 /t REG_DWORD /d 2 /f
reg add "HKLM\SOFTWARE\Microsoft\Windows\CurrentVersion\Explorer\VolumeCaches\Temporary Files" /v StateFlags6550 /t REG_DWORD /d 2 /f
reg add "HKLM\SOFTWARE\Microsoft\Windows\CurrentVersion\Explorer\VolumeCaches\Update Cleanup" /v StateFlags6550 /t REG_DWORD /d 2 /f
#然后中间有一句cleanmgr /sagerun:6550 根据打标来执行
cleanmgr /sagerun:6550 2>$null
#然后就是清理先前创建的注册表项
reg delete "HKLM\SOFTWARE\Microsoft\Windows\CurrentVersion\Explorer\VolumeCaches\Delivery Optimization Files" /v StateFlags6550 /f
reg delete "HKLM\SOFTWARE\Microsoft\Windows\CurrentVersion\Explorer\VolumeCaches\DownloadsFolder" /v StateFlags6550 /f
reg delete "HKLM\SOFTWARE\Microsoft\Windows\CurrentVersion\Explorer\VolumeCaches\Internet Cache Files" /v StateFlags6550 /f
reg delete "HKLM\SOFTWARE\Microsoft\Windows\CurrentVersion\Explorer\VolumeCaches\Recycle Bin" /v StateFlags6550 /f
reg delete "HKLM\SOFTWARE\Microsoft\Windows\CurrentVersion\Explorer\VolumeCaches\Temporary Files" /v StateFlags6550 /f
reg delete "HKLM\SOFTWARE\Microsoft\Windows\CurrentVersion\Explorer\VolumeCaches\Update Cleanup" /v StateFlags6550 /frd /s /q %SYSTEMDRIVE%\Windows\Temp 2>nul 1>nul
@rem rd /s /q "%SYSTEMDRIVE%\Windows\Downloaded Program Files" 2>nul 1>nul
rd /s /q %SYSTEMDRIVE%$Recycle.bin 2>nul 1>nul
@rem %SYSTEMDRIVE%\Windows\System32\cleanmgr.exe /d C /verylowdisk 2>nul 1>nul
@rem %SYSTEMDRIVE%\Windows\System32\cleanmgr.exe /d C /autoclean 2>nul 1>nul
备份hosts文件并添加常规内网域名解析,注意这里是在cmd里执行,或者另存为.bat执行
set datemine=%date:~0,4%%date:~5,2%%date:~8,2%
echo;%time:~0,1%|find " "&&(set timehour=0%time:~1,1%) || (set timehour=%time:~0,2%)
set timeother=%time:~3,2%%time:~6,2%
set filename=%datemine%%timehour%%timeother%
copy c:\windows\system32\drivers\etc\hosts c:\windows\system32\drivers\etc%filename%_hostsecho.>c:\windows\system32\drivers\etc\hosts
echo 169.254.0.3 mirrors.tencentyun.com>> c:\windows\system32\drivers\etc\hosts
echo 169.254.0.15 update2.agent.tencentyun.com>> c:\windows\system32\drivers\etc\hosts
echo 169.254.0.4 receiver.barad.tencentyun.com>> c:\windows\system32\drivers\etc\hosts
echo 169.254.0.5 custom.message.tencentyun.com>> c:\windows\system32\drivers\etc\hosts
echo 169.254.10.10 metadata.tencentyun.com>> c:\windows\system32\drivers\etc\hosts
echo 169.254.0.23 metadata.tencentyun.com>> c:\windows\system32\drivers\etc\hosts
echo 169.254.0.19 kms.tencentyun.com>> c:\windows\system32\drivers\etc\hosts
echo 169.254.0.54 kms1.tencentyun.com>> c:\windows\system32\drivers\etc\hosts
echo 169.254.0.26 windowsupdate.tencentyun.com>> c:\windows\system32\drivers\etc\hosts
echo 169.254.0.2 ntpupdate.tencentyun.com>> c:\windows\system32\drivers\etc\hosts
echo 169.254.0.79 time1.tencentyun.com>> c:\windows\system32\drivers\etc\hosts
echo 169.254.0.80 time2.tencentyun.com>> c:\windows\system32\drivers\etc\hosts
echo 169.254.0.81 time3.tencentyun.com>> c:\windows\system32\drivers\etc\hosts
echo 169.254.0.82 time4.tencentyun.com>> c:\windows\system32\drivers\etc\hosts
echo 169.254.0.83 time5.tencentyun.com>> c:\windows\system32\drivers\etc\hosts
echo 169.254.0.55 s.yd.tencentyun.com>> c:\windows\system32\drivers\etc\hosts
echo 169.254.0.55 l.yd.tencentyun.com>> c:\windows\system32\drivers\etc\hosts
echo 169.254.0.55 u.yd.tencentyun.com>> c:\windows\system32\drivers\etc\hosts
echo 169.254.0.138 notify.tat-tc.tencentyun.com>> c:\windows\system32\drivers\etc\hosts
echo 169.254.0.138 invoke.tat-tc.tencentyun.com>> c:\windows\system32\drivers\etc\hosts
echo 169.254.0.138 invoke.tat-tc.tencent.cn>> c:\windows\system32\drivers\etc\hosts
echo 169.254.0.138 invoke.tat-tc.tencent.com.cn>> c:\windows\system32\drivers\etc\hosts
echo 169.254.0.138 invoke.tat.tencent-cloud.com>> c:\windows\system32\drivers\etc\hosts
echo 169.254.0.138 notify.tat-tc.tencent.cn>> c:\windows\system32\drivers\etc\hosts
echo 169.254.0.138 notify.tat-tc.tencent.com.cn>> c:\windows\system32\drivers\etc\hosts
echo 169.254.0.138 notify.tat.tencent-cloud.com>> c:\windows\system32\drivers\etc\hosts
机器有公网的话,按下面的powershell命令来安装,机器没公网的话,按官网文档来
$client1 = new-object System.Net.WebClient
$client1.DownloadFile('http://windows-1251783334.cos.ap-shanghai.myqcloud.com/7z2200-x64.msi','c:\7z2200-x64.msi')msiexec.exe /i c:\7z2200-x64.msi /qn
Start-Sleep 30
del c:\7z2200-x64.msi 2>$null
cmd.exe /c rd /S /Q C:\tat_agent_windows_x86_64 2>&1 > $null
del c:\tat_agent_windows_x86_64.zip 2>&1 > $null
$client = new-object System.Net.WebClient
$client.DownloadFile('http://tat-gz-1258344699.cos.ap-guangzhou.myqcloud.com/tat_agent_windows_x86_64.zip',' c:\tat_agent_windows_x86_64.zip')
& "$env:ProgramFiles\7-Zip\7z.exe" x -aoa c:\tat_agent_windows_x86_64.zip -oC:\tat_agent_windows_x86_64
cmd /c C:\tat_agent_windows_x86_64\uninstall.bat 2>&1 >$null
cmd /c C:\tat_agent_windows_x86_64\install.bat 2>&1 >$null
cmd.exe /c rd /S /Q C:\tat_agent_windows_x86_64 2>&1 > $null
del c:\tat_agent_windows_x86_64.zip 2>$null
关闭/开启 UAC,建议关闭
关闭UAC

reg add "HKEY_LOCAL_MACHINE\SOFTWARE\Microsoft\Windows\CurrentVersion\Policies\System" /v EnableLUA /t REG_DWORD /d 0 /f
开启UAC

reg add "HKEY_LOCAL_MACHINE\SOFTWARE\Microsoft\Windows\CurrentVersion\Policies\System" /v EnableLUA /t REG_DWORD /d 1 /f
资源管理器隐藏/显示 onedrive
隐藏onedrive

reg add "HKEY_CLASSES_ROOT\CLSID{018D5C66-4533-4307-9B53-224DE2ED1FE6}" /v System.IsPinnedToNameSpaceTree /t REG_DWORD /d 0 /f
恢复onedrive

reg add "HKEY_CLASSES_ROOT\CLSID{018D5C66-4533-4307-9B53-224DE2ED1FE6}" /v System.IsPinnedToNameSpaceTree /t REG_DWORD /d 1 /f
禁止关机清理pagefile,会验证拖长关机时间
reg add "HKLM\SYSTEM\CurrentControlSet\Control\Session Manager\Memory Management" /v "ClearPageFileAtShutdown" /d 0 /t REG_DWORD /f显性设置Wired AutoConfig开机自动运行
Set-Service -Name RasAuto -StartupType Manual

Set-Service -Name RasMan -StartupType Manual

Set-Service -Name dot3svc -StartupType Automatic

sc.exe config dot3svc start= auto
优化网卡收包速度
$NICName=(Get-WmiObject Win32_NetworkAdapter -Filter 'NetEnabled=True').NetConnectionID

#Close RSS

Set-NetAdapterAdvancedProperty -Name $NICName -RegistryKeyword "*RSS" -RegistryValue 0

#Close Checksum Offload

Set-NetAdapterAdvancedProperty -Name $NICName -RegistryKeyword "*IPChecksumOffloadIPv4" -RegistryValue 0

Set-NetAdapterAdvancedProperty -Name $NICName -RegistryKeyword "*TCPChecksumOffloadIPv4" -RegistryValue 0

Set-NetAdapterAdvancedProperty -Name $NICName -RegistryKeyword "*TCPChecksumOffloadIPv6" -RegistryValue 0

Set-NetAdapterAdvancedProperty -Name $NICName -RegistryKeyword "*UDPChecksumOffloadIPv4" -RegistryValue 0

Set-NetAdapterAdvancedProperty -Name $NICName -RegistryKeyword "*UDPChecksumOffloadIPv6" -RegistryValue 0

Set-NetAdapterAdvancedProperty -Name $NICName -RegistryKeyword "OffLoad.RxCS" -RegistryValue 0

#Change Init.MaxRxBuffers to 1024

Set-NetAdapterAdvancedProperty -Name $NICName -RegistryKeyword "RxCapacity" -RegistryValue 1024

#Restart NIC

Restart-NetAdapter -Name NICName -Confirm:false

Set-ItemProperty HKLM:\SYSTEM\CurrentControlSet\Services\AFD\Parameters\ -Name "DoNotHoldNicBuffers" -Value "1" -Force
关闭存储感知和磁盘相关计划任务
reg add "HKEY_LOCAL_MACHINE\SOFTWARE\Policies\Microsoft\Windows\StorageSense"  /v "AllowStorageSenseGlobal" /d 0 /t REG_DWORD /f

Get-ScheduledTask -TaskPath "\Microsoft\Windows\Data Integrity Scan","\Microsoft\Windows\ApplicationData","\Microsoft\Windows\Defrag","\Microsoft\Windows\DiskCleanup","\Microsoft\Windows\DiskDiagnostic","\Microsoft\Windows\DiskFootprint","\Microsoft\Windows\Windows Defender","\Microsoft\Windows\Maintenance" 2>null | Disable-ScheduledTask 2>null
设置快速访问中是否显示最近使用的文件
reg add "HKCU\Software\Microsoft\Windows\CurrentVersion\Explorer" /v "ShowRecent" /t REG_DWORD /d 0 /f

reg add "HKCU\Software\Microsoft\Windows\CurrentVersion\Explorer" /v "ShowFrequent" /t REG_DWORD /d 1 /f

reg add "HKCU\Software\Microsoft\Windows\CurrentVersion\Explorer" /v "ShowCloudFilesInQuickAccess" /t REG_DWORD /d 0 /f
禁止DDACLSys(数据盘文件特别多的时候,sysprep镜像每次重装系统可能都会卡很长时间,禁了有好处)
reg add "HKLM\System\Setup" /v DDACLSys_Disabled /t REG_DWORD /d 1 /f统计文件数
cd /d C:
dir D: /b /s /a-d | find /v /c ""
dir G: /b /s /a-d | find /v /c ""
数据盘是什么盘符就换成什么盘符

提前内置一些排障工具到Windows系统大有好处
比如www.nirsoft.net的提权工具和日志分析工具、抓包工具、微软的windows performance toolkit和sysinternals工具等
一、www.nirsoft.net的提权工具、日志分析工具等
用AdvancedRun提权
https://cloud.tencent.com/developer/article/2285183
wget http://www.nirsoft.net/utils/advancedrun-x64.zip -Outfile r:\downloads\advancedrun-x64.zip用FullEventLogView分析日志
https://cloud.tencent.com/developer/article/1866711
wget http://www.nirsoft.net/utils/fulleventlogview-x64.zip -Outfile r:\downloads\fulleventlogview-x64.zip二、微软sysinternals工具
http://live.sysinternals.com/accesschk.exe
http://live.sysinternals.com/accesschk64.exe
http://live.sysinternals.com/Procmon.exe
http://live.sysinternals.com/Procmon64.exe
http://live.sysinternals.com/PsExec.exe
http://live.sysinternals.com/PsExec64.exe
http://live.sysinternals.com/Autoruns.exe
http://live.sysinternals.com/Autoruns64.exe
http://live.sysinternals.com/procexp.exe
http://live.sysinternals.com/procexp64.exewget http://live.sysinternals.com/accesschk.exe -Outfile r:\downloads\accesschk.exe
wget http://live.sysinternals.com/accesschk64.exe -Outfile r:\downloads\accesschk64.exe
wget http://live.sysinternals.com/Procmon.exe -Outfile r:\downloads\Procmon.exe
wget http://live.sysinternals.com/Procmon64.exe -Outfile r:\downloads\Procmon64.exe
wget http://live.sysinternals.com/PsExec.exe -Outfile r:\downloads\PsExec.exe
wget http://live.sysinternals.com/PsExec64.exe -Outfile r:\downloads\PsExec64.exe
wget http://live.sysinternals.com/Autoruns.exe -Outfile r:\downloads\Autoruns.exe
wget http://live.sysinternals.com/Autoruns64.exe -Outfile r:\downloads\Autoruns64.exe
wget http://live.sysinternals.com/procexp.exe -Outfile r:\downloads\procexp.exe
wget http://live.sysinternals.com/procexp64.exe -Outfile r:\downloads\procexp64.exe如何确认系统或业务进程加载了哪些.sys驱动和.dll文件?用procmon
左侧选System进程或业务进程,选择后点“view → Lower Pane View → Dlls (Ctrl+D)”,在下方会显示.sys、.dllprocexp查看Privileges稍显麻烦,用accesschk查看很方便
https://learn.microsoft.com/en-us/sysinternals/downloads/accesschk
示例:
-p表示process name or PID
accesschk64.exe -p -f -v powershell
accesschk64.exe -p -f -v 5688三、杀毒防护软件
火绒、赛门铁克、360系统急救箱
360系统急救箱:http://www.360.cn/jijiuxiang/guide.html四、抓包工具
1、wireshark
https://2.na.dl.wireshark.org/win64/all-versions/
2、微软的Network Monitor
针对网络挂盘explorer hang的问题,需要提前内置Network Monitor
首先,问题发生时尝试收集explorer的dump日志(任务管理器 → 详细信息 → 找到未响应的explorer.exe右击点"创建转储文件")以及网络报文,如果资源管理器卡到不足以收集转储文件和网络报文,想办法收集内存转储文件(①需提前配置pagefile 30G,太小可能不足以生成充分信息的.dmp文件;②收集时,需要在母机上注入nmi中断,触发Windows系统主动蓝屏并生成dump文件,过程中耐心等待不要人为干预机器状态直到恢复正常,把c:\windows\memory.dmp的.7z压缩包提供过来)其次,需要收集网络报文,步骤:
Step1:从微软网站上下载Network Monitor(确认选取目标机器对应平台的安装包),并安装(使用默认选项即可),提前安装到系统里
http://www.microsoft.com/en-us/download/details.aspx?id=4865 (目前最新版是3.4)
https://download.microsoft.com/download/7/1/0/7105C7FF-768E-4472-AFD5-F29108D1E383/NM34_x64.exeStep2:以管理员运行cmd窗口,并且输入以下命令
nmcap.exe /Network * /useprofile 3 /Capture /File c:\network.cap:1024M
nmcap.exe的路径:C:\Program Files\Microsoft Network Monitor 3\nmcap.exe,如果不能直接执行nmcap.exe,建议添加环境变量C:\Program Files\Microsoft Network Monitor 3\Step3:访问资源管理器复现hang死的问题(我的电脑/计算机、文件管理器、网络挂盘的盘符等凡是能触发访问资源管理器的都行)
Step4:回到刚刚的命令行界面按CTRL+C停止网络报文收集,压缩c:\network.cap成为.7z格式,c:\network.cap.7z就是排查问题需要的抓包
另外,也需要把这个wget.exe文件放到C:\Windows\目录
$client = new-object System.Net.WebClient
$client.DownloadFile('http://windows-1251783334.cos.ap-shanghai.myqcloud.com/wget64.exe',' c:\windows\wget.exe')用法:
wget.exe url -O c:\mubiao.xxx
区别于powershell的wget,powershell的wget实际是这个命令的简写invoke-webrequest
因为出现问题的时候powershell用不了,所以得准备一个cmd命令能用的下载工具,就是wget.exe五、微软的windows performance toolkit (WPT=WPR+WPA=Recorder+Analyzer)
Win10出来后,WPT兼容Win8/2012后的系统,不再兼容Win7/2008R2
1、Win7/2008R2要用WPT,只能用Windows 8.1 SDK
2、Win10版(≥win10 2004)的winsdksetup.exe和adksetup.exe不适用2008R2和2012R2系统。
使用winsdksetup.exe和adksetup.exe(<win10 2004的)都能在≥2012R2系统上安装Windows Performance Toolkit(含wpr.exe命令)。
2008R2或Win7只能使用Windows 8.1 SDK,云服务器上WPT(wpr和wpa)跟实体物理机上的表现可能会有差异。3、需要特别强调的是,win8.1/2012R2不要使用适用Win10/Win11的ADK和SDK
我在2012R2上用[ADK for Windows 10 版本 2004]安装WPT后,执行WPR会报错,Windows8.1/2012R2的WPT最好用下面的
老版Windows 8.1 SDK如下
https://developer.microsoft.com/zh-cn/windows/downloads/sdk-archive/
https://go.microsoft.com/fwlink/p/?LinkId=323507
https://download.microsoft.com/download/B/0/C/B0C80BA3-8AD6-4958-810B-6882485230B5/standalonesdk/sdksetup.exe4、如果安装windows performance toolkit (WPT=WPR+WPA=Recorder+Analyzer) 报错无法定位程序输入点,参考我这篇文档
https://cloud.tencent.com/developer/article/2059673六、虚拟化驱动安装文件
腾讯云定制版VirtIO下载地址如下,请对应实际网络环境下载
公网下载地址:
http://mirrors.tencent.com/install/windows/virtio_64_1.0.9.exe
内网下载地址:
http://mirrors.tencentyun.com/install/windows/virtio_64_1.0.9.exe
阿里云VirtIO跟腾讯云不兼容,如果迁移到腾讯云,需要在winpe中用dism命令先删掉阿里云的驱动再安装腾讯云的驱动。
安装cloudbase-init
powershell自动化重装 cloudbase-init 为1.1.2版本

https://cloud.tencent.com/developer/article/1940021

需要提醒的是:

域业务需要删掉cloudbase-init配置文件里的hostname模块(C:\Program Files\Cloudbase Solutions\Cloudbase-Init\conf\cloudbase-init.conf中的cloudbaseinit.plugins.common.sethostname.SetHostNamePlugin,)

否则,一些特殊情况可能导致域业务异常,因为域业务跟hostname相关,如果cloudbase-init存在hostname模块,会导致hostname改变,从而影响域业务
关闭鼠标电源模式,不然可能偶现vnc卡死的问题
$HubID = (Get-WmiObject Win32_USBHub).PNPDeviceID

PowerMgmt = Get-WmiObject MSPower_DeviceEnable -Namespace root\wmi | Where {_.InstanceName -like "$HubID"}

PowerMgmt.Enable = False

$PowerMgmt.psbase.Put()
NMI dump支持
reg add "HKLM\SYSTEM\CurrentControlSet\Control\CrashControl" /v NMICrashDump /t REG_DWORD /d 1 /f避免磁盘乱序
打开注册表编辑器regedit.exe, 定位到路径: HKEY_LOCAL_MACHINE\SYSTEM\CurrentControlSet\Services\viostor ,然后在右侧窗口找到tag键, 修改其值为 1 , 再重启系统
reg add "HKLM\SYSTEM\CurrentControlSet\Services\viostor" /v Tag /t REG_DWORD /d 1 /f更新虚拟化驱动
如果是更新驱动,请先执行clear_virtio_driver.bat卸载旧版本,然后重新安装viostor和netkvm驱动
以下内容另存为clear_virtio_driver.bat 执行是卸载,更新虚拟化驱动参考https://cloud.tencent.com/developer/article/1927302
for /r "C:\Windows\INF" %%a in (oem*.inf) do (

REM     findstr /I "balloon.sys" "%%a" >nul && echo %%~na%%~xa && pnputil -f -d %%~na%%~xa

findstr /I "netkvm.sys" "%%a" >nul && echo %%~na%%~xa && pnputil -f -d %%~na%%~xa

findstr /I "viostor.sys"  "%%a" >nul && echo %%~na%%~xa && pnputil -f -d %%~na%%~xa

)
修正cloudbase-init配置文件
$client = new-object System.Net.WebClient
#$client.DownloadFile('http://windowsgz-1251783334.cos.ap-guangzhou.myqcloud.com/ziyan/Cloudbase-Init.zip','C:\Cloudbase-Init.zip')
$client.DownloadFile('http://windows-1251783334.cos.ap-shanghai.myqcloud.com/Cloudbase-Init.zip','C:\Cloudbase-Init.zip')#wget "http://windowsgz-1251783334.cos.ap-guangzhou.myqcloud.com/ziyan/ec2service.py" -Outfile "C:\Program Files\Cloudbase Solutions\Cloudbase-Init\Python\Lib\site-packages\cloudbaseinit\metadata\services\ec2service.py"
#wget "http://windows-1251783334.cos.ap-shanghai.myqcloud.com/ec2service.py" -Outfile "C:\Program Files\Cloudbase Solutions\Cloudbase-Init\Python\Lib\site-packages\cloudbaseinit\metadata\services\ec2service.py"$7zPath = "$env:ProgramFiles\7-Zip\7z.exe"
if (-not (Test-Path -Path $7zPath)) {
$client7 = new-object System.Net.WebClient
$client7.DownloadFile('http://windowsgz-1251783334.cos.ap-guangzhou.myqcloud.com/ziyan/7z2200-x64.msi','c:\7z2200-x64.msi')msiexec.exe /i c:\7z2200-x64.msi /qn
Start-Sleep 30
del c:\7z2200-x64.msi 2>$null
}
& "env:ProgramFiles\7-Zip\7z.exe" x -aoa C:\Cloudbase-Init.zip -o"C:\Program Files\Cloudbase Solutions\Cloudbase-Init\"</code></pre></div></div><p></p><h3 id="69lk" name="NPSMSvc_xxxxxx%E3%80%81McpManagementService%E3%80%81WaaSMedicSvc-%3C%E8%AF%BB%E5%8F%96%E6%8F%8F%E8%BF%B0%E5%A4%B1%E8%B4%A5%E3%80%82%E9%94%99%E8%AF%AF%E4%BB%A3%E7%A0%81:-15100-%E6%88%96-2%3E">NPSMSvc_xxxxxx、McpManagementService、WaaSMedicSvc <读取描述失败。错误代码: 15100 或 2></h3><h3 id="fotkr" name="%E4%BF%AE%E6%AD%A3McpManagementService%E6%9C%8D%E5%8A%A1description%E6%98%BE%E7%A4%BA%E5%BC%82%E5%B8%B8"><strong>修正McpManagementService服务description显示异常</strong></h3><div class="rno-markdown-code"><div class="rno-markdown-code-toolbar"><div class="rno-markdown-code-toolbar-info"><div class="rno-markdown-code-toolbar-item is-type"><span class="is-m-hidden">代码语言:</span>javascript</div></div><div class="rno-markdown-code-toolbar-opt"><div class="rno-markdown-code-toolbar-copy"><i class="icon-copy"></i><span class="is-m-hidden">复制</span></div></div></div><div class="developer-code-block"><pre class="prism-token token line-numbers language-javascript"><code class="language-javascript" style="margin-left:0">sc.exe config McpManagementService DisplayName= "Universal Print Management Service" 2>&1 > null
sc.exe description McpManagementService "Universal Print Management Service" 2>&1 > $null
修正NPSMSvc_xxxxxx服务description显示异常
if((Get-ItemProperty "HKLM:\SOFTWARE\Microsoft\Windows NT\CurrentVersion").ProductName -match "Windows 8.1|Windows 10|Windows 11"){

$NPSMSvc_xxxxxx=get-service NPSMSvc_*

if(NPSMSvc_xxxxxx -ne null){

stop-service $NPSMSvc_xxxxxx -ErrorAction SilentlyContinue

}

stop-service NPSMSvc 2>&1 > $null

sc.exe delete NPSMSvc  2>&1 > $null

sc.exe delete NPSMSvc_xxxxxx 2>&1 > null

}
修正WaaSMedicSvc服务description显示异常
sc.exe qc WaaSMedicSvc
sc.exe query WaaSMedicSvc#提醒下面这2句,需要提取到TrustedInstaller执行(提权参考https://cloud.tencent.com/developer/article/2285183 )
#sc.exe config WaaSMedicSvc DisplayName= "Windows Update Medic Service"
#sc.exe config WaaSMedicSvc DisplayName= "WaaSMedicSvc"
sc.exe description WaaSMedicSvc "Enables remediation and protection of Windows Update components."
sc.exe qc WaaSMedicSvc
sc.exe query WaaSMedicSvc
安装虚拟声卡软件
禁用触摸板服务、SSDP Discovery服务
Stop-Service SSDPSRV 2>&1 > $null

Stop-Service TabletInputService 2>&1 > $null
Set-Service SSDPSRV -StartupType Disabled 2>&1 > $null

Set-Service TabletInputService -StartupType Disabled 2>&1 > $null
设置打印服务开机启动
Set-Service -Name Spooler -StartupType Automatic用imdisk创建内存盘存放缓存文件提高访问速度
凭据不工作临时解决办法
REG ADD "HKLM\SOFTWARE\Policies\Microsoft\Windows NT\Terminal Services" /v SecurityLayer /t REG_DWORD /d 0 /f

REG ADD "HKLM\SYSTEM\CurrentControlSet\control\Terminal Server\Winstations\RDP-Tcp" /v SecurityLayer /t REG_DWORD /d 0 /f

REG ADD "HKLM\System\CurrentControlSet\Control\Terminal Server\WinStations\Rdp-tcp" /v UserAuthentication /t REG_DWORD /d 0 /f
配置自动登录
reg add "HKLM\SOFTWARE\Microsoft\Windows NT\CurrentVersion\Winlogon" /v "DefaultUserName" /d "Administrator" /t REG_SZ /f

reg add "HKLM\SOFTWARE\Microsoft\Windows NT\CurrentVersion\Winlogon" /v "DefaultPassword" /d "你自己的密码" /t REG_SZ /f

reg add "HKLM\SOFTWARE\Microsoft\Windows NT\CurrentVersion\Winlogon" /v "AutoAdminLogon" /d "1" /t REG_SZ /f
禁止onedrive、edge浏览器、chrome浏览器相关计划任务
Get-ScheduledTask | Where-Object { _.TaskName -like "OneDrive*"}| Disable-ScheduledTask 2>null
Get-Service MicrosoftEdge*, edgeupdate*|ft -auto

Get-Service GoogleChrome*, gupdate* | ft -auto

Get-Service MicrosoftEdge*, edgeupdate* | Set-Service -StartupType Disabled

Get-Service GoogleChrome*, gupdate* | Set-Service -StartupType Disabled

Get-ScheduledTask | Where-Object { _.TaskName -like "MicrosoftEdgeUpdateTaskMachine*"} | Disable-ScheduledTask 2>&1 >null

Get-ScheduledTask | Where-Object { _.TaskName -like "GoogleUpdateTaskMachine*"} | Disable-ScheduledTask 2>null
禁止或卸载可能影响渲染的系统服务和计划任务
以下都是powershell,管理员身份一、禁止或卸载Microsoft Defender/Endpoint Protection
禁止还是卸载,看你自己
#禁止命令
reg add "HKEY_LOCAL_MACHINE\SOFTWARE\Microsoft\Windows Defender\Miscellaneous Configuration" /v "PreventPlatformUpdate" /t REG_DWORD /d 1 /f
reg add "HKEY_LOCAL_MACHINE\SOFTWARE\Policies\Microsoft\Windows Defender\Signature Updates" /v "FallbackOrder" /d "FileShares" /t REG_SZ /f
reg add "HKEY_LOCAL_MACHINE\SOFTWARE\Policies\Microsoft\Windows Defender\Signature Updates" /v "ScheduleDay" /t REG_DWORD /d 8 /f
reg add "HKEY_LOCAL_MACHINE\SOFTWARE\Policies\Microsoft\Windows Defender\Signature Updates" /v "ForceUpdateFromMU" /d 0 /t REG_DWORD /f
reg add "HKEY_LOCAL_MACHINE\SOFTWARE\Policies\Microsoft\Windows Defender" /v "DisableAntiSpyware" /d 1 /t REG_DWORD /f#卸载命令:
预览卸载Uninstall-WindowsFeature -Name Windows-Defender -WhatIf
真正卸载Uninstall-WindowsFeature -Name Windows-Defender
最后的那个-WhatIf参数是什么作用
在 PowerShell 中,-WhatIf 参数用于预览命令的结果,而不实际执行命令。当您使用 -WhatIf 参数运行命令时,PowerShell 会告诉您命令将执行哪些操作,但不会实际执行这些操作。这对于在执行潜在危险或破坏性操作之前检查命令的影响非常有用。二、禁止可能影响渲染的计划任务
reg add "HKEY_LOCAL_MACHINE\SOFTWARE\Microsoft\Windows NT\CurrentVersion\Schedule\Maintenance" /v "MaintenanceDisabled" /t REG_DWORD /d 1 /f
Get-ScheduledTask -TaskPath "\Microsoft\Windows\Power Efficiency Diagnostics","\Microsoft\Windows\ApplicationData","\Microsoft\Windows\Customer Experience Improvement Program","\Microsoft\Windows\CloudExperienceHost","\Microsoft\Windows\DiskFootprint","\Microsoft\Windows\StateRepository","\Microsoft\Windows\Application Experience","\Microsoft\Windows\DiskDiagnostic","\Microsoft\Windows\MemoryDiagnostic","\Microsoft\Windows\WDI","\Microsoft\Windows\UpdateOrchestrator","\Microsoft\Windows\Diagnosis","\Microsoft\Windows\Network Controller","\Microsoft\Windows\PI","\Microsoft\Windows\DiskCleanup","\Microsoft\Windows\TPM","\Microsoft\Windows\Windows Defender","\Microsoft\Windows\Maintenance" 2>null | Disable-ScheduledTask 2>null | ft -autoGet-ScheduledTask | Where-Object { _.TaskName -like "OneDrive*"}| Disable-ScheduledTask 2>null
Get-Service MicrosoftEdge*, edgeupdate*|ft -auto
Get-Service GoogleChrome*, gupdate* | ft -auto
Get-Service MicrosoftEdge*, edgeupdate* | Set-Service -StartupType Disabled
Get-Service GoogleChrome*, gupdate* | Set-Service -StartupType Disabled
Get-ScheduledTask | Where-Object { _.TaskName -like "MicrosoftEdgeUpdateTaskMachine*"} | Disable-ScheduledTask 2>&1 >null
Get-ScheduledTask | Where-Object { _.TaskName -like "GoogleUpdateTaskMachine*"} | Disable-ScheduledTask 2>null