SpringBoot整合Swagger2
api文档作用:
- api文档 想必大家都不陌生, 目前大多数, 互联网的项目,都是属于前后端分离的 , 而,为了前后台更好的对接,还是为了以后交接方便,都有要求写API文档。
- 记录各个接口
api的,作用,参数,请求方式… 可以避免开发的很多问题,提高效率的一种方式;
而,手写api文档,不可避免会有很多麻烦的的方:
- 文档需要更新的时候,需要再次发送一份给前端,也就是文档更新交流不及时。
- 接口返回结果不明确
- 不能直接在线测试接口,通常需要使用工具,比如postman
- 接口文档太多,不好管理
Swagger也就是为了解决这个问题,可以不用在手动写api 文档,并且可以实时的更新!
Swagger2 缺点:
- 代码移入性比较强。
需要在Controller 层, 植入大量的注解...描述信息..
Boot 整合Swagger2 Demo

依赖:
pom.xml
<!-- swagger2需要的依赖 -->
<dependency>
	<groupId>io.springfox</groupId>
	<artifactId>springfox-swagger2</artifactId>
	<version>2.6.1</version>
</dependency>
<!-- swagger2的ui 页面,进行展示! -->

<dependency>

<groupId>io.springfox</groupId>

<artifactId>springfox-swagger-ui</artifactId>

<version>2.6.1</version>

</dependency>
Swagger配置类
Swagger2.Java
import org.springframework.context.annotation.Bean;
import org.springframework.context.annotation.Configuration;
import springfox.documentation.builders.ApiInfoBuilder;
import springfox.documentation.builders.PathSelectors;
import springfox.documentation.builders.RequestHandlerSelectors;
import springfox.documentation.service.ApiInfo;
import springfox.documentation.spi.DocumentationType;
import springfox.documentation.spring.web.plugins.Docket;@Configuration //Boot的配置类,注解!
public class Swagger2 {@Bean //Swagger配置需要返回的一个: Docket文档对象 public Docket createRestApi() { return new Docket(DocumentationType.SWAGGER_2) .apiInfo(apiInfo()) //调用内部私有方法! .select() .apis(RequestHandlerSelectors.basePackage("com.zb.controller")) //指定要扫描配置 描述的包下api类! .paths(PathSelectors.any()) .build(); } //在apiInfo中,主要配置一下Swagger2文档网站的信息,例如网站的title,网站的描述,联系人的信息,使用的协议等等。 //swagger ui页面的描述信息 private ApiInfo apiInfo() { return new ApiInfoBuilder() .title("springboot利用swagger构建api文档") //标题! .description("简单优雅的restfun风格,wsm到此一游...") .termsOfServiceUrl("https://blog.csdn.net/qq_45542380/article/details/113483608?spm=1001.2014.3001.5502") .version("1.0") .license("wsm Demoblog") .licenseUrl("https://blog.csdn.net/qq_45542380/article/details/113483608?spm=1001.2014.3001.5502") //个人博客学习连接 .build(); }
}
- 不同人不同的写法习惯,有的人把 apiInfo(); 方法写在
.apiInfo(new ApiInfoBuilder(...))Java内部类来完成,只写一个方法;
SpringBoot 启动类:注解 @EnableSwagger2
- 启动类上加上注解
@EnableSwagger2 表示开启Swagger
TestRun.Java
import org.springframework.boot.SpringApplication;
import org.springframework.boot.autoconfigure.SpringBootApplication;
import springfox.documentation.swagger2.annotations.EnableSwagger2;@SpringBootApplication
@EnableSwagger2
public class TestRun {public static void main(String[] args) { SpringApplication.run(TestRun.class, args); }
}
ok, 到这儿 Swagger2就已经配置号了,接下来就是如何使用:
测试:swagger-ui.html
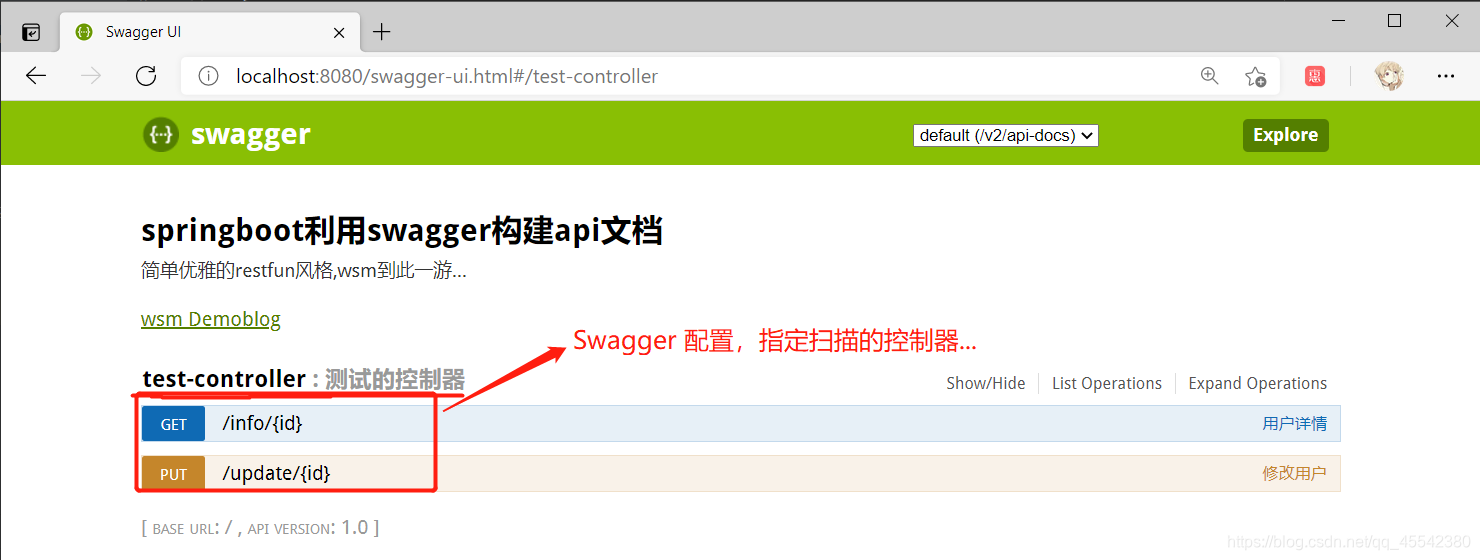
输入:http://localhost:8080/swagger-ui.html,能够看到如下页面,说明已经配置成功了:
这里的8080是Boot的默认端口, 根据项目端口更改!

使用
Swagger2常用注解:
swagger通过注解生成接口文档,包括接口名、请求方法、参数、返回信息的等等。
- @Api:修饰整个类,描述Controller的作用
使用@Api来置顶控制器的名字(value)以及详情(description) - @ApiOperation:描述一个类的一个方法,或者说一个接口
可以添加的参数形式:
@ApiOperation(value = “接口说明”, httpMethod = “接口请求方式”, response = “接口返回参数类型”, notes = “接口发布说明”) - @ApiParam:单个参数描述
@ApiParam(required = “是否必须参数”, name = “参数名称”, value = “参数具体描述”,dateType="变量类型”,paramType="请求方式”) - @ApiImplicitParam:一个请求参数描述
@ApiImplicitParam(required = “是否必须参数”, name = “参数名称”, value = “参数具体描述”,dateType="变量类型”,paramType="请求方式”) - @ApiImplicitParams: 多个请求参数描述
@ApiImplicitParams({@ApiImplicitParam(...),@ApiImplicitParam(...)}) - @ApiModel:用对象实体来作为入参,
model 数据模型即,接口所需要请求的实体类描述@ApiModel(value = "用户类User")@ApiModel(value = “实体类描述”) - @ApiModelProperty:实体类属性描述信息…
@ApiModelProperty(value = "实体类的属性描述") - @ApiIgnore:使用该注解忽略这个API
- @ApiError :发生错误返回的信息
- @ApiProperty:用对象接实体收参数时,描述对象的一个字段
- @ApiResponse:HTTP响应其中1个描述
- @ApiResponses:HTTP响应整体描述
创建接口Demo 测试:
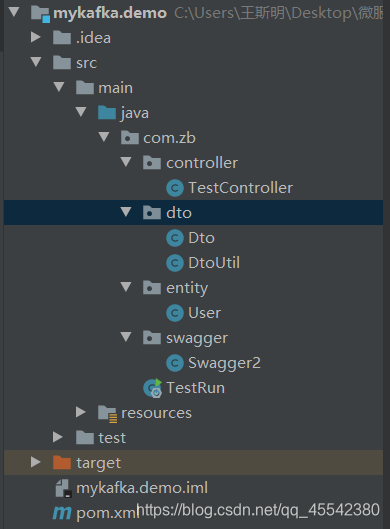
用户实体类 entity.user.Java
User.java 仔细查看Swagger注解
import io.swagger.annotations.ApiModel;
import io.swagger.annotations.ApiModelProperty;
@ApiModel(value = "用户类型")

public class User {

@ApiModelProperty(value = "用户编号")

private Integer id;

private String name;

private Integer age;

private String address;

//省 get/set/无参/有参构造;

}
DTO 前后交互统一对象:
不同的企业也许叫法不同... 就不提供了!知道既可以!
TestController.Java
import com.zb.dto.Dto;
import com.zb.dto.DtoUtil;
import com.zb.entity.User;
import io.swagger.annotations.Api;
import io.swagger.annotations.ApiImplicitParam;
import io.swagger.annotations.ApiImplicitParams;
import io.swagger.annotations.ApiOperation;
import org.springframework.web.bind.annotation.*;
import java.util.ArrayList;
import java.util.List;@RestController
@Api(value = "测试的控制器", description = "测试的控制器")
public class TestController {
//创建,用户假集合数据;
private static List<User> list = new ArrayList<>();
//类加载创建
static {
list.add(new User(1, "张三1", 20, "徐州"));
list.add(new User(2, "张三2", 20, "徐州"));
list.add(new User(3, "张三3", 20, "徐州"));
}//下面方法就注释了,都由Swagger2 注释,并且实时生成api文档! //单参数,get查看用户! @ApiOperation(value = "用户详情", notes = "根据用户编号查询用户信息") @ApiImplicitParam(name = "id", value = "用户编号", required = true, dataType = "int", paramType = "path") @GetMapping("/info/{id}") public Dto getInfo(@PathVariable("id") Integer id) { return DtoUtil.returnSuccess("唯一查询", list.get(id - 1)); } //多参数,put修改用户信息, put= get+post的请求信息都可以获取! @ApiOperation(value = "修改用户", notes = "根据用户编号修改用户信息") @ApiImplicitParams({ @ApiImplicitParam(name = "id", value = "用户编号", required = true, dataType = "int", paramType = "path"), @ApiImplicitParam(name = "user", value = "用户JSON对象", required = true, dataType = "User" ,paramType = "body") }) @PutMapping("/update/{id}") public Dto update(@PathVariable("id") Integer id, @RequestBody User user) { for (User user1 : list) { if (user1.getId() == id) { list.remove(user1); list.add(user); return DtoUtil.returnSuccess("修改成功!"); } } return DtoUtil.returnSuccess("修改失败!"); }
}
测试:
刷新查看:

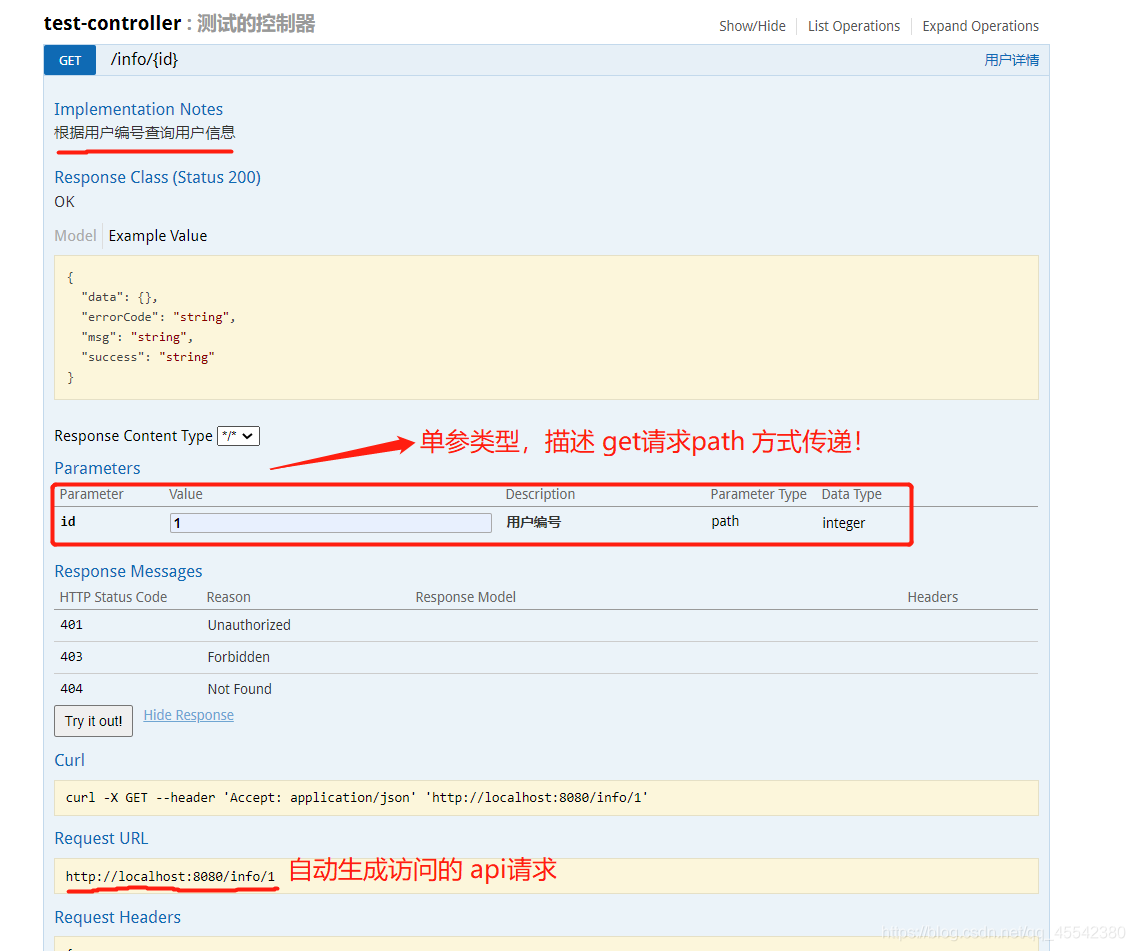
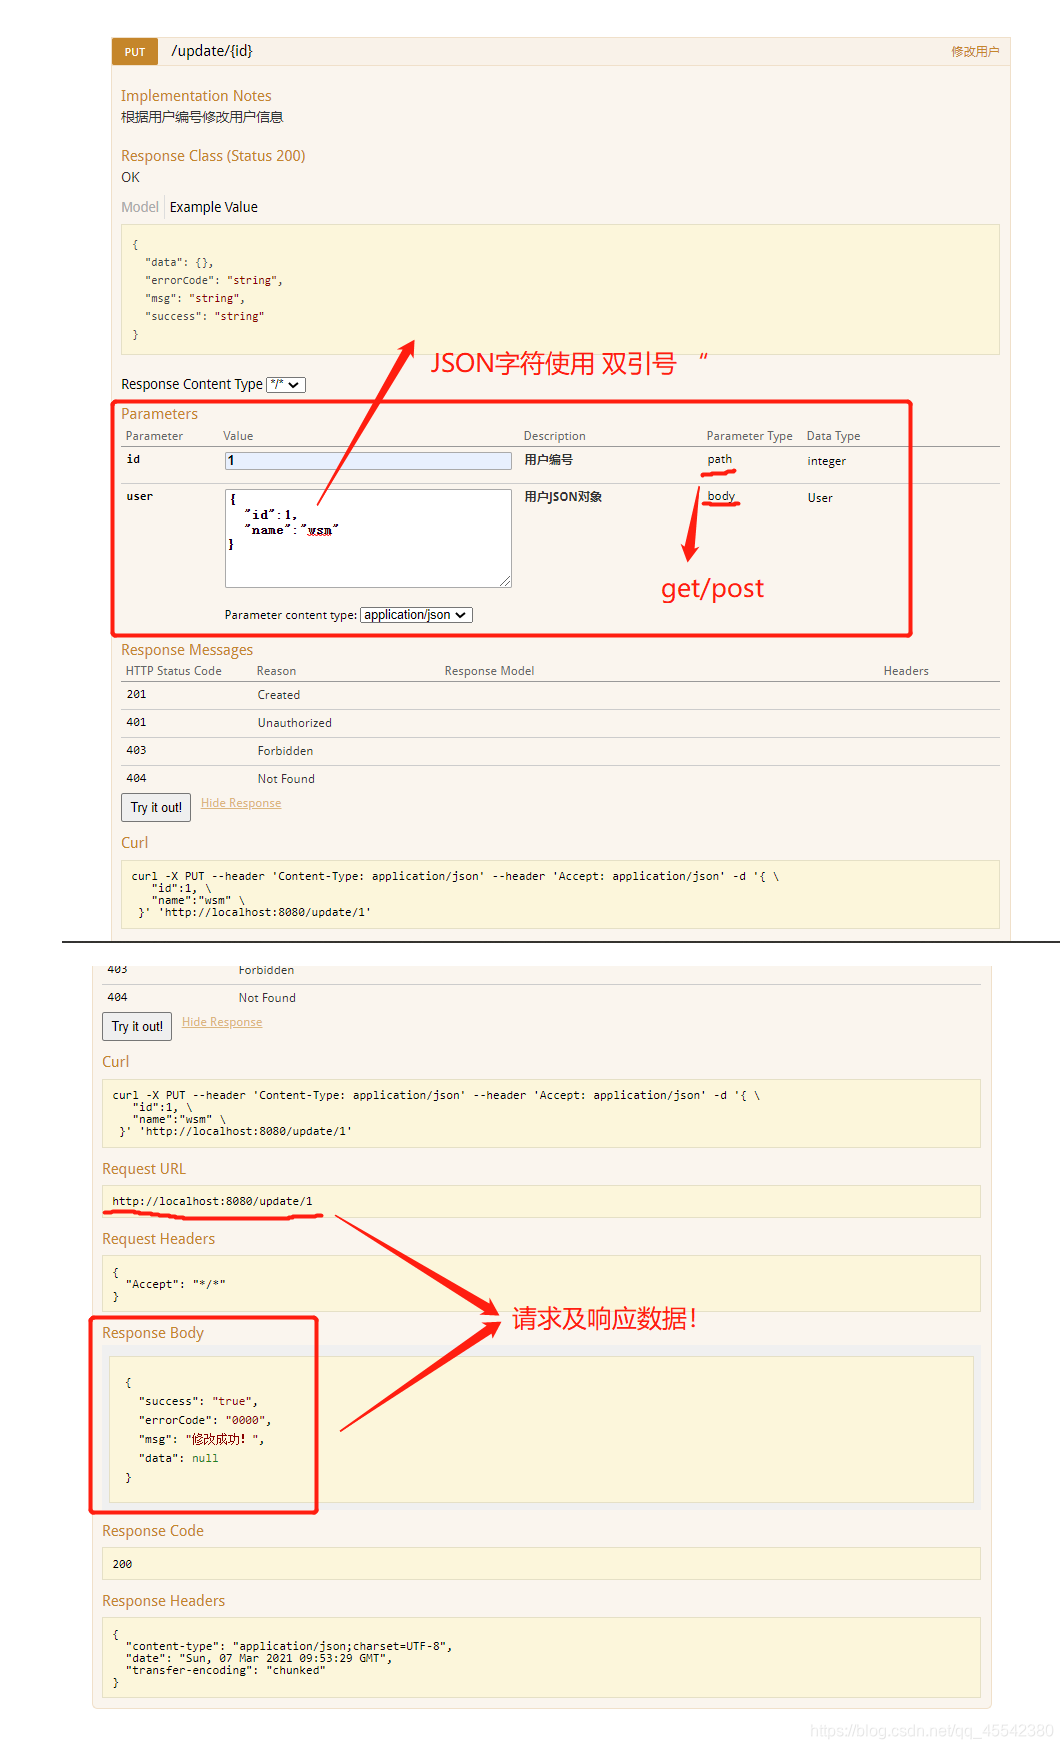
太强了!在这里就可以实时查看数据请求参数类型, 生成请求的api接口…
Get

put
