前言
今天开发项目的 Footer 布局,这里我们参考 Nuxt-UI 官网的布局。
需求拆分
- 准备好域名备案号和
icp图标 - 底部社交按钮链接或其他链接
- 布局组件开发
Footer 布局
1、 新建 components/AppFooter.vue 文件:
<template>
  <footer class="fixed bottom-0 w-full">
    <UDivider :avatar="{ src: '/logo.svg' }" />
    <div class="flex justify-between items-center px-4 md:px-8 lg:px-32 py-3 max-sm:flex-col -mt-2.5">
      <!-- icp 备案 -->
      <ULink
        to="https://beian.miit.gov.cn/#/Integrated/index"
        target="_blank"
        active-class="text-primary"
        inactive-class="text-sm text-gray-400 hover:text-gray-600 dark:hover:text-gray-300"
      >
        <div class="flex items-center gap-2">
          <NuxtImg
            src="/icp.png"
            alt="粤ICP备2023007649号-3"
            class="w-4"
          />
          粤ICP备2023007649号-3
        </div>
      </ULink>
      <!-- 社交图标 -->
      <div class="max-sm:order-first">
        <!-- github -->
        <SocialButton
          icon="i-ri-github-line"
          url="https://github.com/baiwumm"
          tip="Github"
        />
        <!-- 微信 -->
        <SocialButton
          icon="i-ri-wechat-line"
          url="https://wechat.baiwumm.com/"
          tip="微信"
        />
        <!-- 电子邮箱 -->
        <SocialButton
          icon="i-ri-mail-line"
          url="mailto:baiwumm@foxmail.com"
          tip="Email"
        />
        <!-- 博客 -->
        <SocialButton
          icon="i-ri-quill-pen-line"
          url="https://baiwumm.com"
          tip="博客"
        />
      </div>
    </div>
  </footer>
 </template>
2、 layouts/default.vue 文件配置组件:
 <template>
  <div>
    <!-- header -->
    <AppHeader />
    <!-- main -->
    <slot />
    <!-- footer -->
    <AppFooter />
  </div>
 </template>
3、 这里我们顺便给 AppColorMode 组件加个切换过渡动画,让网站丰富一点:
<script setup lang="ts"> const colorMode = useColorMode()// 切换模式
const setColorMode = () => {
colorMode.value = colorMode.value === 'dark' ? 'light' : 'dark'
}// 判断是否支持 startViewTransition API
const enableTransitions = () =>
'startViewTransition' in document &&
window.matchMedia('(prefers-reduced-motion: no-preference)').matches// 切换动画
async function toggleDark({ clientX: x, clientY: y }: MouseEvent) {
const isDark = colorMode.value === 'dark'if (!enableTransitions()) { setColorMode() return } const clipPath = [ `circle(0px at ${x}px ${y}px)`, `circle(${Math.hypot( Math.max(x, innerWidth - x), Math.max(y, innerHeight - y) )}px at ${x}px ${y}px)` ] await document.startViewTransition(async () => { setColorMode() await nextTick() }).ready document.documentElement.animate( { clipPath: !isDark ? clipPath.reverse() : clipPath }, { duration: 300, easing: 'ease-in', pseudoElement: `::view-transition-${!isDark ? 'old' : 'new'}(root)` } )}
</script><template>
<UTooltip :text="切换${$colorMode.value === 'dark' ? '白天' : '黑夜'}模式">
<UButton
:icon="$colorMode.value === 'dark' ? 'i-heroicons-moon-solid' : ' i-heroicons-sun-solid'"
size="sm"
variant="ghost"
class="text-gray-700 dark:text-gray-200 hover:text-gray-900 dark:hover:text-white hover:bg-gray-50 dark:hover:bg-gray-800"
@click="toggleDark"
/>
</UTooltip>
</template><style>
::view-transition-old(root),
::view-transition-new(root) {
animation: none;
mix-blend-mode: normal;
}::view-transition-old(root),
.dark::view-transition-new(root) {
z-index: 1;
}
::view-transition-new(root),
.dark::view-transition-old(root) {
z-index: 9999;
}
</style>
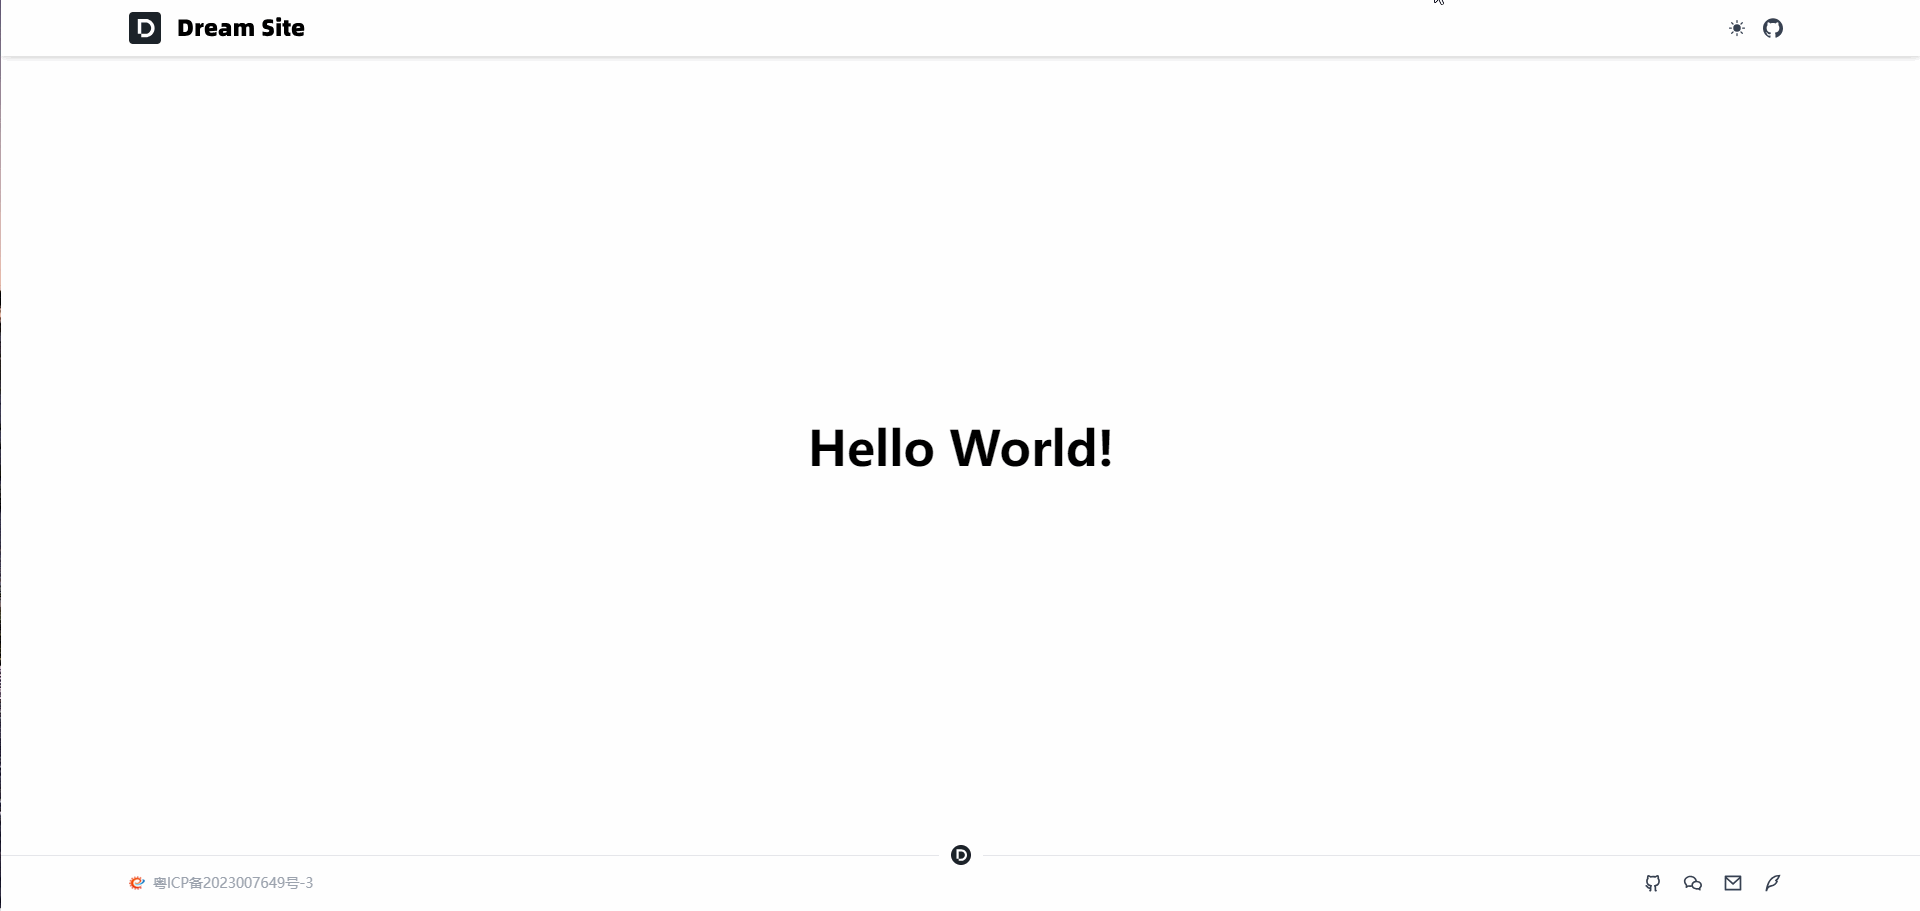
最终效果
总结
这个篇章内容比较简单,下一篇开发主体内容。
好了,今天就到这吧!
Github 仓库:dream-site
线上预览:dream-site.cn