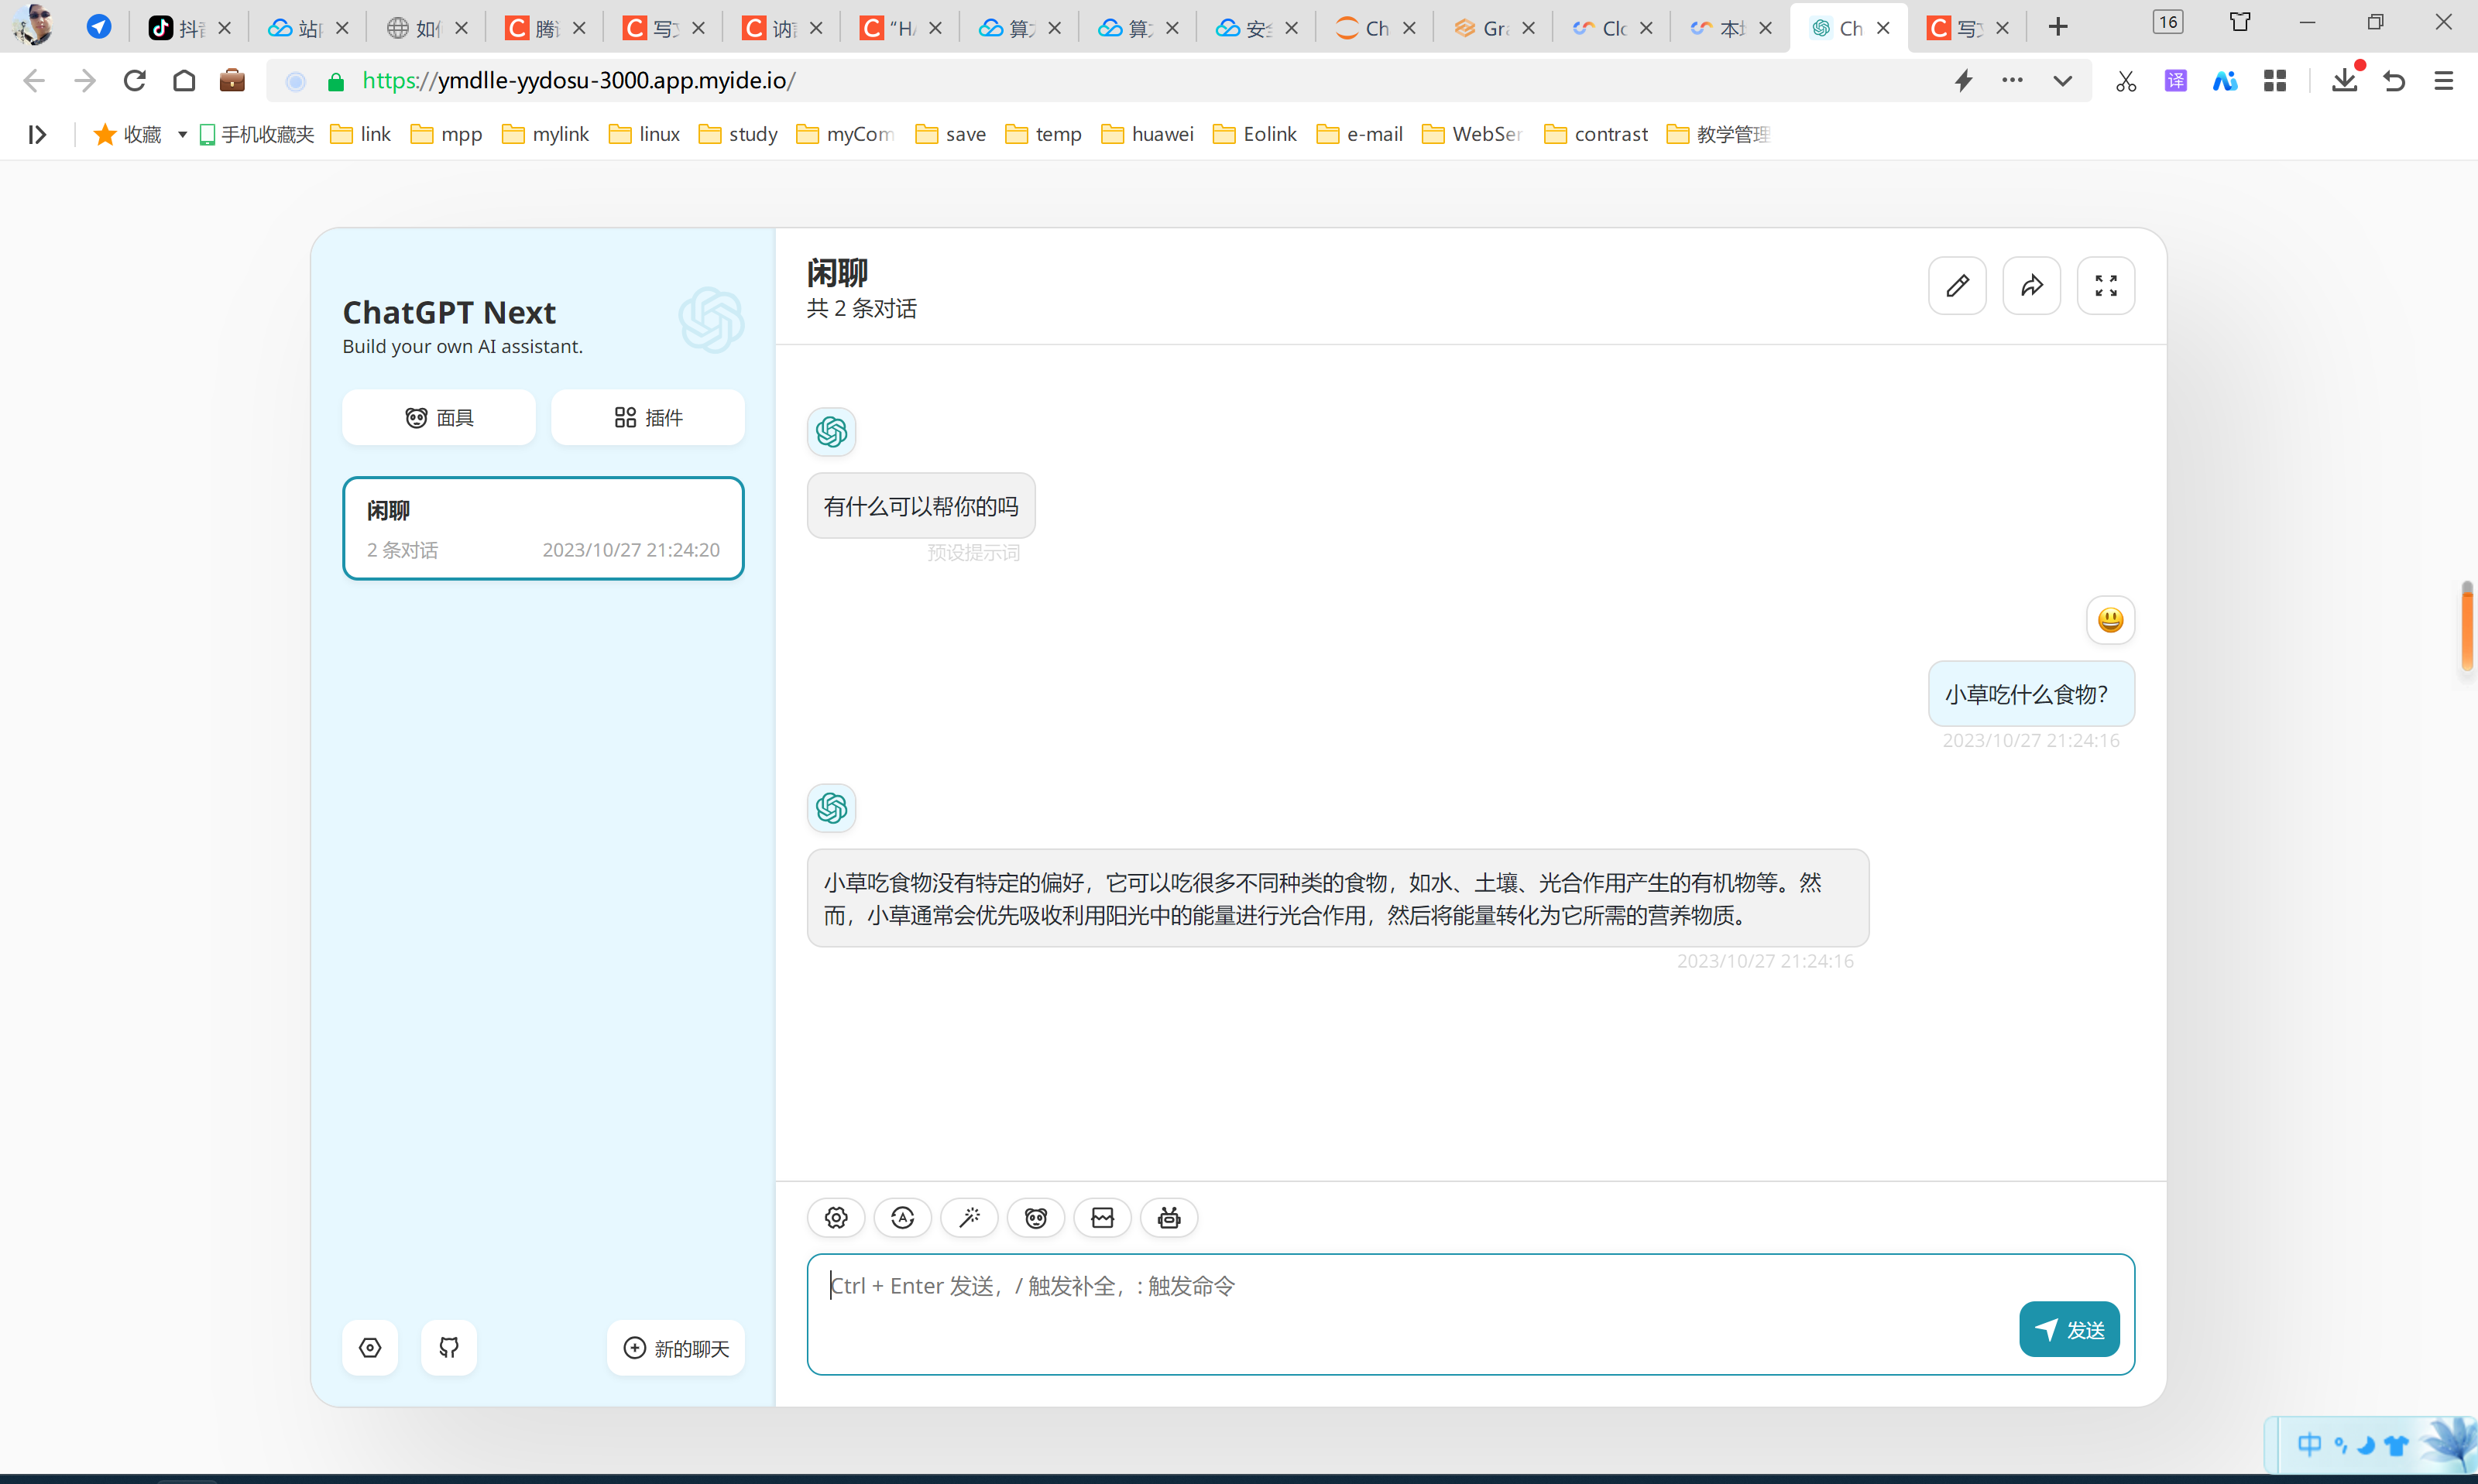
单独访问效果:
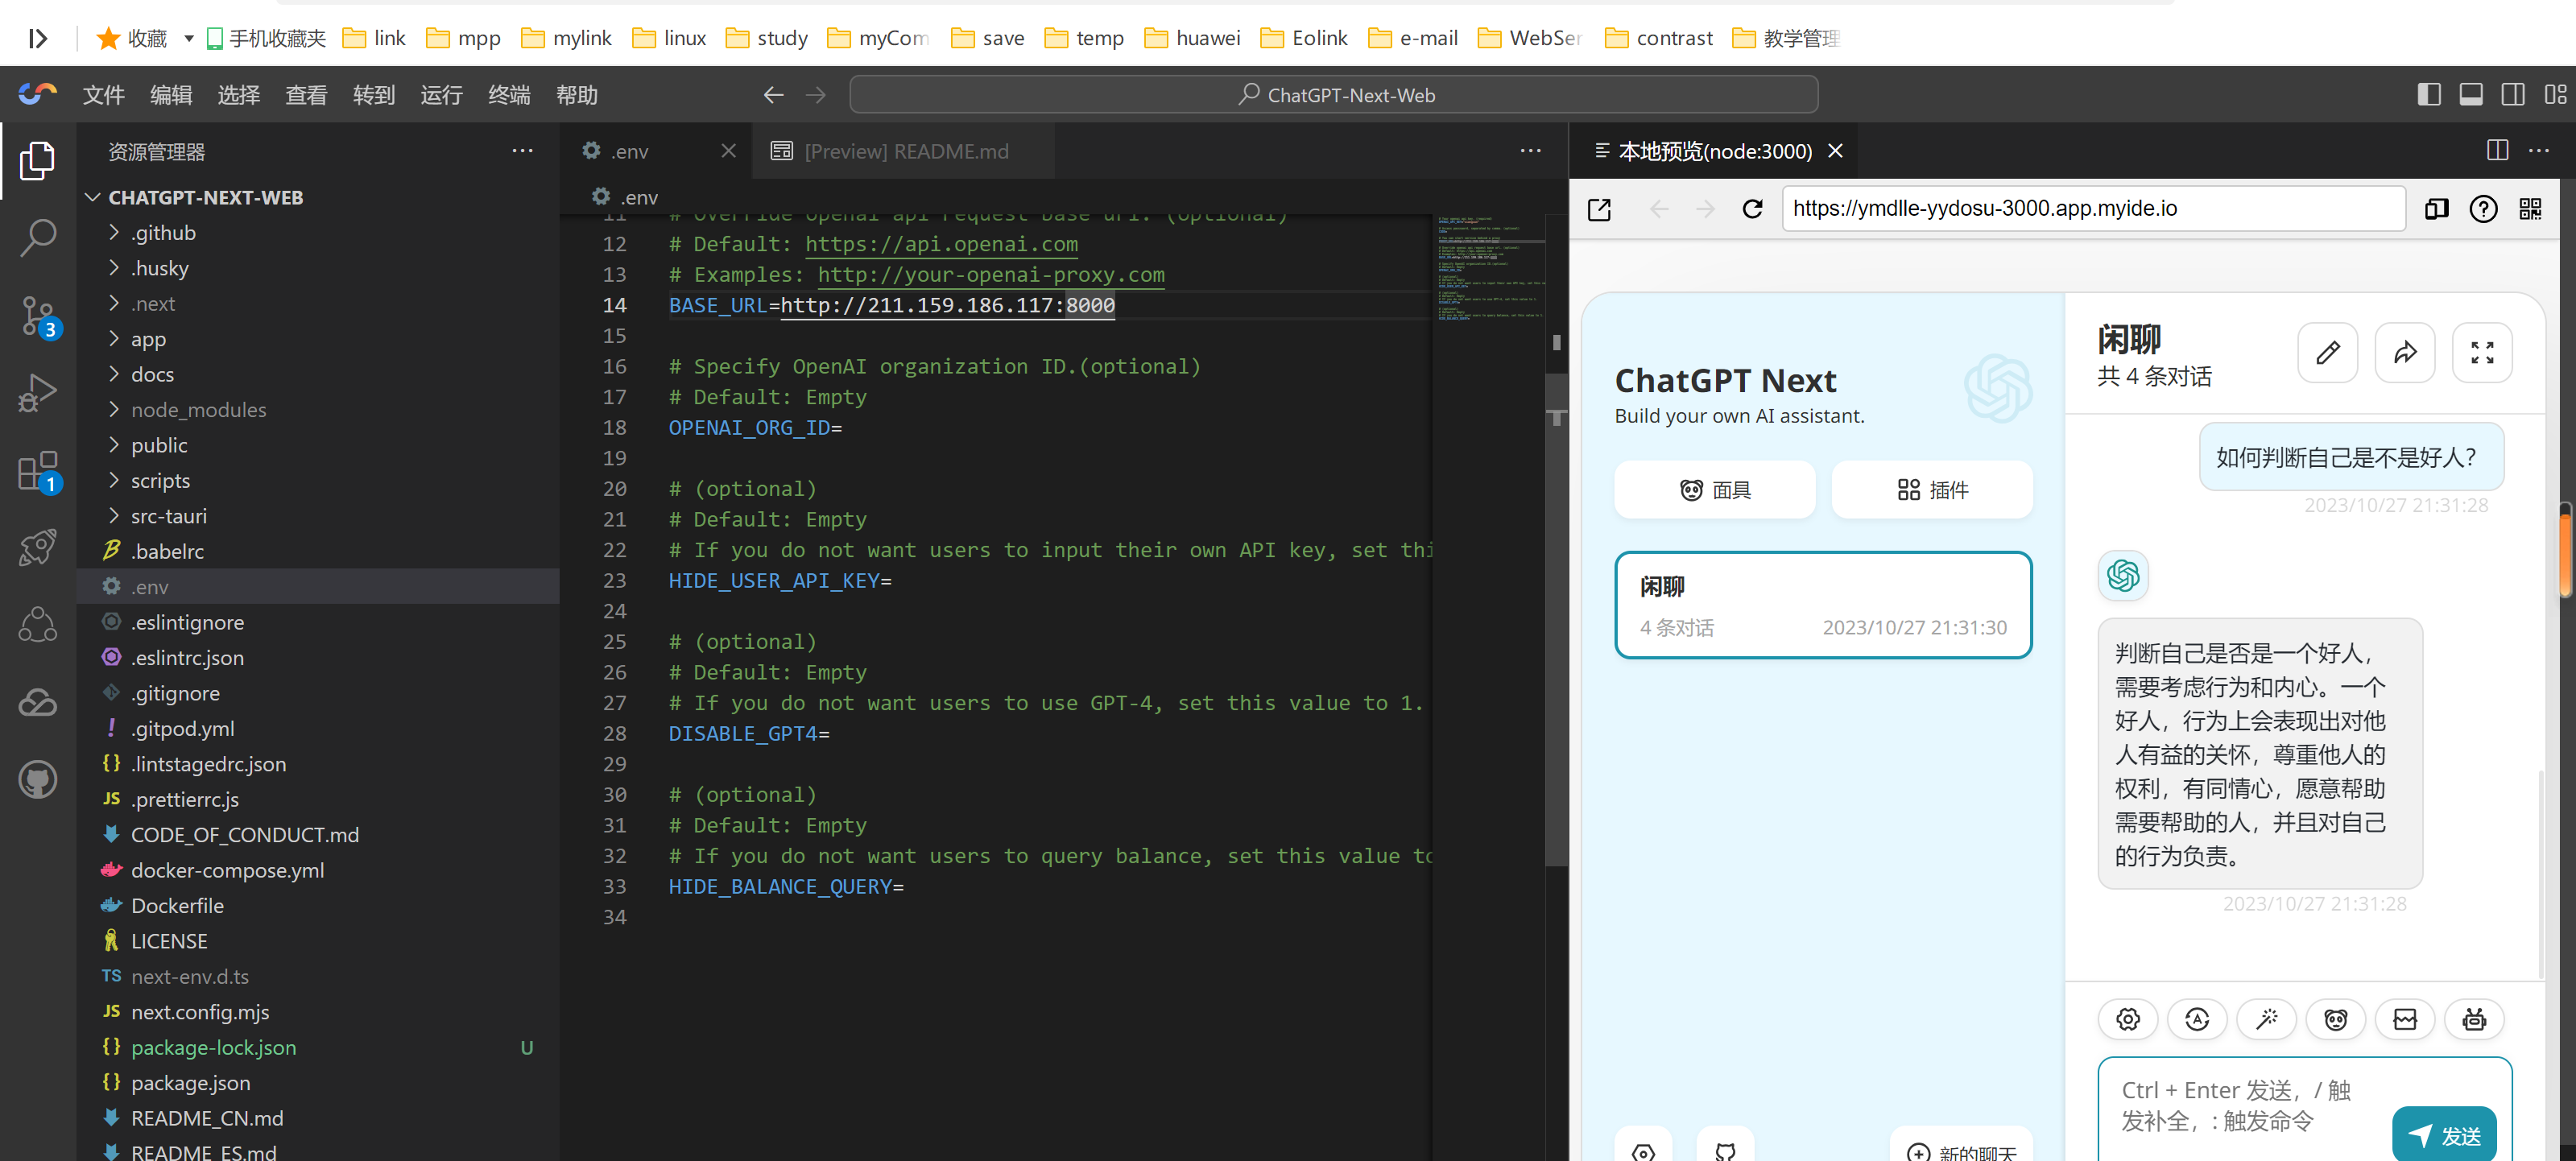
vscode内运行效果:
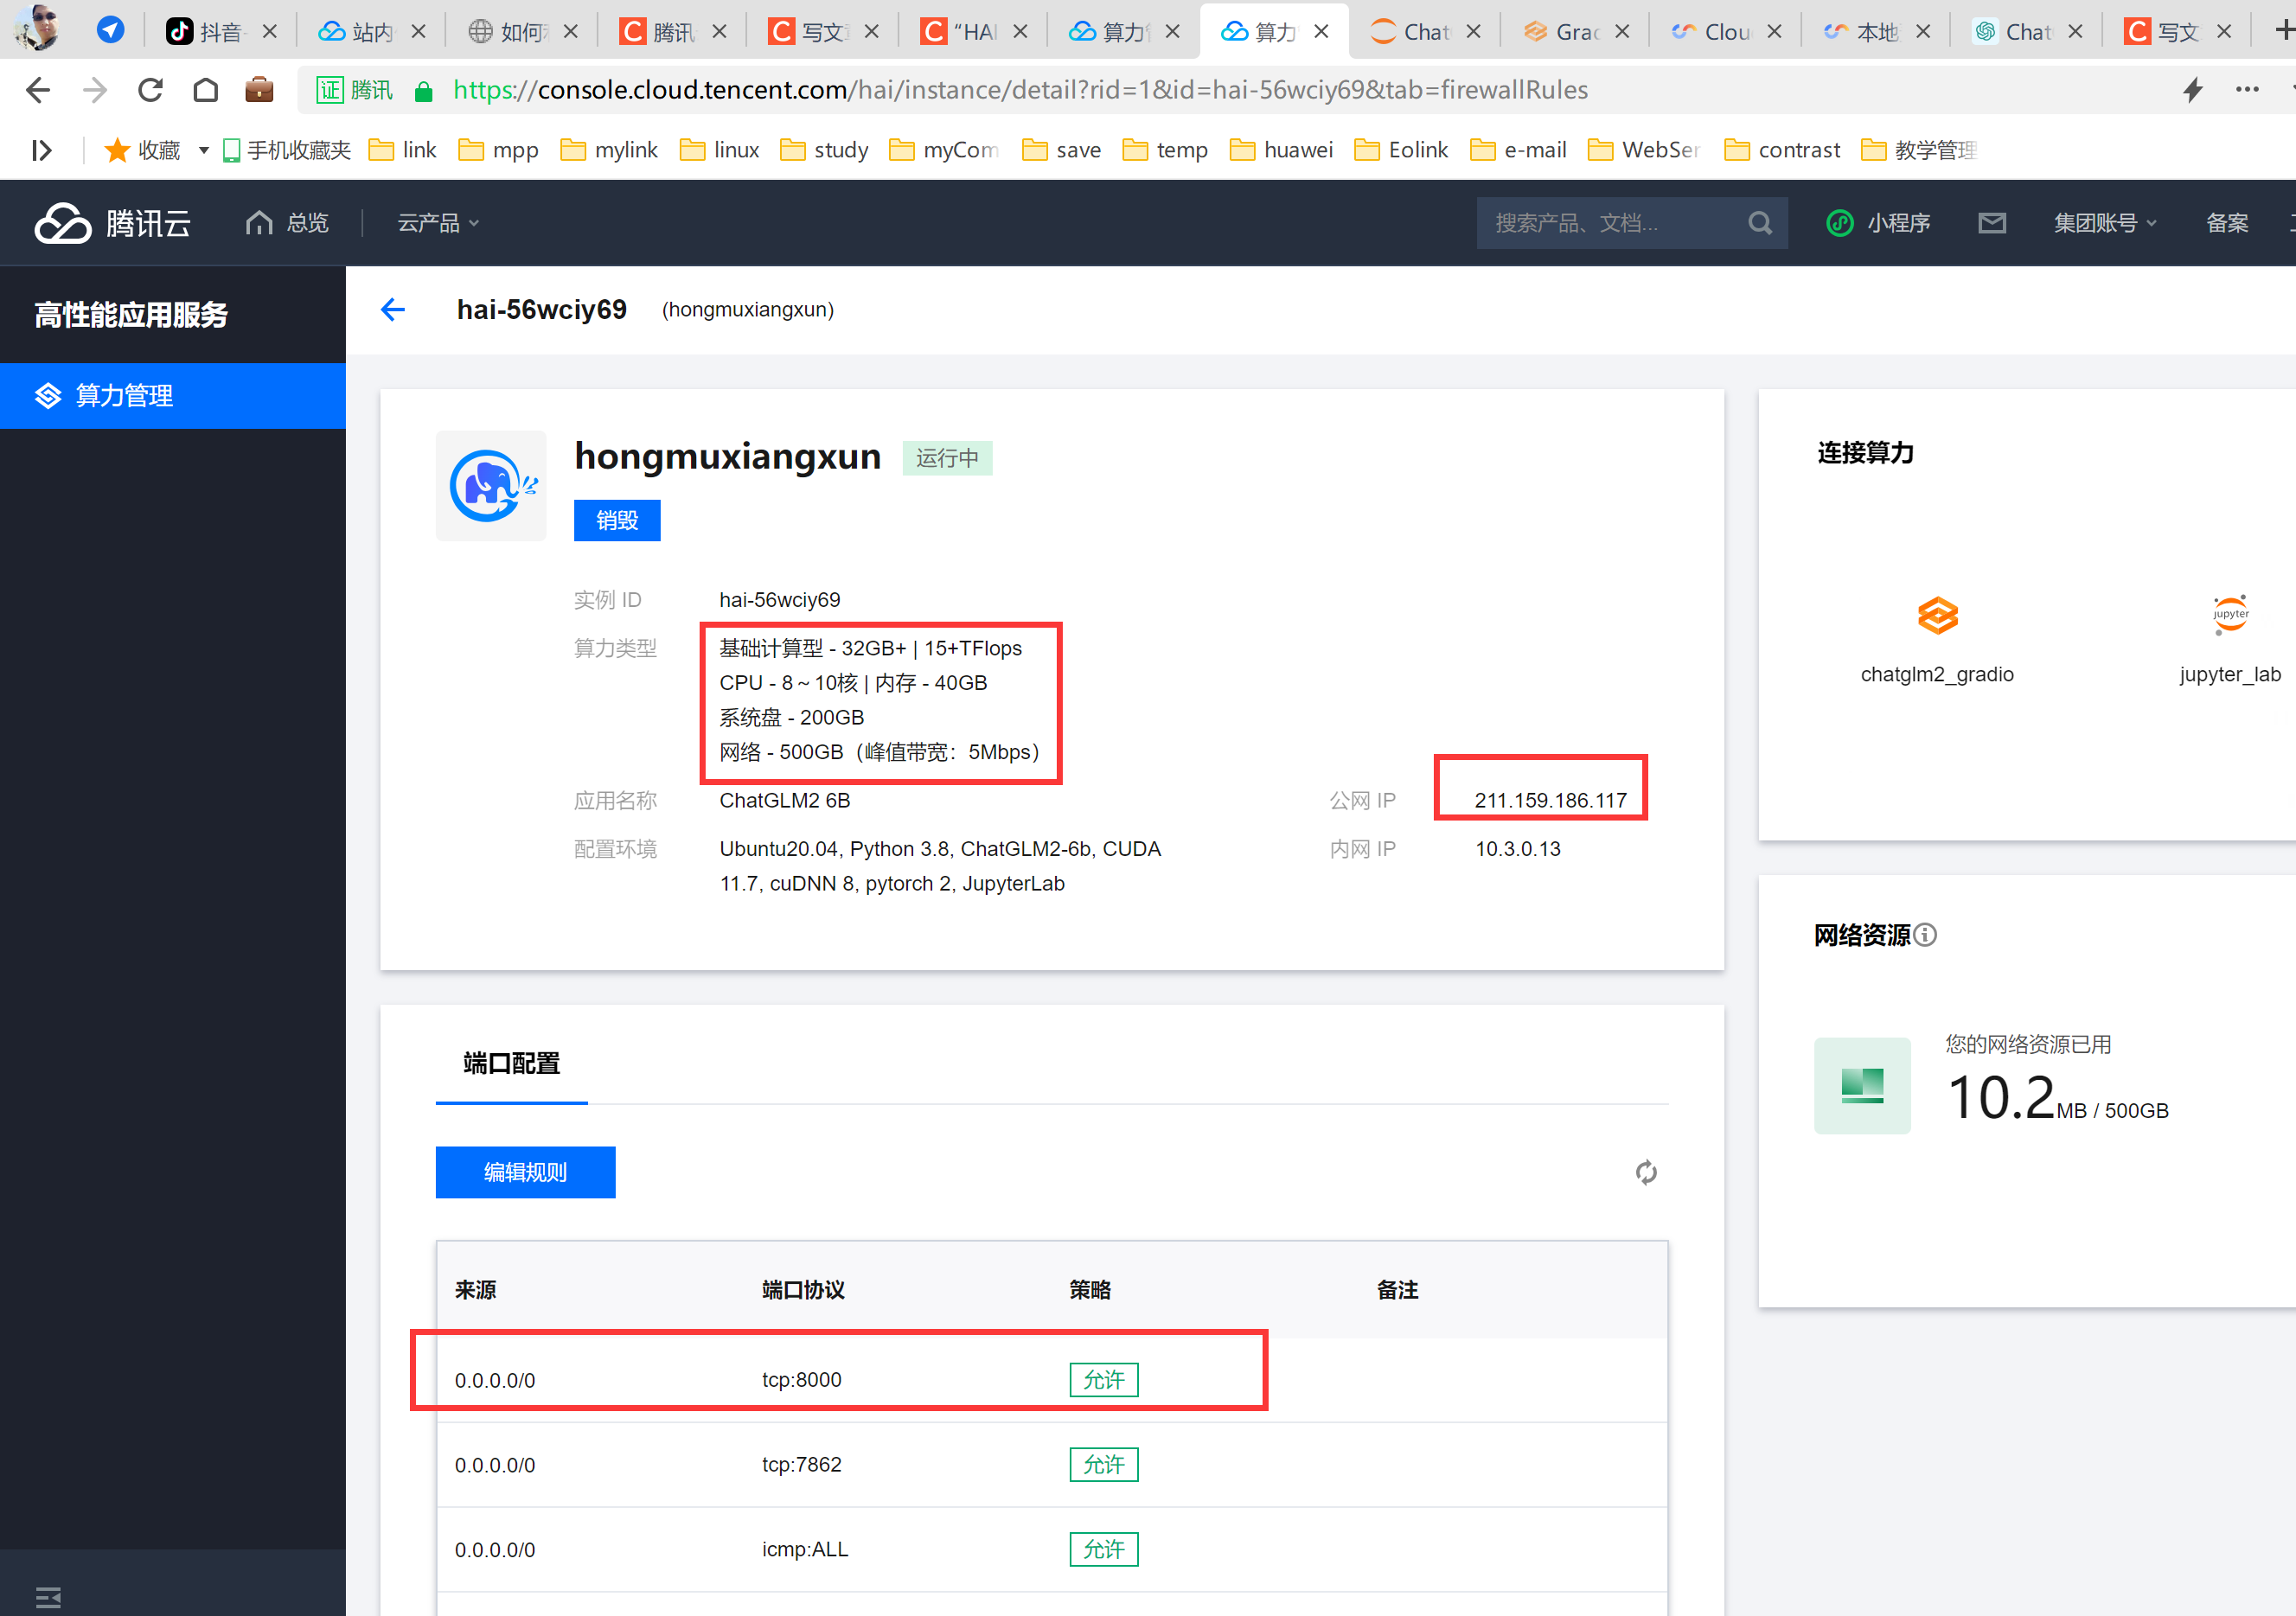
我们使用腾讯云来创建,有完整的操作流程,很方便我们搭建使用。
一、服务创建
创建效果:
步骤1:
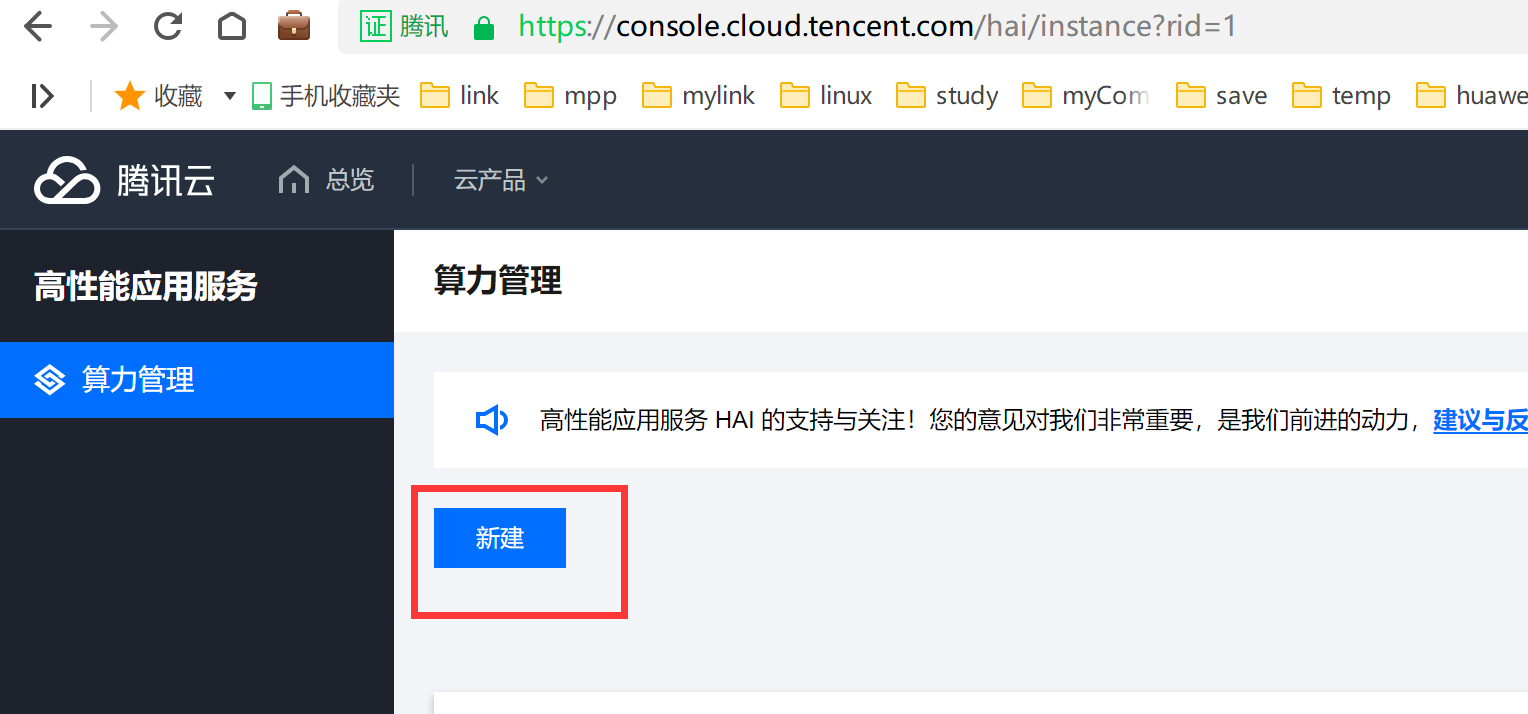
步骤2:(这里可以下拉选择大一些的硬盘)
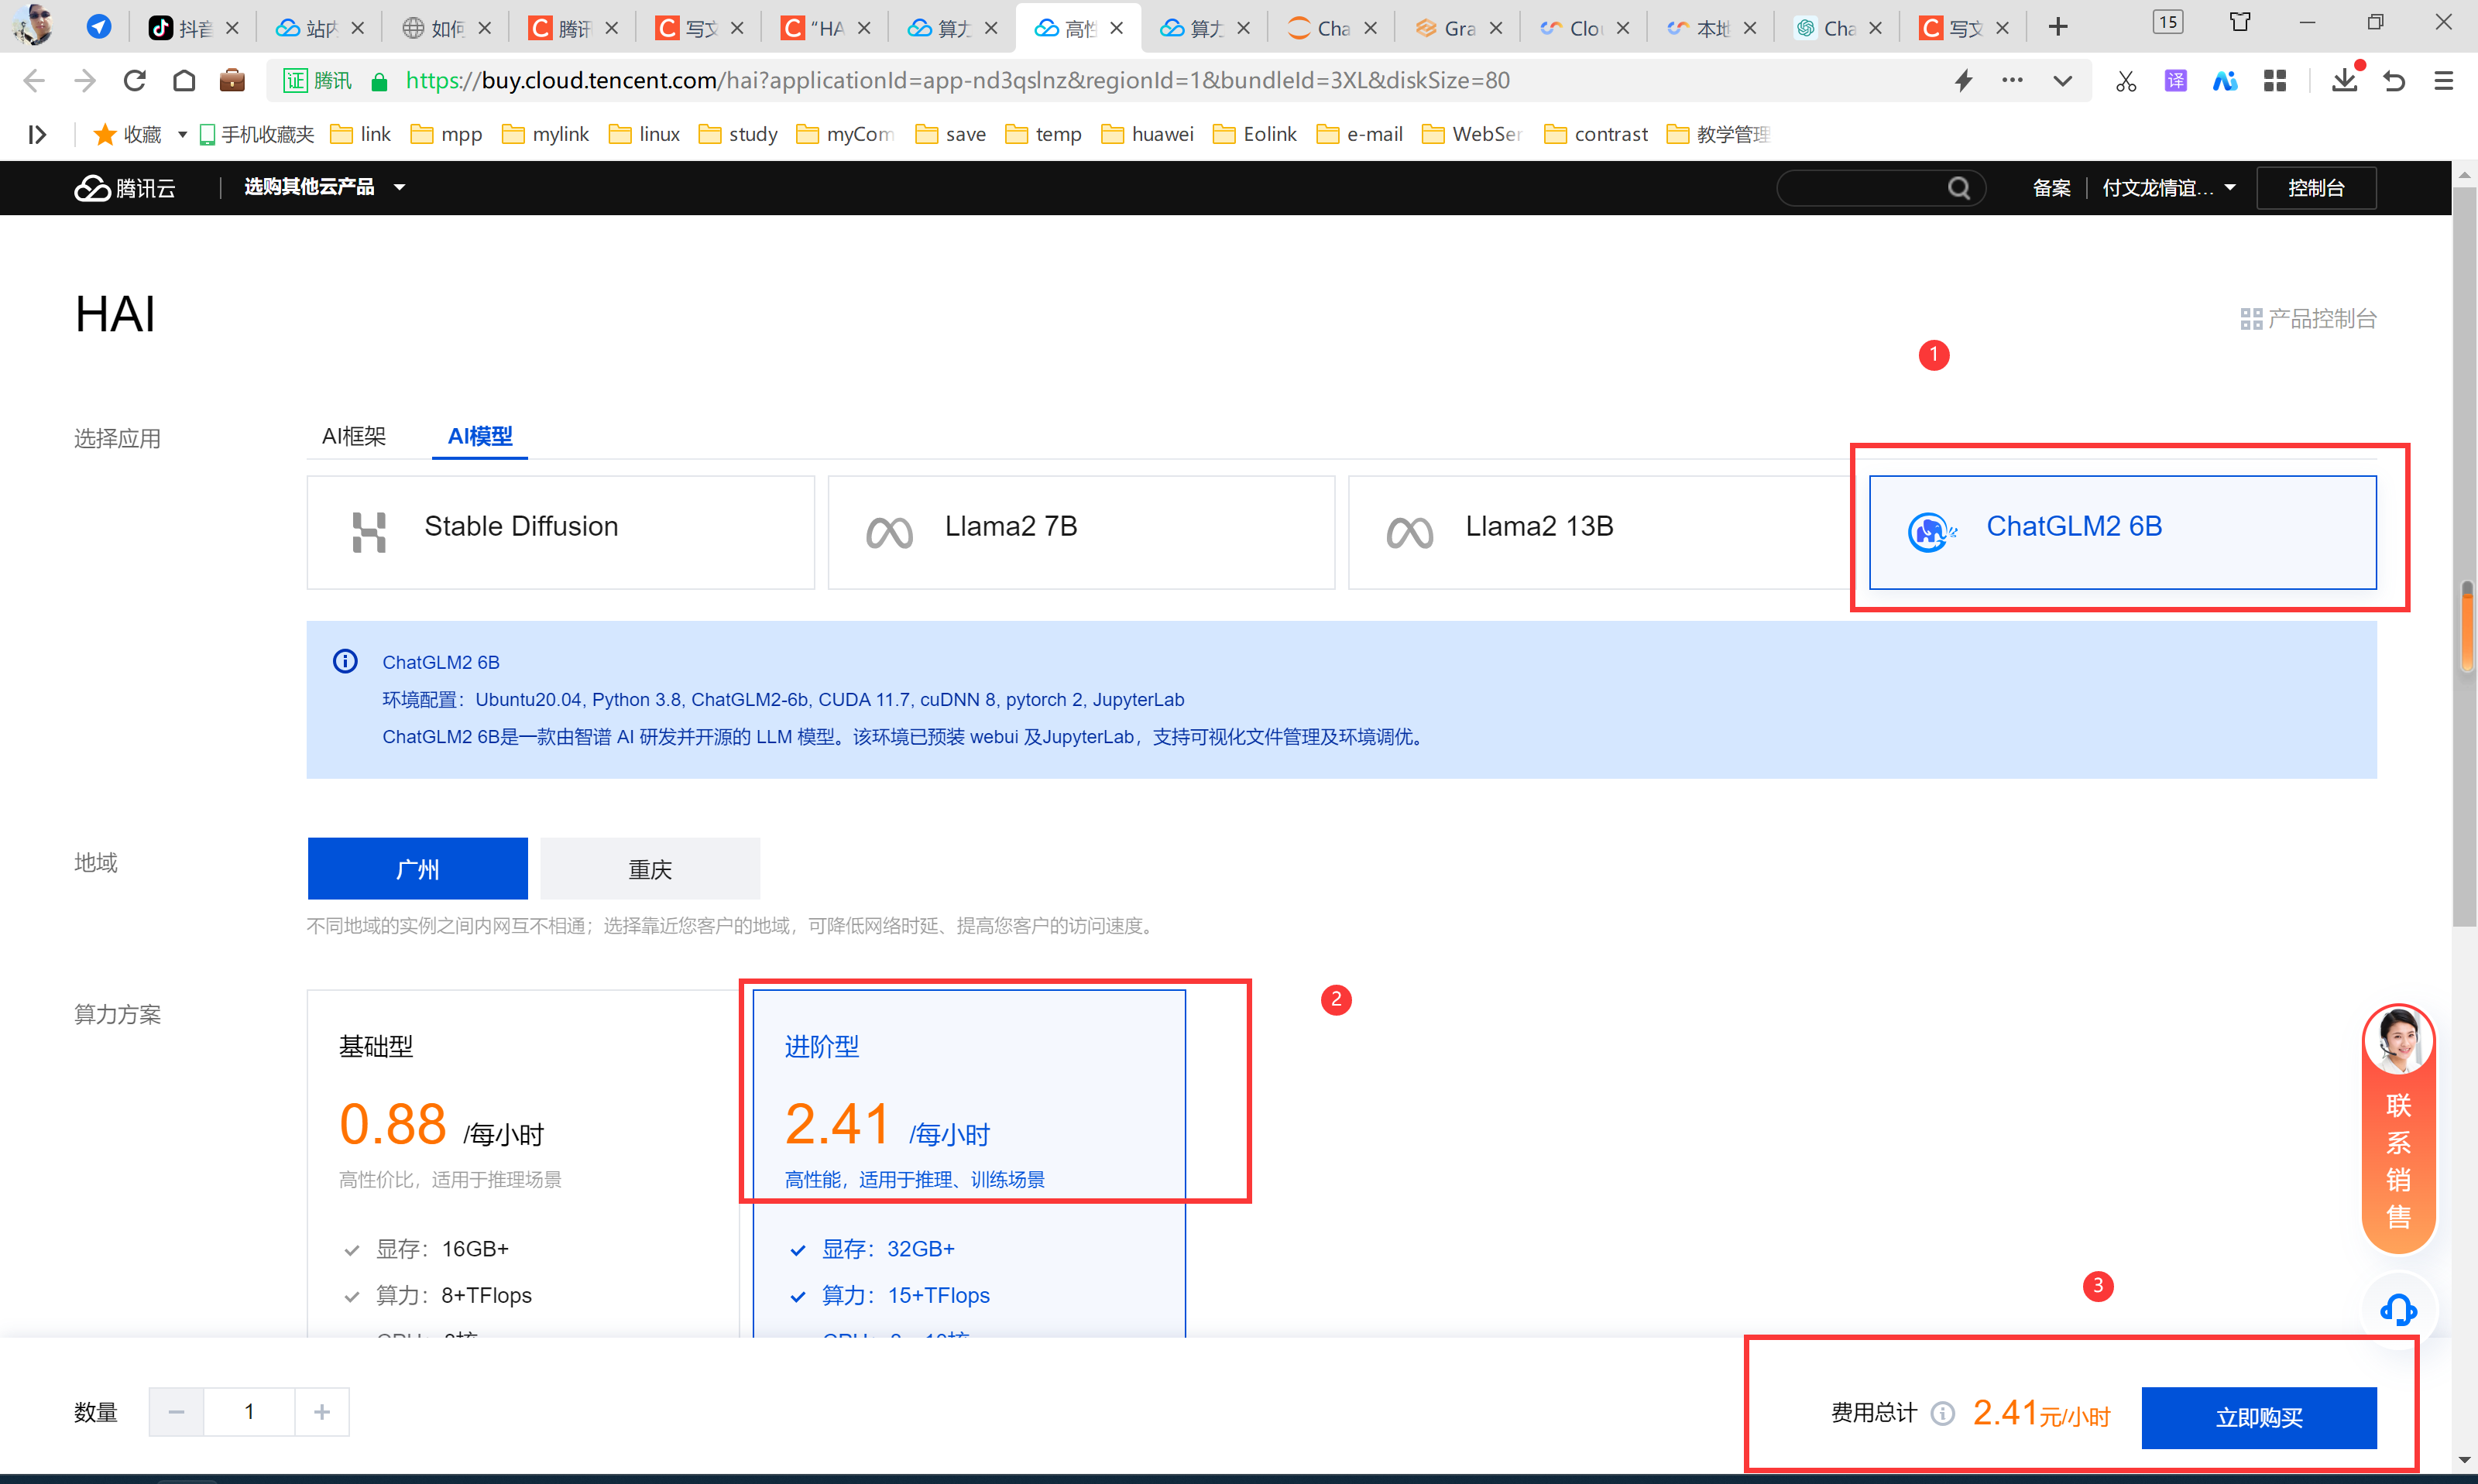

剩余的时间需要等待。
创建完毕效果:
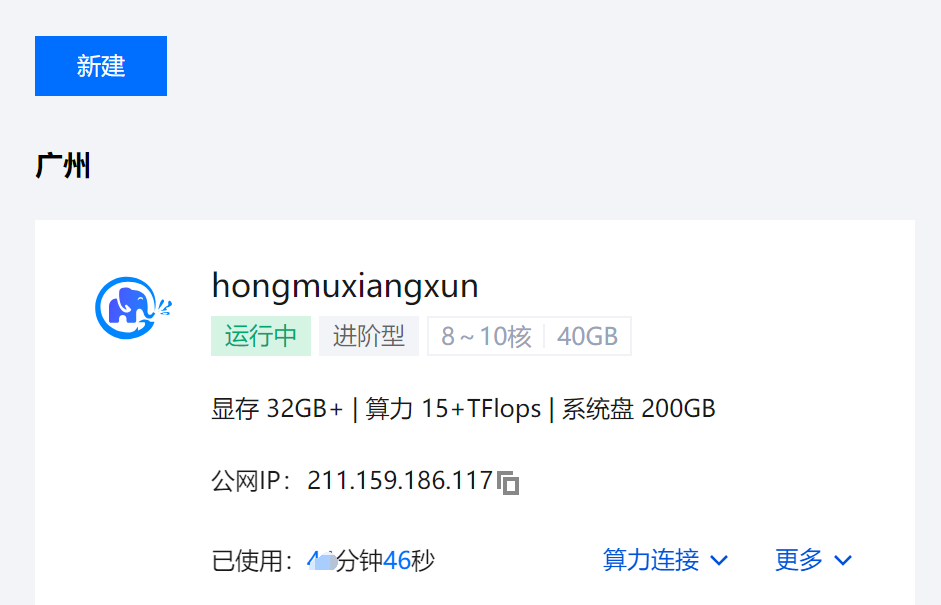
二、操作面板介绍
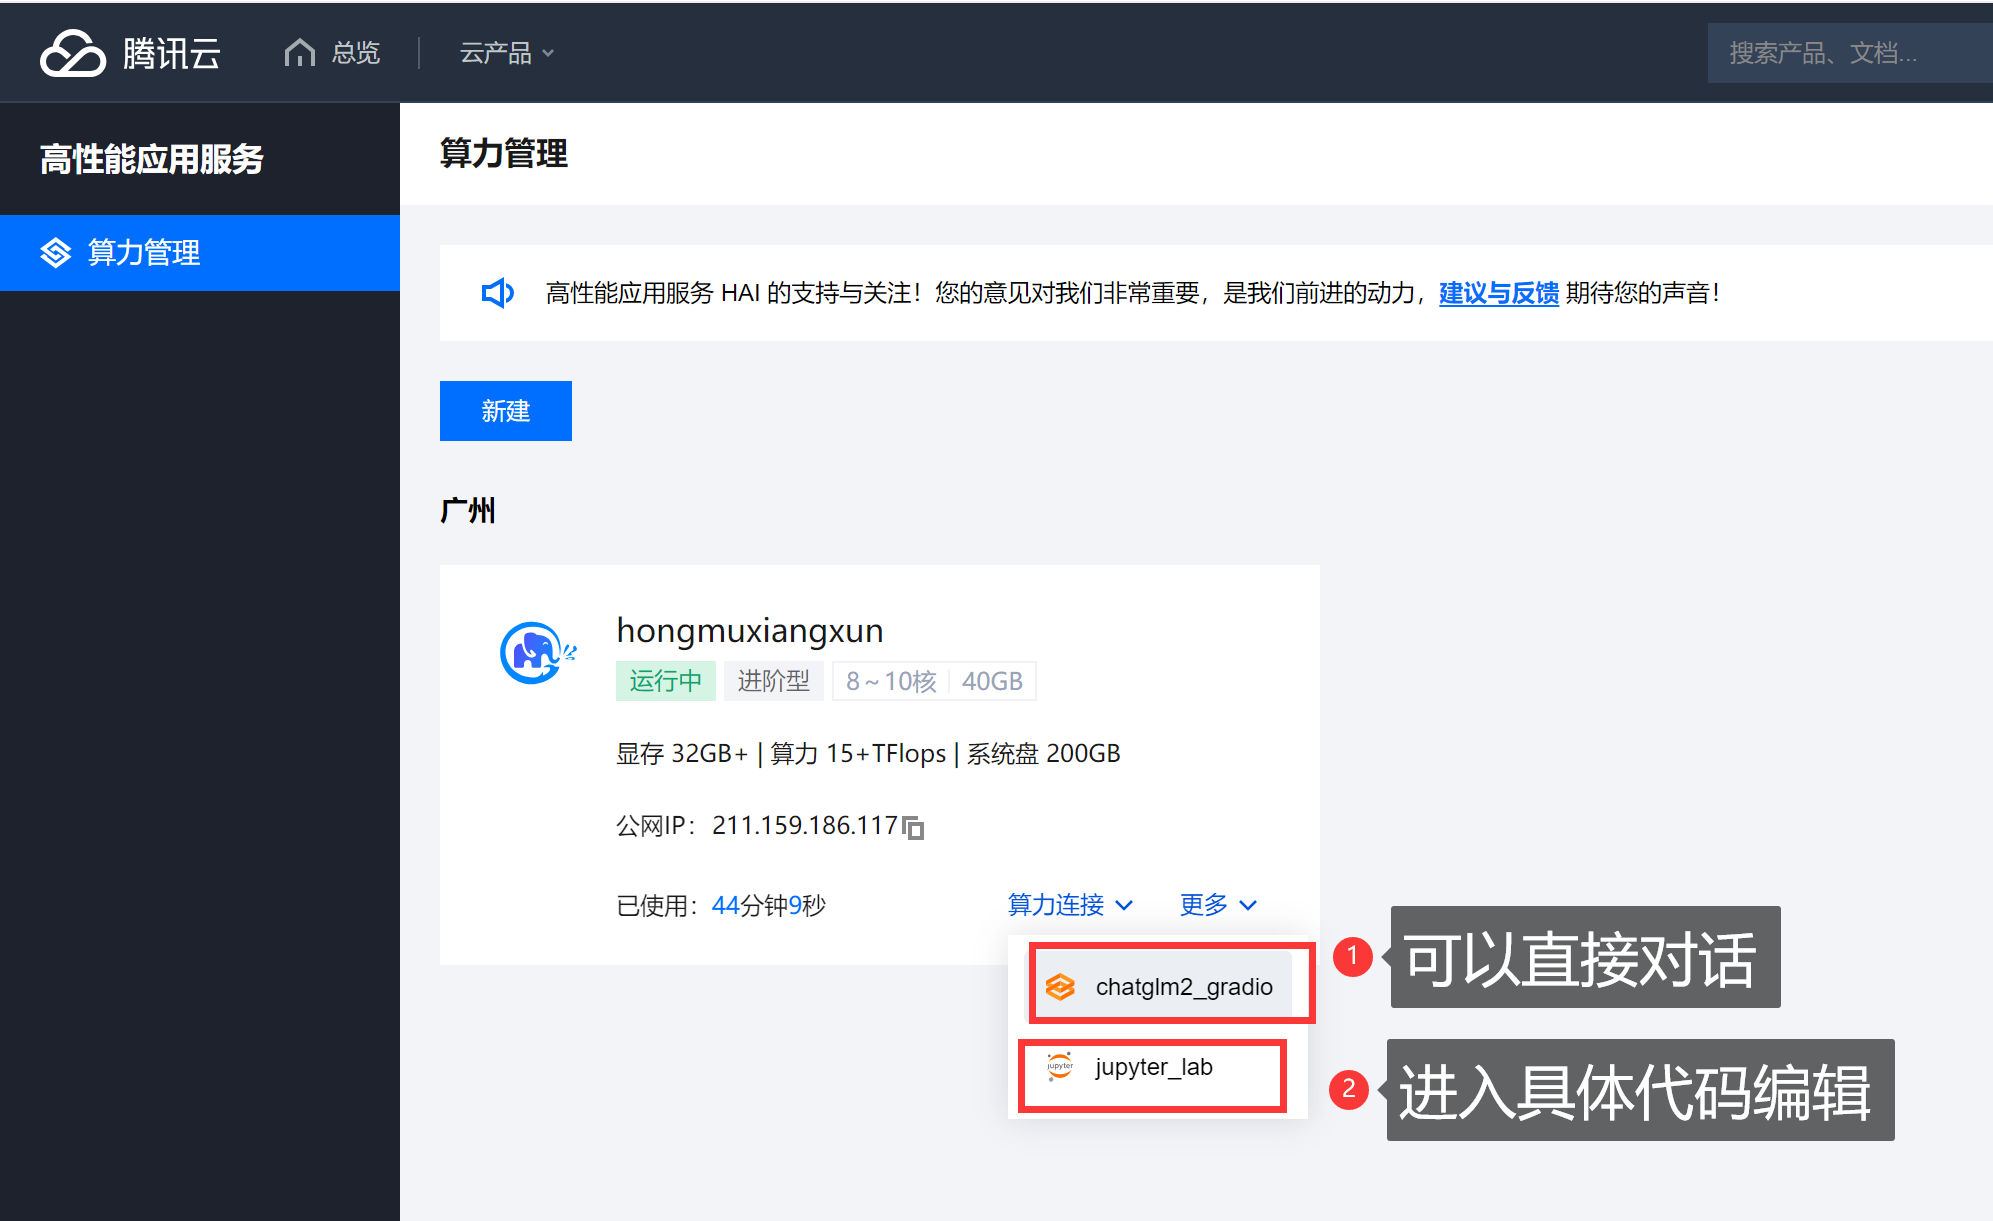
1、chatglm_gradio:
我们可以直接通过这个网址进行对话操作。
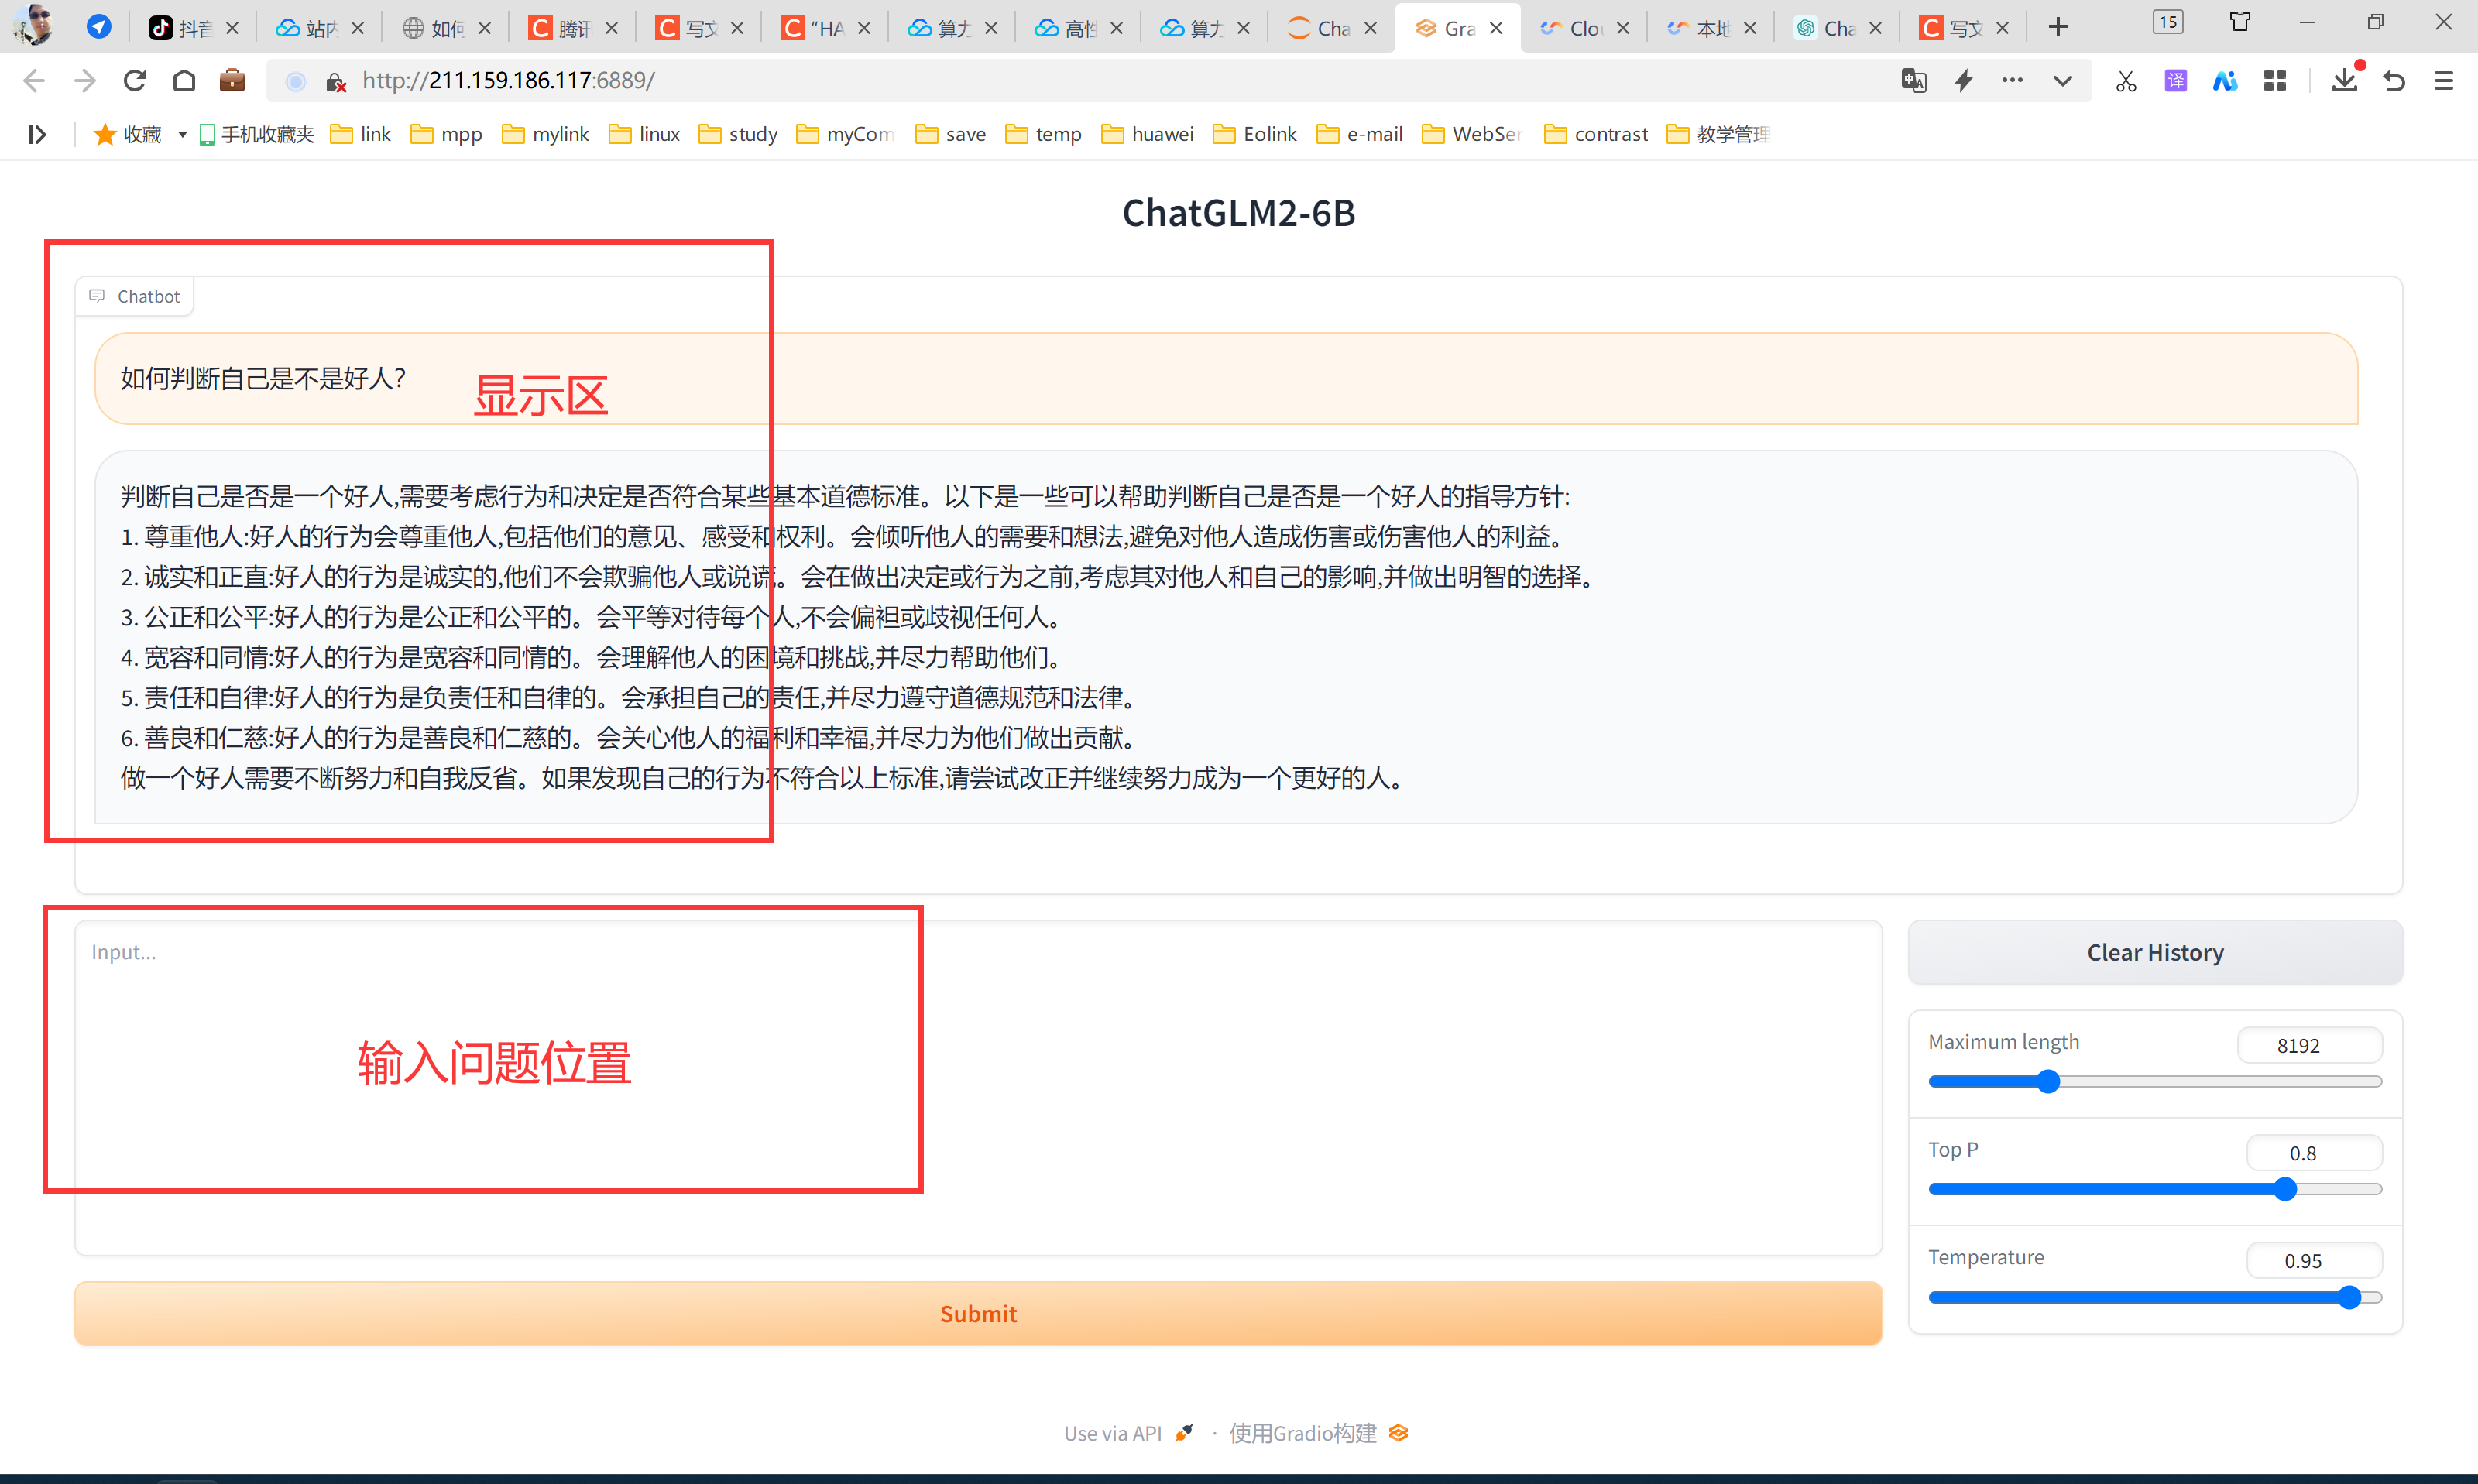
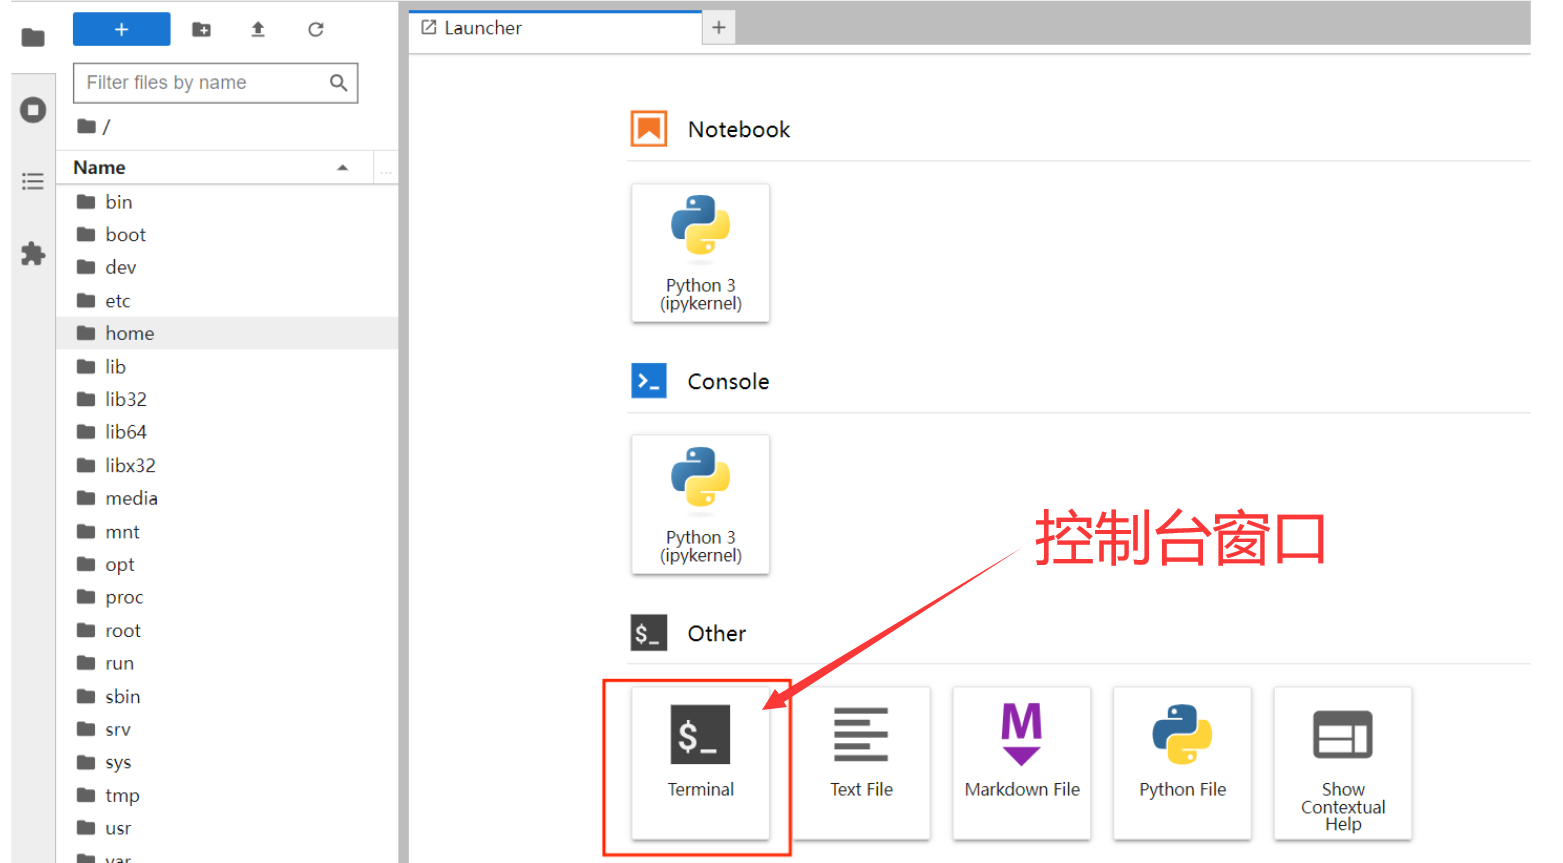
2、jupyter_lab:
创建控制台窗口,可以在这里进行具体的代码编辑与运行。
三、基础服务示例(jupyter_lab操作)
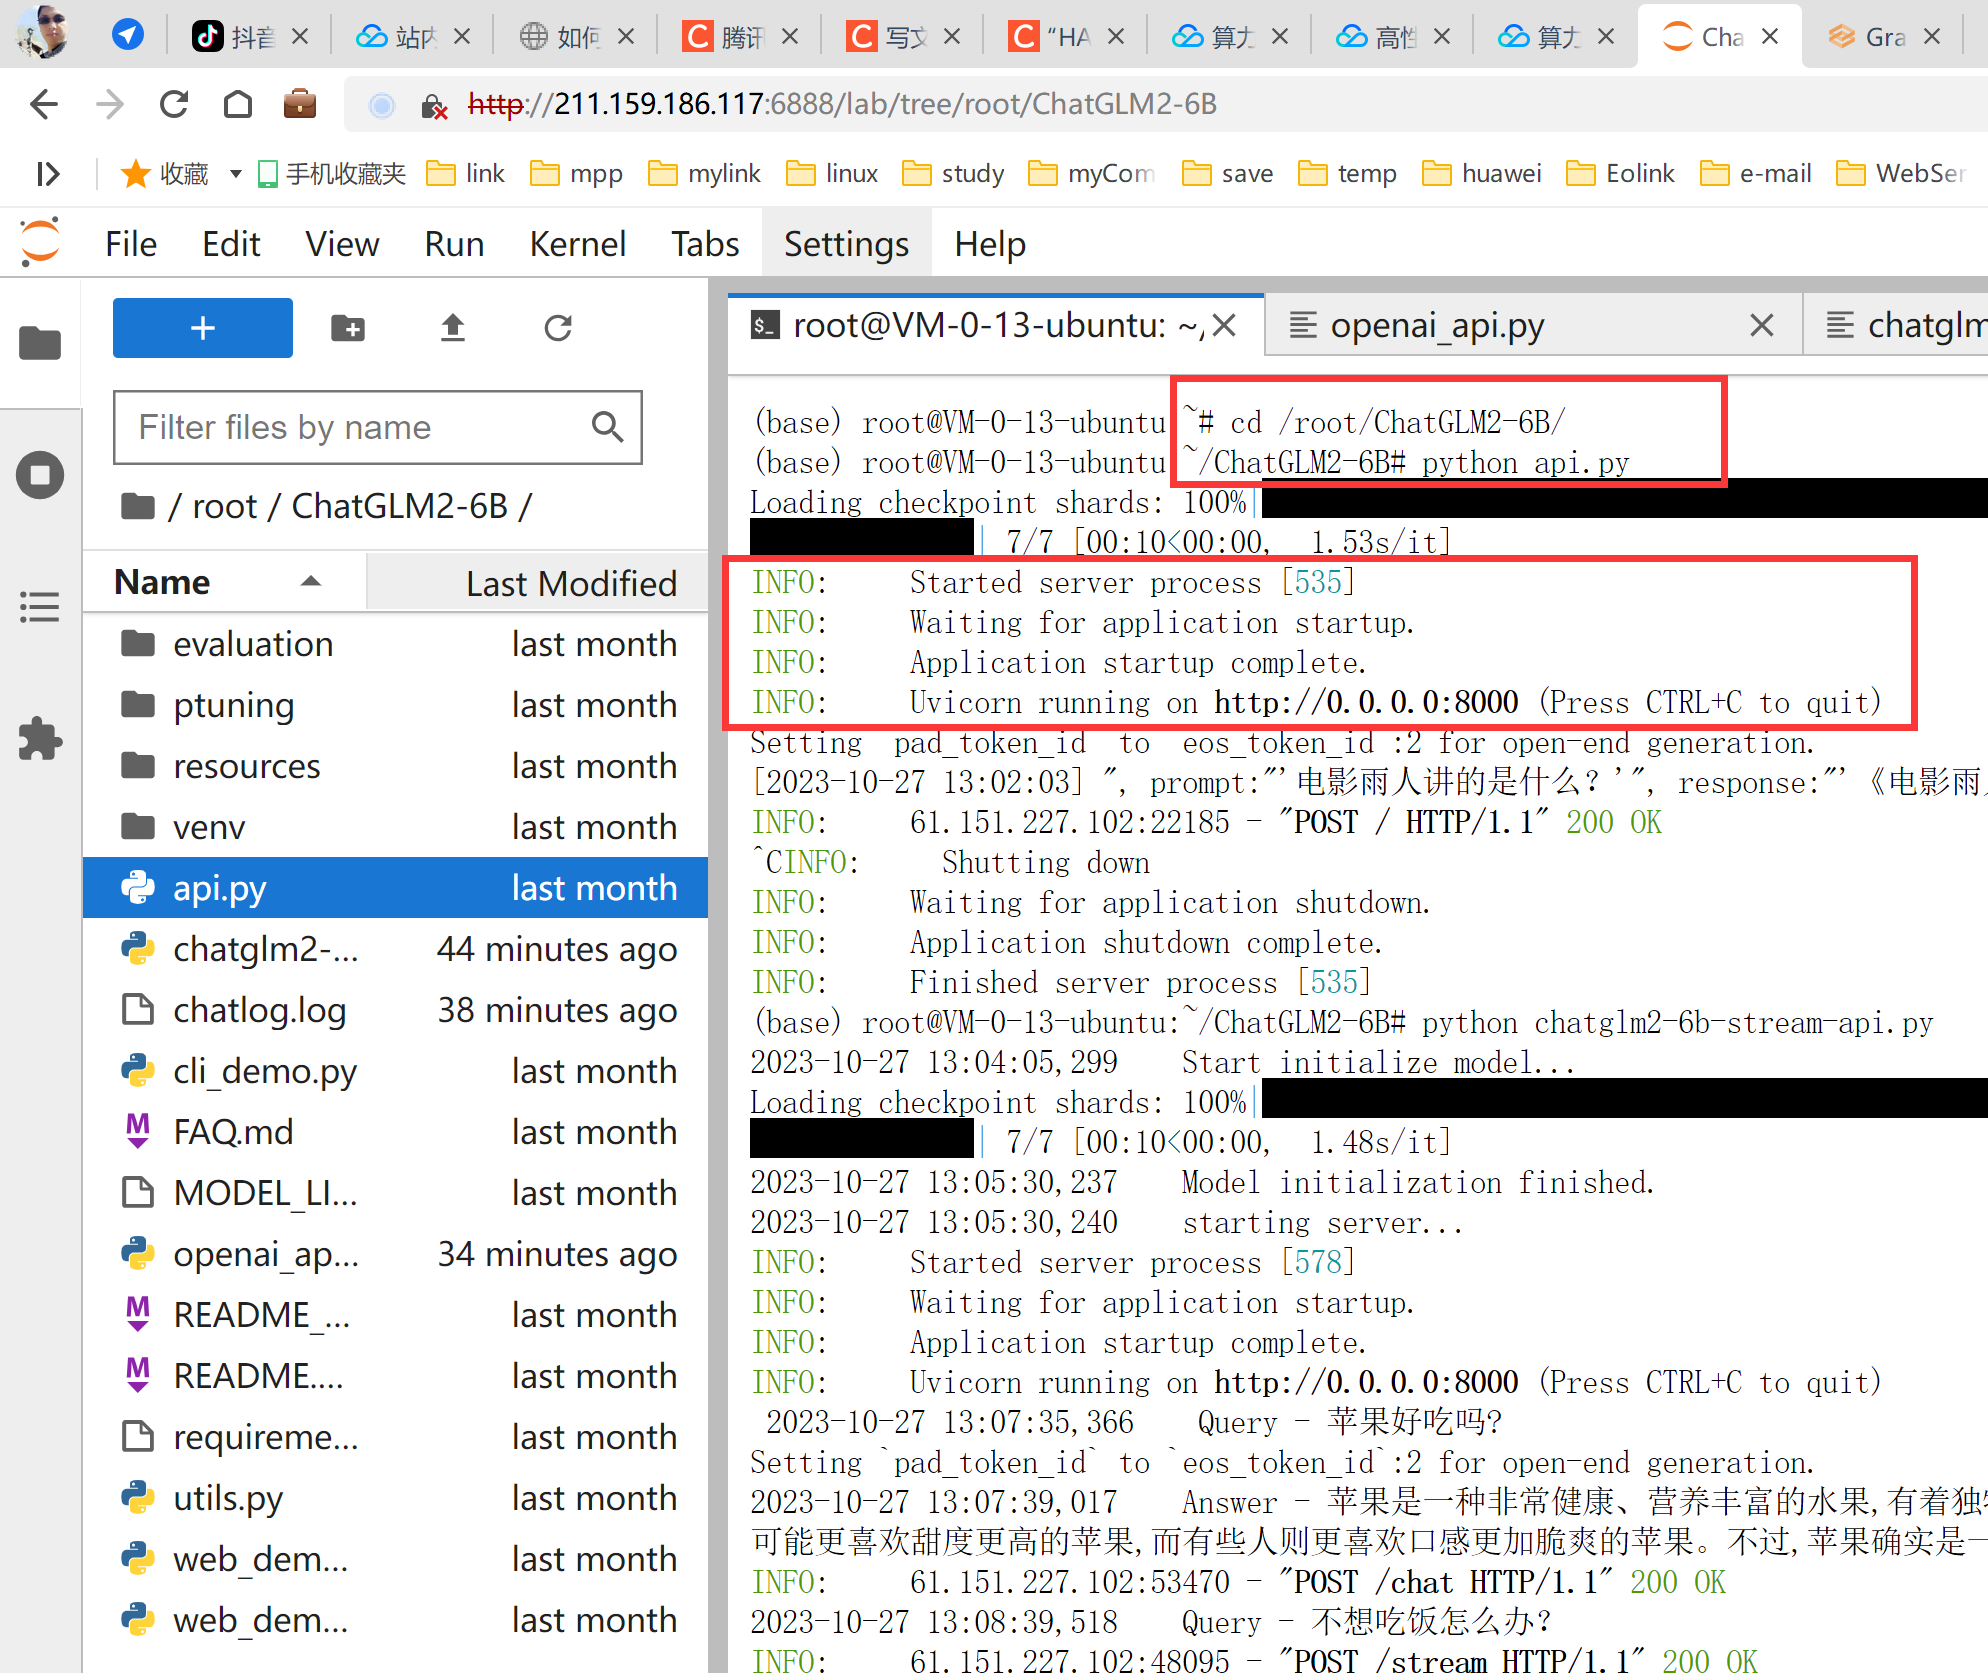
1、进入并启动服务
cd /root/ChatGLM2-6B/
python api.py
运行起来能看到有信息提示。
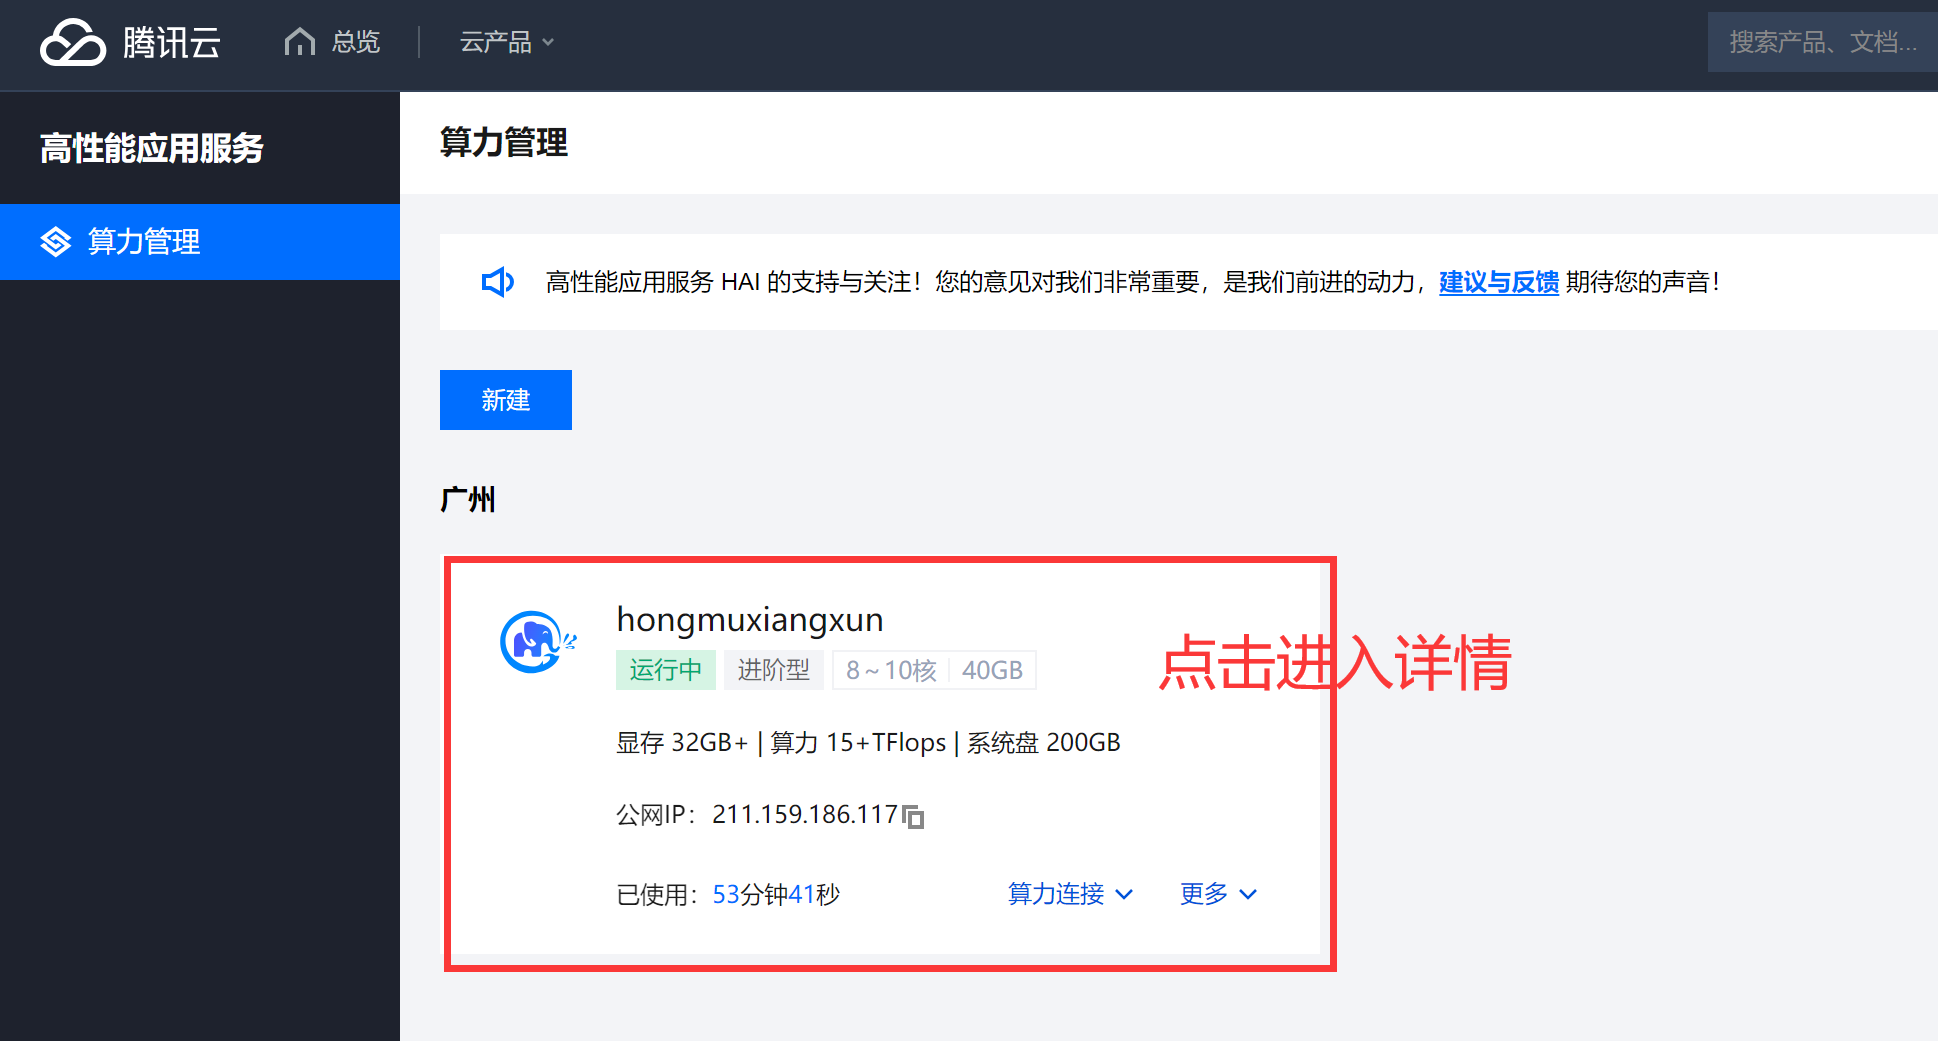
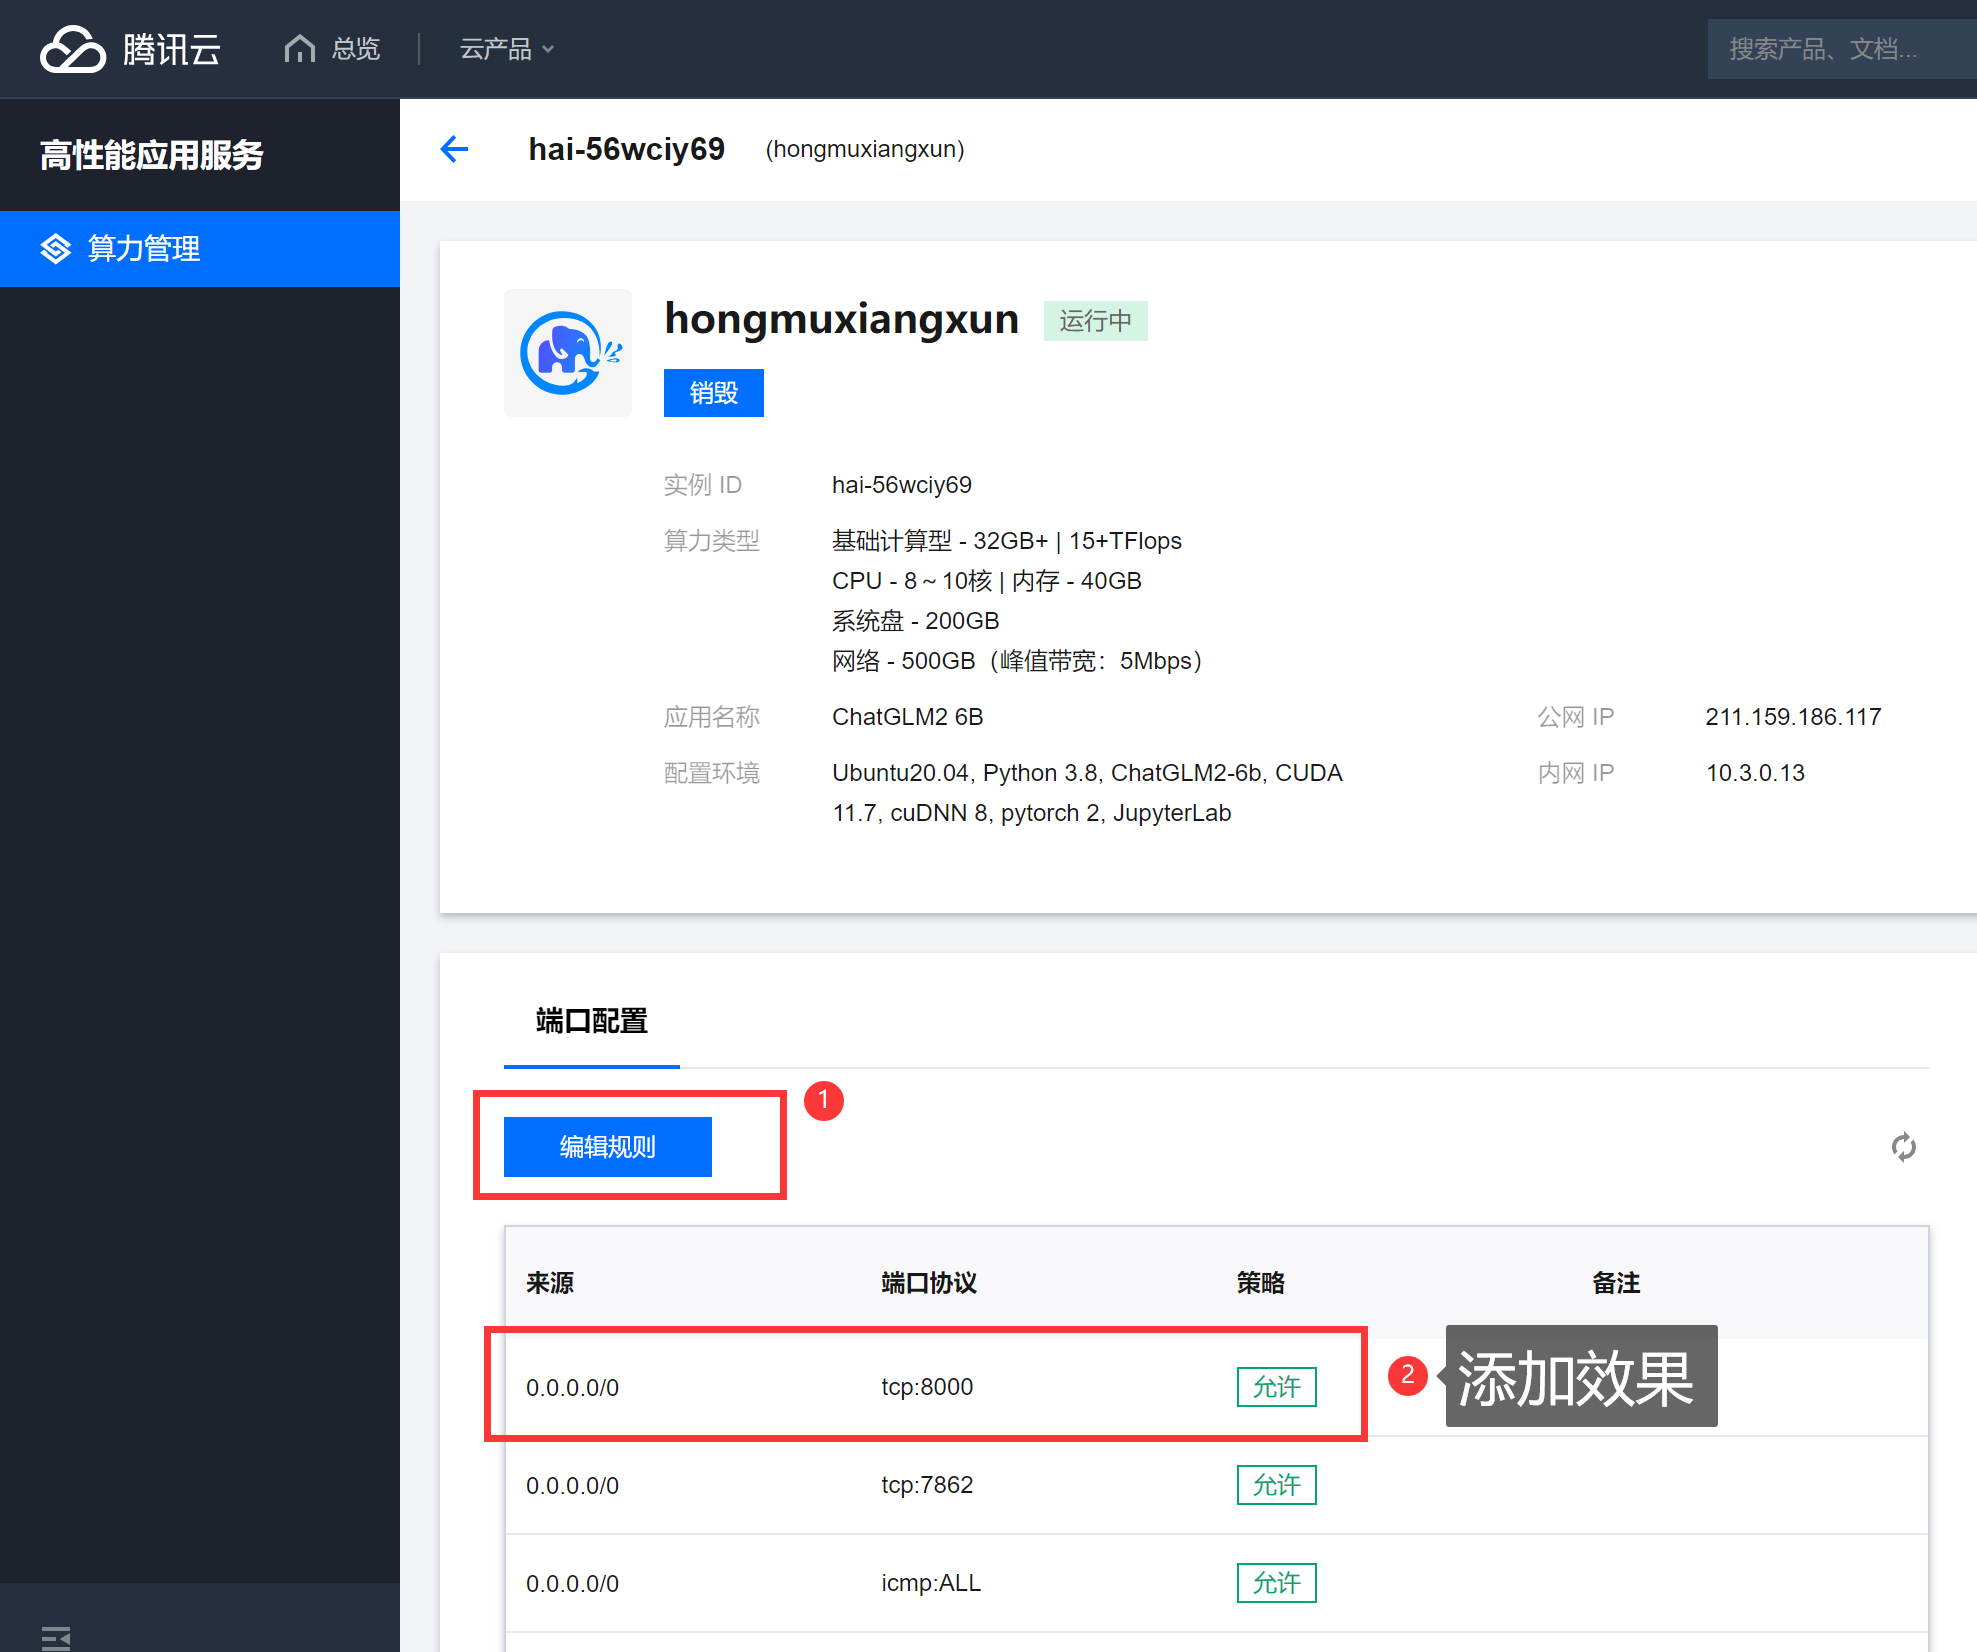
2、启动后开启访问端口(8000)
进入到服务详情。
添加防火墙可通过的端口号。
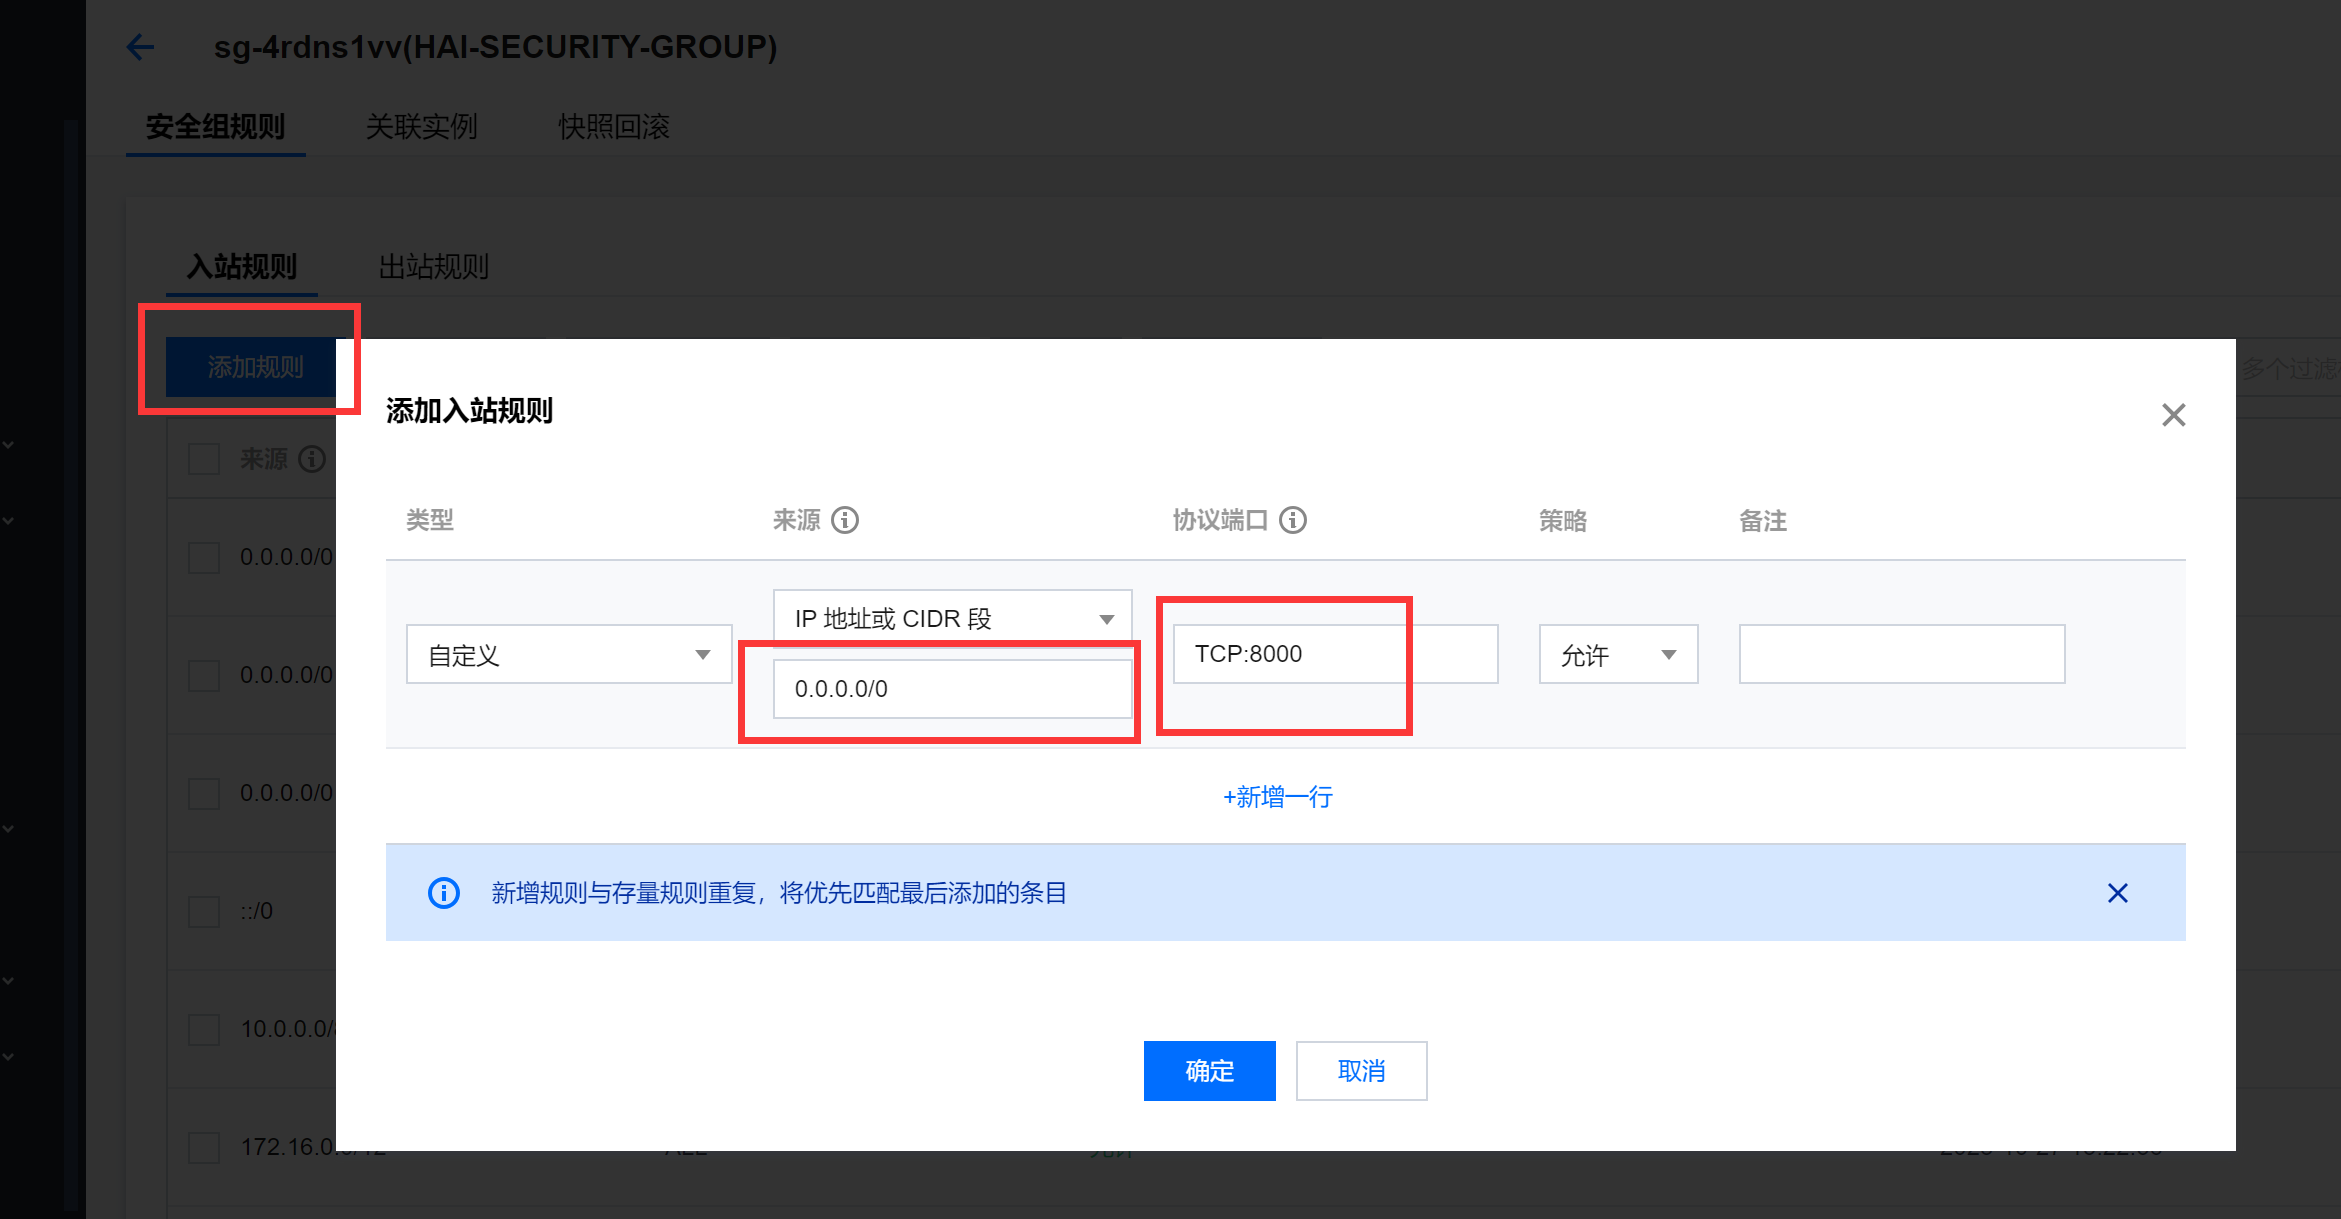
添加效果:
3、Python接口访问效果
添加后即可访问:http://你的公网IP:8000/ 的这个接口,具体服务参数如下列代码:
import requests定义测试数据,以及FastAPI服务器的地址和端口
server_url = "http://0.0.0.0" # 请确保将地址和端口更改为您的API服务器的实际地址和端口
test_data = {
"prompt": "'电影雨人讲的是什么?'",
"history": [],
"max_length": 50,
"top_p": 0.7,
"temperature": 0.95
}发送HTTP POST请求
response = requests.post(server_url, json=test_data)
处理响应
if response.status_code == 200:
result = response.json()
print("Response:", result["response"])
print("History:", result["history"])
print("Status:", result["status"])
print("Time:", result["time"])
else:
print("Failed to get a valid response. Status code:", response.status_code)
访问效果:

四、正式服务代码
1、修改【openai-api.py】文件
使用以下代码覆盖原有的代码:
# coding=utf-8Implements API for ChatGLM2-6B in OpenAI's format. (https://platform.openai.com/docs/api-reference/chat)
Usage: python openai_api.py
Visit http://localhost:8000/docs for documents.
import time
import torch
import uvicorn
from pydantic import BaseModel, Field
from fastapi import FastAPI, HTTPException
from fastapi.middleware.cors import CORSMiddleware
from contextlib import asynccontextmanager
from typing import Any, Dict, List, Literal, Optional, Union
from transformers import AutoTokenizer, AutoModel
from sse_starlette.sse import ServerSentEvent, EventSourceResponse@asynccontextmanager
async def lifespan(app: FastAPI): # collects GPU memory
yield
if torch.cuda.is_available():
torch.cuda.empty_cache()
torch.cuda.ipc_collect()app = FastAPI(lifespan=lifespan)
app.add_middleware(
CORSMiddleware,
allow_origins=["*"],
allow_credentials=True,
allow_methods=["*"],
allow_headers=["*"],
)class ModelCard(BaseModel):
id: str
object: str = "model"
created: int = Field(default_factory=lambda: int(time.time()))
owned_by: str = "owner"
root: Optional[str] = None
parent: Optional[str] = None
permission: Optional[list] = Noneclass ModelList(BaseModel):
object: str = "list"
data: List[ModelCard] = []class ChatMessage(BaseModel):
role: Literal["user", "assistant", "system"]
content: strclass DeltaMessage(BaseModel):
role: Optional[Literal["user", "assistant", "system"]] = None
content: Optional[str] = Noneclass ChatCompletionRequest(BaseModel):
model: str
messages: List[ChatMessage]
temperature: Optional[float] = None
top_p: Optional[float] = None
max_length: Optional[int] = None
stream: Optional[bool] = Falseclass ChatCompletionResponseChoice(BaseModel):
index: int
message: ChatMessage
finish_reason: Literal["stop", "length"]class ChatCompletionResponseStreamChoice(BaseModel):
index: int
delta: DeltaMessage
finish_reason: Optional[Literal["stop", "length"]]class ChatCompletionResponse(BaseModel):
model: str
object: Literal["chat.completion", "chat.completion.chunk"]
choices: List[Union[ChatCompletionResponseChoice, ChatCompletionResponseStreamChoice]]
created: Optional[int] = Field(default_factory=lambda: int(time.time()))@app.get("/v1/models", response_model=ModelList)
async def list_models():
global model_args
model_card = ModelCard(id="gpt-3.5-turbo")
return ModelList(data=[model_card])@app.post("/v1/chat/completions", response_model=ChatCompletionResponse)
async def create_chat_completion(request: ChatCompletionRequest):
global model, tokenizerif request.messages[-1].role != "user": raise HTTPException(status_code=400, detail="Invalid request") query = request.messages[-1].content prev_messages = request.messages[:-1] if len(prev_messages) > 0 and prev_messages[0].role == "system": query = prev_messages.pop(0).content + query history = [] if len(prev_messages) % 2 == 0: for i in range(0, len(prev_messages), 2): if prev_messages[i].role == "user" and prev_messages[i+1].role == "assistant": history.append([prev_messages[i].content, prev_messages[i+1].content]) if request.stream: generate = predict(query, history, request.model) return EventSourceResponse(generate, media_type="text/event-stream") response, _ = model.chat(tokenizer, query, history=history) choice_data = ChatCompletionResponseChoice( index=0, message=ChatMessage(role="assistant", content=response), finish_reason="stop" ) return ChatCompletionResponse(model=request.model, choices=[choice_data], object="chat.completion")async def predict(query: str, history: List[List[str]], model_id: str):
global model, tokenizerchoice_data = ChatCompletionResponseStreamChoice( index=0, delta=DeltaMessage(role="assistant"), finish_reason=None ) chunk = ChatCompletionResponse(model=model_id, choices=[choice_data], object="chat.completion.chunk") #yield "{}".format(chunk.json(exclude_unset=True, ensure_ascii=False)) yield "{}".format(chunk.model_dump_json(exclude_unset=True)) current_length = 0 for new_response, _ in model.stream_chat(tokenizer, query, history): if len(new_response) == current_length: continue new_text = new_response[current_length:] current_length = len(new_response) choice_data = ChatCompletionResponseStreamChoice( index=0, delta=DeltaMessage(content=new_text), finish_reason=None ) chunk = ChatCompletionResponse(model=model_id, choices=[choice_data], object="chat.completion.chunk") #yield "{}".format(chunk.json(exclude_unset=True, ensure_ascii=False)) yield "{}".format(chunk.model_dump_json(exclude_unset=True)) choice_data = ChatCompletionResponseStreamChoice( index=0, delta=DeltaMessage(), finish_reason="stop" ) chunk = ChatCompletionResponse(model=model_id, choices=[choice_data], object="chat.completion.chunk") #yield "{}".format(chunk.json(exclude_unset=True, ensure_ascii=False)) yield "{}".format(chunk.model_dump_json(exclude_unset=True)) yield '[DONE]'if name == "main":
tokenizer = AutoTokenizer.from_pretrained("THUDM/chatglm2-6b", revision="v1.0", trust_remote_code=True)
model = AutoModel.from_pretrained("THUDM/chatglm2-6b", revision="v1.0", trust_remote_code=True).cuda()
# 多显卡支持,使用下面两行代替上面一行,将num_gpus改为你实际的显卡数量
# from utils import load_model_on_gpus
# model = load_model_on_gpus("THUDM/chatglm2-6b", num_gpus=2)
model.eval()uvicorn.run(app, host='0.0.0.0', port=8000, workers=1)</code></pre></div></div><h5 id="cp5sg" name="2%E3%80%81%E8%BF%90%E8%A1%8C%E3%80%90openai-api.py%E3%80%91%E6%96%87%E4%BB%B6%EF%BC%8C%E6%9C%8D%E5%8A%A1%E7%AB%AF%E5%BC%80%E5%90%AF%E6%9C%8D%E5%8A%A1"> 2、运行【<strong>openai-api.py</strong>】文件,服务端开启服务</h5><p>在控制台直接输入python openai-api.py即可运行</p><figure class=""><div class="rno-markdown-img-url" style="text-align:center"><div class="rno-markdown-img-url-inner" style="width:100%"><div style="width:100%"><img src="https://cdn.static.attains.cn/app/developer-bbs/upload/1723319216348495924.png" /></div></div></div></figure><h4 id="1l33g" name="%E4%BA%94%E3%80%81%E5%8F%AF%E8%A7%86%E5%8C%96%E9%A1%B5%E9%9D%A2%E6%90%AD%E5%BB%BA">五、可视化页面搭建</h4><h5 id="22le" name="1%E3%80%81%E5%9C%A8%E5%88%9B%E5%BB%BAcloud-Studio%E7%9A%84%E6%97%B6%E5%80%99%E9%80%89%E6%8B%A9%E3%80%90%E5%BA%94%E7%94%A8%E6%8E%A8%E8%8D%90%E3%80%91">1、在创建cloud Studio的时候选择【应用推荐】</h5><p>选择【ChatGPT Next Web】</p><figure class=""><div class="rno-markdown-img-url" style="text-align:center"><div class="rno-markdown-img-url-inner" style="width:100%"><div style="width:100%"><img src="https://cdn.static.attains.cn/app/developer-bbs/upload/1723319216814882994.png" /></div></div></div></figure><h5 id="9k07q" name="2%E3%80%81Fork%E9%A1%B9%E7%9B%AE">2、Fork项目</h5><figure class=""><div class="rno-markdown-img-url" style="text-align:center"><div class="rno-markdown-img-url-inner" style="width:100%"><div style="width:100%"><img src="https://cdn.static.attains.cn/app/developer-bbs/upload/1723319217461556997.png" /></div></div></div></figure><h5 id="b7vs0" name="3%E3%80%81%E4%BF%AE%E6%94%B9%E3%80%90.env.template%E3%80%91%E6%96%87%E4%BB%B6">3、修改【<strong>.env.template</strong>】文件</h5><figure class=""><div class="rno-markdown-img-url" style="text-align:center"><div class="rno-markdown-img-url-inner" style="width:69.9%"><div style="width:100%"><img src="https://cdn.static.attains.cn/app/developer-bbs/upload/1723319218098819713.png" /></div></div></div></figure><p>直接替换我下面的就行,但是需要替换一下你服务的IP。</p><div class="rno-markdown-code"><div class="rno-markdown-code-toolbar"><div class="rno-markdown-code-toolbar-info"><div class="rno-markdown-code-toolbar-item is-type"><span class="is-m-hidden">代码语言:</span>javascript</div></div><div class="rno-markdown-code-toolbar-opt"><div class="rno-markdown-code-toolbar-copy"><i class="icon-copy"></i><span class="is-m-hidden">复制</span></div></div></div><div class="developer-code-block"><pre class="prism-token token line-numbers language-javascript"><code class="language-javascript" style="margin-left:0"># Your openai api key. (required)OPENAI_API_KEY="hongMuXiangXun"
Access passsword, separated by comma. (optional)
CODE=
You can start service behind a proxy
PROXY_URL=http://你的IP:8000
Override openai api request base url. (optional)
Default: https://api.openai.com
Examples: http://your-openai-proxy.com
BASE_URL=http://你的IP:8000
Specify OpenAI organization ID.(optional)
Default: Empty
OPENAI_ORG_ID=
(optional)
Default: Empty
If you do not want users to input their own API key, set this value to 1.
HIDE_USER_API_KEY=
(optional)
Default: Empty
If you do not want users to use GPT-4, set this value to 1.
DISABLE_GPT4=
(optional)
Default: Empty
If you do not want users to query balance, set this value to 1.
HIDE_BALANCE_QUERY=
4、修改【.env.template】为【.env】文件
鼠标右键,重命名即可。

六、运行可视化操作页面
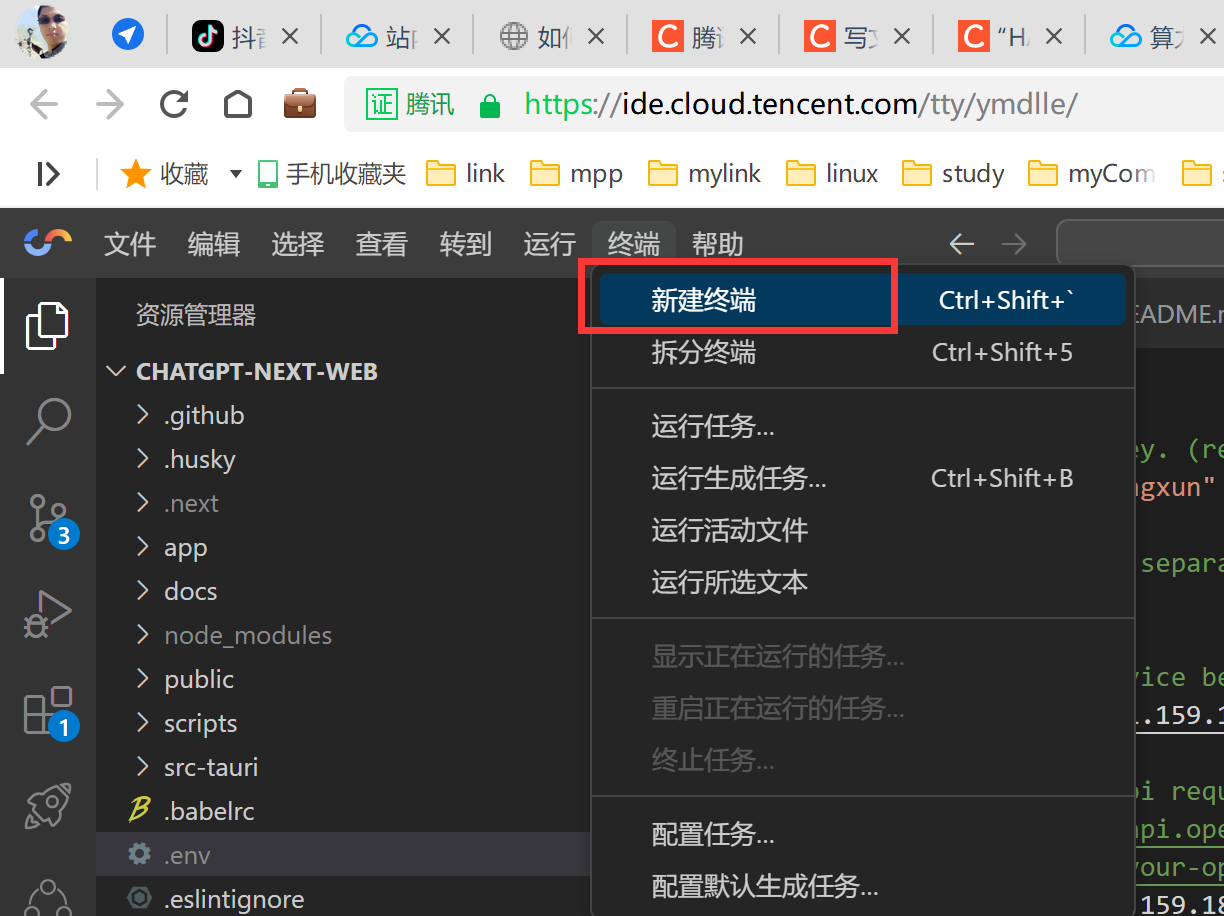
1、新建终端
2、运行服务
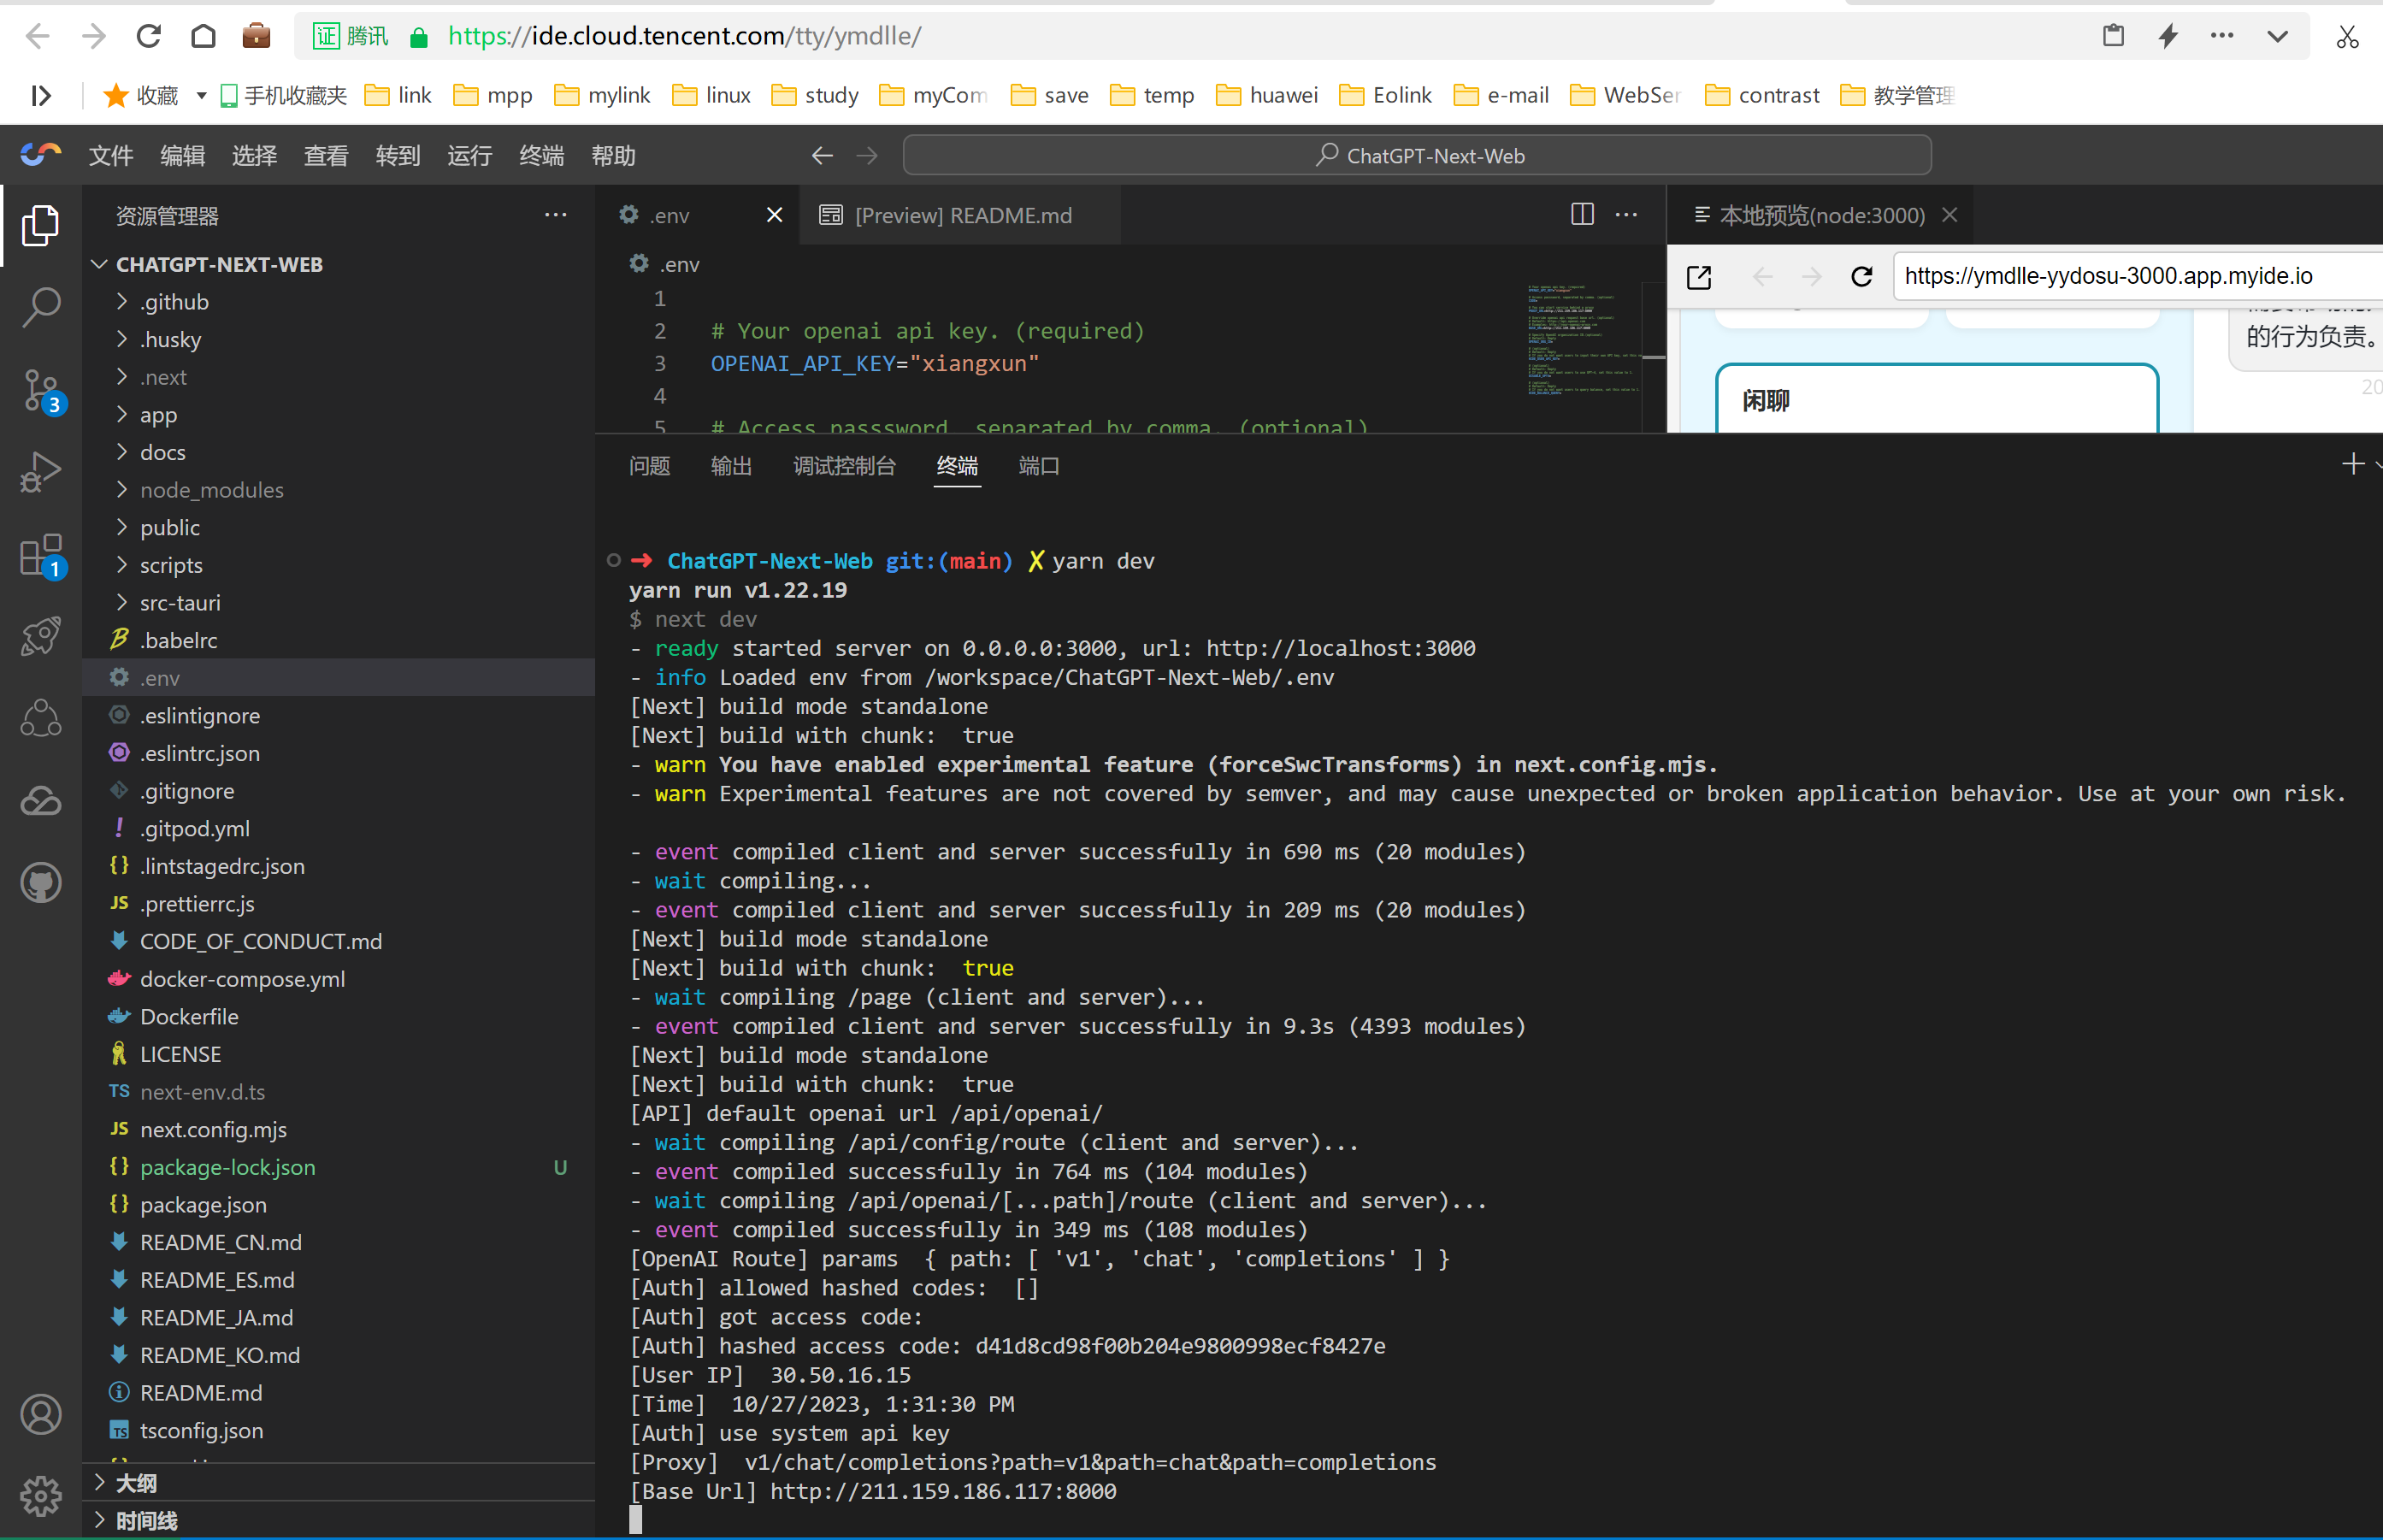
先运行npm的安装,在通过【yarn dev】启动。
npm install
yarn dev
安装时间较长,别急,等一会。

运行yarn dev效果:
3、选择打开方式
这里需要选择到端口处进行具体的选择,选择方式如下图。
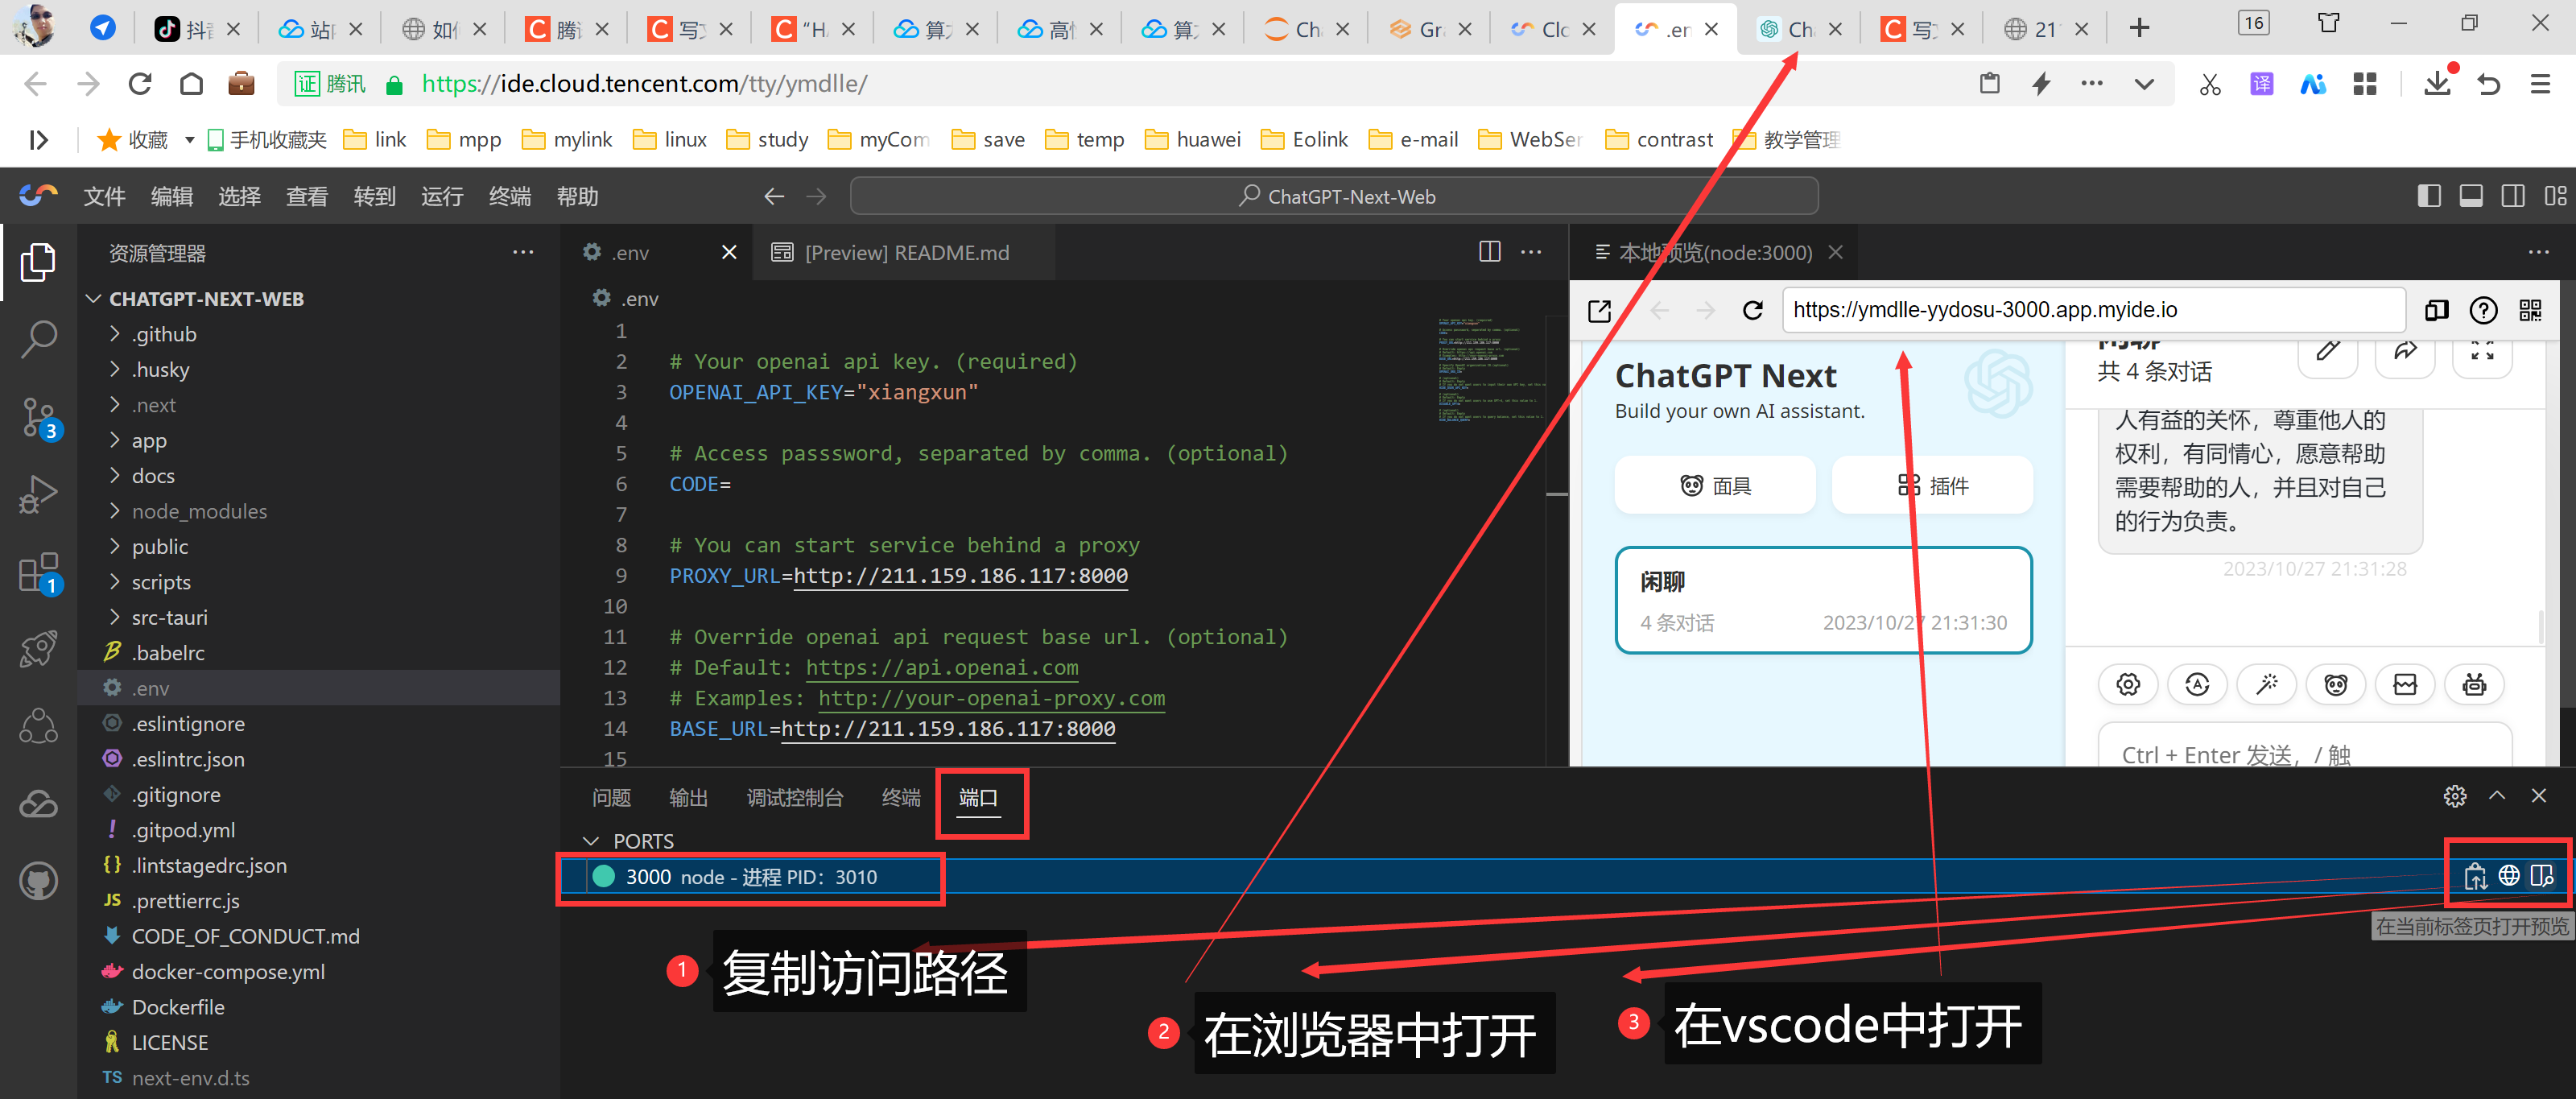
我觉得这个页面设计的还是不错的。

内部访问效果也OK:
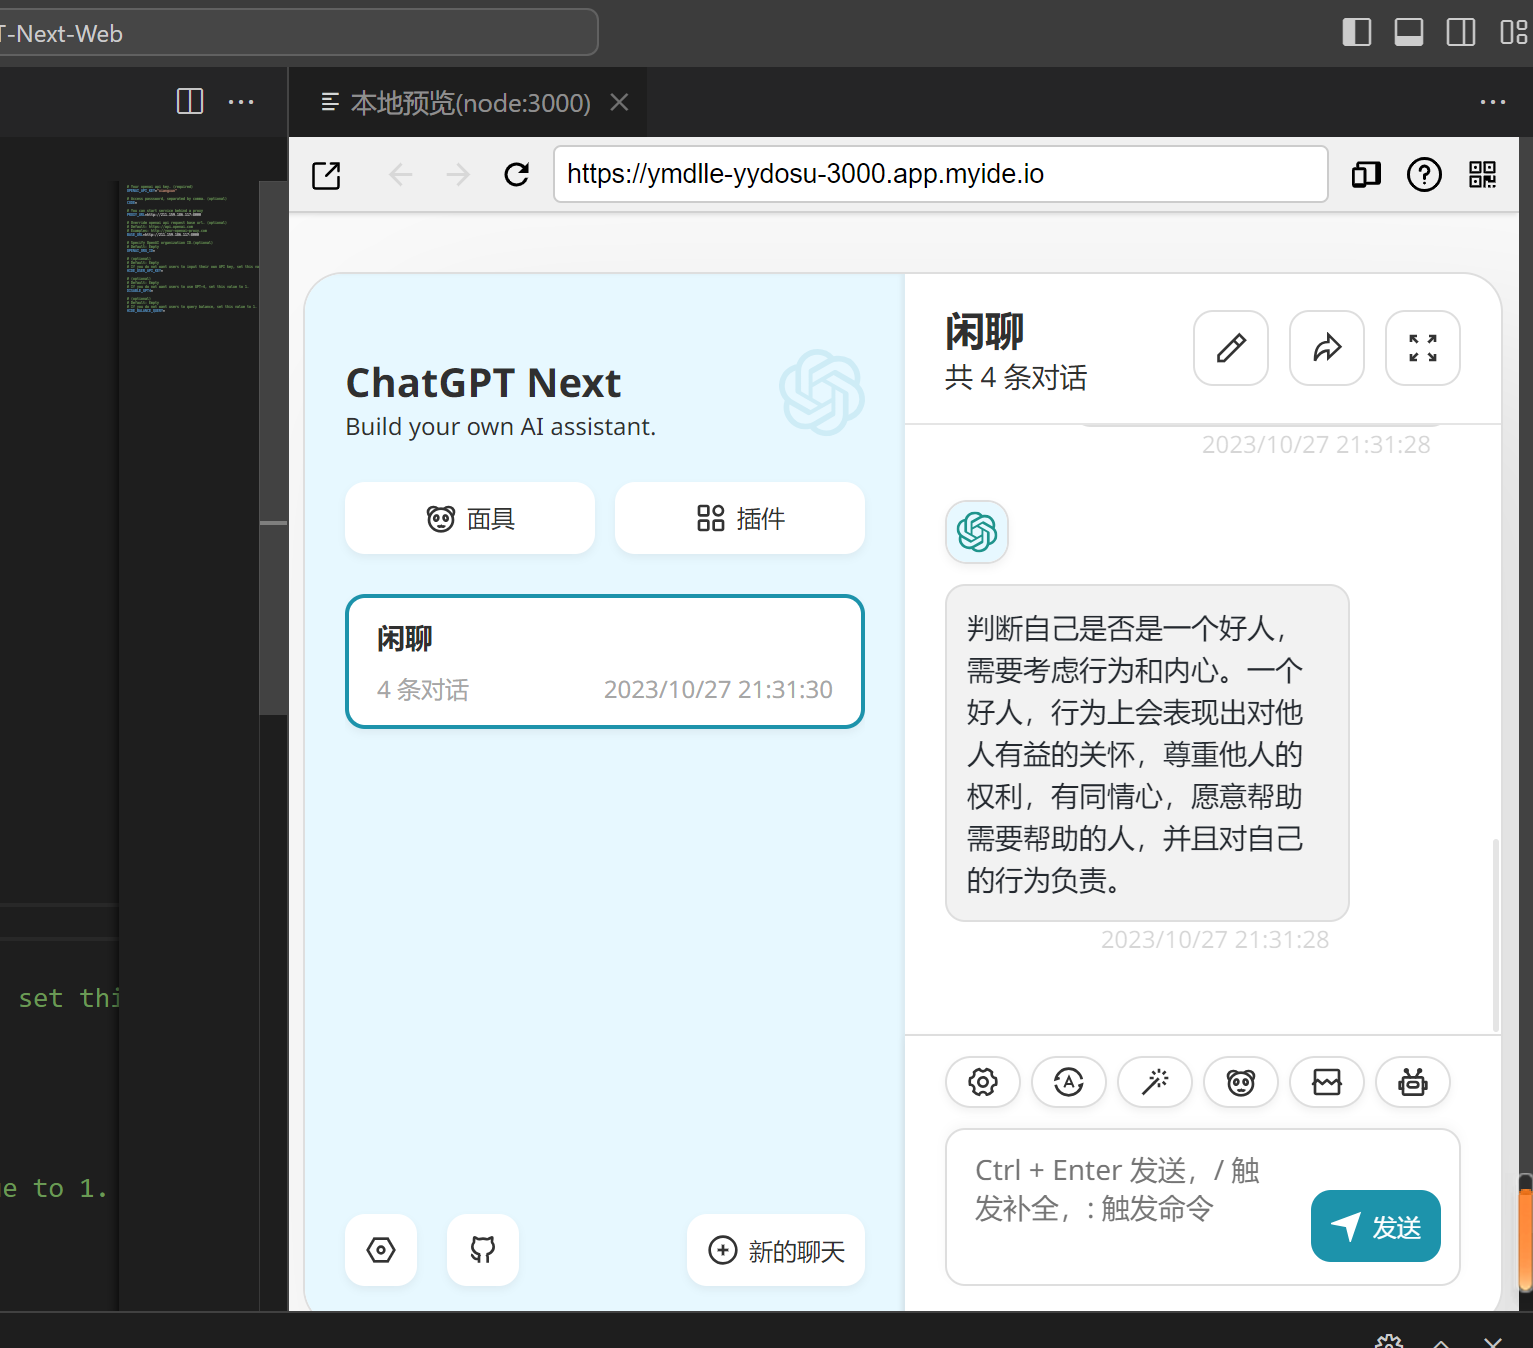
到此,恭喜你,创建完毕了。
总结
整体上六个大步骤,没有消耗多长时间,我是搞了一遍之后开始写的这篇文章,故而看着时间长一些,其实熟练操作也就分分钟的事情,应该是适合绝大多数的程序员来操作的。
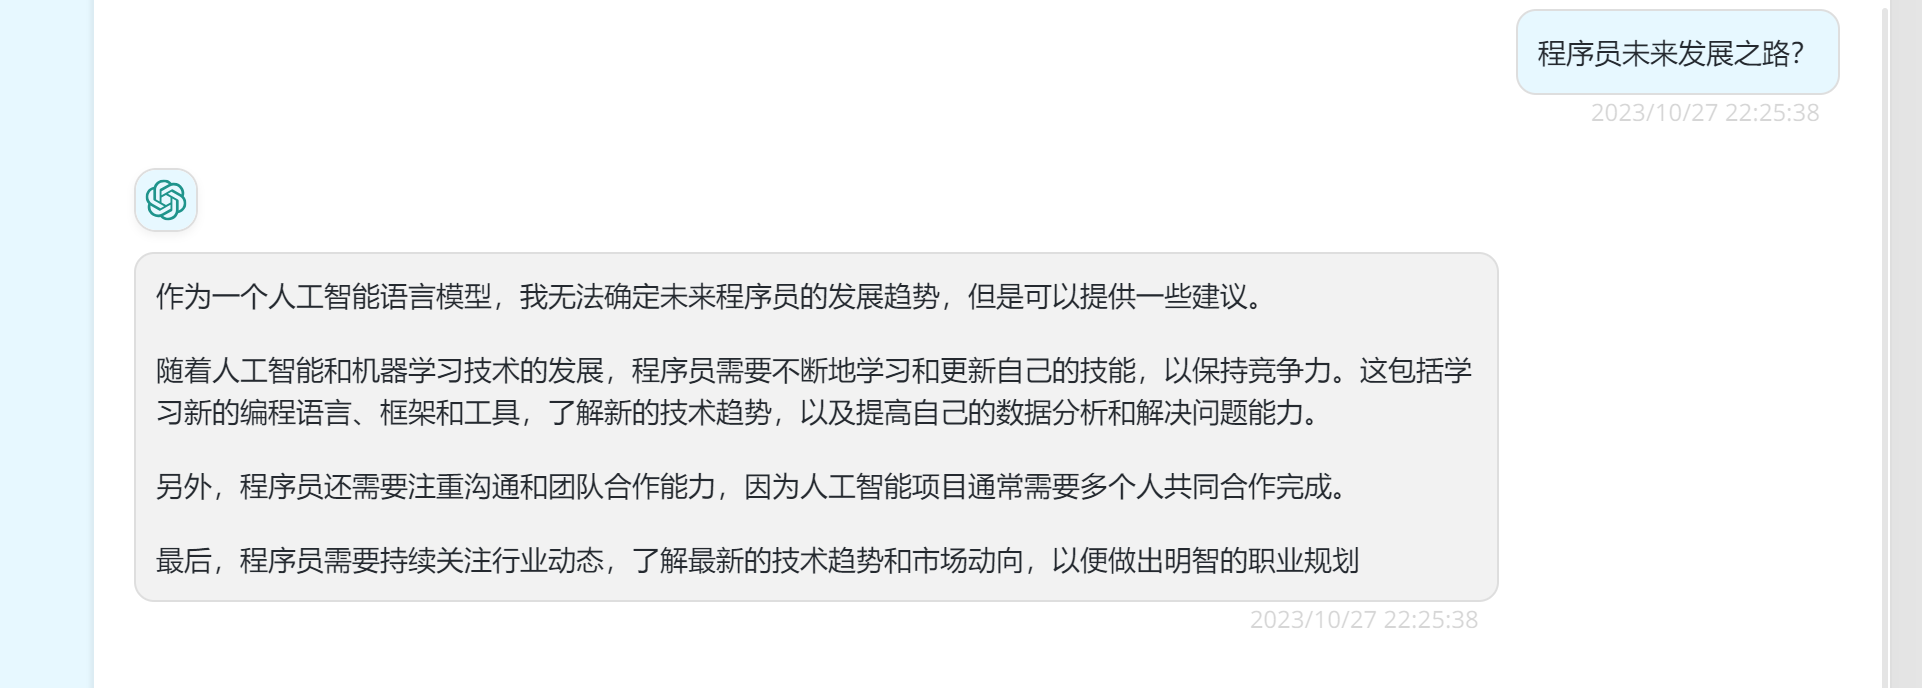
对于程序员来说,生成图片的作用不大,所以我选择了这个对话的示例来做演示,操作不复杂,基本都有提示,希望对大家都能有所帮助,下面我单独问了一个问题,就是我们程序员未来发展之路,未遂没有一个具体解答,但是还是很中肯的,那就是学无止境。
现在还有活动呢,下面是活动的连接:
腾讯云 HAI 新品公测产品体验地址 :https://cloud.tencent.com/act/pro/hai
腾讯云 HAI 新品公测专题页地址:https://marketing.csdn.net/p/b18dedb1166a0d94583db1877e49b039
腾讯云 HAI 新品公测活动报名地址:https://jinshuju.net/f/dHxwJ7