
商城系统-基础业务-分类管理
在上一篇的基础上继续介绍。
启动renren-fast如果出现如下错误
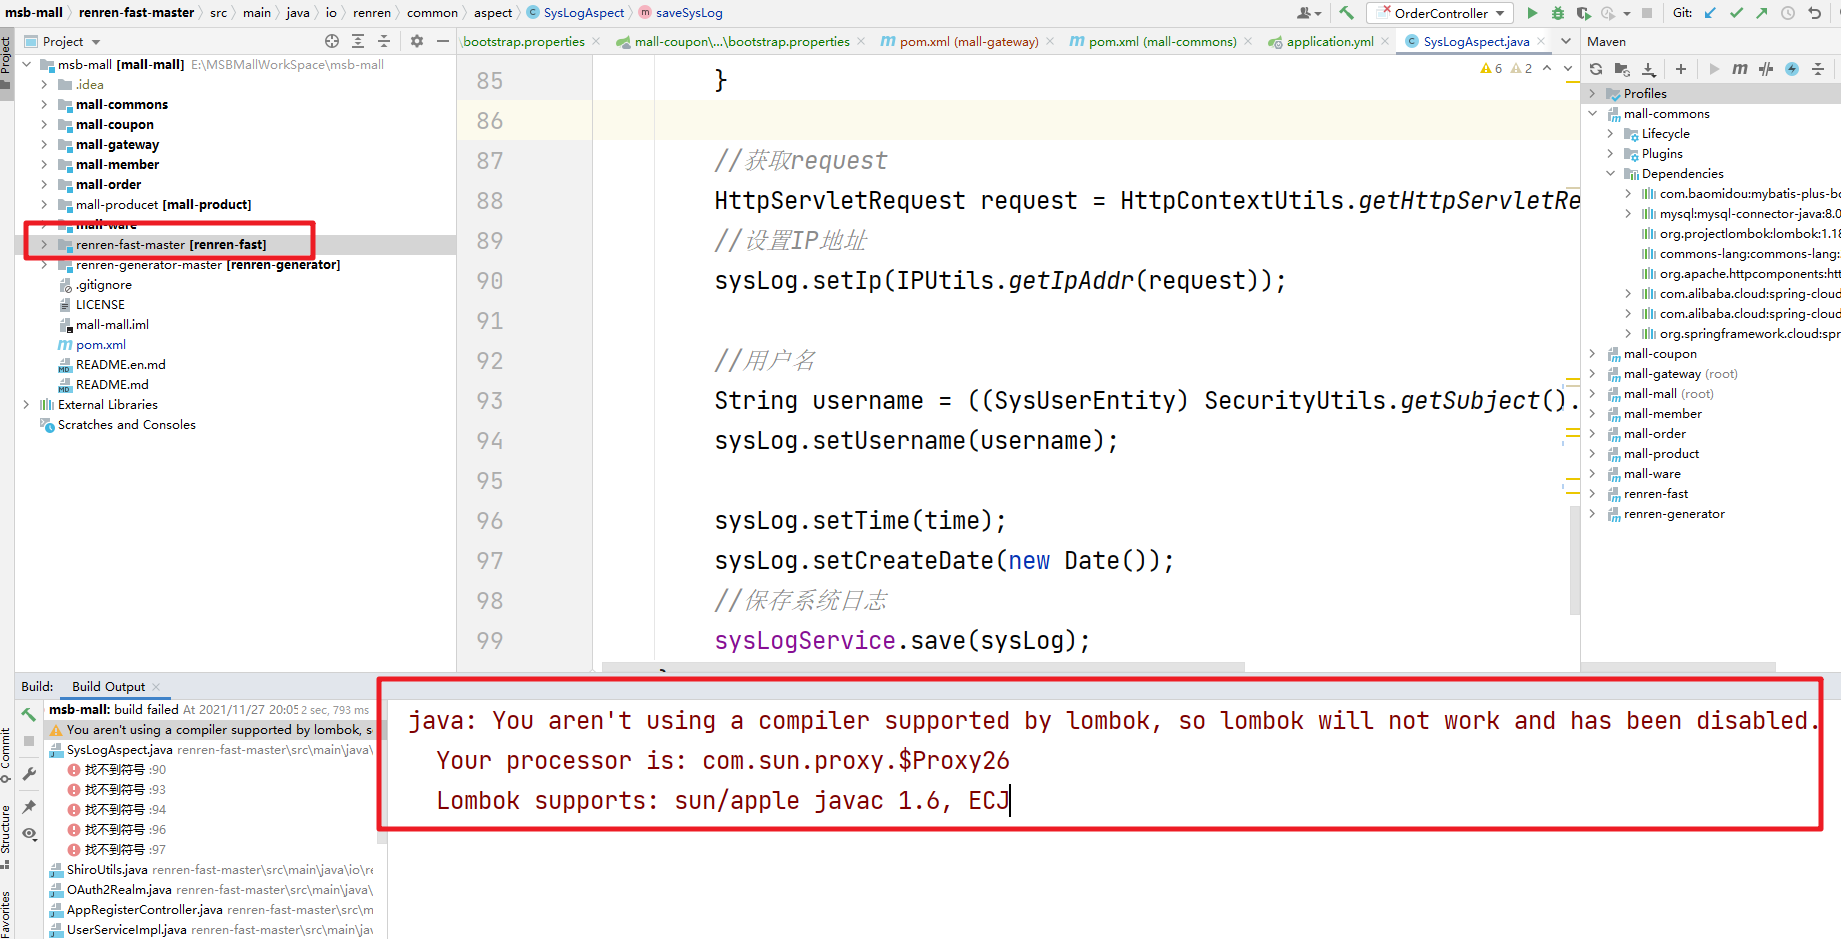
-Djps.track.ap.dependencies=false
添加相关配置即可

分类管理
1.后端分类接口
JDK8特性:https://blog.csdn.net/qq_38526573/category_11113126.html
在后端服务中我们需要查询出所有的三级分类信息,并将这些信息组合为有父子关系的数据,所以首先我们需要在对应的entity中添加关联字段 childrens
	/**
	 * 当前类别所拥有的所有的子类
	 */
	@TableField(exist = false)
	private List<CategoryEntity> childrens;
然后我们在service中完成对应的数据处理的逻辑,具体实现逻辑参考注释
/** * 查询所有的类别数据,然后将数据封装为树形结构,便于前端使用 * * @param params * @return */ @Override public List<CategoryEntity> queryPageWithTree(Map<String, Object> params) { // 1.查询所有的商品分类信息 List<CategoryEntity> categoryEntities = baseMapper.selectList(null); // 2.将商品分类信息拆解为树形结构【父子关系】 // 第一步遍历出所有的大类 parent_cid = 0 List<CategoryEntity> list = categoryEntities.stream().filter(categoryEntity -> categoryEntity.getParentCid() == 0) .map(categoryEntity -> { // 根据大类找到多有的小类 递归的方式实现 categoryEntity.setChildrens(getCategoryChildrens(categoryEntity,categoryEntities)); return categoryEntity; }).sorted((entity1, entity2) -> { return (entity1.getSort() == null ? 0 : entity1.getSort()) - (entity2.getSort() == null ? 0 : entity2.getSort()); }).collect(Collectors.toList()); // 第二步根据大类找到对应的所有的小类 return list; }/** * 查找该大类下的所有的小类 递归查找 * @param categoryEntity 某个大类 * @param categoryEntities 所有的类别数据 * @return */ private List<CategoryEntity> getCategoryChildrens(CategoryEntity categoryEntity , List<CategoryEntity> categoryEntities) { List<CategoryEntity> collect = categoryEntities.stream().filter(entity -> { // 根据大类找到他的直属的小类 return entity.getParentCid() == categoryEntity.getCatId(); }).map(entity -> { // 根据这个小类递归找到对应的小小类 entity.setChildrens(getCategoryChildrens(entity, categoryEntities)); return entity; }).sorted((entity1, entity2) -> { return (entity1.getSort() == null ? 0 : entity1.getSort()) - (entity2.getSort() == null ? 0 : entity2.getSort()); }).collect(Collectors.toList()); return collect; }</code></pre></div></div><p>CategoryService中同步定义对应的接口方法</p><div class="rno-markdown-code"><div class="rno-markdown-code-toolbar"><div class="rno-markdown-code-toolbar-info"><div class="rno-markdown-code-toolbar-item is-type"><span class="is-m-hidden">代码语言:</span>javascript</div></div><div class="rno-markdown-code-toolbar-opt"><div class="rno-markdown-code-toolbar-copy"><i class="icon-copy"></i><span class="is-m-hidden">复制</span></div></div></div><div class="developer-code-block"><pre class="prism-token token line-numbers language-javascript"><code class="language-javascript" style="margin-left:0">public interface CategoryService extends IService<CategoryEntity> { PageUtils queryPage(Map<String, Object> params); List<CategoryEntity> queryPageWithTree(Map<String, Object> params);
}
然后在CategoryController中新增对应处理的方法
@GetMapping("/listTree")
public R listTree(@RequestParam Map<String, Object> params){
List<CategoryEntity> list = categoryService.queryPageWithTree(params);
return R.ok().put("data", list);
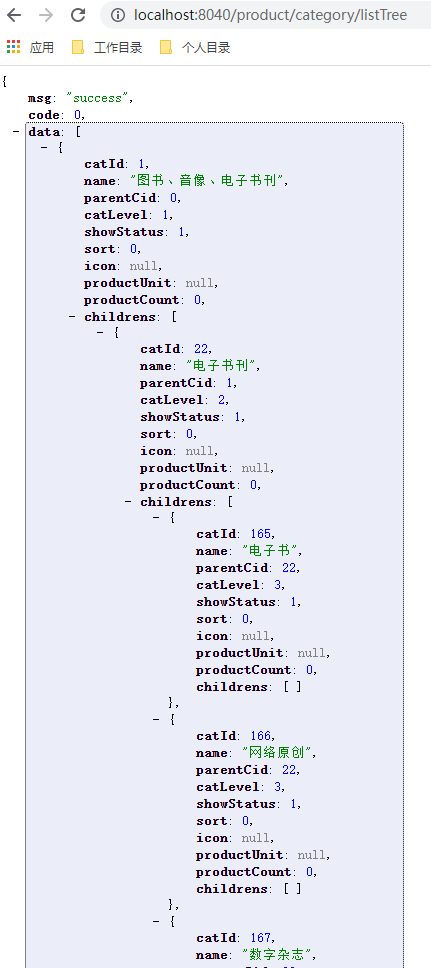
}启动服务访问测试
2. 前端服务串联
2.1 新增菜单
首先我们新增一个 商品系统的目录
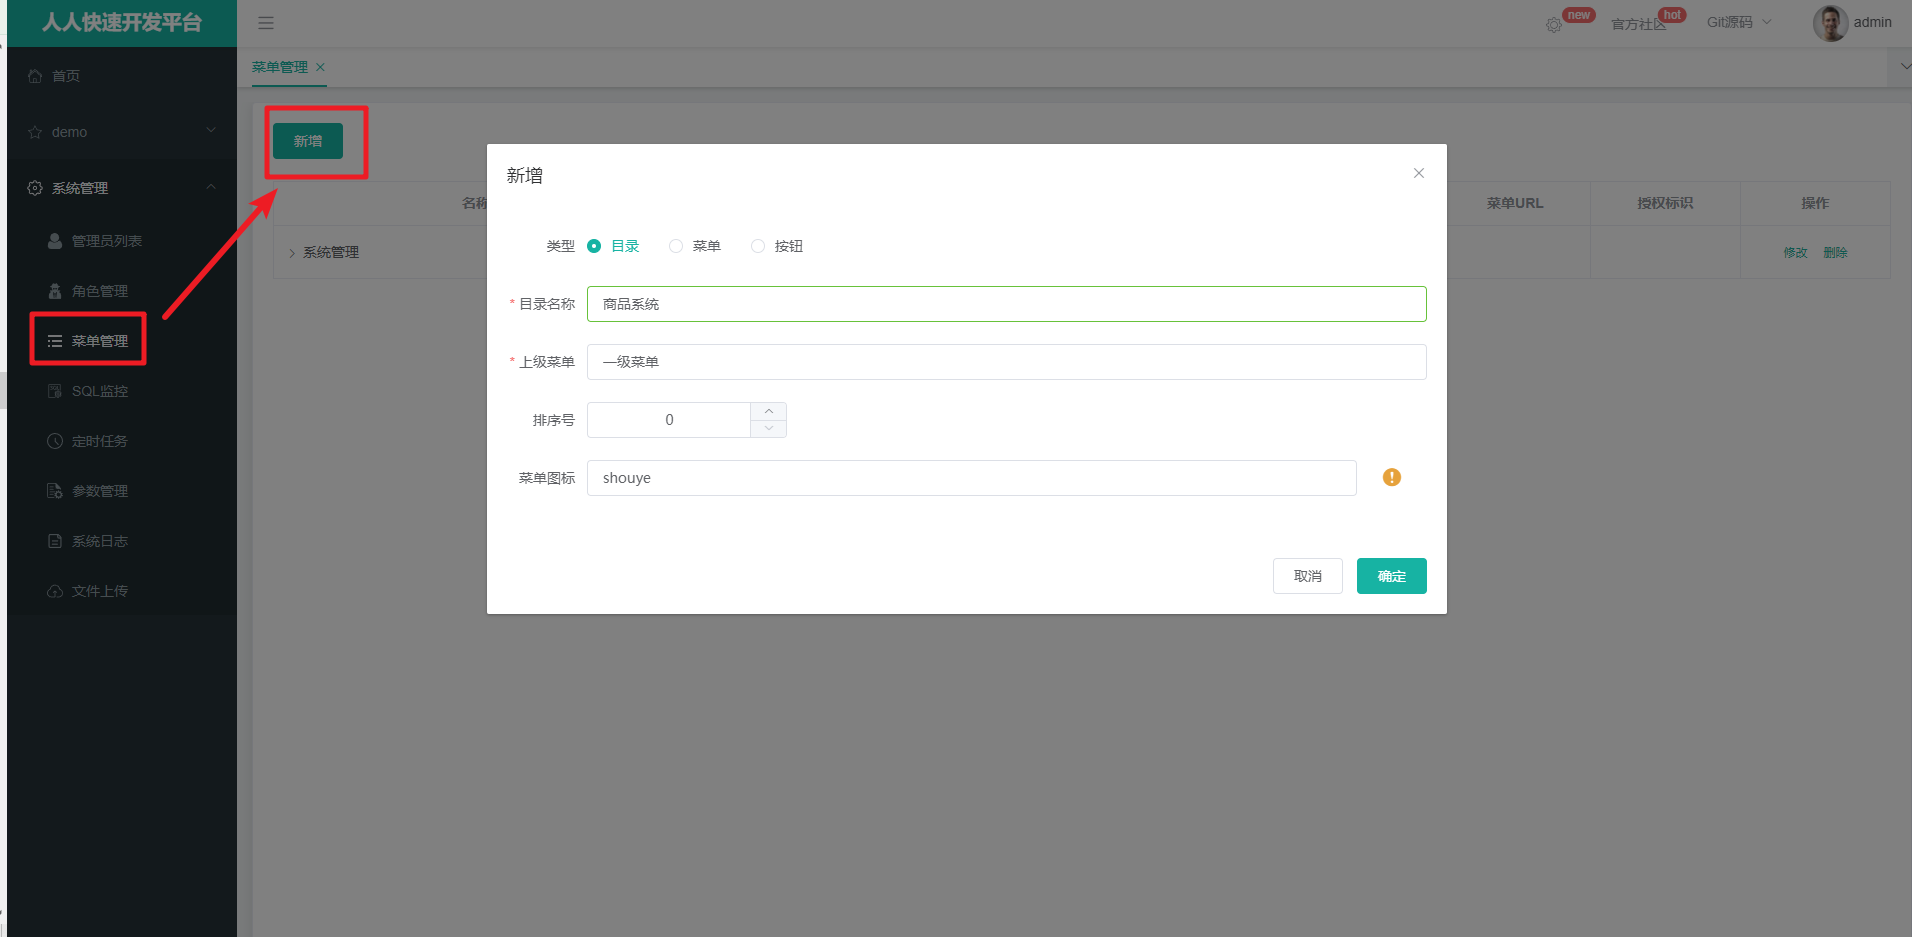
按照上图的操作完成即可

然后在商品系统下添加 类别管理的菜单
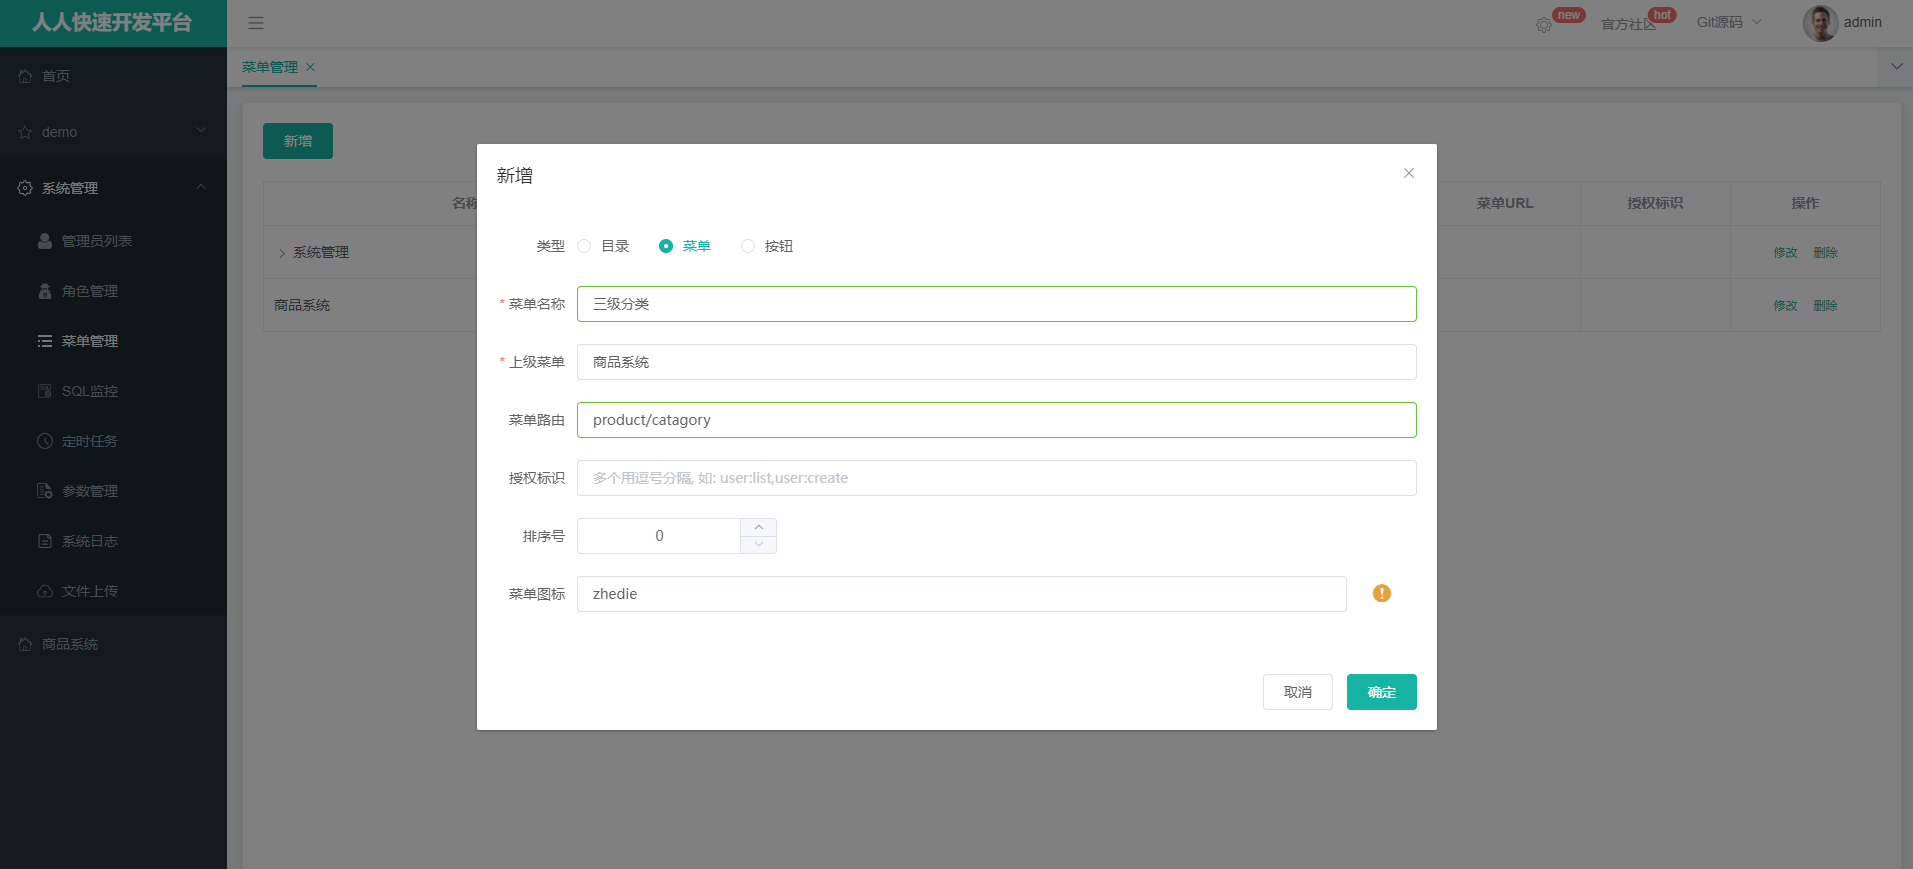
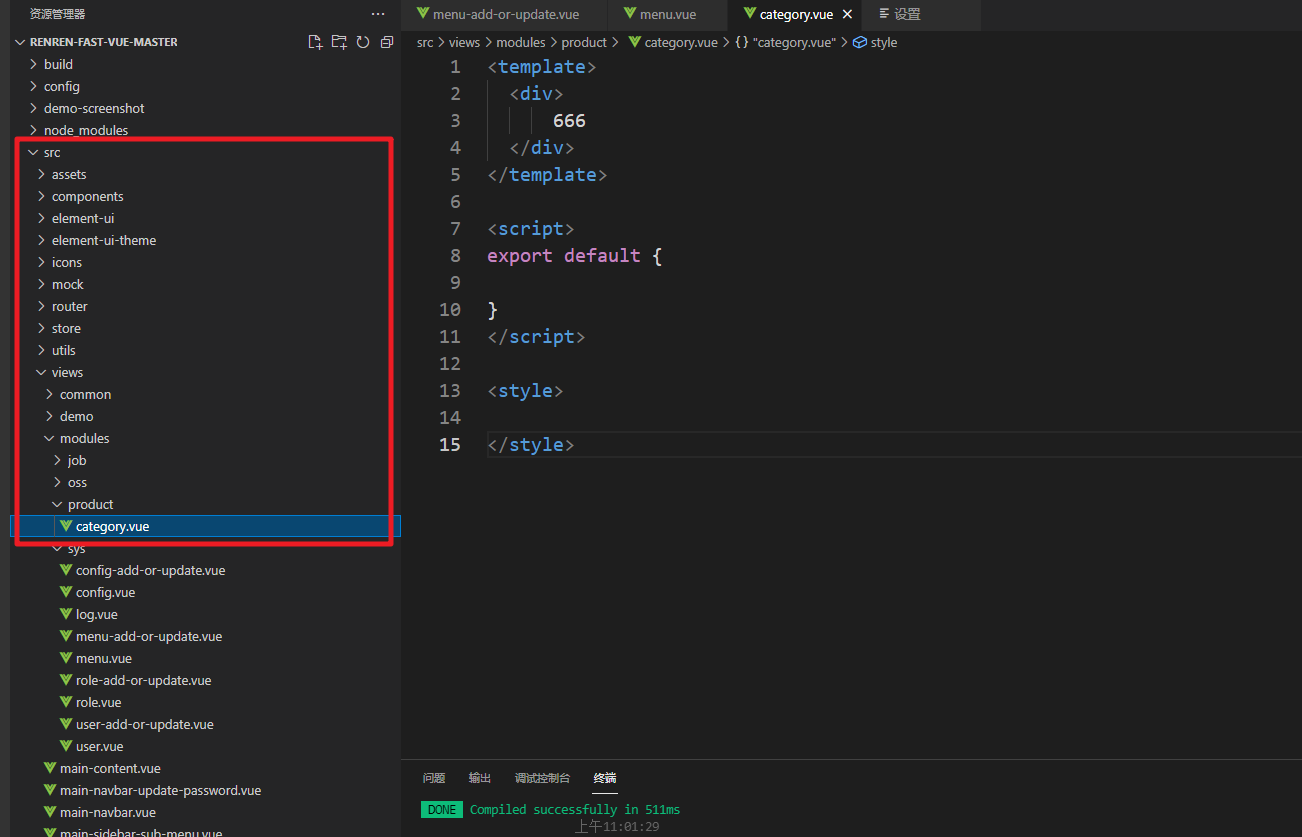
对应的三级分类的页面 product/catagory–> src/views/modules/product/category.vue
2.2 类别数据
ElementUI官网:https://element.eleme.cn/#/zh-CN
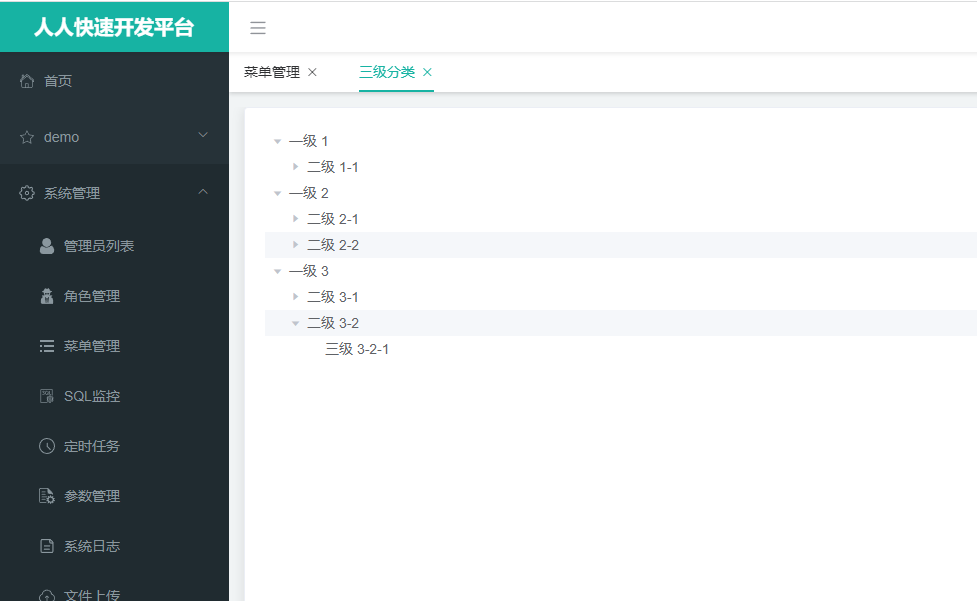
第一步:展示静态的数据,直接从ElementUI官网拷贝Tree相关案例代码
<template>
<div>
<el-tree :data="data" :props="defaultProps" @node-click="handleNodeClick"></el-tree>
</div>
</template><script>
/* eslint-disable */
export default {
data() {
return {
data: [{
label: '一级 1',
children: [{
label: '二级 1-1',
children: [{
label: '三级 1-1-1'
}]
}]
}, {
label: '一级 2',
children: [{
label: '二级 2-1',
children: [{
label: '三级 2-1-1'
}]
}, {
label: '二级 2-2',
children: [{
label: '三级 2-2-1'
}]
}]
}, {
label: '一级 3',
children: [{
label: '二级 3-1',
children: [{
label: '三级 3-1-1'
}]
}, {
label: '二级 3-2',
children: [{
label: '三级 3-2-1'
}]
}]
}],
defaultProps: {
children: 'children',
label: 'label'
}
};
},
methods: {
handleNodeClick(data) {
console.log(data);
}
}
};
</script><style>
</style>
页面效果
第二步:动态获取后台服务的数据
<template>
<div>
<el-tree :data="data" :props="defaultProps" @node-click="handleNodeClick"></el-tree>
</div>
</template><script>
/* eslint-disable */
export default {
data() {
return {
data: [],
defaultProps: {
children: 'children',
label: 'label'
}
};
},
methods: {
getCategory(){
this.$http({
url: this.$http.adornUrl('/product/category/listTree'),
method: 'get'
}).then(({data}) => {
console.log("成功获取的类别数据:",data.data)
this.data = data.data
})
},
handleNodeClick(data) {
console.log(data);
}
},created(){
this.getCategory();
}
};
</script><style>
</style>
访问三级分类数据并没有得到我们期望的结果。出现了404错误:http://localhost:8080/renren-fast/product/category/listTree
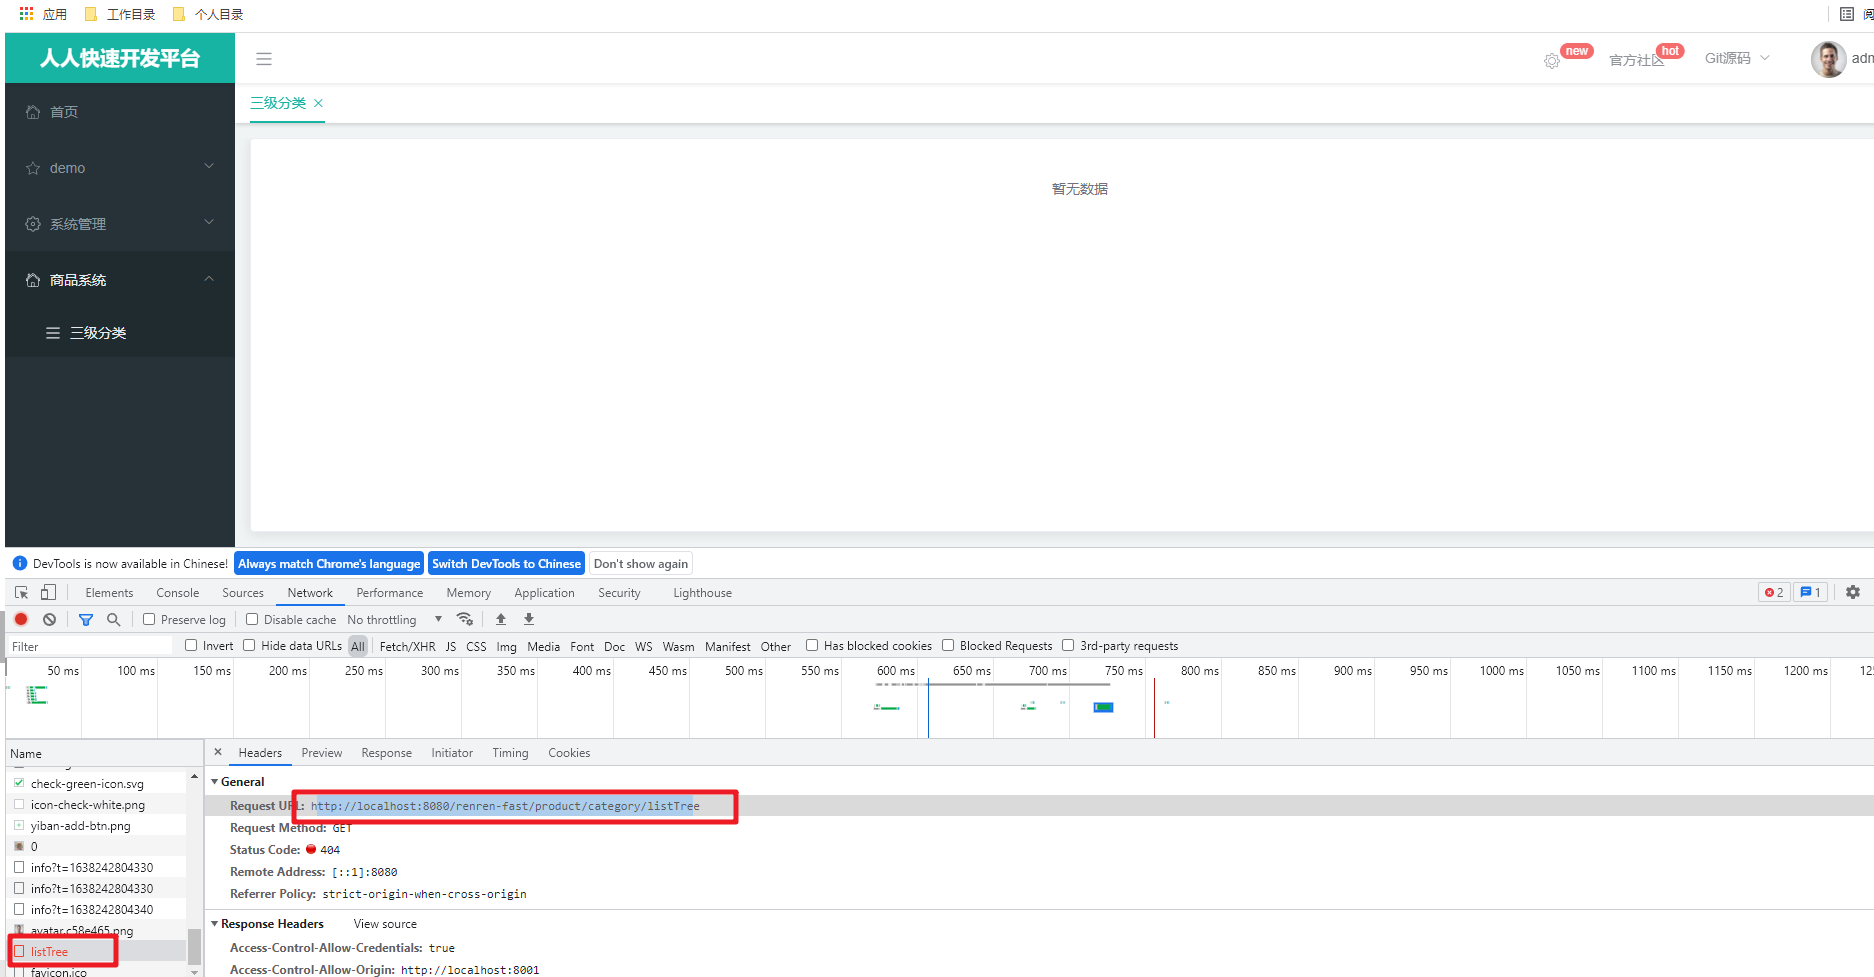
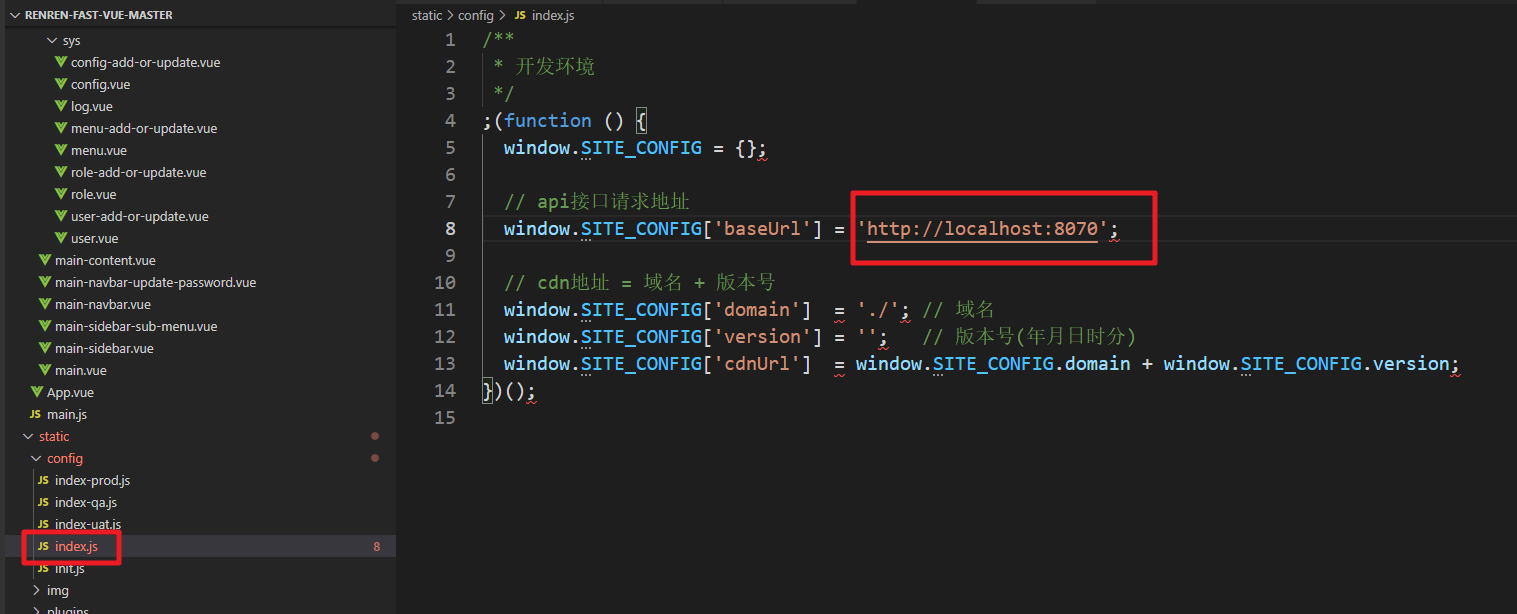
针对这个错误提示我们需要通过网关服务来实现统一的路由处理

修改了前端统一的后端服务地址为路由服务后
访问后这个验证码出不来了
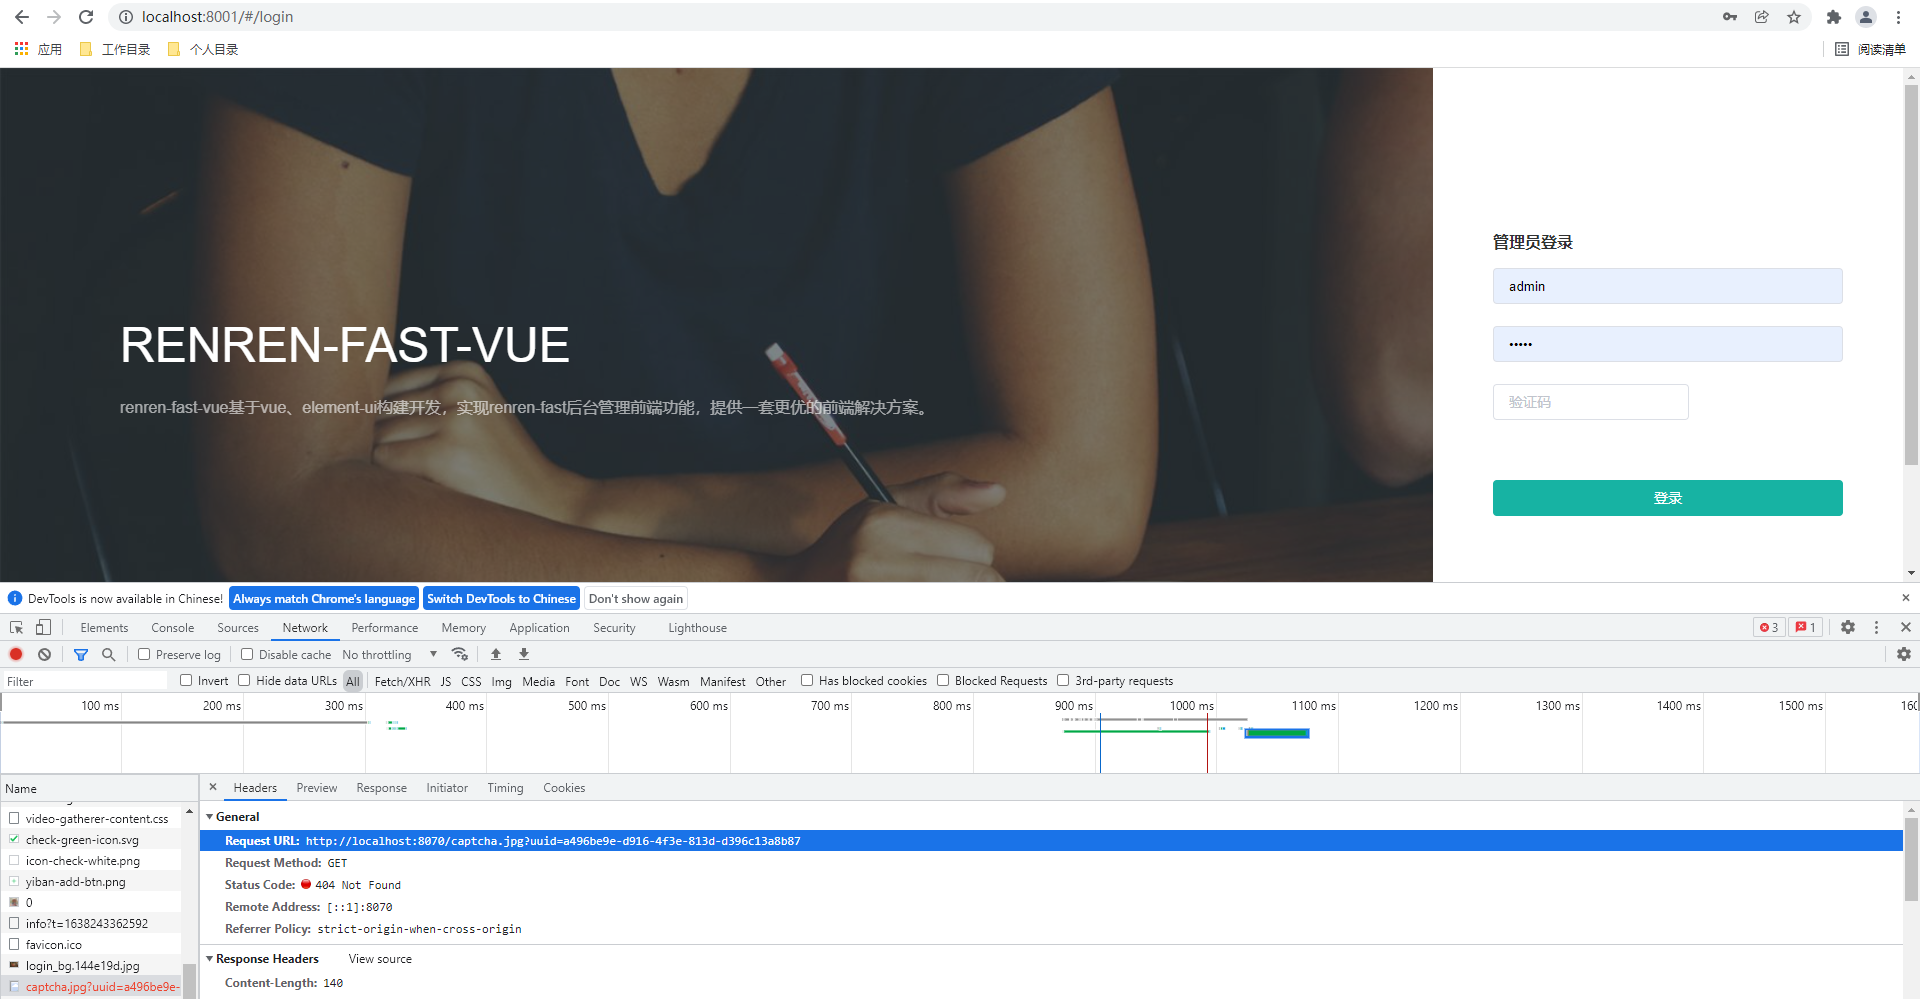
验证码出不来的原因是请求的地址:http://localhost:8070/captcha.jpg?uuid=a496be9e-d916-4f3e-813d-d396c13a8b87 跑到网关服务获取验证码了,这里网关服务就应该要将这个请求路由到renren-fast服务中。
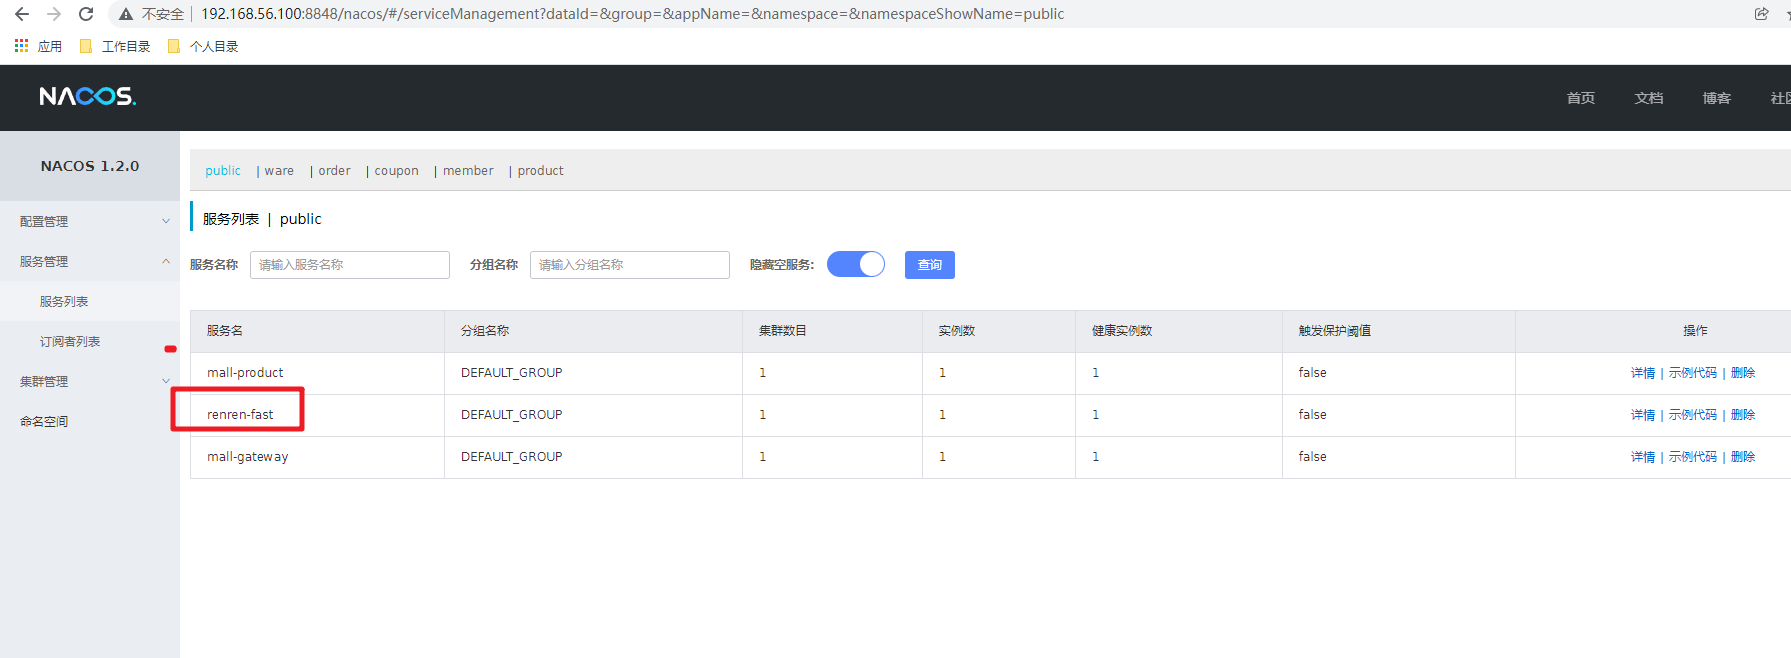
首先renren-fast服务没有在注册中心中注册,网关发现不了,先注册renren-fast服务
在renren-fast中依赖commons
		<dependency>

<groupId>com.msb.mall</groupId>

<artifactId>mall-commons</artifactId>

<version>0.0.1-SNAPSHOT</version>

</dependency>
添加注册中心和配置中心相关的信息

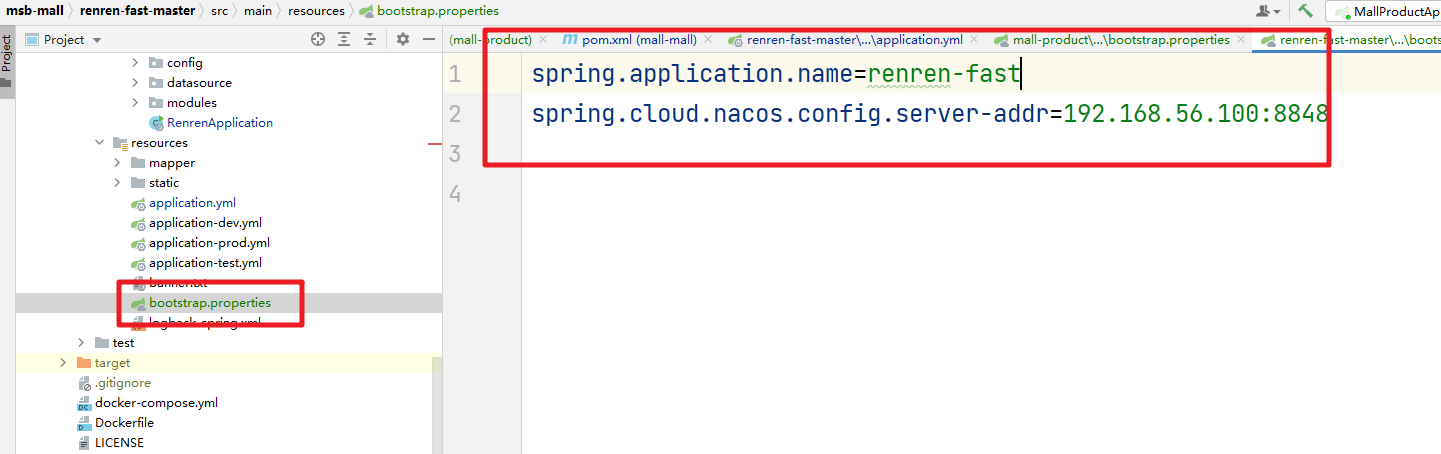
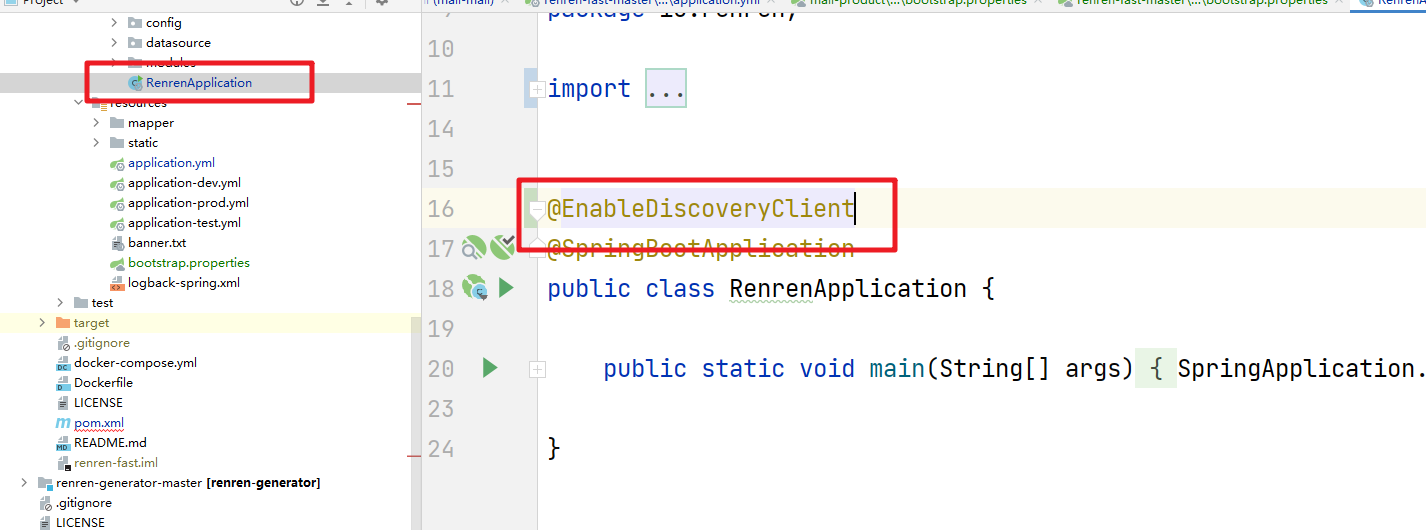
然后放开注册中心
最后启动服务提示如下错误
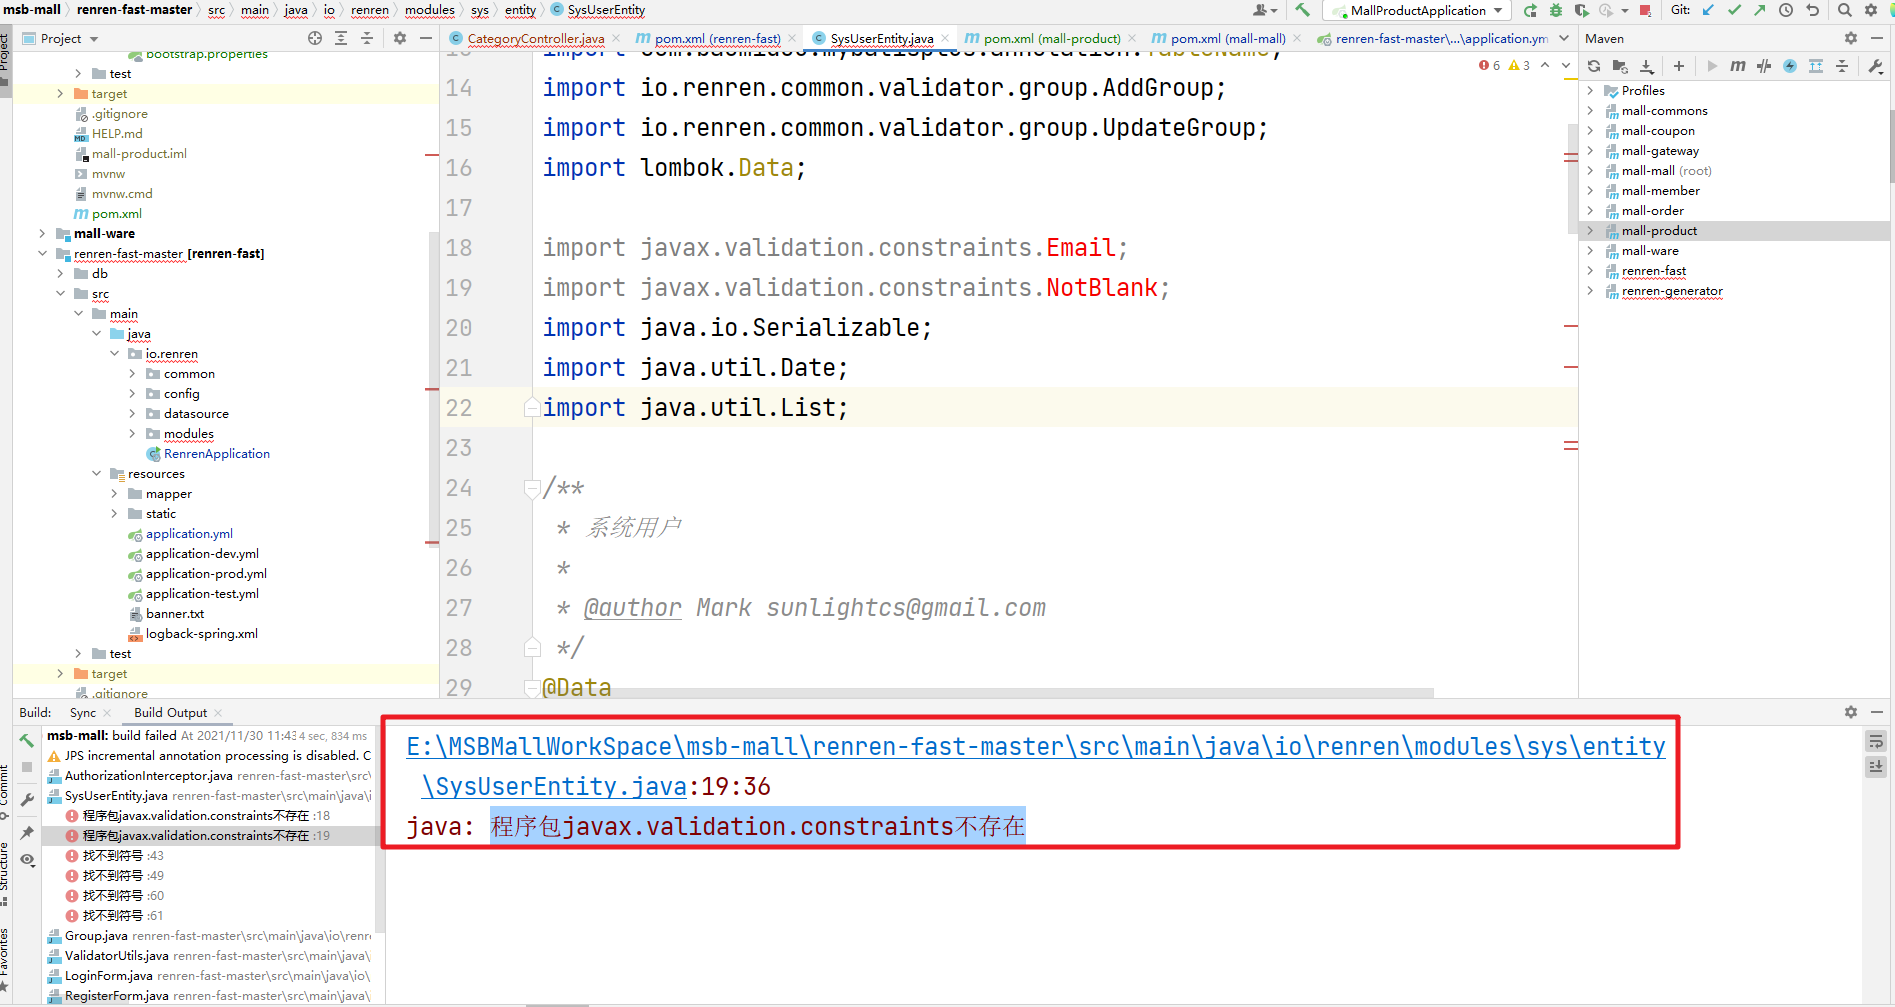
原因是因为SpringBoot我们把版本升级到了2.4.12那么validation默认被移除了,我们需要收到的添加依赖
		<dependency>

<groupId>org.springframework.boot</groupId>

<artifactId>spring-boot-starter-validation</artifactId>

<version>2.4.12</version>

</dependency>
启动服务,注册成功
解决验证码图片不显示的问题,我们需要在网关服务中添加对renren-fast服务访问的路由
# 注册中心的信息
spring:
application:
name: mall-gateway
cloud:
nacos:
discovery:
server-addr: 192.168.56.100:8848
gateway:
routes:
- id: route1
uri: http://www.baidu.com
predicates:
- Query=url,baidu
- id: route2
uri: http://www.jd.com
predicates:
- Query=url,jd
- id: app_route
uri: lb://renren-fast
predicates:
- Path=/app/**
filters:
- RewritePath=/app/(?<segment>/?.*), /renren-fast/${segment}localhost:8070/app/captcha.jpg -->
localhost:8080/app/captcha.jpg localhost:8080/renren-fast/captcha.jpg
指定注册中心的服务端口
server:
port: 8070
然后测试访问验证码出现了503的错误
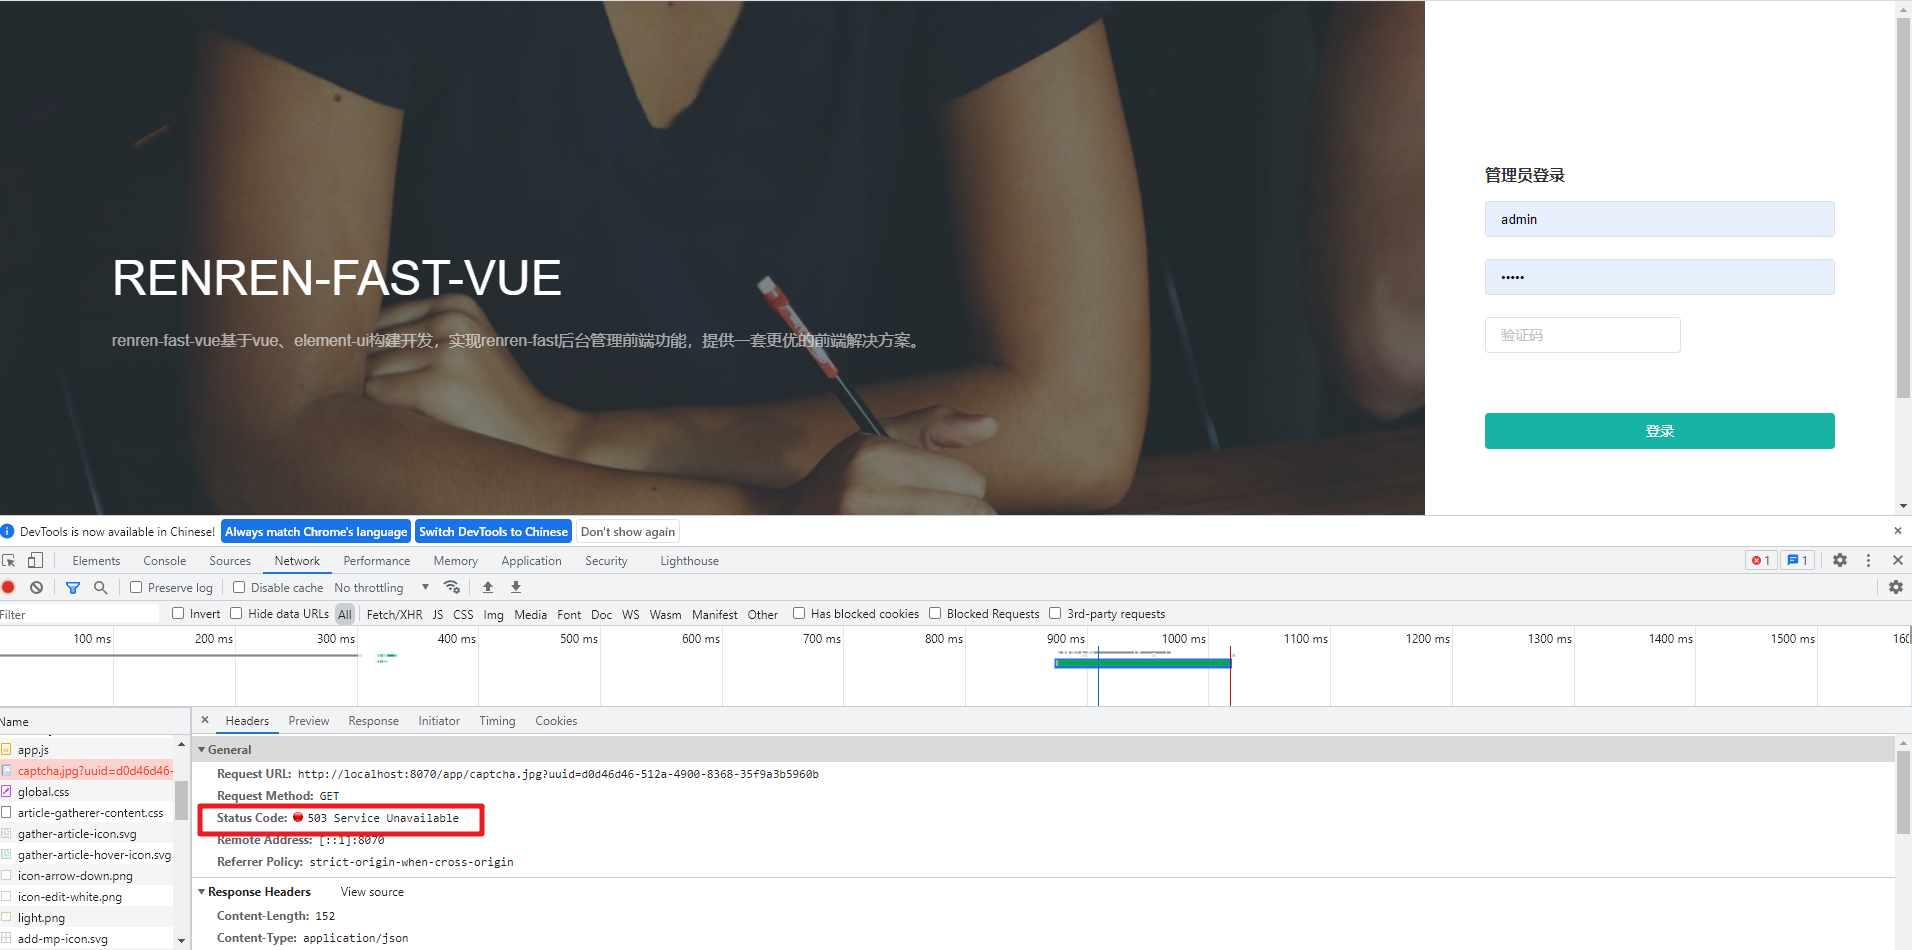
出现503错误的原因是Gateway网关服务中会根据loadbanlance负载均衡路由到renren-fast但是缺少了对应的依赖,在Gateway服务中添加即可
<dependency>
<groupId>org.springframework.cloud</groupId>
<artifactId>spring-cloud-starter-loadbalancer</artifactId>
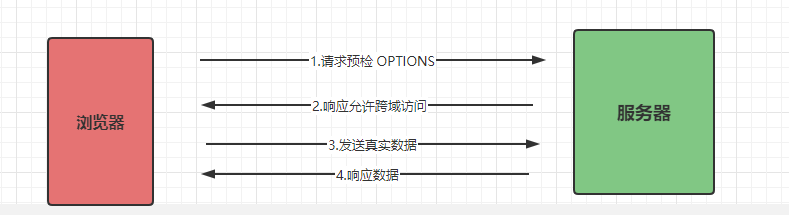
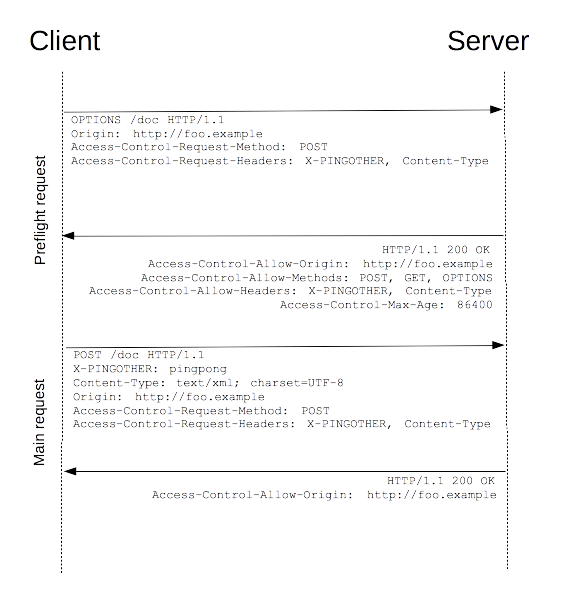
</dependency>2.3 跨域问题
同源策略
由于浏览器的同源策略,即属于不同域的页面之间不能相互访问各自的页面内容
注:同源策略,单说来就是同协议,同域名,同端口
URL 说明 是否允许通信
http://www.a.com/a.js
http://www.a.com/b.js 同一域名下 允许
http://www.a.com/lab/a.js
http://www.a.com/script/b.js 同一域名下不同文件夹 允许
http://www.a.com:8000/a.js
http://www.a.com/b.js 同一域名,不同端口 不允许
http://www.a.com/a.js
https://www.a.com/b.js 同一域名,不同协议 不允许
http://www.a.com/a.js
http://70.32.92.74/b.js 域名和域名对应ip 不允许
http://www.a.com/a.js
http://script.a.com/b.js 主域相同,子域不同 不允许
http://www.a.com/a.js
http://a.com/b.js 同一域名,不同二级域名(同上) 不允许(cookie这种情况下也不允许访问)
http://www.cnblogs.com/a.js
http://www.a.com/b.js 不同域名 不允许
跨域网站介绍:https://developer.mozilla.org/zh-CN/docs/Web/HTTP/CORS
对于跨域问题的解决我们统一在Gateway中设定。注意删除掉在renren-fast中配置的跨域问题
package com.msb.mall.gateway.config;import org.springframework.context.annotation.Bean;
import org.springframework.context.annotation.Configuration;
import org.springframework.web.cors.CorsConfiguration;
import org.springframework.web.cors.reactive.CorsConfigurationSource;
import org.springframework.web.cors.reactive.CorsWebFilter;
import org.springframework.web.cors.reactive.UrlBasedCorsConfigurationSource;@Configuration
public class MallCorsConfiguration {@Bean public CorsWebFilter corsWebFilter(){ UrlBasedCorsConfigurationSource source = new UrlBasedCorsConfigurationSource(); CorsConfiguration configuration = new CorsConfiguration(); // 配置跨域的信息 configuration.addAllowedHeader("*"); configuration.addAllowedMethod("*"); // SpringBoot升级到2.4.0 之后需要使用该配置 configuration.addAllowedOriginPattern("*"); configuration.setAllowCredentials(true); source.registerCorsConfiguration("/**",configuration); return new CorsWebFilter(source); }
}
然后登录操作即可

2.4 查看类别数据
首先需要在Gateway中配置商品服务的路由信息,同时要注意配置规则的先后顺序
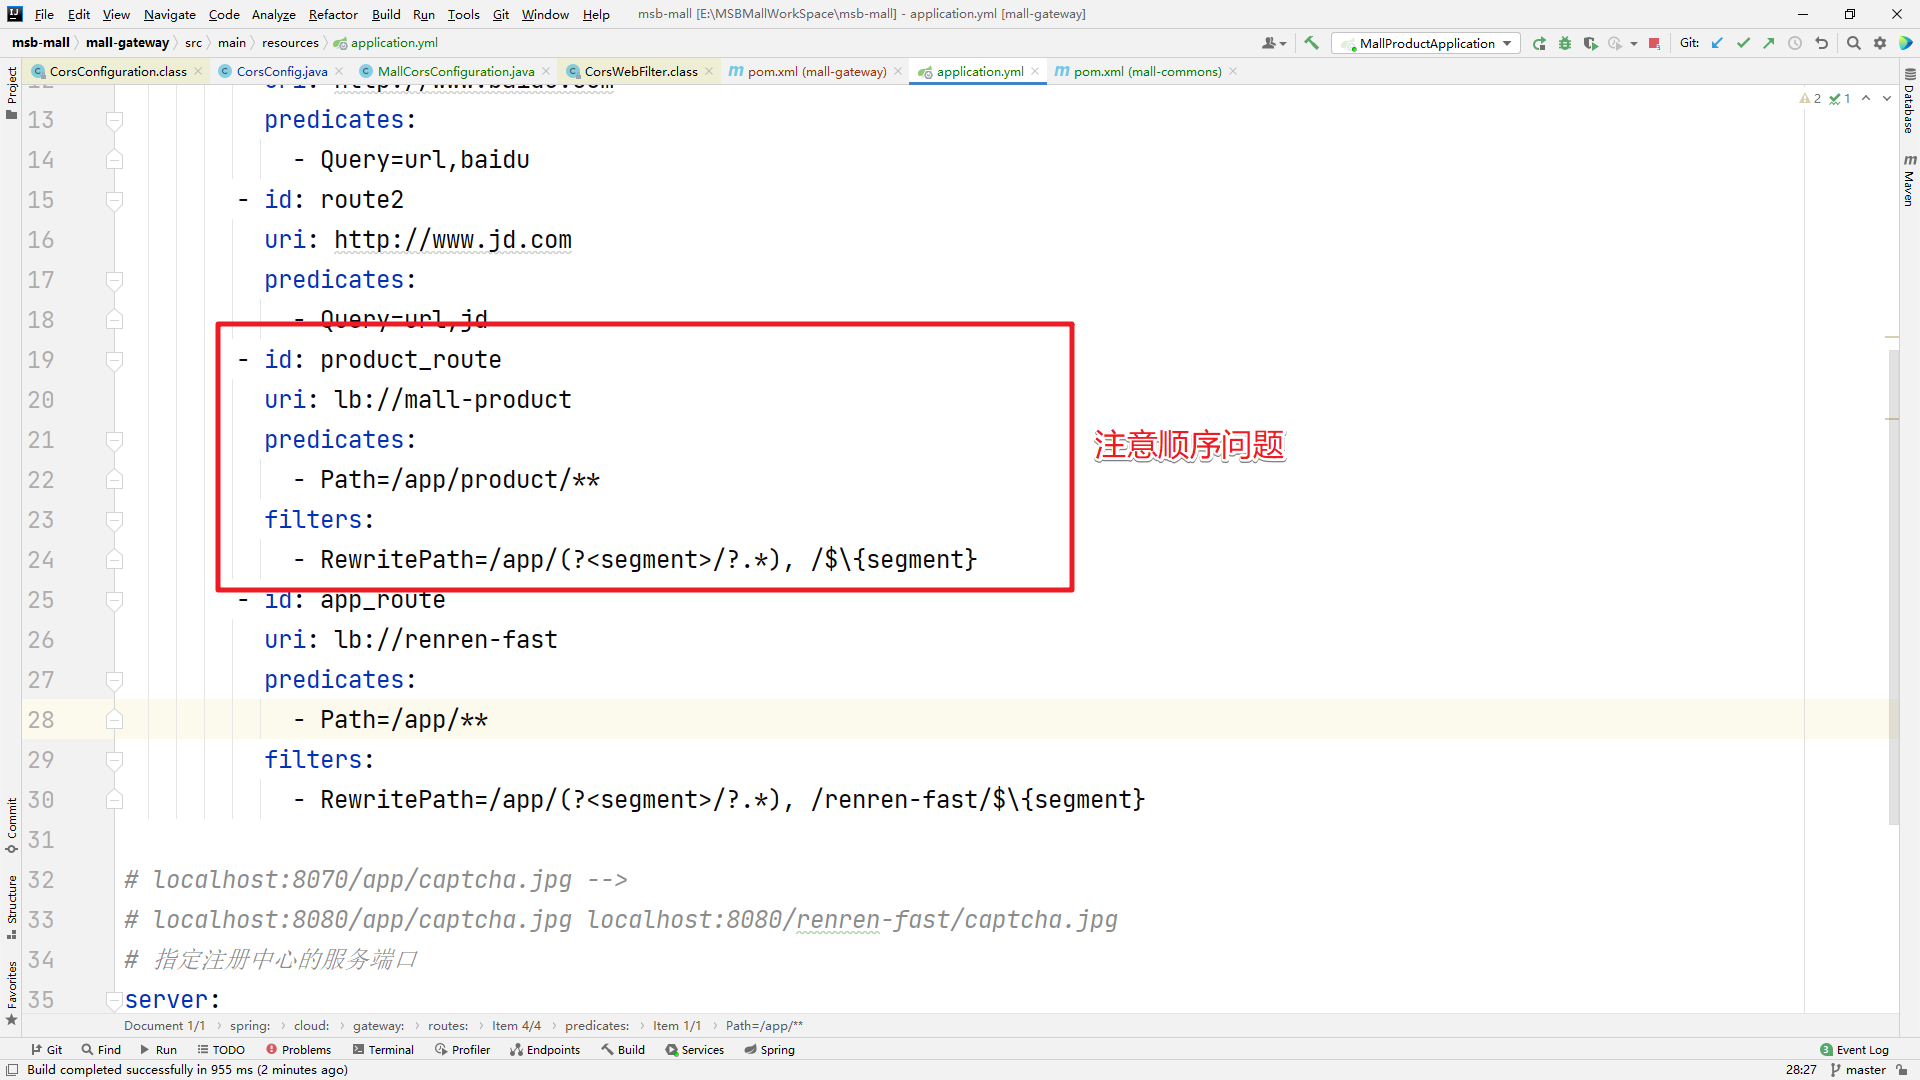
然后服务端响应的数据的字段要在Vue文件中显示的对应,才能正确的显示

访问测试

3 删除类别
1> 先完成类型页面的基础处理
添加相关的 添加 , 删除按钮和复选框按钮以及相关的代码逻辑

对应的Vue代码
<template>
<div>
<el-tree :data="data" :props="defaultProps"
:expand-on-click-node="false"
show-checkbox
node-key="catId"
>
<span class="custom-tree-node" slot-scope="{ node, data }">
<span>{{ node.label }}</span>
<span>
<el-button v-if="data.catLevel <= 2" type="text" size="mini" @click="() => append(data)">
添加
</el-button>
<el-button v-if="data.childrens.length == 0" type="text" size="mini" @click="() => remove(node, data)">
删除
</el-button>
</span>
</span>
</el-tree>
</div>
</template><script>
/* eslint-disable */
export default {
data() {
return {
data: [],
defaultProps: {
children: "childrens",
label: "name",
},
};
},
methods: {
getCategory() {
this.$http({
url: this.$http.adornUrl("/product/category/listTree"),
method: "get",
}).then(({ data }) => {
console.log("成功获取的类别数据:", data.data);
this.data = data.data;
});
},append(data) {
console.log("添加",data)
},
remove(node, data) {
console.log("删除",data,node)
}
},
created() {
this.getCategory();
},
};
</script>
<style>
</style>
2> 实现后台服务逻辑删除的操作
在实际开发中针对数据删除这块我们一般都会采用逻辑删除的方法来操作。在本项目中我们可以通过mybatis-Puls中提供的逻辑删除方式来实现
mybatis-plus:https://mp.baomidou.com/guide/
首先配置全局的逻辑删除逻辑

然后在entity的字段中显示的标明:
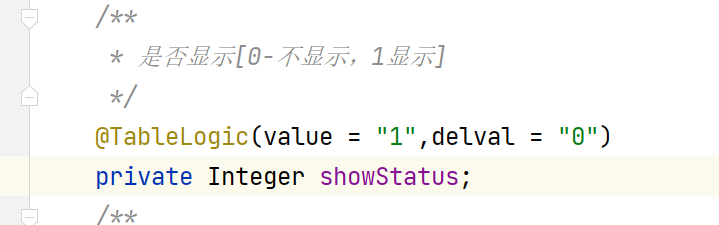
然后我们就可以在service中继续使用delete相关的方法来操作了
/**
* 逻辑批量删除操作
* @param ids
*/
@Override
public void removeCategoryByIds(List<Long> ids) {
// TODO 1.检查类别数据是否在其他业务中使用// 2.批量逻辑删除操作 baseMapper.deleteBatchIds(ids); }</code></pre></div></div><p>然后通过postman测试</p><figure class=""><div class="rno-markdown-img-url" style="text-align:center"><div class="rno-markdown-img-url-inner" style="width:100%"><div style="width:100%"><img src="https://cdn.static.attains.cn/app/developer-bbs/upload/1722842888784311248.png" /></div><div class="figure-desc">image.png</div></div></div></figure><p>然后在数据库中反应的效果</p><figure class=""><div class="rno-markdown-img-url" style="text-align:center"><div class="rno-markdown-img-url-inner" style="width:100%"><div style="width:100%"><img src="https://cdn.static.attains.cn/app/developer-bbs/upload/1722842889196080381.png" /></div><div class="figure-desc">image.png</div></div></div></figure><p>3> 串联前后端的逻辑</p><p>要实现该效果,首先需要通过ajax异步的来提交请求到后端服务</p><div class="rno-markdown-code"><div class="rno-markdown-code-toolbar"><div class="rno-markdown-code-toolbar-info"><div class="rno-markdown-code-toolbar-item is-type"><span class="is-m-hidden">代码语言:</span>javascript</div></div><div class="rno-markdown-code-toolbar-opt"><div class="rno-markdown-code-toolbar-copy"><i class="icon-copy"></i><span class="is-m-hidden">复制</span></div></div></div><div class="developer-code-block"><pre class="prism-token token line-numbers language-javascript"><code class="language-javascript" style="margin-left:0">this.$http({ url: this.$http.adornUrl("/product/category/delete"), method: "post", data: this.$http.adornData(ids, false), }).then(({ data }) => { if (data && data.code === 0) { this.$message({ message: "操作成功", type: "success", }); // 重新加载所有的菜单数据 this.getCategory(); // 设置默认展开的父节点信息 this.expandKeys=[node.parent.data.catId] } else { this.$message.error(data.msg); }</code></pre></div></div><p>然后删除需要必要的提示信息</p><div class="rno-markdown-code"><div class="rno-markdown-code-toolbar"><div class="rno-markdown-code-toolbar-info"><div class="rno-markdown-code-toolbar-item is-type"><span class="is-m-hidden">代码语言:</span>javascript</div></div><div class="rno-markdown-code-toolbar-opt"><div class="rno-markdown-code-toolbar-copy"><i class="icon-copy"></i><span class="is-m-hidden">复制</span></div></div></div><div class="developer-code-block"><pre class="prism-token token line-numbers language-javascript"><code class="language-javascript" style="margin-left:0">this.$confirm(`是否确认删除【${data.name}】记录?`, "提示", { confirmButtonText: "确定", cancelButtonText: "取消", type: "warning", }) .then(() => { // 传递的数据 let ids = [data.catId]; // 把删除的请求提交到后台服务 this.$http({ url: this.$http.adornUrl("/product/category/delete"), method: "post", data: this.$http.adornData(ids, false), }).then(({ data }) => { if (data && data.code === 0) { this.$message({ message: "操作成功", type: "success", }); // 重新加载所有的菜单数据 this.getCategory(); // 设置默认展开的父节点信息 this.expandKeys=[node.parent.data.catId] } else { this.$message.error(data.msg); } }); }) .catch(() => { this.$message({ type: "info", message: "已取消删除", }); }); console.log("删除", data, node);</code></pre></div></div><figure class=""><div class="rno-markdown-img-url" style="text-align:center"><div class="rno-markdown-img-url-inner" style="width:100%"><div style="width:100%"><img src="https://cdn.static.attains.cn/app/developer-bbs/upload/1722842889611642184.png" /></div><div class="figure-desc">image.png</div></div></div></figure><figure class=""><div class="rno-markdown-img-url" style="text-align:center"><div class="rno-markdown-img-url-inner" style="width:100%"><div style="width:100%"><img src="https://cdn.static.attains.cn/app/developer-bbs/upload/1722842889958240001.png" /></div><div class="figure-desc">image.png</div></div></div></figure><p>最后删除成功数据后Tree数据刷新及对应的Tree的默认展示父节点信息</p><figure class=""><div class="rno-markdown-img-url" style="text-align:center"><div class="rno-markdown-img-url-inner" style="width:95.29%"><div style="width:100%"><img src="https://cdn.static.attains.cn/app/developer-bbs/upload/1722842890530478997.png" /></div><div class="figure-desc">image.png</div></div></div></figure><figure class=""><div class="rno-markdown-img-url" style="text-align:center"><div class="rno-markdown-img-url-inner" style="width:63.65%"><div style="width:100%"><img src="https://cdn.static.attains.cn/app/developer-bbs/upload/1722842890886254889.png" /></div><div class="figure-desc">image.png</div></div></div></figure><figure class=""><div class="rno-markdown-img-url" style="text-align:center"><div class="rno-markdown-img-url-inner" style="width:100%"><div style="width:100%"><img src="https://cdn.static.attains.cn/app/developer-bbs/upload/1722842891151670837.png" /></div><div class="figure-desc">image.png</div></div></div></figure><p>到此,三级分类数据的删除操作搞定</p><h4 id="d8dk7" name="4.%E6%96%B0%E5%A2%9E%E7%B1%BB%E5%88%AB">4.新增类别</h4><p>后台的添加逻辑已经有了,我们只需要在前端项目中完成新增的相关页面逻辑就可以了</p><p>对话框页面</p><figure class=""><div class="rno-markdown-img-url" style="text-align:center"><div class="rno-markdown-img-url-inner" style="width:100%"><div style="width:100%"><img src="https://cdn.static.attains.cn/app/developer-bbs/upload/1722842891500964076.png" /></div><div class="figure-desc">image.png</div></div></div></figure><p>点击后弹出页面</p><figure class=""><div class="rno-markdown-img-url" style="text-align:center"><div class="rno-markdown-img-url-inner" style="width:100%"><div style="width:100%"><img src="https://cdn.static.attains.cn/app/developer-bbs/upload/1722842891989247390.png" /></div><div class="figure-desc">image.png</div></div></div></figure><p>修改新增类别相关的数据</p><div class="rno-markdown-code"><div class="rno-markdown-code-toolbar"><div class="rno-markdown-code-toolbar-info"><div class="rno-markdown-code-toolbar-item is-type"><span class="is-m-hidden">代码语言:</span>javascript</div></div><div class="rno-markdown-code-toolbar-opt"><div class="rno-markdown-code-toolbar-copy"><i class="icon-copy"></i><span class="is-m-hidden">复制</span></div></div></div><div class="developer-code-block"><pre class="prism-token token line-numbers language-javascript"><code class="language-javascript" style="margin-left:0"> append(data) { this.dialogVisible = true; // 打开弹出窗口 // console.log("添加", data); this.categoryForm.parentCid = data.catId;// 添加的类别对应的父菜单 this.categoryForm.catLevel = data.catLevel + 1; // 设置添加类别的层级 this.categoryForm.showStatus = 1; // 菜单的显示状态 1 显示 0 被删除 this.categoryForm.sort = 0; // 排序 默认给 0 }</code></pre></div></div><p>完成表单数据提交的ajax请求</p><div class="rno-markdown-code"><div class="rno-markdown-code-toolbar"><div class="rno-markdown-code-toolbar-info"><div class="rno-markdown-code-toolbar-item is-type"><span class="is-m-hidden">代码语言:</span>javascript</div></div><div class="rno-markdown-code-toolbar-opt"><div class="rno-markdown-code-toolbar-copy"><i class="icon-copy"></i><span class="is-m-hidden">复制</span></div></div></div><div class="developer-code-block"><pre class="prism-token token line-numbers language-javascript"><code class="language-javascript" style="margin-left:0"> addDialog(){ // 添加三级分类的类别信息 this.$http({ url: this.$http.adornUrl("/product/category/save"), method: "post", data: this.$http.adornData(this.categoryForm, false), }).then(({ data }) => { if (data && data.code === 0) { this.$message({ message: "数据添加成功", type: "success", }); this.dialogVisible = false; // 关闭弹出窗口 // 重新加载所有的菜单数据 this.getCategory(); // 设置默认展开的父节点信息 this.expandKeys = [this.categoryForm.parentCid]; } else { this.$message.error(data.msg); } }); }</code></pre></div></div><p>页面效果</p><figure class=""><div class="rno-markdown-img-url" style="text-align:center"><div class="rno-markdown-img-url-inner" style="width:100%"><div style="width:100%"><img src="https://cdn.static.attains.cn/app/developer-bbs/upload/1722842892494728142.png" /></div><div class="figure-desc">image.png</div></div></div></figure><p>添加信息隐藏了一个Bug,如果在二级分类下面添加三级分类,然后添加的三级分类不能显示。原因在Java后端中的Long类型数据的比较。只需要修改相关代码即可</p><figure class=""><div class="rno-markdown-img-url" style="text-align:center"><div class="rno-markdown-img-url-inner" style="width:100%"><div style="width:100%"><img src="https://cdn.static.attains.cn/app/developer-bbs/upload/1722842892876914250.png" /></div><div class="figure-desc">image.png</div></div></div></figure><p>原因</p><figure class=""><div class="rno-markdown-img-url" style="text-align:center"><div class="rno-markdown-img-url-inner" style="width:100%"><div style="width:100%"><img src="https://cdn.static.attains.cn/app/developer-bbs/upload/1722842893350943342.png" /></div><div class="figure-desc">image.png</div></div></div></figure><h4 id="bafvj" name="5.%E4%BF%AE%E6%94%B9%E7%B1%BB%E5%88%AB">5.修改类别</h4><p>同样的后台逻辑已经实现,我们只需要完善前端业务即可</p><p>添加修改按钮</p><figure class=""><div class="rno-markdown-img-url" style="text-align:center"><div class="rno-markdown-img-url-inner" style="width:100%"><div style="width:100%"><img src="https://cdn.static.attains.cn/app/developer-bbs/upload/1722842893677007807.png" /></div><div class="figure-desc">image.png</div></div></div></figure><p>点击更新的按钮弹出对话框</p><figure class=""><div class="rno-markdown-img-url" style="text-align:center"><div class="rno-markdown-img-url-inner" style="width:100%"><div style="width:100%"><img src="https://cdn.static.attains.cn/app/developer-bbs/upload/1722842894126824342.png" /></div><div class="figure-desc">image.png</div></div></div></figure><p>然后修改数据后的更新提交</p><figure class=""><div class="rno-markdown-img-url" style="text-align:center"><div class="rno-markdown-img-url-inner" style="width:100%"><div style="width:100%"><img src="https://cdn.static.attains.cn/app/developer-bbs/upload/1722842894589238105.png" /></div><div class="figure-desc">image.png</div></div></div></figure><figure class=""><div class="rno-markdown-img-url" style="text-align:center"><div class="rno-markdown-img-url-inner" style="width:100%"><div style="width:100%"><img src="https://cdn.static.attains.cn/app/developer-bbs/upload/1722842894919725542.png" /></div><div class="figure-desc">image.png</div></div></div></figure><h4 id="5436b" name="6.-%E6%8B%96%E6%8B%BD%E5%8A%9F%E8%83%BD">6. 拖拽功能</h4><p>首先实现拖拽效果</p><p>1> 放开拖拽的功能</p><figure class=""><div class="rno-markdown-img-url" style="text-align:center"><div class="rno-markdown-img-url-inner" style="width:100%"><div style="width:100%"><img src="https://cdn.static.attains.cn/app/developer-bbs/upload/1722842895495918562.png" /></div><div class="figure-desc">image.png</div></div></div></figure><p>也就是我们只需要将 draggable设置为TRUE即可</p><figure class=""><div class="rno-markdown-img-url" style="text-align:center"><div class="rno-markdown-img-url-inner" style="width:100%"><div style="width:100%"><img src="https://cdn.static.attains.cn/app/developer-bbs/upload/1722842895913085052.png" /></div><div class="figure-desc">image.png</div></div></div></figure><p>然后就是要控制拖拽的位置是否可行,因为我们不能破坏三级分类的规则,我们不能拖拽后整个分类变成了4级5级分类等,控制的条件是在ElementUI中给你我们提供了一个allow-drop属性,该属性接收一个方法,方法返回true表示可放置,返回false表示不可放置,我们要做的就是在这个方法中添加我们的放置逻辑</p><figure class=""><div class="rno-markdown-img-url" style="text-align:center"><div class="rno-markdown-img-url-inner" style="width:100%"><div style="width:100%"><img src="https://cdn.static.attains.cn/app/developer-bbs/upload/1722842895955881178.png" /></div><div class="figure-desc">image.png</div></div></div></figure><figure class=""><div class="rno-markdown-img-url" style="text-align:center"><div class="rno-markdown-img-url-inner" style="width:100%"><div style="width:100%"><img src="https://cdn.static.attains.cn/app/developer-bbs/upload/1722842896320721055.png" /></div><div class="figure-desc">image.png</div></div></div></figure><div class="rno-markdown-code"><div class="rno-markdown-code-toolbar"><div class="rno-markdown-code-toolbar-info"><div class="rno-markdown-code-toolbar-item is-type"><span class="is-m-hidden">代码语言:</span>javascript</div></div><div class="rno-markdown-code-toolbar-opt"><div class="rno-markdown-code-toolbar-copy"><i class="icon-copy"></i><span class="is-m-hidden">复制</span></div></div></div><div class="developer-code-block"><pre class="prism-token token line-numbers language-javascript"><code class="language-javascript" style="margin-left:0"> // draggingNode 要拖拽的节点 // dropNode 目标节点 // type 参数有三种情况:'prev'、'inner' 和 'next' allowDrop(draggingNode, dropNode, type){ // 判断拖拽的节点是否可以在该位置放置 console.log("--->",draggingNode, dropNode, type) // 1.获取当前被拖拽的节点的最大的level this.countNodeLevel(draggingNode); let deep = Math.abs(this.maxLevel - draggingNode.level ) + 1; if(type == 'inner'){ return deep + dropNode.level <= 3; } return deep + dropNode.parent.level <= 3; }, countNodeLevel(node){ // 找到所有子节点,最大的level if(node.childNodes != null && node.childNodes.length > 0){ for(let i = 0; i < node.childNodes.length; i ++){ if(node.childNodes[i].level > this.maxLevel){ this.maxLevel = node.childNodes[i].level } this.countNodeLevel(node.childNodes[i]); } } }</code></pre></div></div><p>然后实现拖拽后台数据更新,我们需要在后台添加批量更新的方法:</p><div class="rno-markdown-code"><div class="rno-markdown-code-toolbar"><div class="rno-markdown-code-toolbar-info"><div class="rno-markdown-code-toolbar-item is-type"><span class="is-m-hidden">代码语言:</span>javascript</div></div><div class="rno-markdown-code-toolbar-opt"><div class="rno-markdown-code-toolbar-copy"><i class="icon-copy"></i><span class="is-m-hidden">复制</span></div></div></div><div class="developer-code-block"><pre class="prism-token token line-numbers language-javascript"><code class="language-javascript" style="margin-left:0"> /** * 批量修改 */ @RequestMapping("/updateBatch") //@RequiresPermissions("product:category:update") public R updateBatch(@RequestBody CategoryEntity[] category){ //categoryService.updateById(category); categoryService.updateBatchById(Arrays.asList(category)); return R.ok(); }</code></pre></div></div><p>前端的数据调整,需要更新的数据保存在了this.updateNodes中。注意push方法的使用。添加对应的提交操作的方法</p><div class="rno-markdown-code"><div class="rno-markdown-code-toolbar"><div class="rno-markdown-code-toolbar-info"><div class="rno-markdown-code-toolbar-item is-type"><span class="is-m-hidden">代码语言:</span>javascript</div></div><div class="rno-markdown-code-toolbar-opt"><div class="rno-markdown-code-toolbar-copy"><i class="icon-copy"></i><span class="is-m-hidden">复制</span></div></div></div><div class="developer-code-block"><pre class="prism-token token line-numbers language-javascript"><code class="language-javascript" style="margin-left:0">editSort(parentId){ // 获取最新的数据回写 this.$http({ url: this.$http.adornUrl(`/product/category/updateBatch`), method: "post", data: this.$http.adornData(this.updateNodes, false), }).then(({ data }) => { if (data && data.code === 0) { this.$message({ message: "拖拽操作成功", type: "success", }); // 重新加载所有的菜单数据 this.getCategory(); // 设置默认展开的父节点信息 this.expandKeys = [parentId]; } else { this.$message.error(data.msg); } }); }</code></pre></div></div><p>针对拖拽相关的开关设置,还是非常有必要的。通过ElementUI中的Switch就可以搞定。</p><figure class=""><div class="rno-markdown-img-url" style="text-align:center"><div class="rno-markdown-img-url-inner" style="width:100%"><div style="width:100%"><img src="https://cdn.static.attains.cn/app/developer-bbs/upload/1722842896638854210.png" /></div><div class="figure-desc">image.png</div></div></div></figure><p>现在是每次拖拽都需要调用后端的接口来处理,如果拖拽的比较频繁那么对系统的性能肯定会有影响,这时我们可以通过批量提交的方式来实现。先添加批量添加的按钮。</p><figure class=""><div class="rno-markdown-img-url" style="text-align:center"><div class="rno-markdown-img-url-inner" style="width:96.05%"><div style="width:100%"><img src="https://cdn.static.attains.cn/app/developer-bbs/upload/1722842897079762738.png" /></div><div class="figure-desc">image.png</div></div></div></figure><p>然后拖拽确定后点击“批量保存”按钮来实现后端数据处理,点击触发相关的方法:</p><figure class=""><div class="rno-markdown-img-url" style="text-align:center"><div class="rno-markdown-img-url-inner" style="width:100%"><div style="width:100%"><img src="https://cdn.static.attains.cn/app/developer-bbs/upload/1722842897666127822.png" /></div><div class="figure-desc">image.png</div></div></div></figure><div class="rno-markdown-code"><div class="rno-markdown-code-toolbar"><div class="rno-markdown-code-toolbar-info"><div class="rno-markdown-code-toolbar-item is-type"><span class="is-m-hidden">代码语言:</span>javascript</div></div><div class="rno-markdown-code-toolbar-opt"><div class="rno-markdown-code-toolbar-copy"><i class="icon-copy"></i><span class="is-m-hidden">复制</span></div></div></div><div class="developer-code-block"><pre class="prism-token token line-numbers language-javascript"><code class="language-javascript" style="margin-left:0">,editSort(){ // 获取最新的数据回写 this.$http({ url: this.$http.adornUrl(`/product/category/updateBatch`), method: "post", data: this.$http.adornData(this.updateNodes, false), }).then(({ data }) => { if (data && data.code === 0) { this.$message({ message: "拖拽操作成功", type: "success", }); // 重新加载所有的菜单数据 this.getCategory(); // 设置默认展开的父节点信息 this.expandKeys = this.pCid; // 提交更新的数据后,重新相关的数据 this.updateNodes=[]; this.maxLevel=0; console.log("parentCid:",this.pCid) this.parentCid=[]; } else { this.$message.error(data.msg); } }); }</code></pre></div></div><p>这样整个更新分类的操作就完成了,完整的vue代码如下:</p><div class="rno-markdown-code"><div class="rno-markdown-code-toolbar"><div class="rno-markdown-code-toolbar-info"><div class="rno-markdown-code-toolbar-item is-type"><span class="is-m-hidden">代码语言:</span>javascript</div></div><div class="rno-markdown-code-toolbar-opt"><div class="rno-markdown-code-toolbar-copy"><i class="icon-copy"></i><span class="is-m-hidden">复制</span></div></div></div><div class="developer-code-block"><pre class="prism-token token line-numbers language-javascript"><code class="language-javascript" style="margin-left:0"><template><div>
<el-switch
v-model="draggable"
active-text="开启拖拽"
inactive-text="关闭拖拽">
</el-switch>
<el-button v-if="draggable" @click="editSort">批量保存</el-button>
<el-tree
:data="data"
:props="defaultProps"
:expand-on-click-node="false"
show-checkbox
node-key="catId"
@node-drop="handleDrop"
:default-expanded-keys="expandKeys"
:draggable="draggable"
:allow-drop="allowDrop"
>
<span class="custom-tree-node" slot-scope="{ node, data }">
<span>{{ node.label }}</span>
<span>
<el-button
v-if="data.catLevel <= 2"
type="text"
size="mini"
@click="() => append(data)"
>
添加
</el-button>
<el-button
type="text"
size="mini"
@click="() => edit(data)"
>
更新
</el-button>
<el-button
v-if="data.childrens.length == 0"
type="text"
size="mini"
@click="() => remove(node, data)"
>
删除
</el-button>
</span>
</span>
</el-tree><!-- 添加 弹出框 --> <el-dialog :title="dialogType?'新增':'更新'" :visible.sync="dialogVisible" width="30%" :close-on-click-modal="false" > <el-form :model="categoryForm"> <el-form-item label="类别名称" > <el-input v-model="categoryForm.name" autocomplete="off"></el-input> </el-form-item> <el-form-item label="图标" > <el-input v-model="categoryForm.icon" autocomplete="off"></el-input> </el-form-item> <el-form-item label="计量单位" > <el-input v-model="categoryForm.productUnit" autocomplete="off"></el-input> </el-form-item> </el-form> <span slot="footer" class="dialog-footer"> <el-button @click="dialogVisible = false">取 消</el-button> <el-button type="primary" @click="submitForm" >确 定</el-button > </span> </el-dialog></div>
</template><script>
/* eslint-disable */
export default {
data() {
return {
pCid:[],
draggable:false, // 拖拽功能默认是关闭的
updateNodes:[], // 拖拽节点后,需要更新的节点的节点信息
maxLevel:0,
dialogType:false, // true 添加 false 更新
dialogVisible: false,
categoryForm:{name:null,icon:null,productUnit:null,showStatus:1,sort:0,catId:null,catLevel:1},
data: [],
expandKeys: [],
defaultProps: {
children: "childrens",
label: "name",
},
};
},
methods: {
getCategory() {
this.$http({
url: this.$http.adornUrl("/product/category/listTree"),
method: "get",
}).then(({ data }) => {
this.data = data.data;
});
},
append(data) {
this.dialogVisible = true; // 打开弹出窗口
// console.log("添加", data);
this.categoryForm.parentCid = data.catId;// 添加的类别对应的父菜单
this.categoryForm.catLevel = data.catLevel + 1; // 设置添加类别的层级
this.categoryForm.showStatus = 1; // 菜单的显示状态 1 显示 0 被删除
this.categoryForm.sort = 0; // 排序 默认给 0// 重置更新的数据 this.categoryForm.catId = null; this.categoryForm.name = ""; this.categoryForm.icon = ""; this.categoryForm.productUnit = ""; // 更新状态 this.dialogType = true; }, // draggingNode 要拖拽的节点 // dropNode 目标节点 // type 参数有三种情况:'prev'、'inner' 和 'next' handleDrop(draggingNode, dropNode, type,event){ // 1. 拖拽节点的父节点需要修改 let parentId = 0; // 找到拖拽节点对应的所有的兄弟节点 let siblings = null; if(type == 'inner'){ parentId = dropNode.data.catId; siblings = dropNode.childNodes; }else{ parentId = dropNode.parent.data.catId == undefined ? 0 : dropNode.parent.data.catId; siblings = dropNode.parent.childNodes; } // 2. 拖拽后节点所在的新的兄弟节点间的排序问题 for(let i = 0 ; i < siblings.length ; i ++){ if(siblings[i].data.catId == draggingNode.data.catId){ // 获取的就是拖拽的那个节点,那么我们需要更新parent_cid // 3. 拖拽后的节点及其节点的的 catLevel 更新问题 let catLevel = draggingNode.level; if(siblings[i].level != catLevel){ // 拖拽后节点的层级发生了变化, catLevel = siblings[i].level; // 递归的方式来更新子节点的层级 this.updateChildNodeLevel(siblings[i]); } this.updateNodes.push({catId:siblings[i].data.catId,sort:i,parentCid:parentId,catLevel:catLevel}) }else{ this.updateNodes.push({catId:siblings[i].data.catId,sort:i}) } } console.log("--->",this.updateNodes) this.pCid.push(parentId); // 将需要更新的数据提交到后端服务处理 //this.editSort(parentId); // 在一次拖拽操作完成后重置相关的数据 //this.updateNodes=[]; //this.maxLevel=0; },updateChildNodeLevel(node){ if(node.childNodes != null && node.childNodes.length > 0){ for(let i = 0 ; i < node.childNodes.length ; i ++){ var childNode = node.childNodes[i].data; this.updateNodes.push({catId:node.childNodes.catId,catLevel:node.childNodes[i].level}); // 如果还有子节点,同步的更新处理 this.updateChildNodeLevel(node.childNodes[i]); } } }, // draggingNode 要拖拽的节点 // dropNode 目标节点 // type 参数有三种情况:'prev'、'inner' 和 'next' allowDrop(draggingNode, dropNode, type){ // 判断拖拽的节点是否可以在该位置放置 // 1.获取当前被拖拽的节点的最大的level this.countNodeLevel(draggingNode); let deep = Math.abs(this.maxLevel - draggingNode.level ) + 1; if(type == 'inner'){ return deep + dropNode.level <= 3; } return deep + dropNode.parent.level <= 3; }, countNodeLevel(node){ // 在获取子节点前给maxLevel赋值 this.maxLevel = node.data.catLevel; // 找到所有子节点,最大的level if(node.childNodes != null && node.childNodes.length > 0){ for(let i = 0; i < node.childNodes.length; i ++){ if(node.childNodes[i].level > this.maxLevel){ this.maxLevel = node.childNodes[i].level } this.countNodeLevel(node.childNodes[i]); } } }, addDialog(){ // 添加三级分类的类别信息 this.$http({ url: this.$http.adornUrl("/product/category/save"), method: "post", data: this.$http.adornData(this.categoryForm, false), }).then(({ data }) => { if (data && data.code === 0) { this.$message({ message: "数据添加成功", type: "success", }); this.dialogVisible = false; // 关闭弹出窗口 // 重新加载所有的菜单数据 this.getCategory(); // 设置默认展开的父节点信息 this.expandKeys = [this.categoryForm.parentCid]; } else { this.$message.error(data.msg); } }); },editDialog(){ // 更新三级分类的类别信息 this.$http({ url: this.$http.adornUrl("/product/category/update"), method: "post", data: this.$http.adornData(this.categoryForm, false), }).then(({ data }) => { if (data && data.code === 0) { this.$message({ message: "数据更新成功", type: "success", }); this.dialogVisible = false; // 关闭弹出窗口 // 重新加载所有的菜单数据 this.getCategory(); // 设置默认展开的父节点信息 this.expandKeys = [this.categoryForm.parentCid]; } else { this.$message.error(data.msg); } }); },editSort(){ // 获取最新的数据回写 this.$http({ url: this.$http.adornUrl(`/product/category/updateBatch`), method: "post", data: this.$http.adornData(this.updateNodes, false), }).then(({ data }) => { if (data && data.code === 0) { this.$message({ message: "拖拽操作成功", type: "success", }); // 重新加载所有的菜单数据 this.getCategory(); // 设置默认展开的父节点信息 this.expandKeys = this.pCid; // 提交更新的数据后,重新相关的数据 this.updateNodes=[]; this.maxLevel=0; console.log("parentCid:",this.pCid) this.parentCid=[]; } else { this.$message.error(data.msg); } }); },edit(data){ this.dialogType = false; // 获取最新的数据回写 this.$http({ url: this.$http.adornUrl(`/product/category/info/${data.catId}`), method: "post", data: this.$http.adornData(this.categoryForm, false), }).then(({ data }) => { console.log("获取的数据",data) // 表单数据回写 this.categoryForm.name = data.category.name; this.categoryForm.productUnit = data.category.productUnit; this.categoryForm.icon = data.category.icon; this.categoryForm.catLevel = data.category.catLevel; this.categoryForm.parentCid = data.category.parentCid; // 填充更新数据的id this.categoryForm.catId = data.category.catId; this.categoryForm.showStatus = 1; this.categoryForm.sort = 0; // 更新类别信息的方法 this.dialogVisible=true; // 打开更新的窗口 }); },submitForm(){ console.log("dialogType",this.dialogType) // 判断当前的操作是更新还是删除 if(this.dialogType){ // 添加操作 this.addDialog(); }else{ // 更新操作 this.editDialog(); } }, remove(node, data) { this.$confirm(`是否确认删除【${data.name}】记录?`, "提示", { confirmButtonText: "确定", cancelButtonText: "取消", type: "warning", }) .then(() => { // 传递的数据 let ids = [data.catId]; // 把删除的请求提交到后台服务 this.$http({ url: this.$http.adornUrl("/product/category/delete"), method: "post", data: this.$http.adornData(ids, false), }).then(({ data }) => { if (data && data.code === 0) { this.$message({ message: "操作成功", type: "success", }); // 重新加载所有的菜单数据 this.getCategory(); // 设置默认展开的父节点信息 this.expandKeys = [node.parent.data.catId]; } else { this.$message.error(data.msg); } }); }) .catch(() => { this.$message({ type: "info", message: "已取消删除", }); }); console.log("删除", data, node); },},
created() {
this.getCategory();
console.log("data数据:",this.data)
},
};
</script>
<style>
</style>
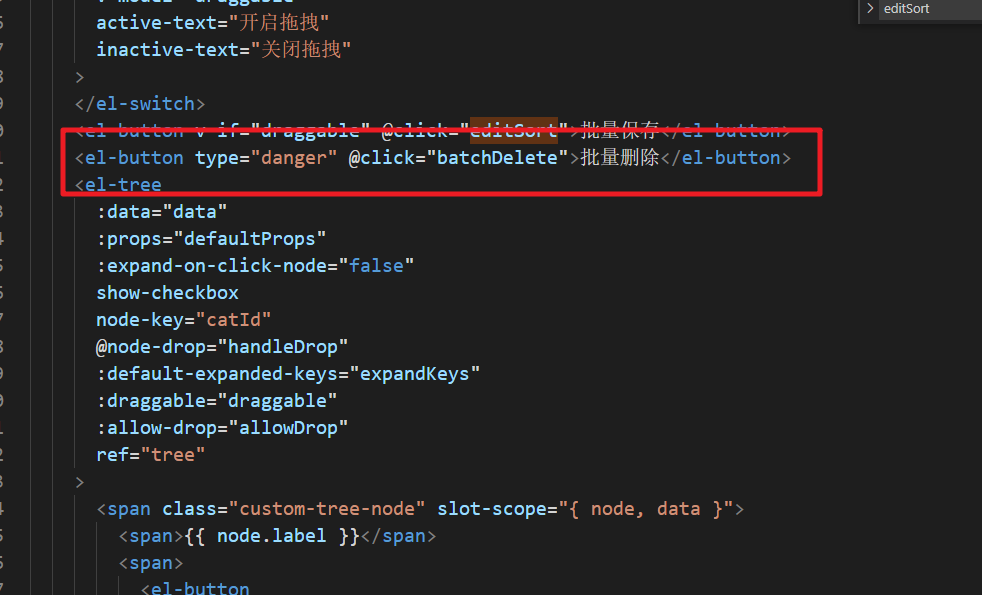
7.批量删除
因为类别比较多,在操作的时候也可以能面临批量删除的操作。我们在案例中来实现,首先创建批量删除的按钮,同时绑定操作的方法。
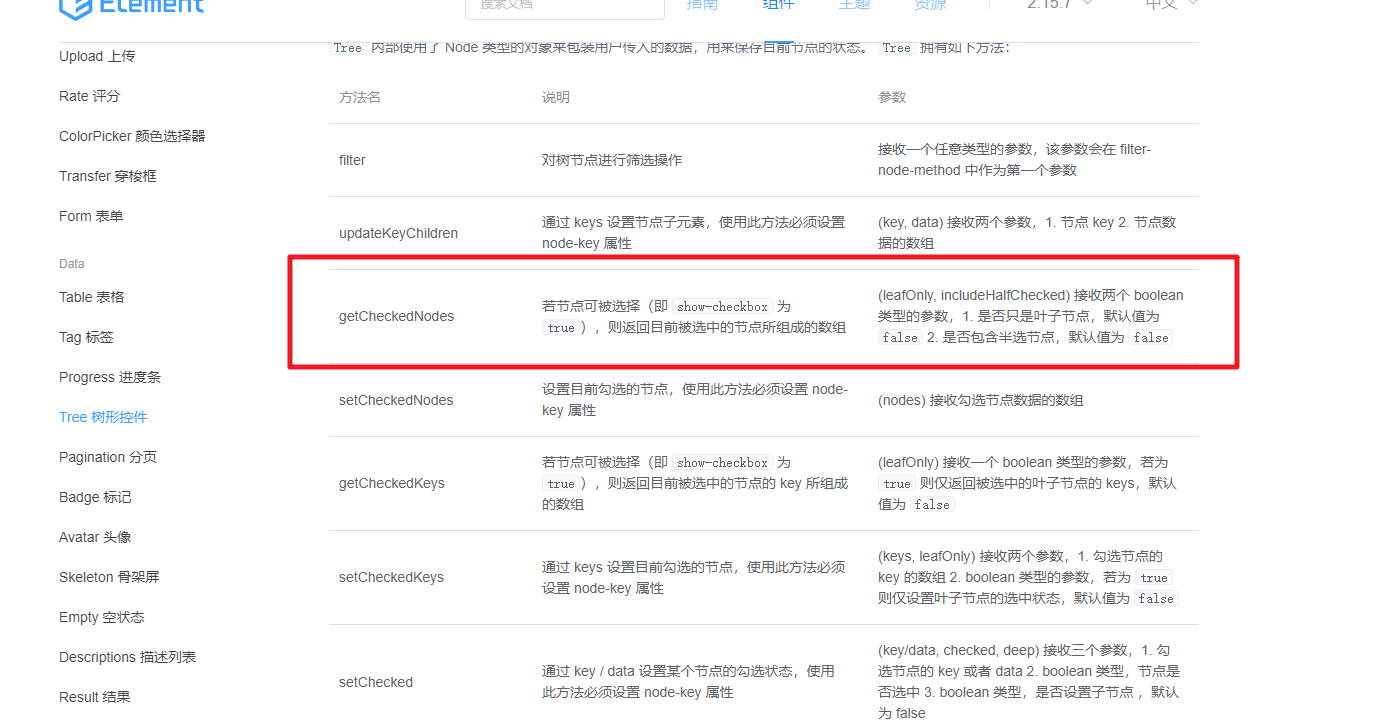
然后就是触发删除的方法后,我们需要找到所有的被选中的节点。结合ElementUI官方的信息来获取。
然后批量删除的方法
batchDelete() {
let catIds = [];
// 批量的删除类别
let checkedNodes = this.$refs.tree.getCheckedNodes(false, false);
// console.log("被选中的节点:",checkedNodes);
for (let i = 0; i < checkedNodes.length; i++) {
catIds.push(checkedNodes[i].catId);
}
// 给出一个删除的提示信息
this.$confirm(`是否确认删除【${catIds}】记录?`, "提示", {
confirmButtonText: "确定",
cancelButtonText: "取消",
type: "warning",
})
.then(() => {
// 把删除的请求提交到后台服务
this.$http({
url: this.$http.adornUrl("/product/category/delete"),
method: "post",
data: this.$http.adornData(catIds, false),
}).then(({ data }) => {
if (data && data.code === 0) {
this.$message({
message: "操作成功",
type: "success",
});
// 重新加载所有的菜单数据
this.getCategory();
} else {
this.$message.error(data.msg);
}
});
})
.catch(() => {
this.$message({
type: "info",
message: "已取消删除",
});
});
},</code></pre></div></div><figure class=""><div class="rno-markdown-img-url" style="text-align:center"><div class="rno-markdown-img-url-inner" style="width:100%"><div style="width:100%"><img src="https://cdn.static.attains.cn/app/developer-bbs/upload/1722842899240683948.png" /></div><div class="figure-desc">image.png</div></div></div></figure>