一:整体架构说明

备注:
● 选择Node_exporter作为指标采集器,因其成熟社区以及腾讯云云监控默认指标维度、粒度都不够;
● 选择Vmagent抓取Node_exporter指标,主要是其高性能,更低的资源消耗相对Prometheus;
● CLS指标主题提供无限制的存储,标准的PromQL查询语法协议,以及开源Prometheus数倍的查询性能,更低的成本;
● 选择Grafana,成熟的社区,用户习惯,配套的Dashboard等
二:Node_exports部署与运行
Node_exports已经成为机器监控的标准exporter,基本指标约100来个,几乎可以覆盖日常定位需求,顾采用其作为机器采集组件。
1. Node_exoports部署
● 下载软件包
# wget https://github.com/prometheus/node_exporter/releases/download/v1.8.1/node_exporter-1.8.1.linux-amd64.tar.gz✓ 版本自行选择,建议使用比较新的版本,特性&bugfix
✓ 因是github下载国内比较慢,建议下载一次,通过批量工具推送到各个服务器端
● 解压缩
# tar xvf node_exporter-1.8.1.linux-amd64.tar.gz
# mv node_exporter-1.8.1.linux-amd64/node_exporter /usr/local/bin/
# rm -rf node_exporter-1.8.1.linux-amd64/
2. 加入Systemd管理,设置开机启动
● 创建对应service文件
# cat /etc/systemd/system/node_exporter.service
[Service]
ExecStart=/usr/local/bin/node_exporter --collector.tcpstat --collector.ethtool
Restart=always
[Install]
WantedBy=multi-user.target
[Unit]
Description=node_exporter
After=network.target
● 启动&校验&加入开机启动
# systemctl start node_exporter.service # systemctl status node_exporter.service ● node_exporter.service - node_exporter Loaded: loaded (/etc/systemd/system/node_exporter.service; disabled; vendor preset: disabled) Active: active (running) since Sun 2024-06-23 13:06:02 CST; 7s ago Main PID: 83821 (node_exporter) Tasks: 5 (limit: 23292) Memory: 5.3M CGroup: /system.slice/node_exporter.service └─83821 /usr/local/bin/node_exporter --collector.tcpstat6月 23 13:06:02 VM-18-3-centos node_exporter[83821]: ts=2024-06-23T05:06:02.021Z caller=node_exporter.go:118 level=info collector=time
systemctl enable node_exporter.service
Created symlink /etc/systemd/system/multi-user.target.wants/node_exporter.service → /etc/systemd/system/node_exporter.service.
3. 验证是否正常工作
默认node_exporters监听9100端口,curl IP+Port/metrics 是否正常返回即可
# curl localhost:9100/metricsHELP go_gc_duration_seconds A summary of the pause duration of garbage collection cycles.
TYPE go_gc_duration_seconds summary
go_gc_duration_seconds{quantile="0"} 0
go_gc_duration_seconds{quantile="0.25"} 0
go_gc_duration_seconds{quantile="0.5"} 0
go_gc_duration_seconds{quantile="0.75"} 0
4. 补充说明
✓ 整体上部署很简单,如有异常根据特定下错误日志上下文排查;
✓ 此外上边步骤可以打包成一个脚本或者特定编排工具部署更简单;
✓ node_exporters启动可以指定更多选项,比如更多指标采集等,但建议尽量使用默认即可,因大多数不是默认项的都是可能导致高负载或者资源占用比较多等。
三:CLS指标主题创建&子用户创建
备注:
指标主题,等同于一个Prometheus实例集群,用于接收vmagent上报,grafana查询等

子用户,主要用于上报、查询指标主题的数据,通过腾讯云API 秘钥鉴权
1. 创建子用户&赋予其相关权限
备注:用来鉴权,赋予CLS读写权限
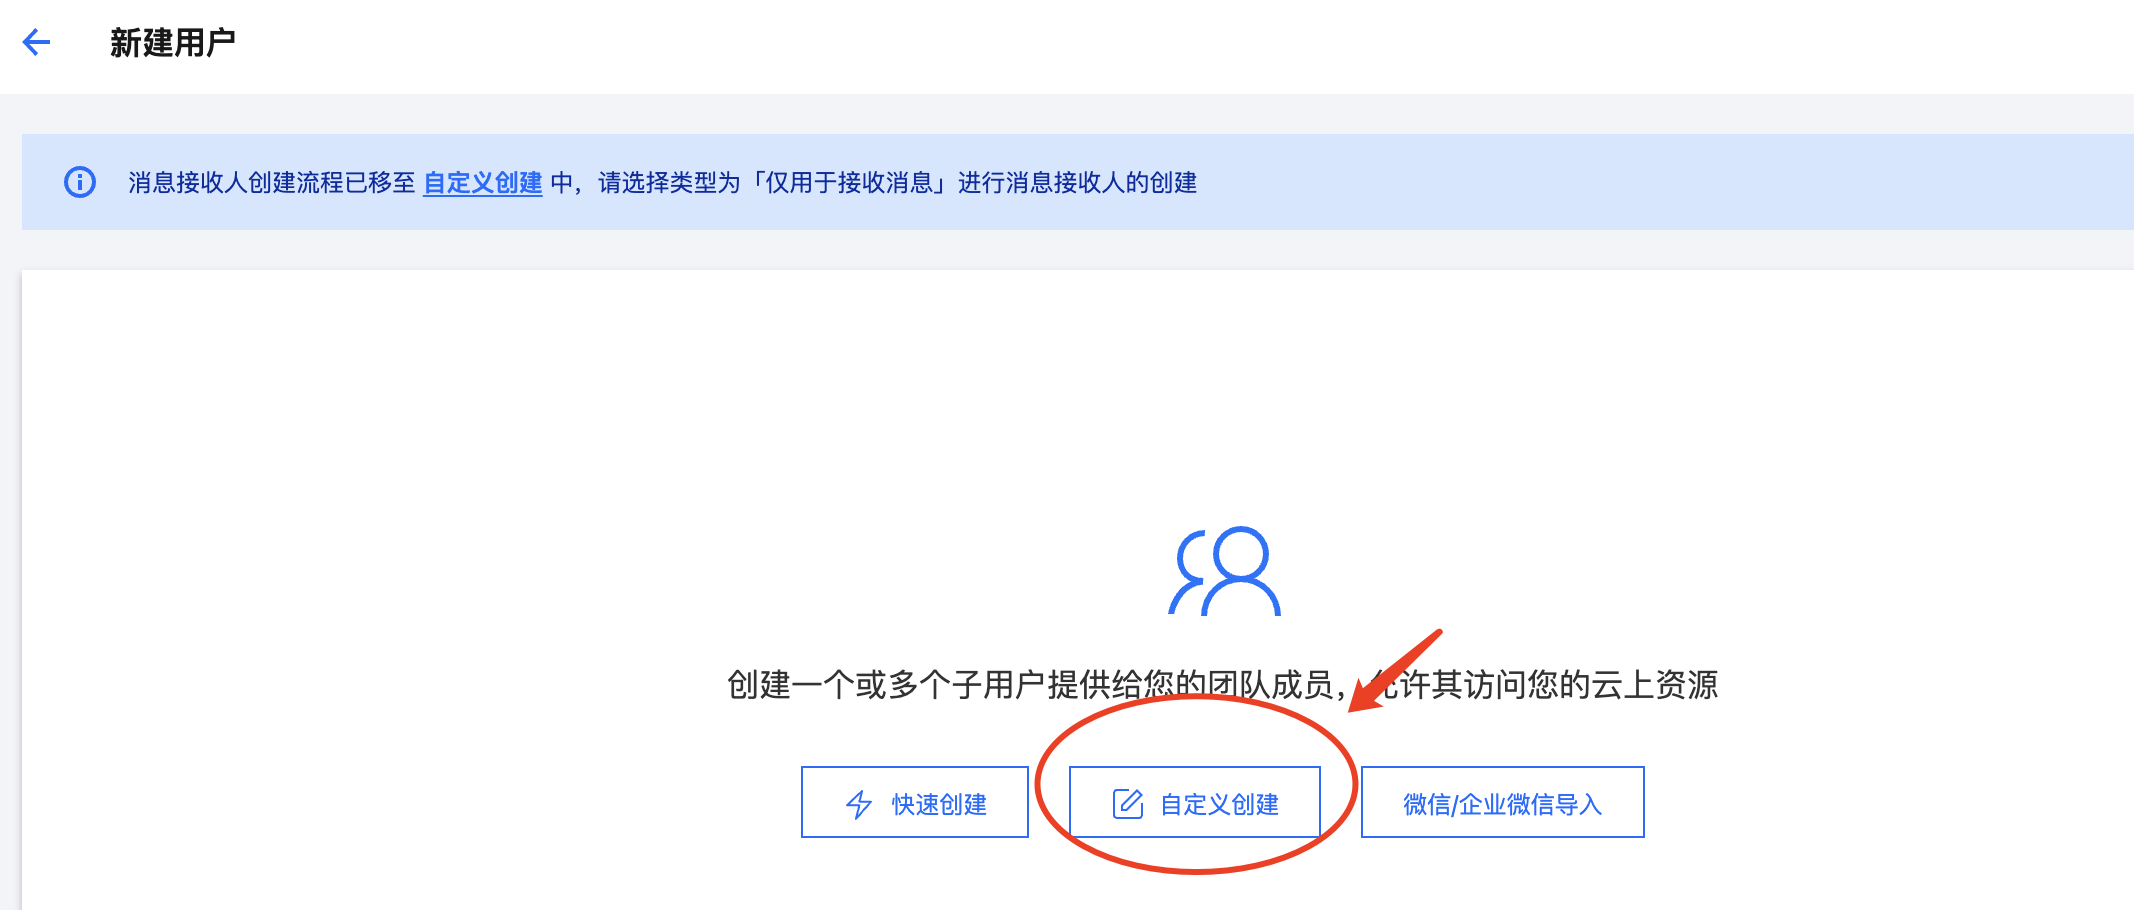
● 打开腾讯云控制台-访问管理页面,新建用户

● 选择自定义创建
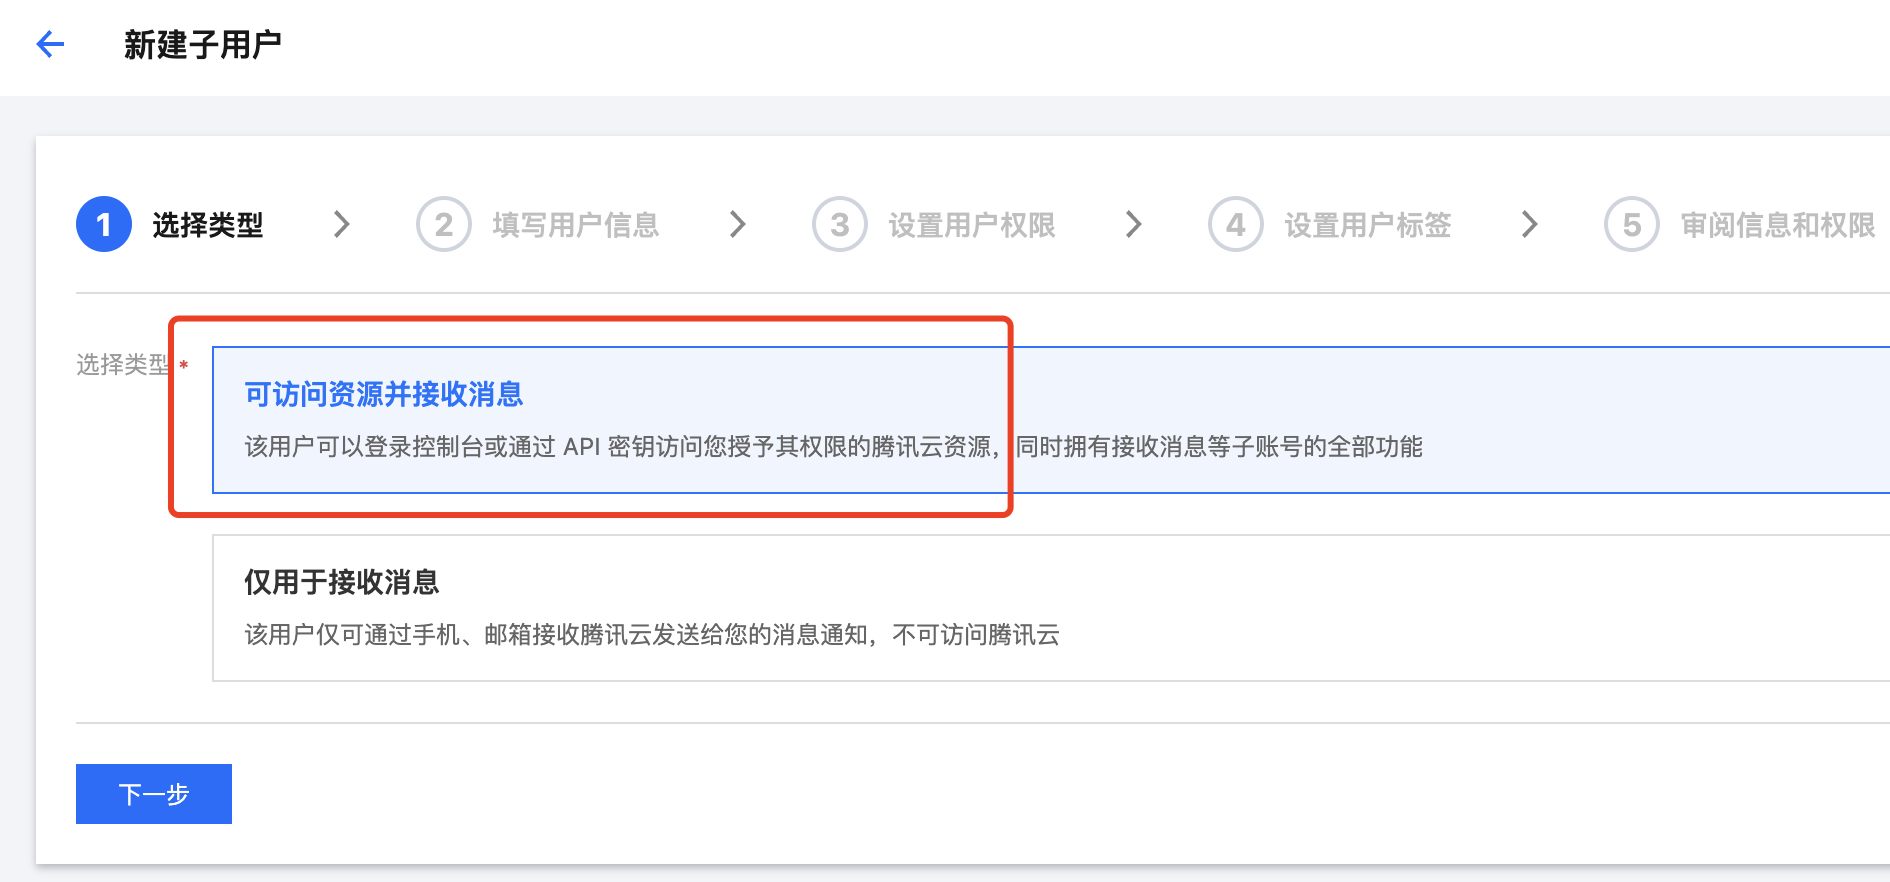
● 默认选择可访问资源
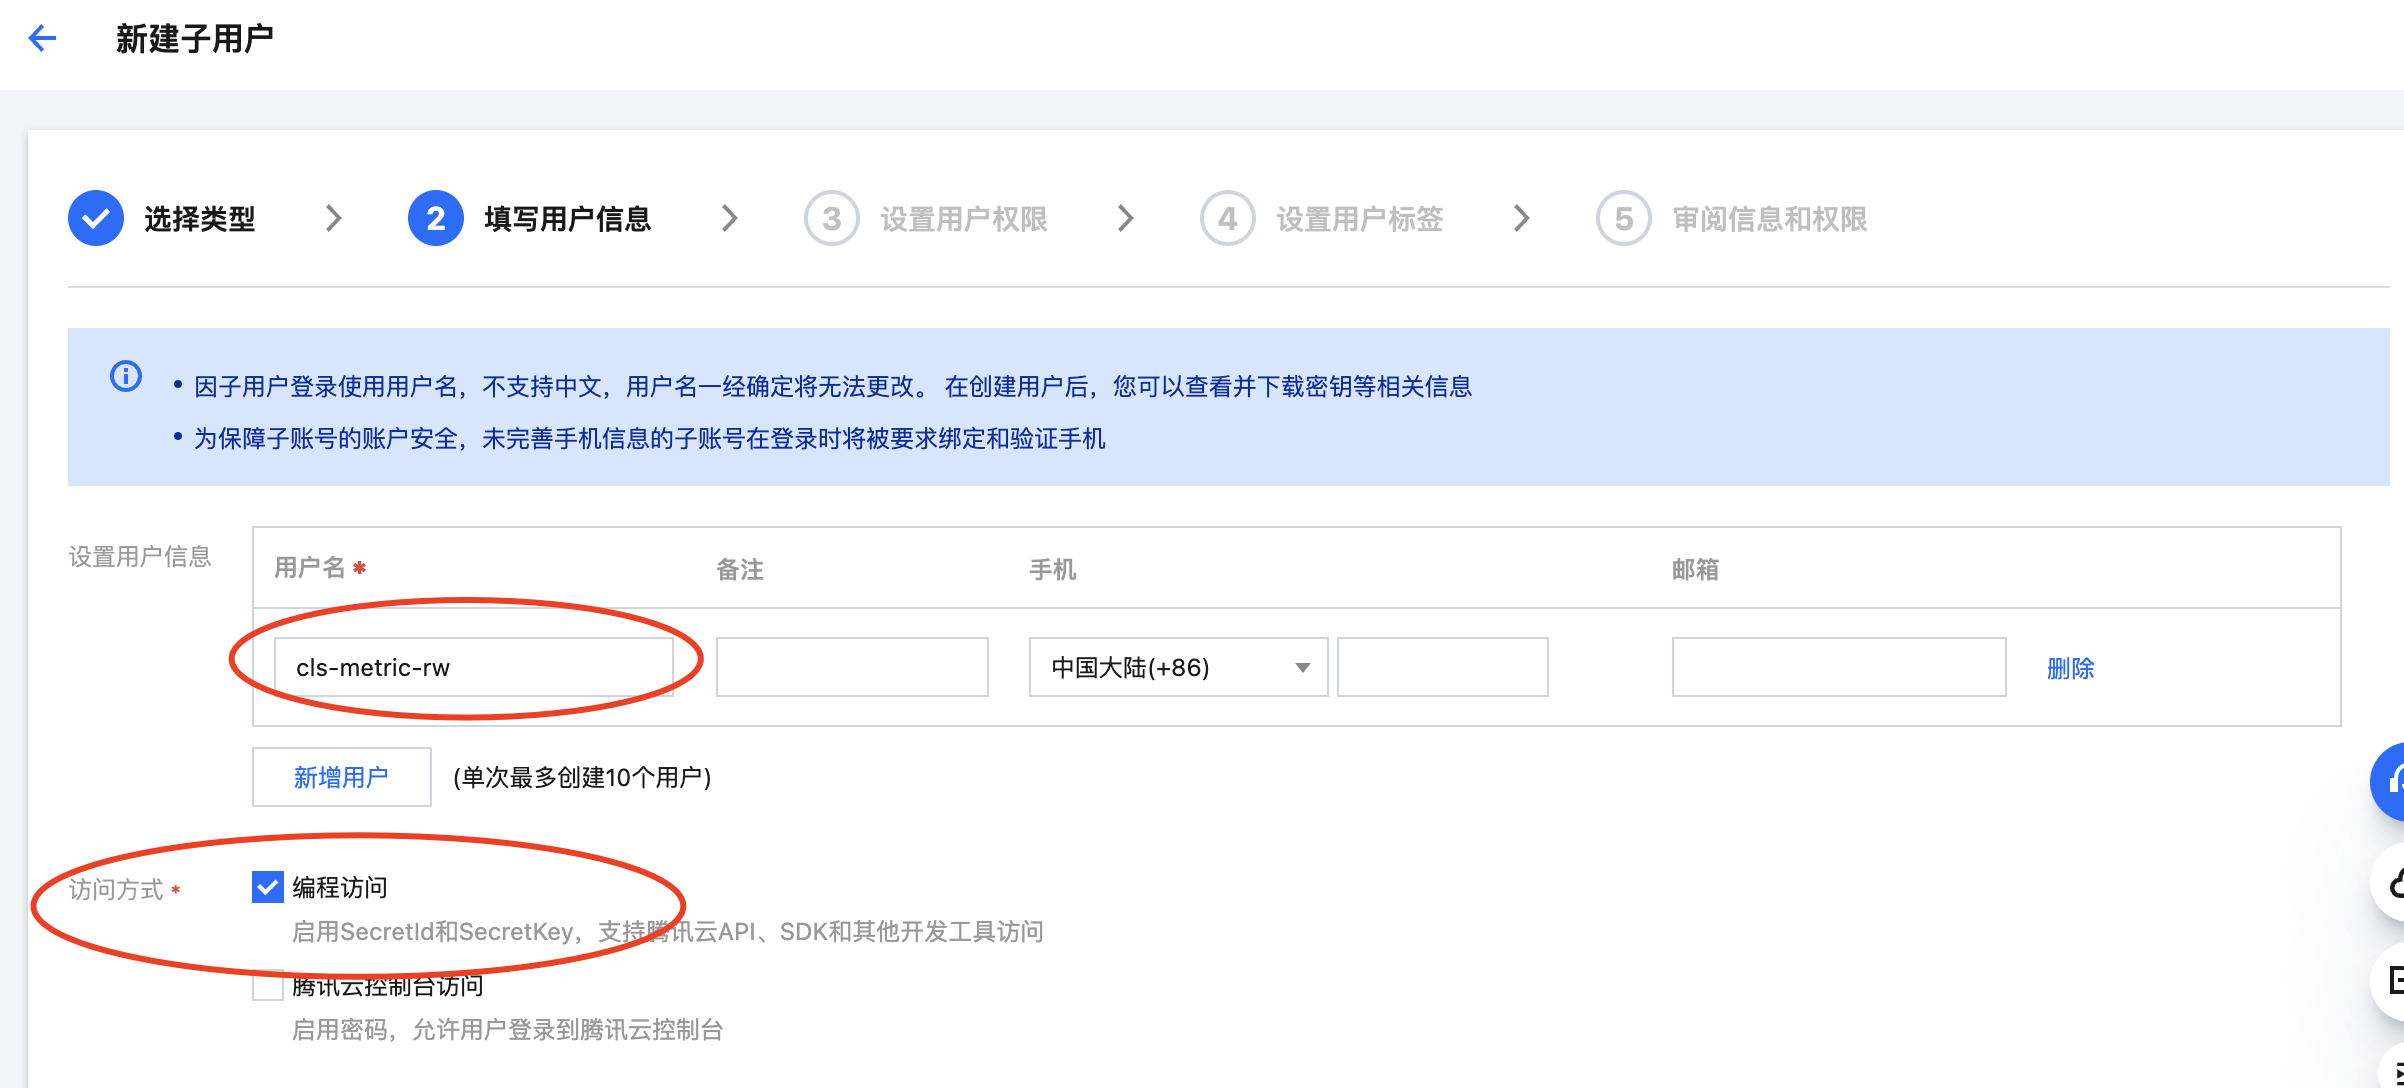
● 设置用户名&勾选编程权限
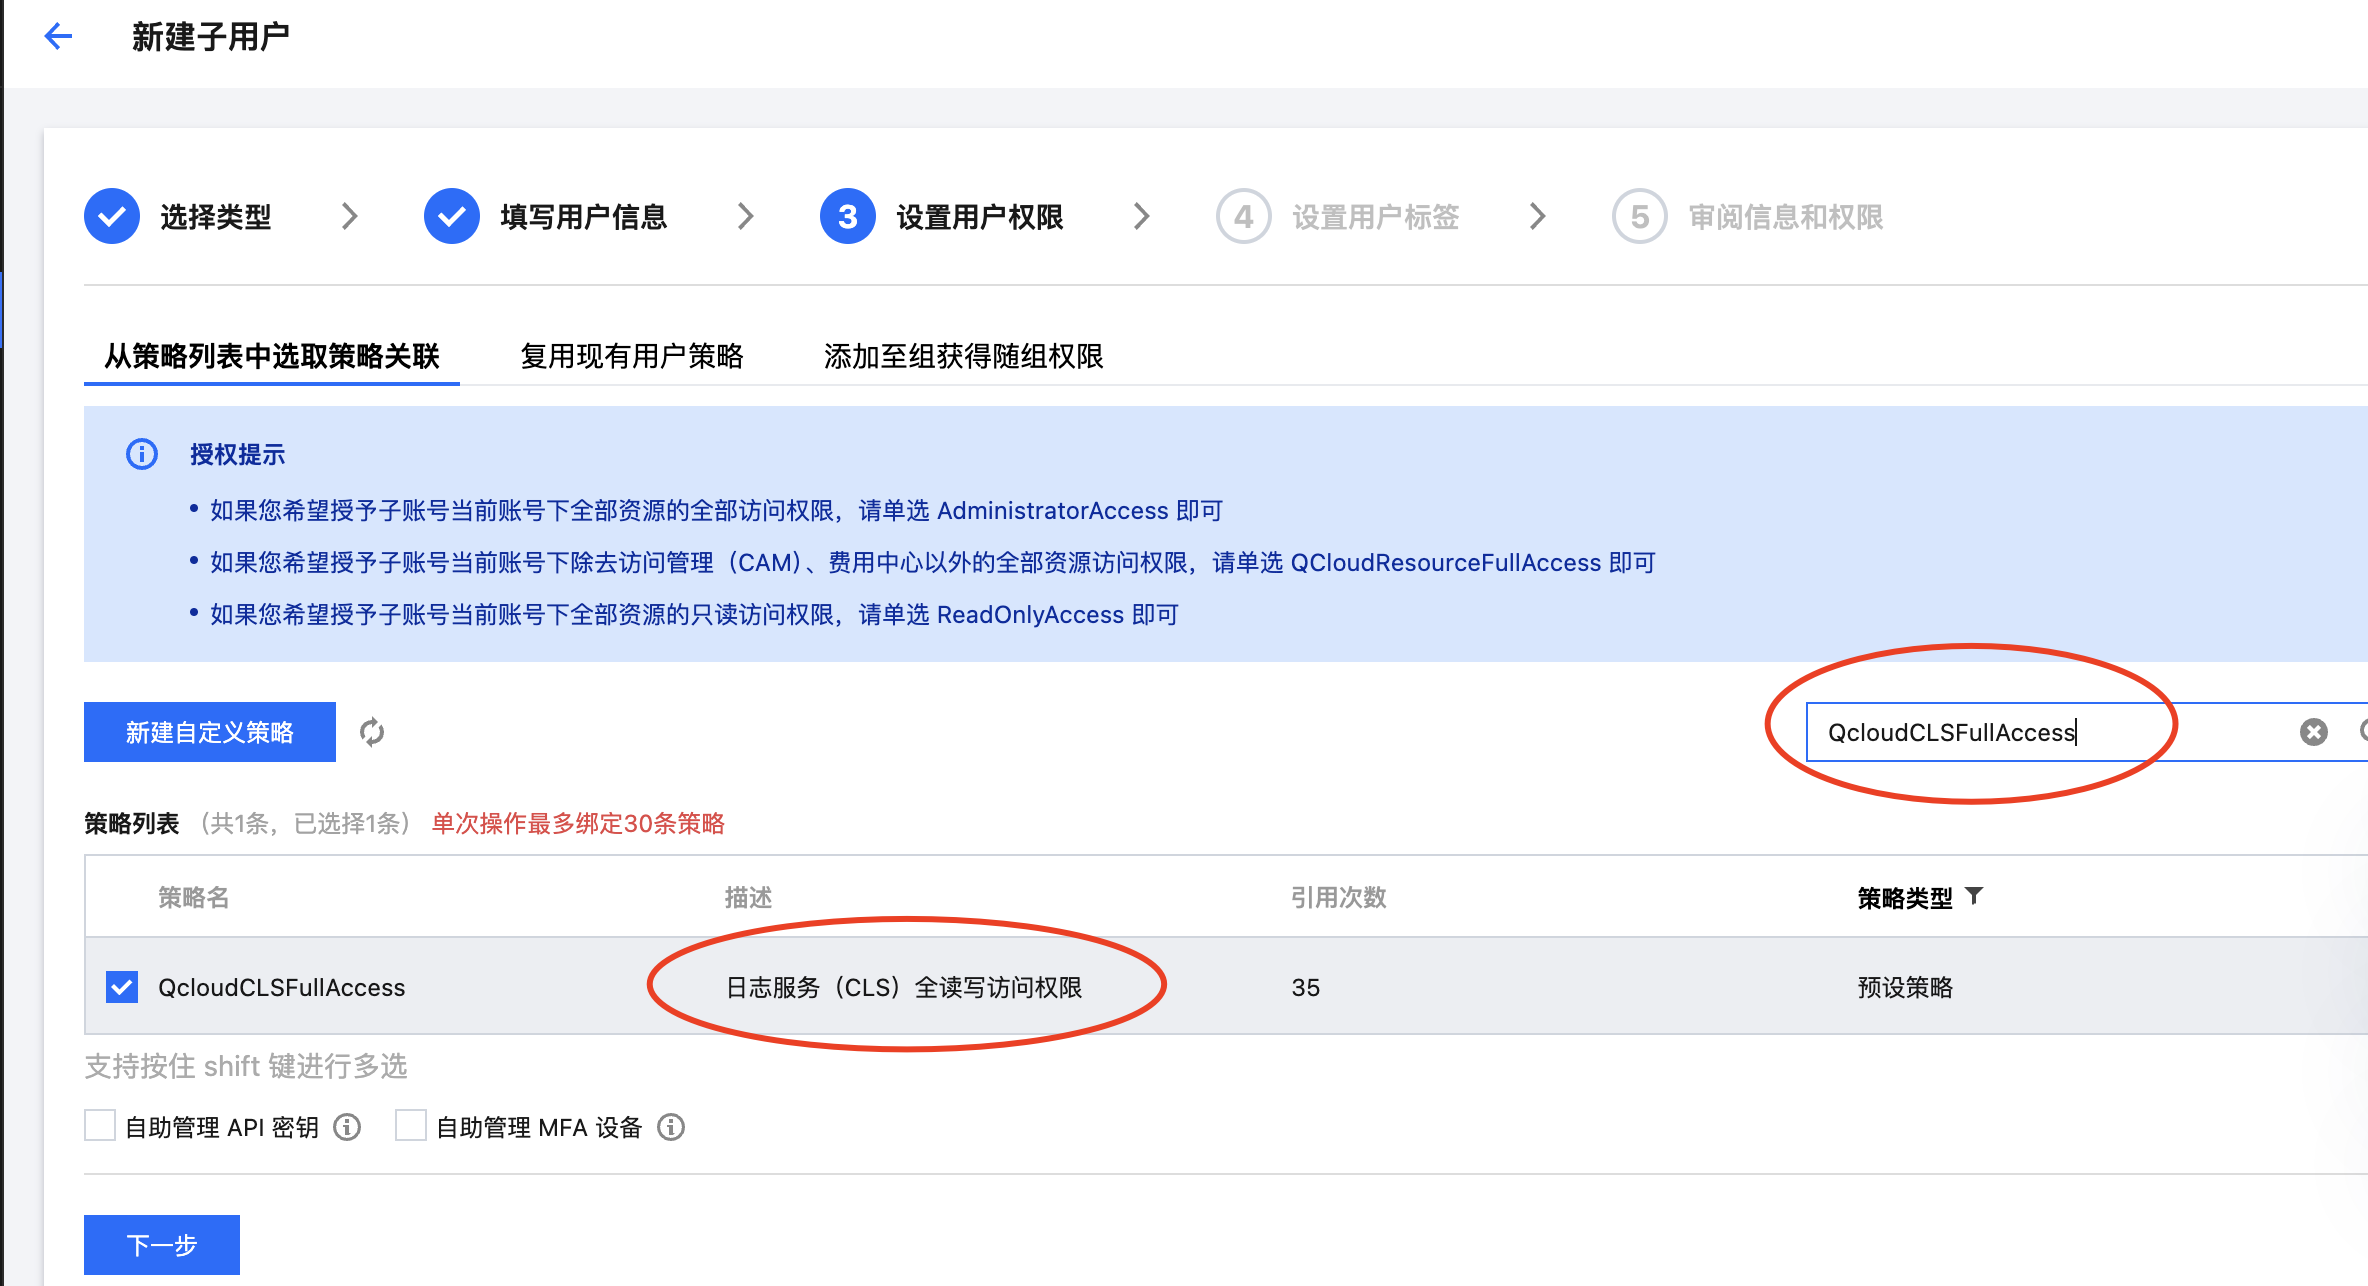
● 设置用户权限(这里选择了CLS产品的全读写权限)
● 设置标签(按需是否设置)
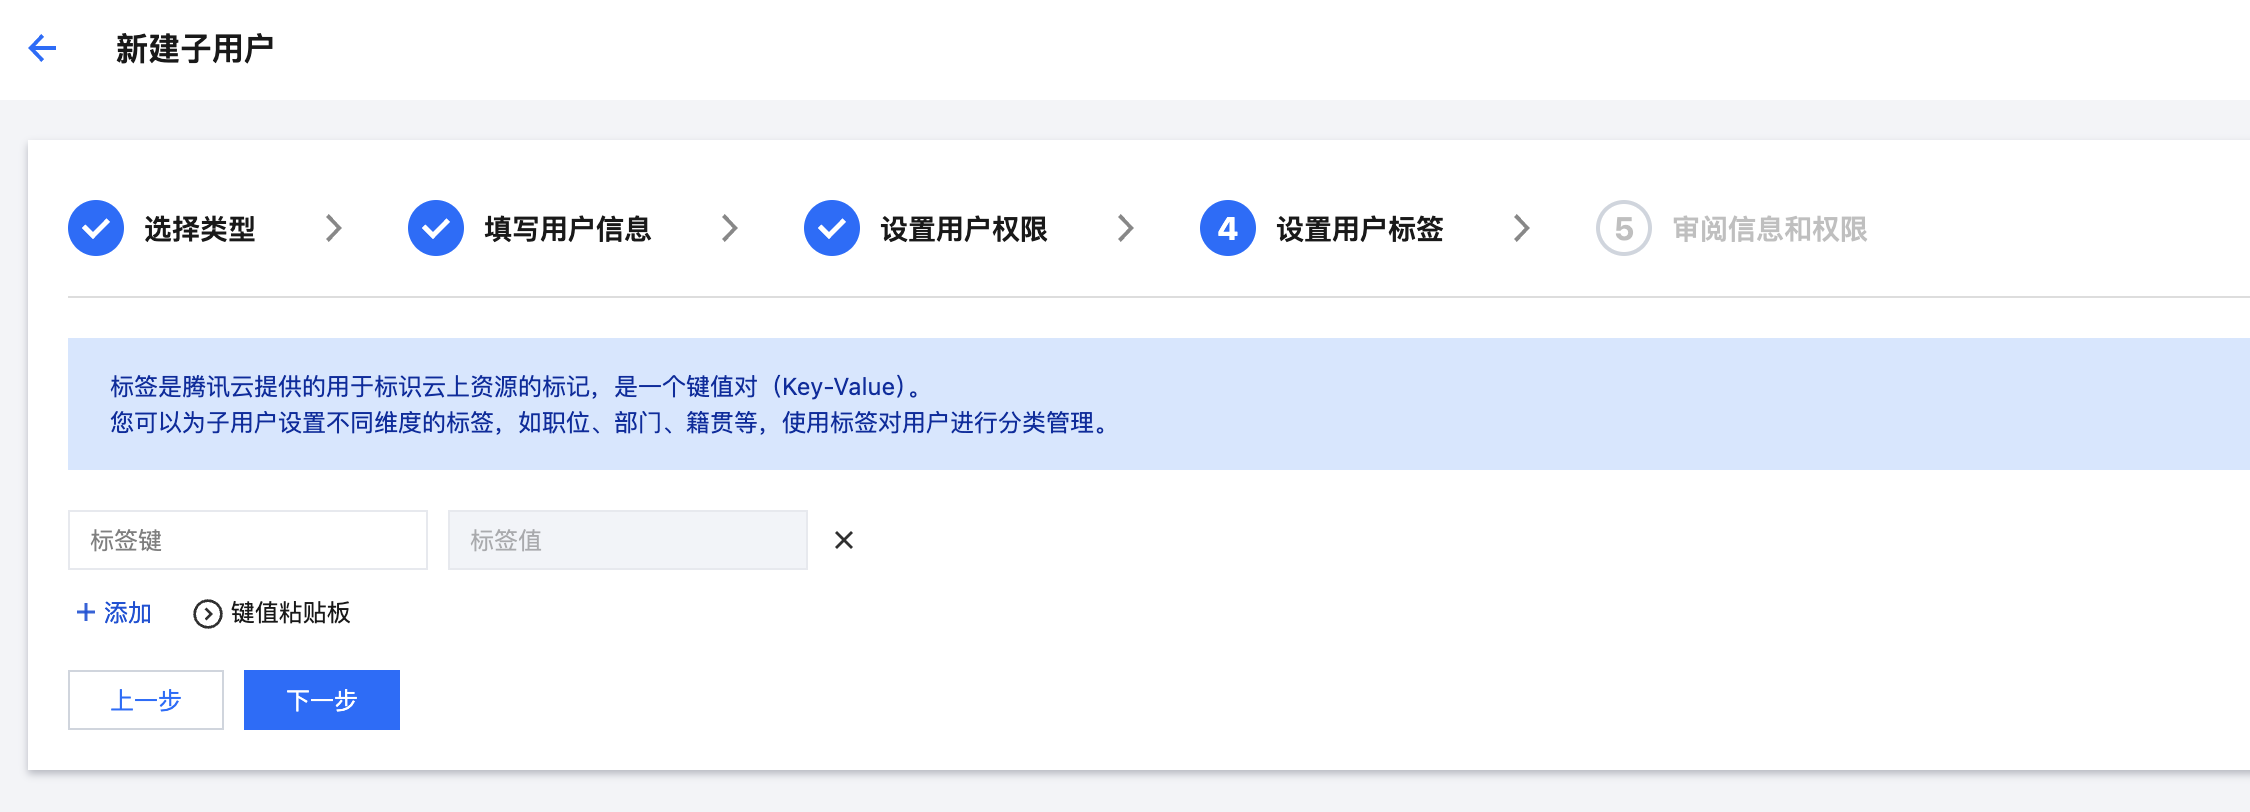
● 审阅信息&权限(点击完成即可)

● 显示成功创建
备注:
✓ 要自己备份好相关API Key、ID ,目前只显示一次,或者发送到自己邮箱备份
✓ 这里的Secret ID、Key就是我们下面填充Vmagent和Grafana所使用的

2. 创建CLS指标主题&获取相关信息
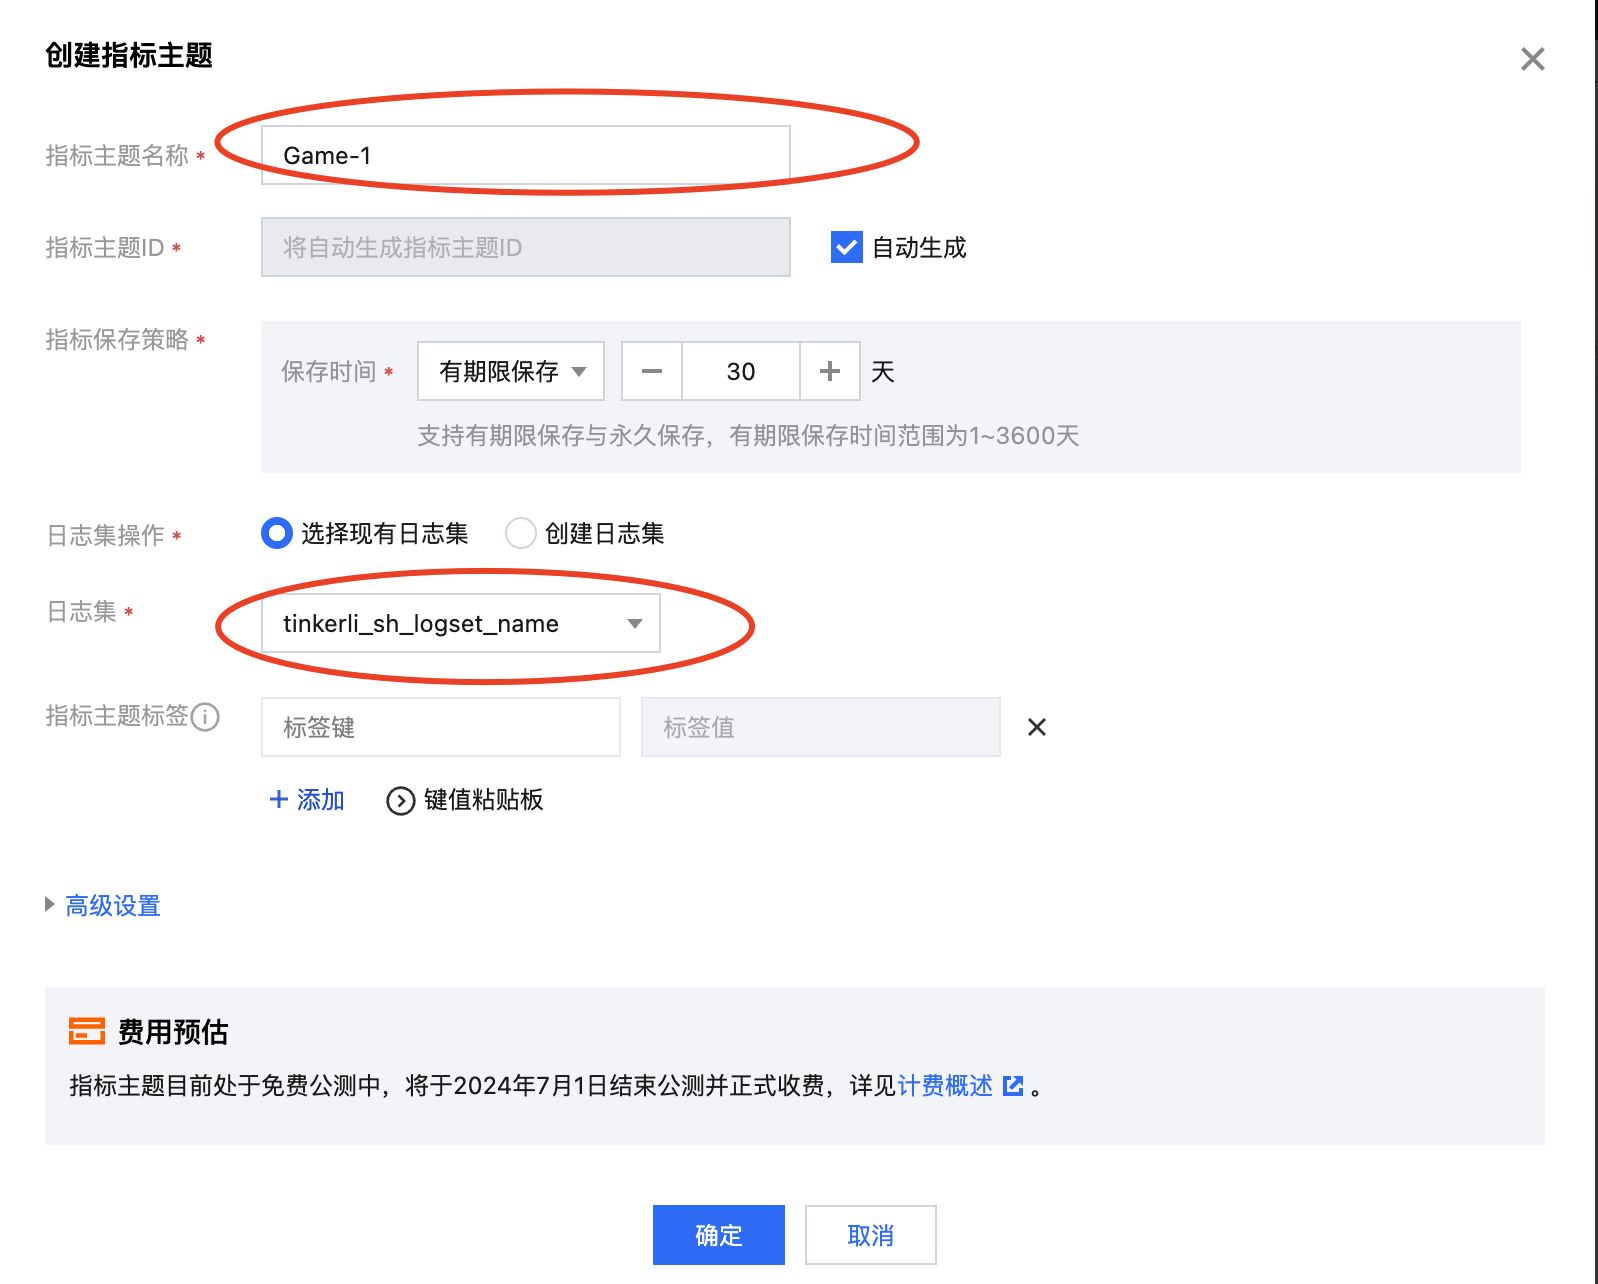
● 创建指标主题
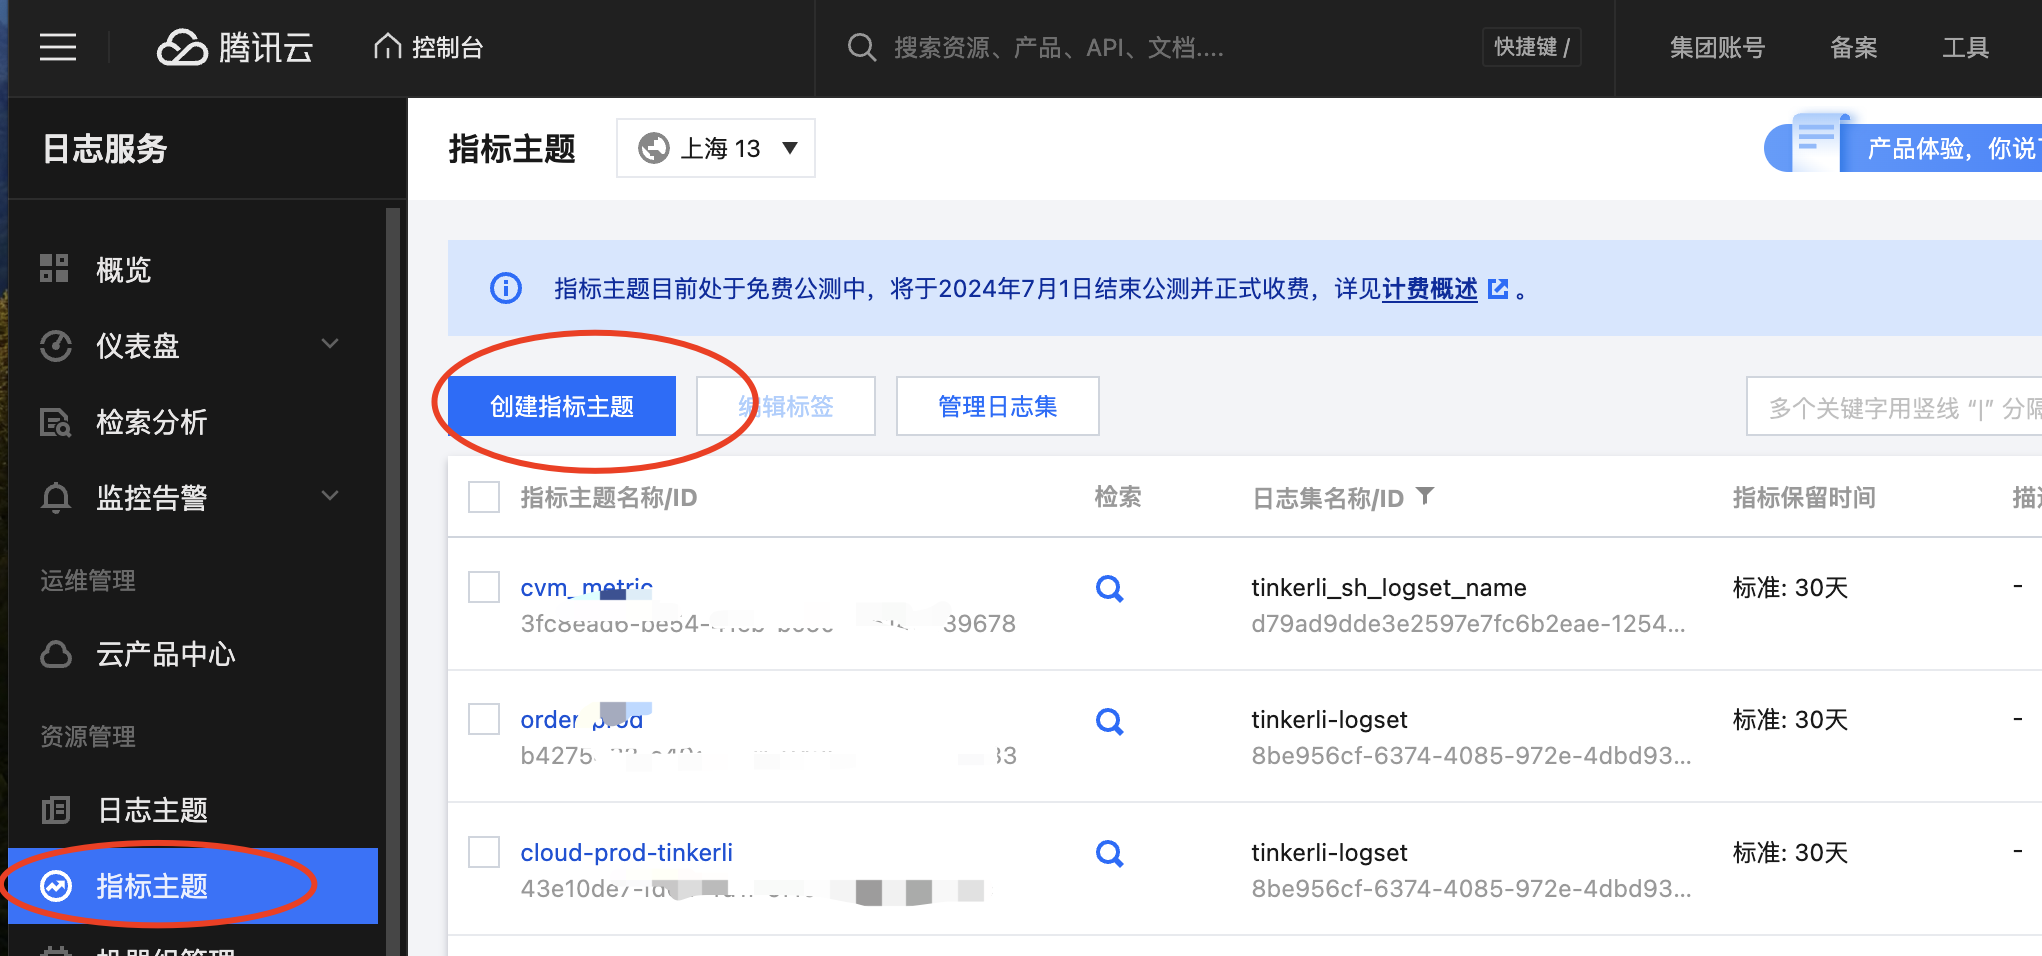
● 设置指标主题名称&选择其对应日志集,点击确定即可
备注:按需选择存储时长;日志集不存在选择创建
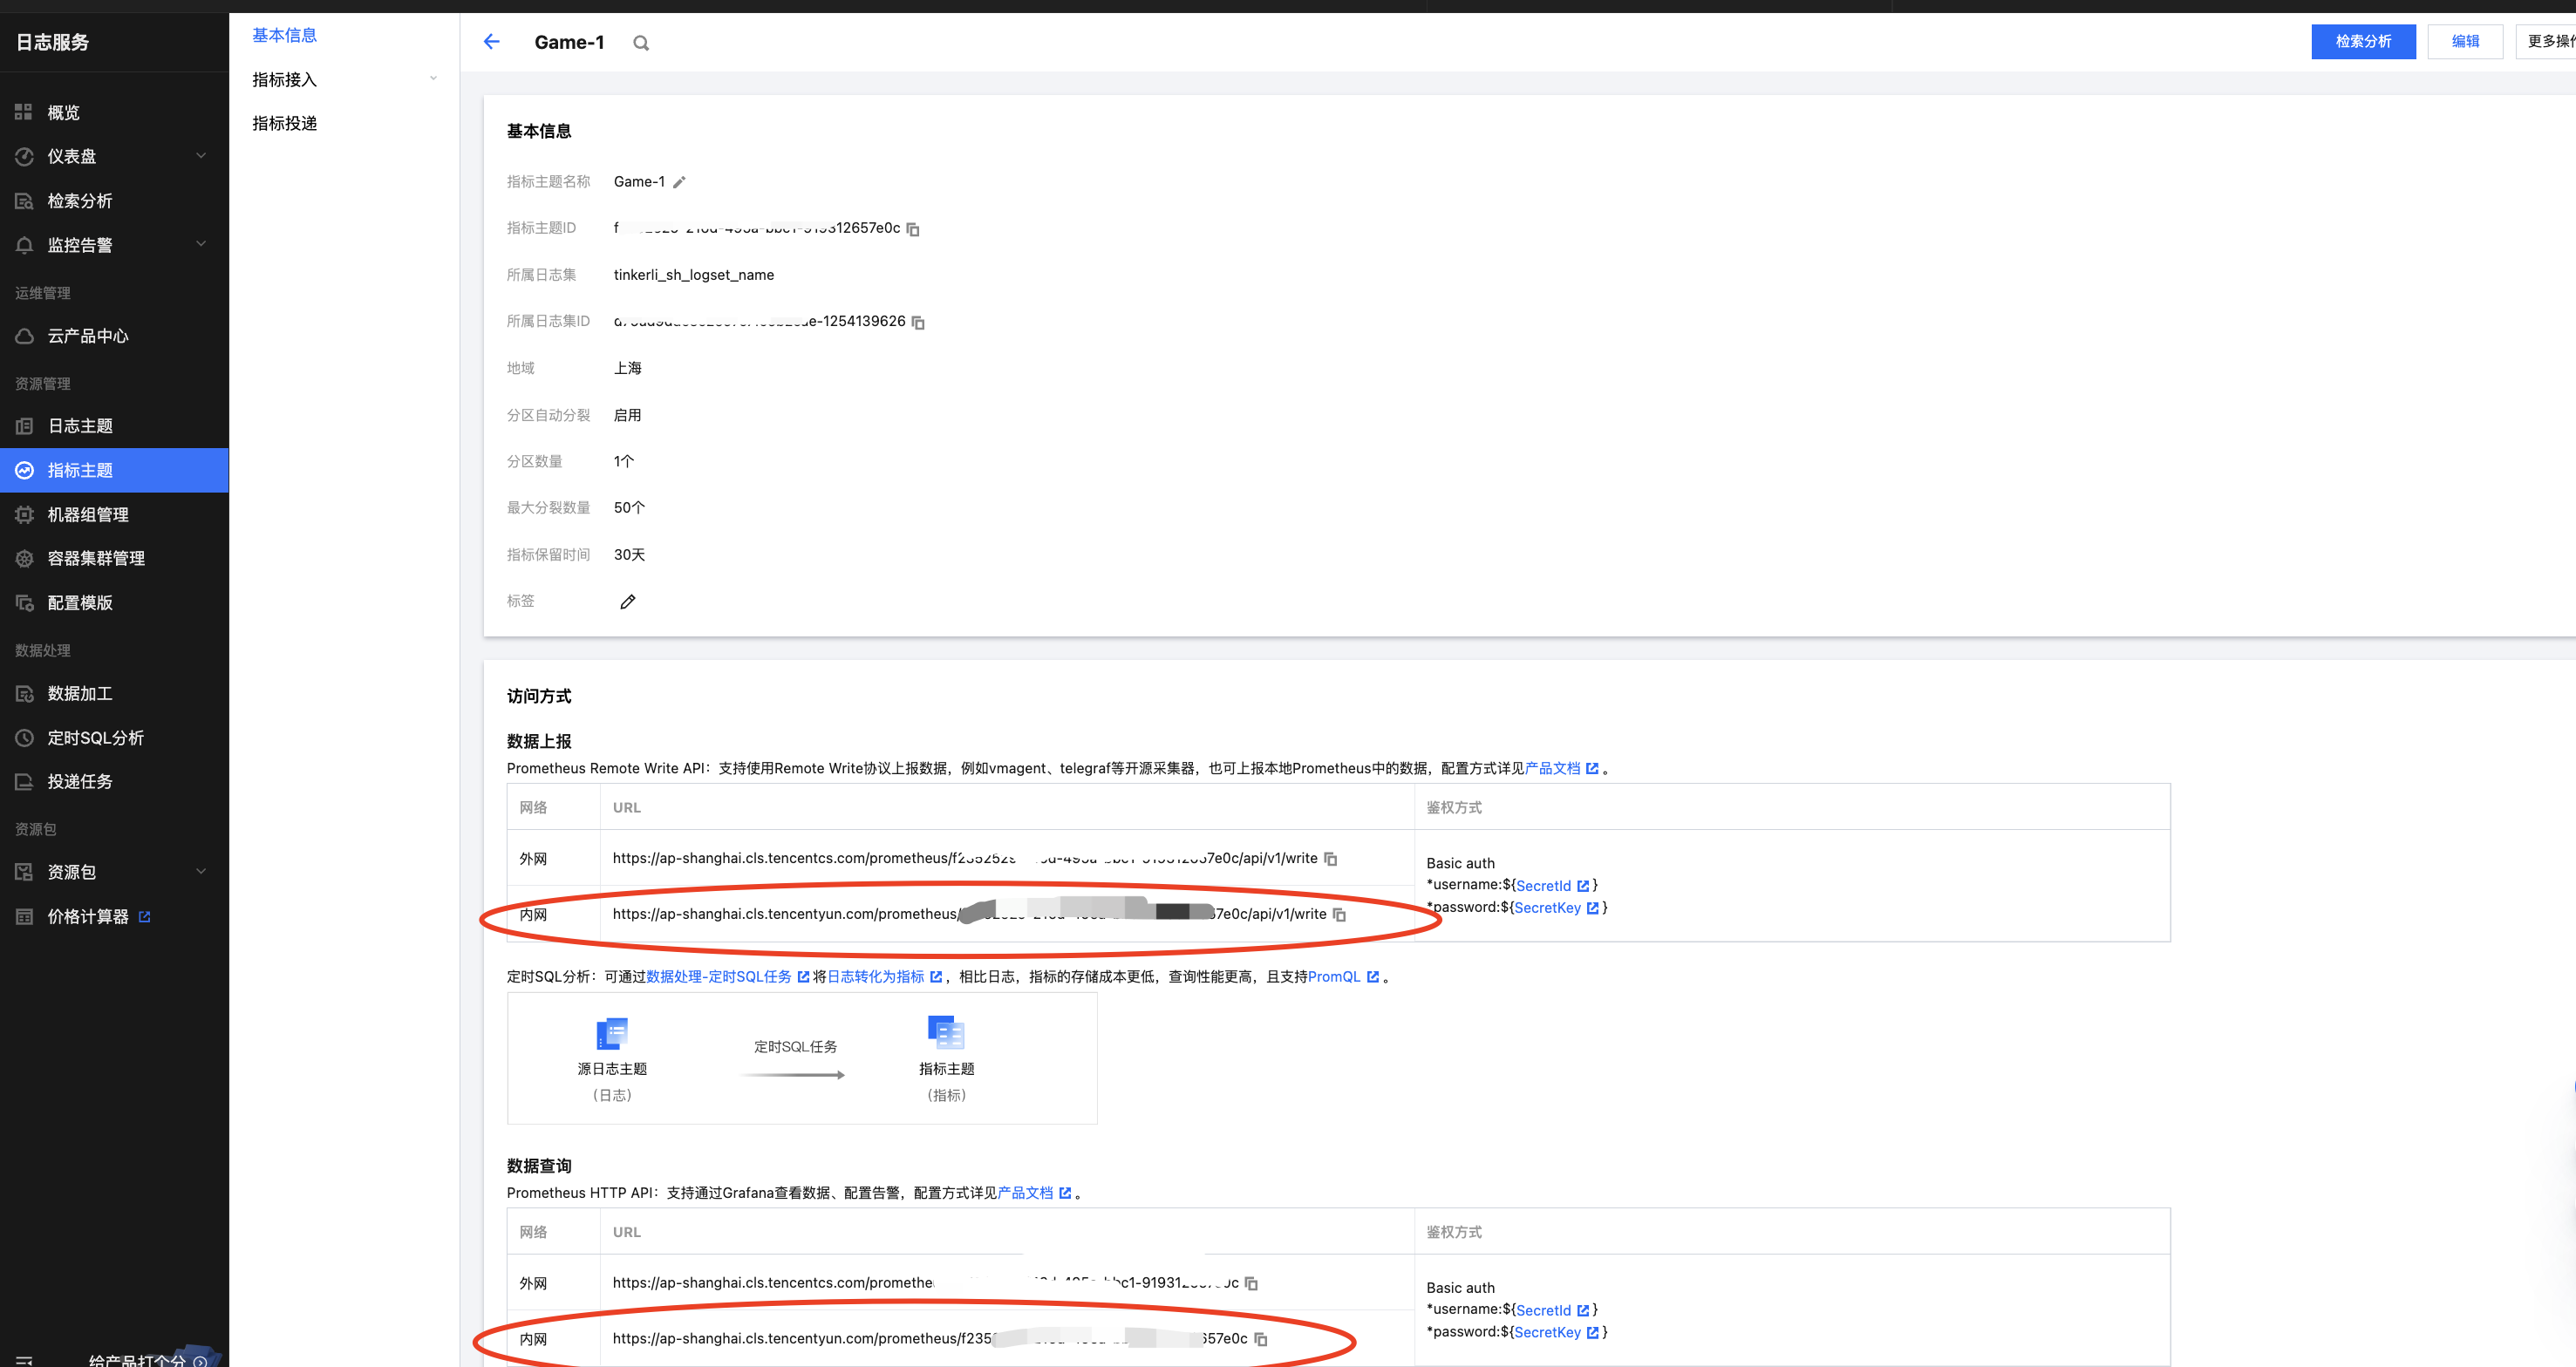
● 获取指标上报地址和指标查询地址
备注:
✓ 如Grafana、Vmagent部署在腾讯云上建议都走内网地址,提供更稳定的网络链路。
✓ 数据上报,即Vmagent Remote Write的地址
✓ 数据查询,即Grafana配置Prometheus的地址
● dddd
四:Vmagent 部署与运行
1. Vmagent部署
● 下载软件包
✓ 版本自行选择,建议使用比较新的版本,特性&bugfix;
✓ 因是github下载国内比较慢,建议下载一次,通过批量工具推送到各个服务器端;也可以尝试搜索国内镜像源;
✓ 注意下载vmutils-*开头的包,Vmagent包含这个包中
● 解压缩&删除无关包
# tar xvf vmutils-linux-amd64-v1.101.0.tar.gzmv vmagent-prod /usr/local/bin/
rm vmalert-prod vmalert-tool-prod vmctl-prod vmrestore-prod vmbackup-prod vmutils-linux-amd64-v1.101.0.tar.gz vmauth-prod -f
2. 创建Vmagent配置
● 配置结构如下:
/etc/vmagent/
├── vmagent.yaml

├── targets/

│   ├── test.json

│   └── prod.json
备注:
✓ 这里使用了Prometheus 服务发现机制中的通过文件发现新的目标,其支持丰富的动态机制,比如DNS、K8s、consul等等,参考:https://docs.victoriametrics.com/sd_configs/#scrape_configs
✓ targets这里划分,分不同的目标,如不同环境Test、Prod。可根据实际情况调整,比如不同业务模块划分不同的targets,以更方便添加label等操作
● 配置文件详情
vmagent.yaml:
# cat vmagent.yaml

scrape_configs:
-
job_name: 'node_exporter'
scrape_interval: 15s
file_sd_configs:- files:
- '/etc/vmagent/targets/*.json'
relabel_configs:
- '/etc/vmagent/targets/*.json'
- source_labels: [__meta_filepath]
regex: './(.).json'
target_label: env
- files:
job_name: 'vmagent_self_exporter'

scrape_interval: 15s

static_configs:
targets: ['localhost:8088']
备注:
✓ 这里要注意scrape_interval配置的位置,vmagent一些配置项并不完全兼容Prometheus;
✓ scrape_interval的值决定了Vmagent多久抓取一次目标对象的指标,即一个数据点,这个值也会直接影响PromQL查询的结构,比如设置太长,可能导致配套PromQL查询不到数据等情况,建议设置15s即可。太小也会对目标、Vmagent自身造成资源的高负载情况;
✓ relabel 根据不同的文件,添加不同环境的label标签
prod.json:
cat targets/prod.json

[

{

"targets": ["10.16.120.17:9100", "10.16.120.12:9100"],

"labels": {

"env": "prod"

}

}

]
test.json:
cat targets/test.json

[

{

"targets": ["10.16.100.125:9100", "test-node2:9100"],

"labels": {

"env": "test"

}

}

]
即:后续新增机器(部署node_exports)、下降机器只需要从对应prod.json、test.json删除其机器列表即可。
3. 加入Systemd管理,设置开启启动
● 创建对应的Service文件
# cat /etc/systemd/system/vmagent.service
[Unit]
Description=vmagent
Wants=network-online.target
After=network-online.target[Service]
ExecStart=/usr/local/bin/vmagent -promscrape.config=/etc/vmagent/vmagent.yaml -promscrape.configCheckInterval=60s -httpListenAddr=:8088 -promscrape.maxScrapeSize=50MB -remoteWrite.url=https://ap-shanghai.cls.tencentyun.com/prometheus/3fc8ead6-be54-41eb-bc60-df5146439678/api/v1/write -remoteWrite.basicAuth.username=AKIDQxxxxxxxxxxxUvCE0Wm -remoteWrite.basicAuth.password=3sRknbxxxxxxgEXa67rL
Restart=always
[Install]
WantedBy=multi-user.target
备注:
✓ promscrape.configCheckInterval参数的核心作用是,Vmagent自动检测config文件更新,就不需要手动reload Service生效了,默认行为是不会自动检测更新
✓ promscrape.maxScrapeSize 参数主要是解决获取抓取目标最大返回的大小,默认是16MB,建议可以调大些,特别是被监控的samples比较多的情况
✓ remoteWrite.url参数就是指定remote write cls的指标主题的写入地址,参考第三块获取相关地址
✓ remoteWrite.basicAuth.username 就是对应第三块中对应的子用户的API ID
✓ remoteWrite.basicAuth.password 就是对应第三块中对应的子用户的API KEY
4. 启动&校验&加入开机启动
# systemctl start vmagent.servicesystemctl status vmagent.service
systemctl enable vmagent.service
5. 验证是否正常工作
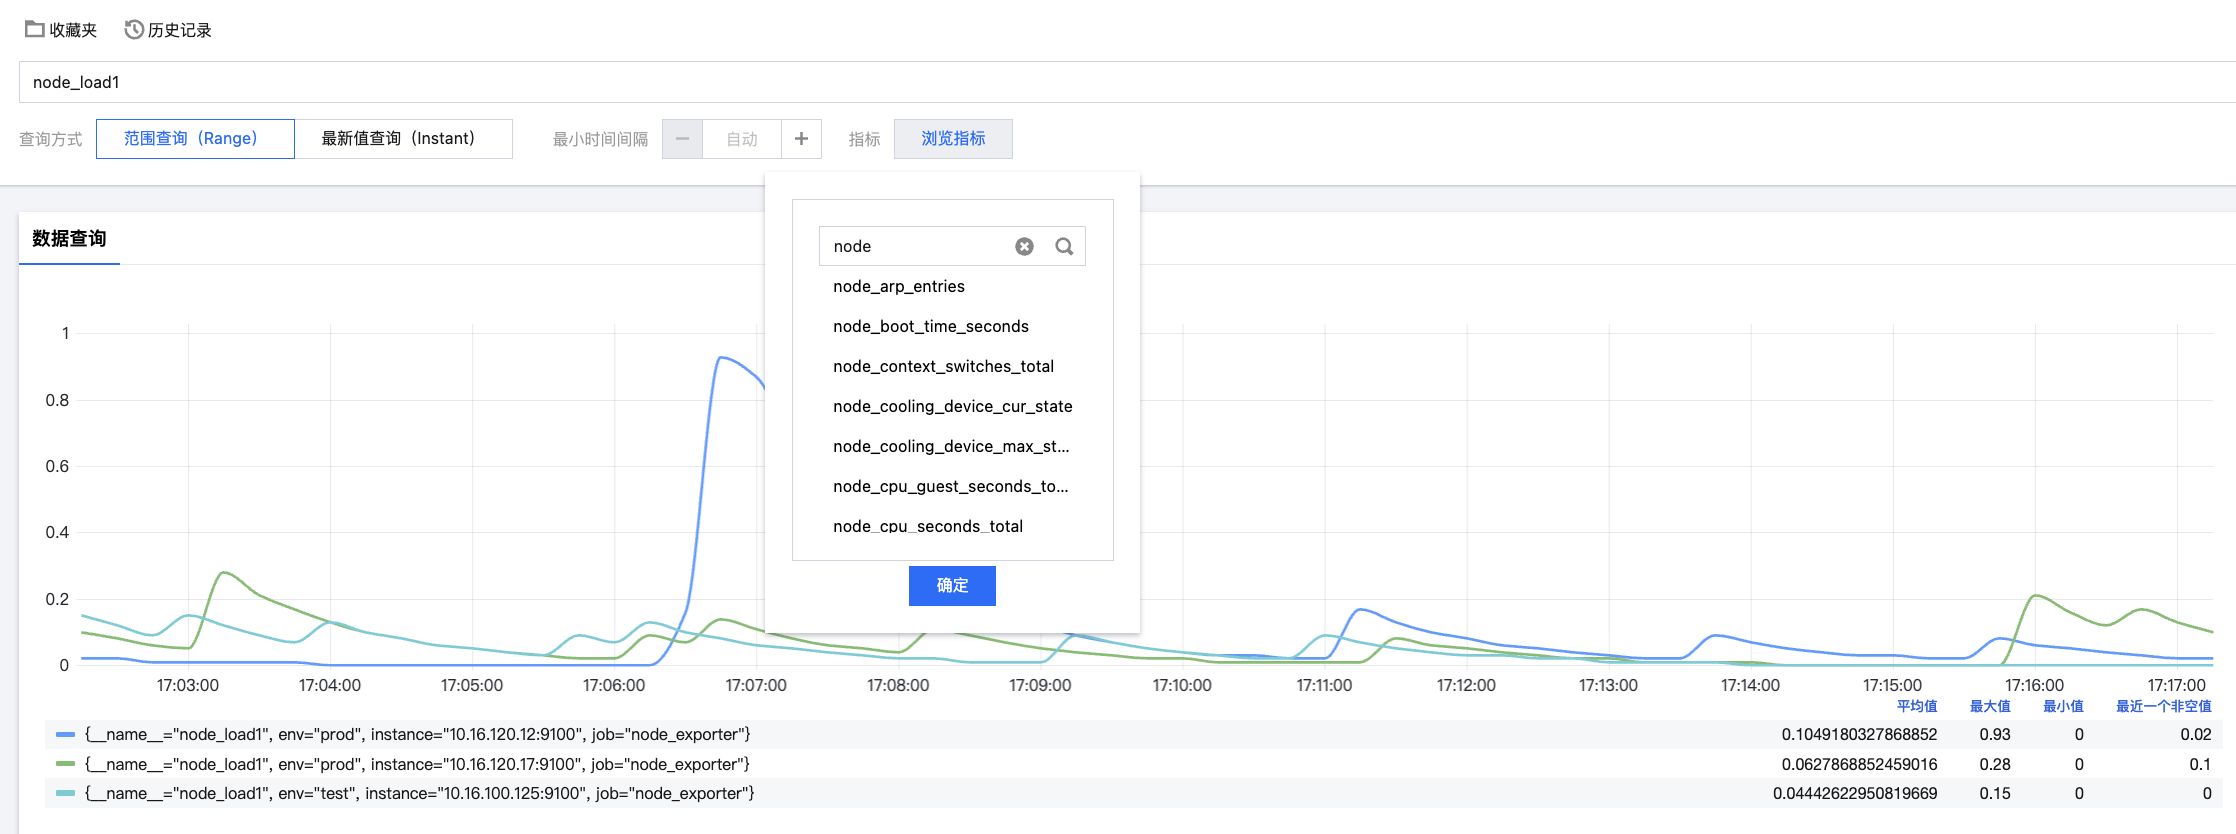
到CLS控制台检索其相关指标主题,查看指标是否正常即可
五:配置Grafana仪表盘&告警
1. 安装部署
● 安装软件
# yum install -y https://dl.grafana.com/oss/release/grafana-11.0.0-1.x86_64.rpm备注:
✓ 版本选择较新版本,因为部分特性比如$__rate_interval变量是7.x后的版本才支持
✓ 安装方式自行选择,参考:Install Grafana on RHEL or Fedora | Grafana documentation
● 通过systemd启动grafana&校验&加入开机启动
# systemctl daemon-reloadsystemctl start grafana-server
systemctl status grafana-server
● grafana-server.service - Grafana instance
Loaded: loaded (/usr/lib/systemd/system/grafana-server.service; disabled; vendor preset: disabled)
Active: active (running) since 日 2024-06-23 21:28:37 CST; 12s ago
Docs: http://docs.grafana.org
Main PID: 11679 (grafana)
CGroup: /system.slice/grafana-server.service
└─11679 /usr/share/grafana/bin/grafana server --config=/etc/grafana/grafana.ini --pidfile=/var/run/grafana/grafana-server.pid --packaging=rpm cfg:default.paths.logs=/var/log/grafana cfg:default....systemctl enable grafana-server.service
Created symlink from /etc/systemd/system/multi-user.target.wants/grafana-server.service to /usr/lib/systemd/system/grafana-server.service.
备注:Grafana默认监听在3000端口,注意安全组放通
2. 配置DataSource
● 首次登录grafana需要重置admin密码,默认admin/admin

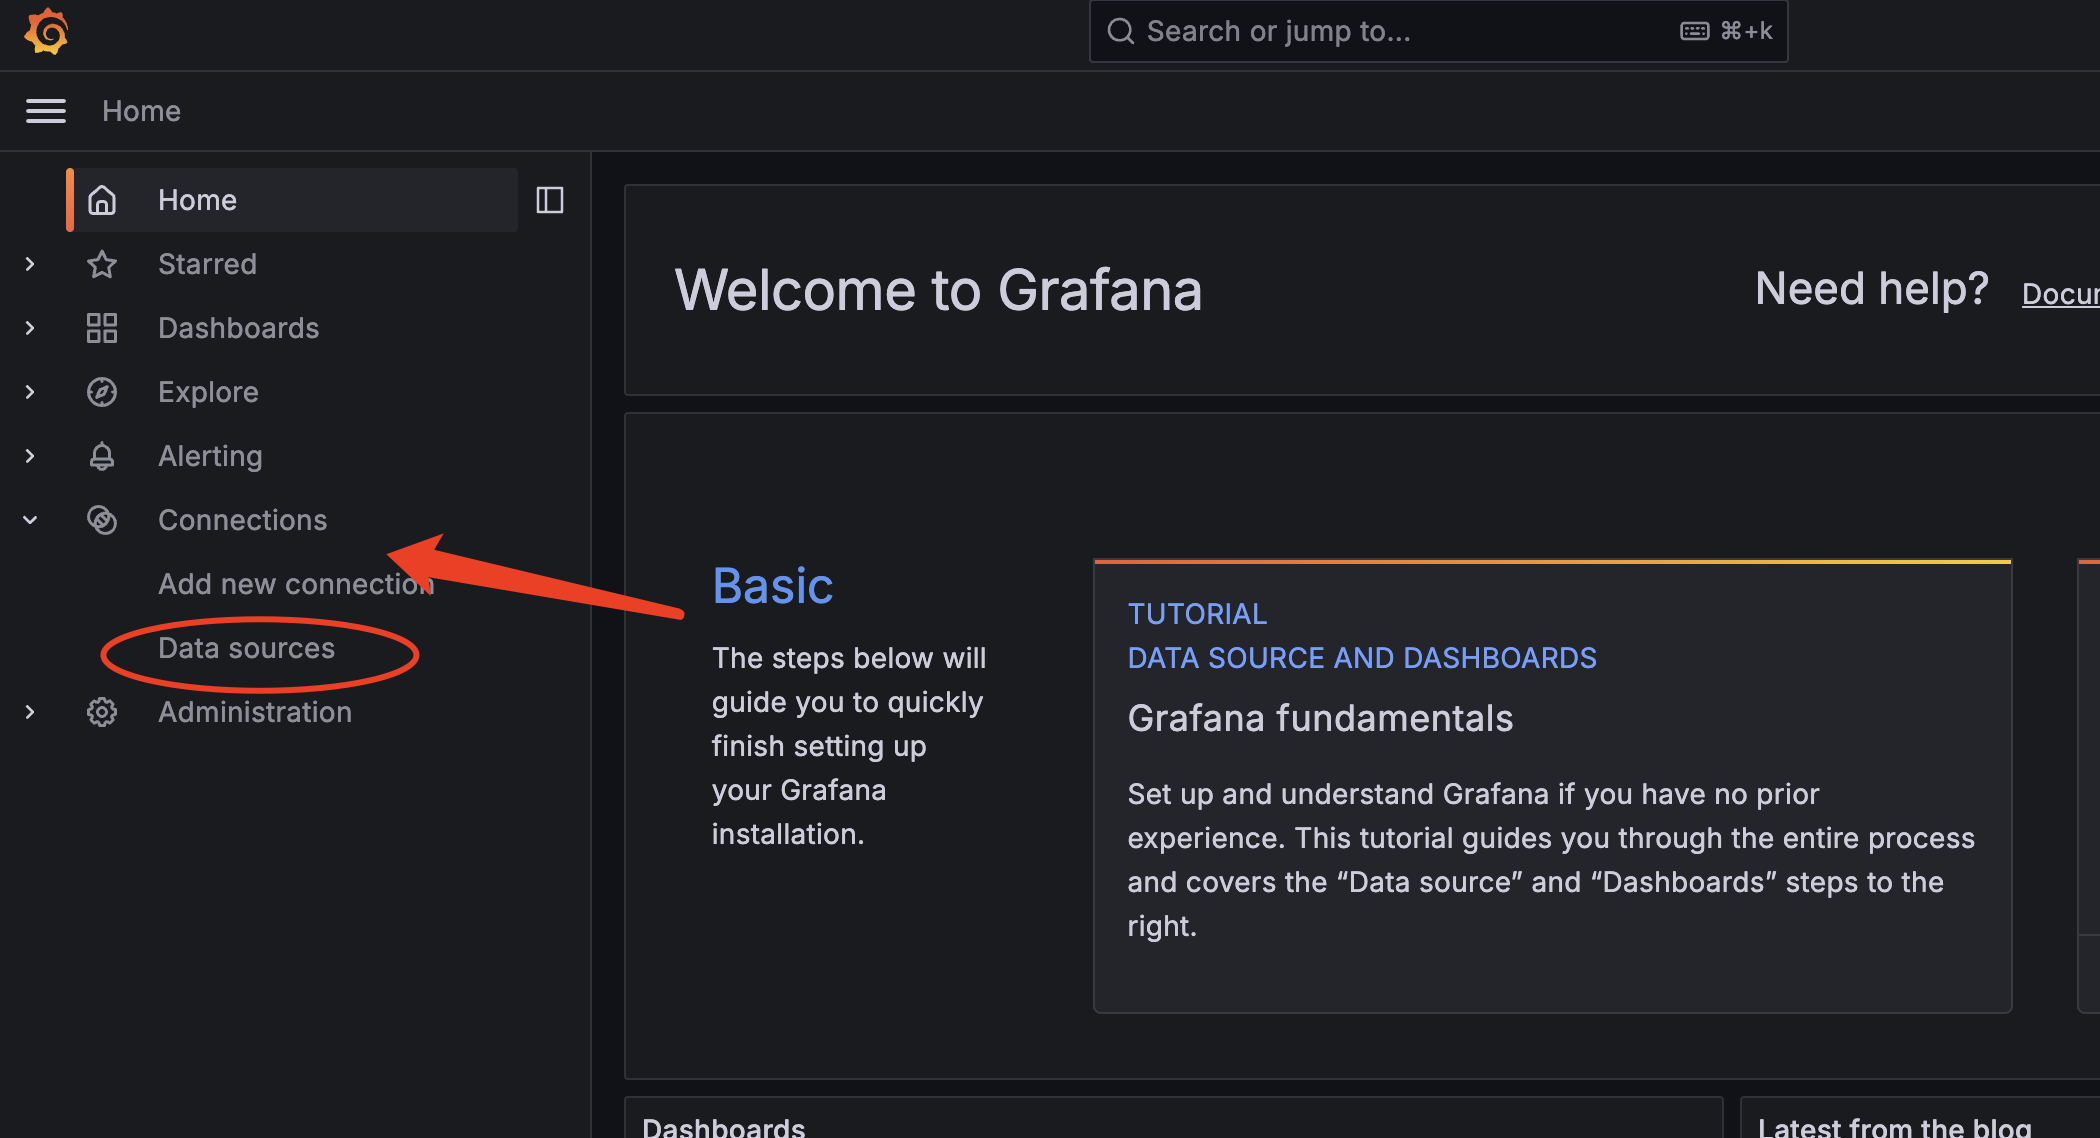
● 选择DataSource入口
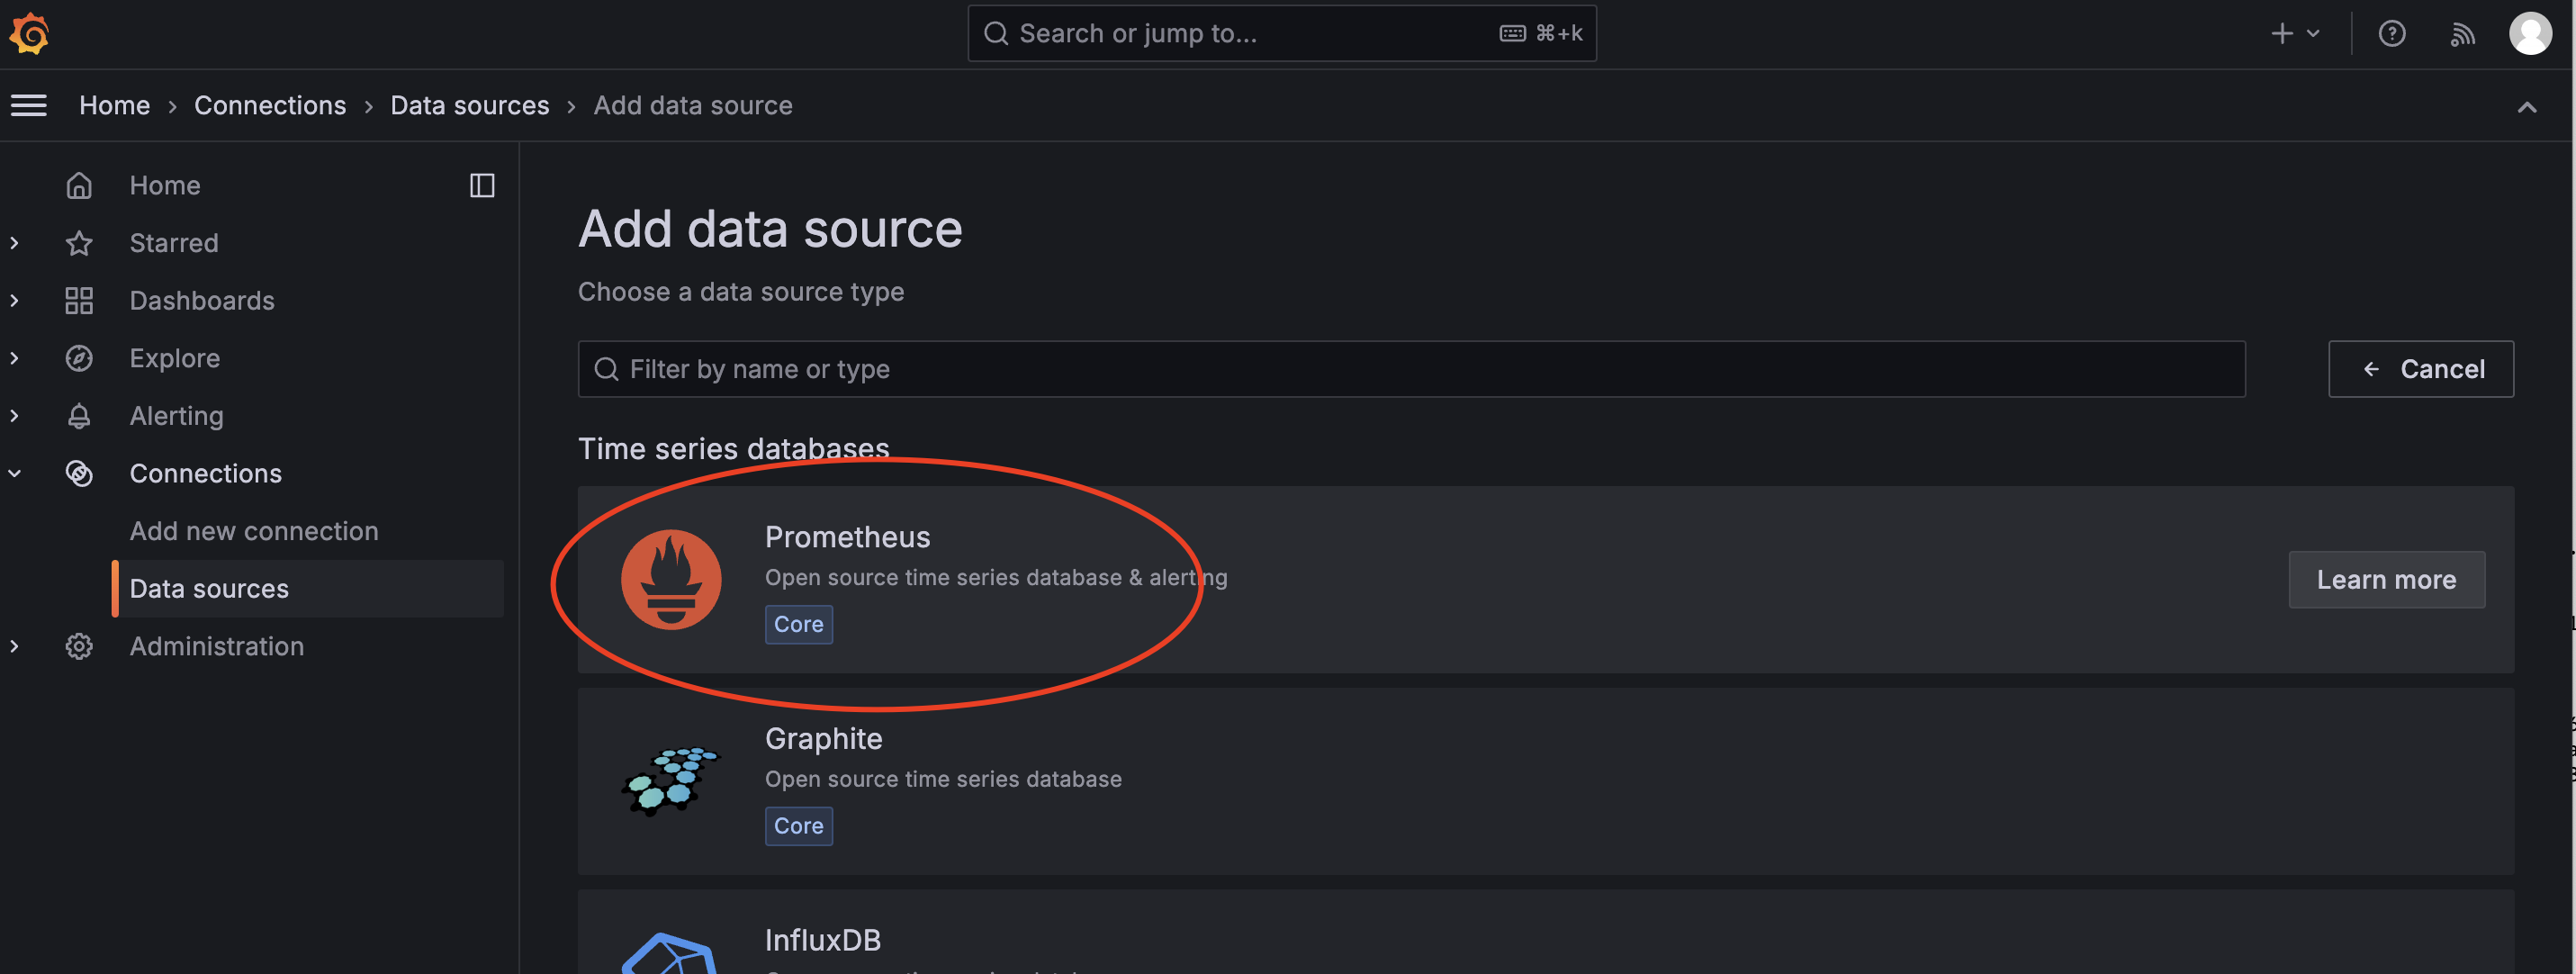
● 选择Prometheus选项
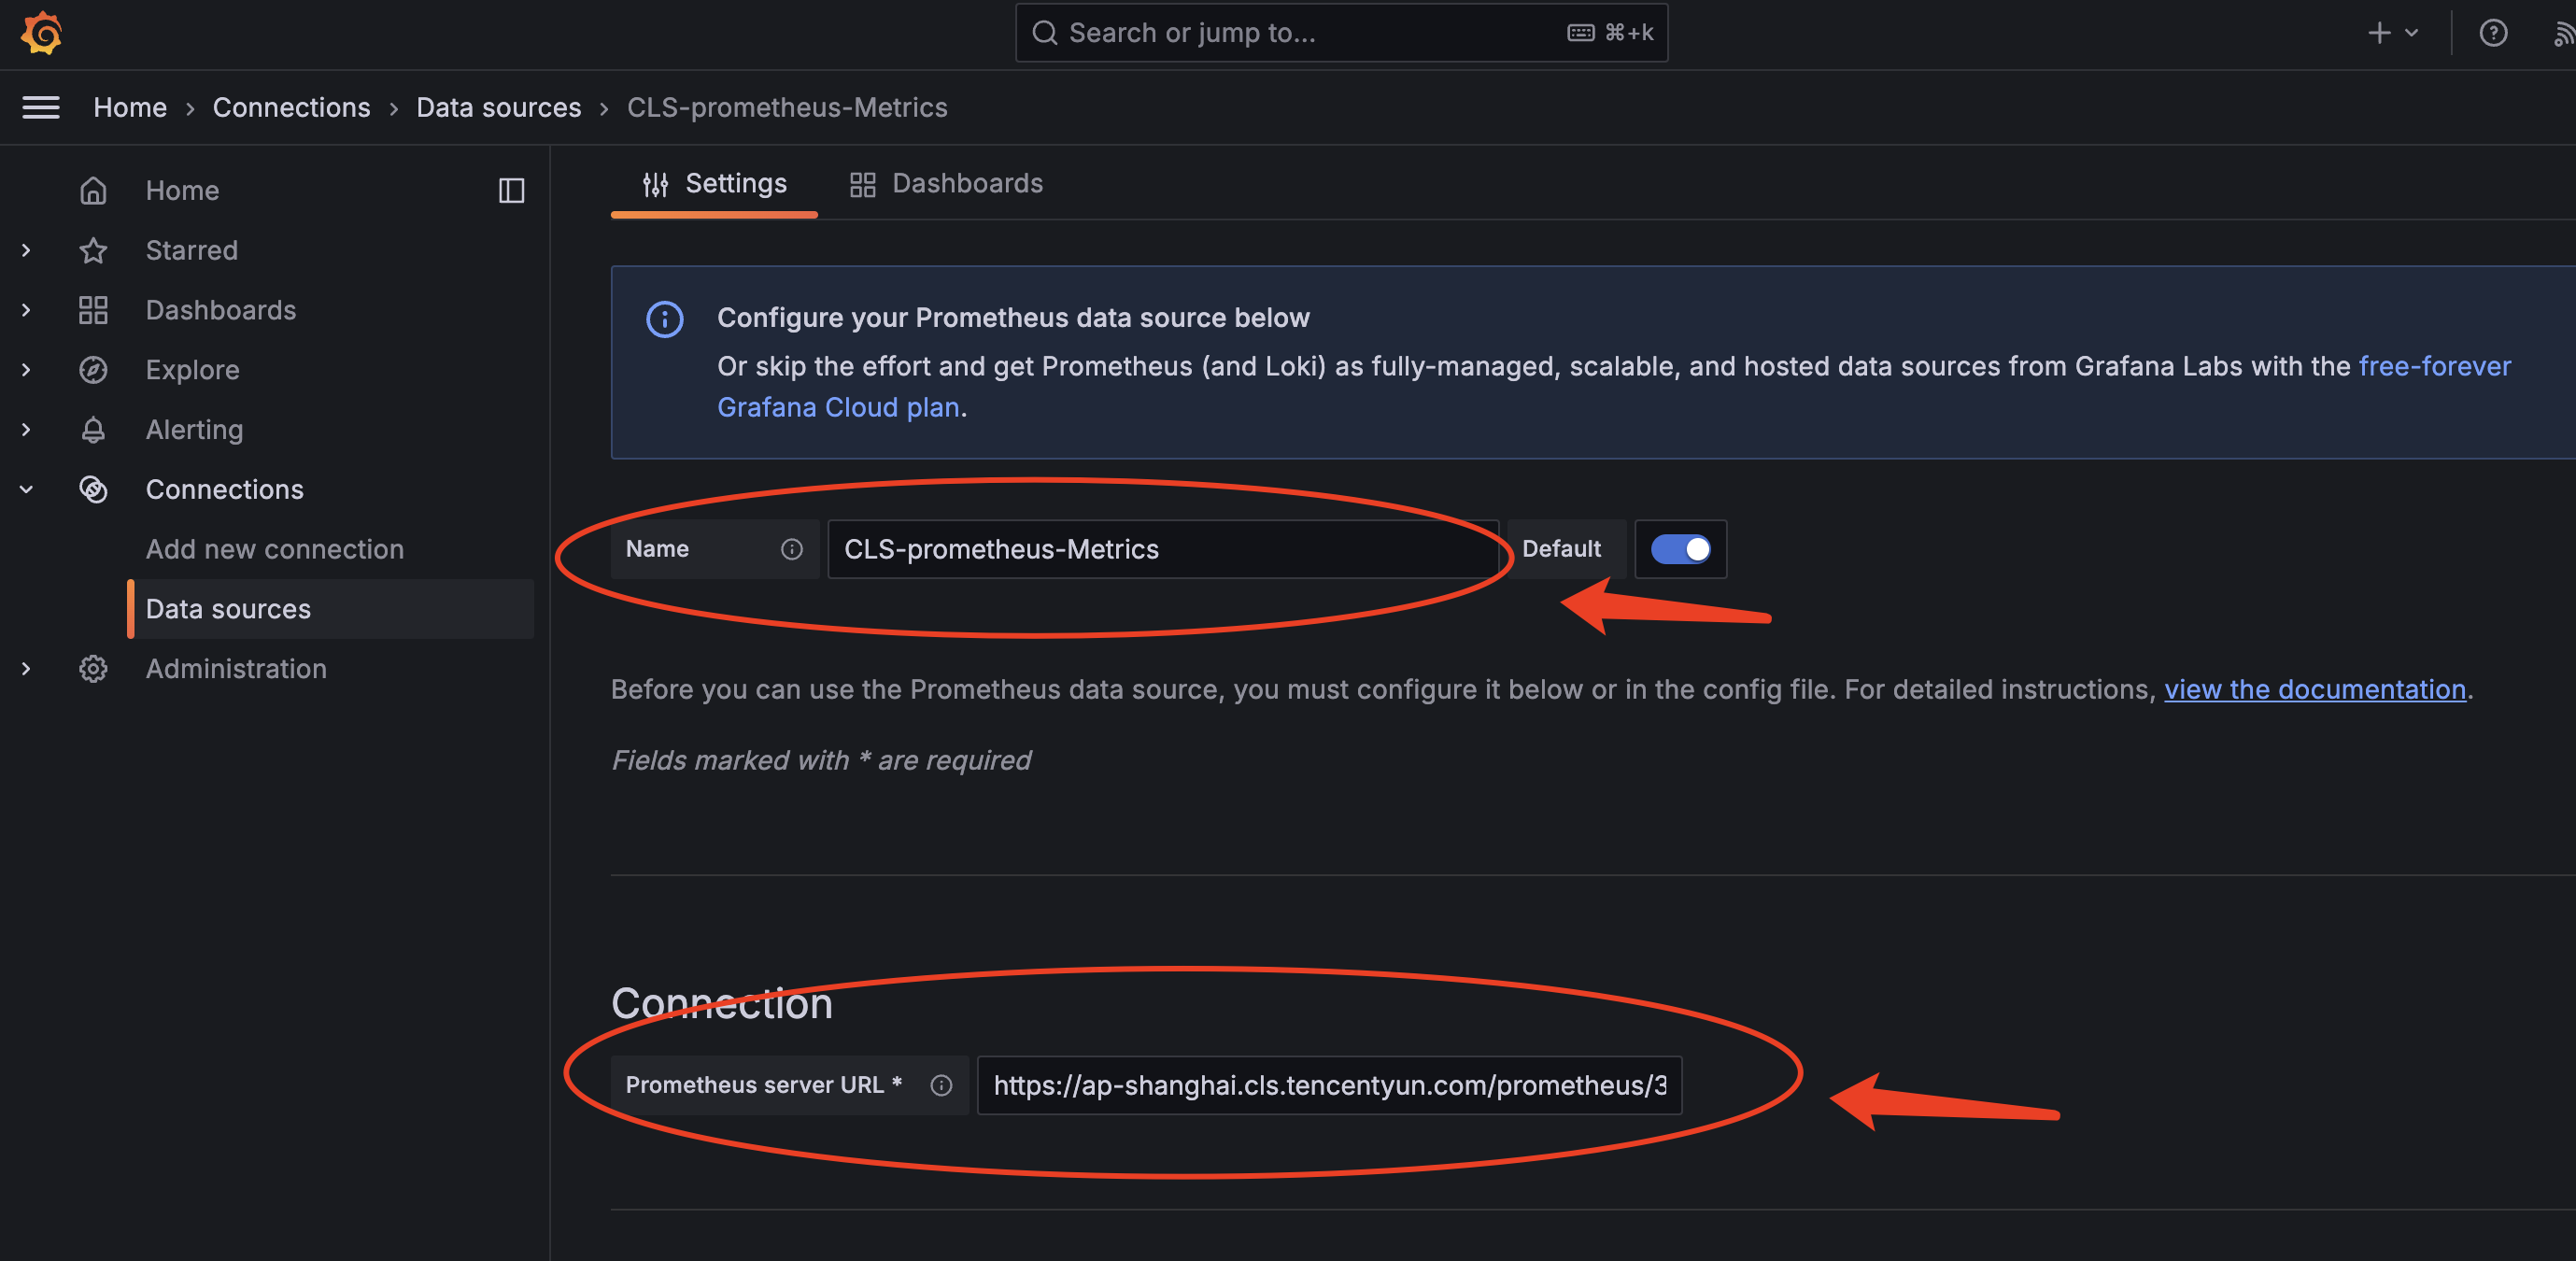
● 配置DataSource
备注:
✓ Name按自己习惯填写
✓ Prometheus server URL:即第三步中对应CLS指标主题的查询数据接口,条件ok选择内网接入点
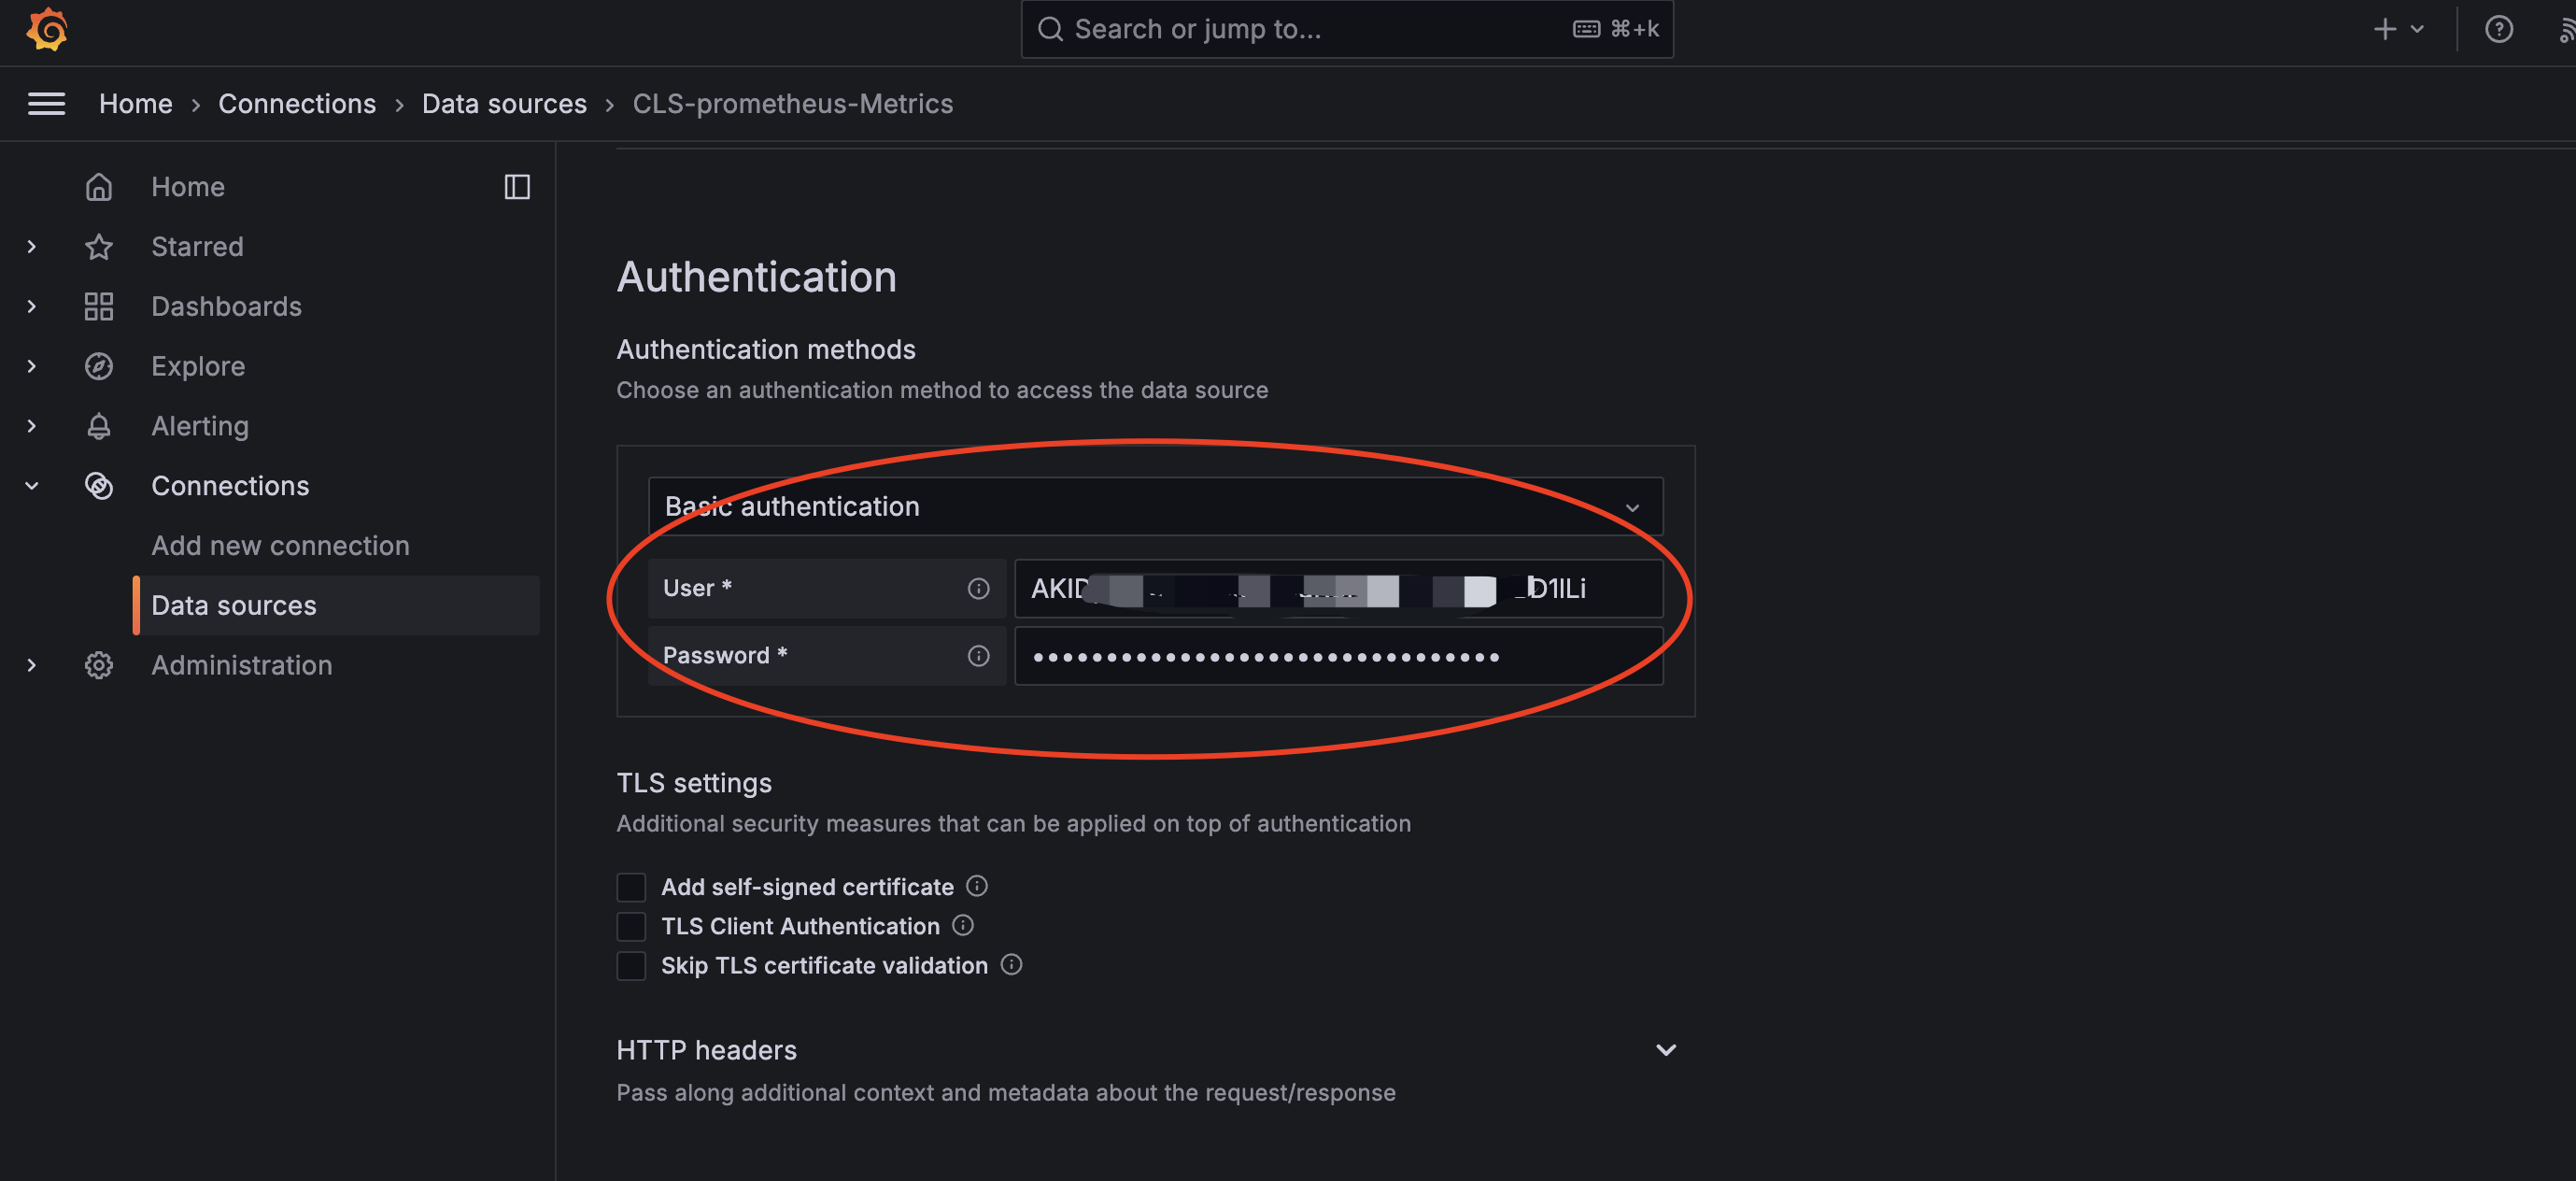
备注:
✓ 认证方式选择Basic Auth
✓ User即对应第三步中创建子用户对应SecretID
✓ Password即对应第三步中创建子用户对应SecretKey
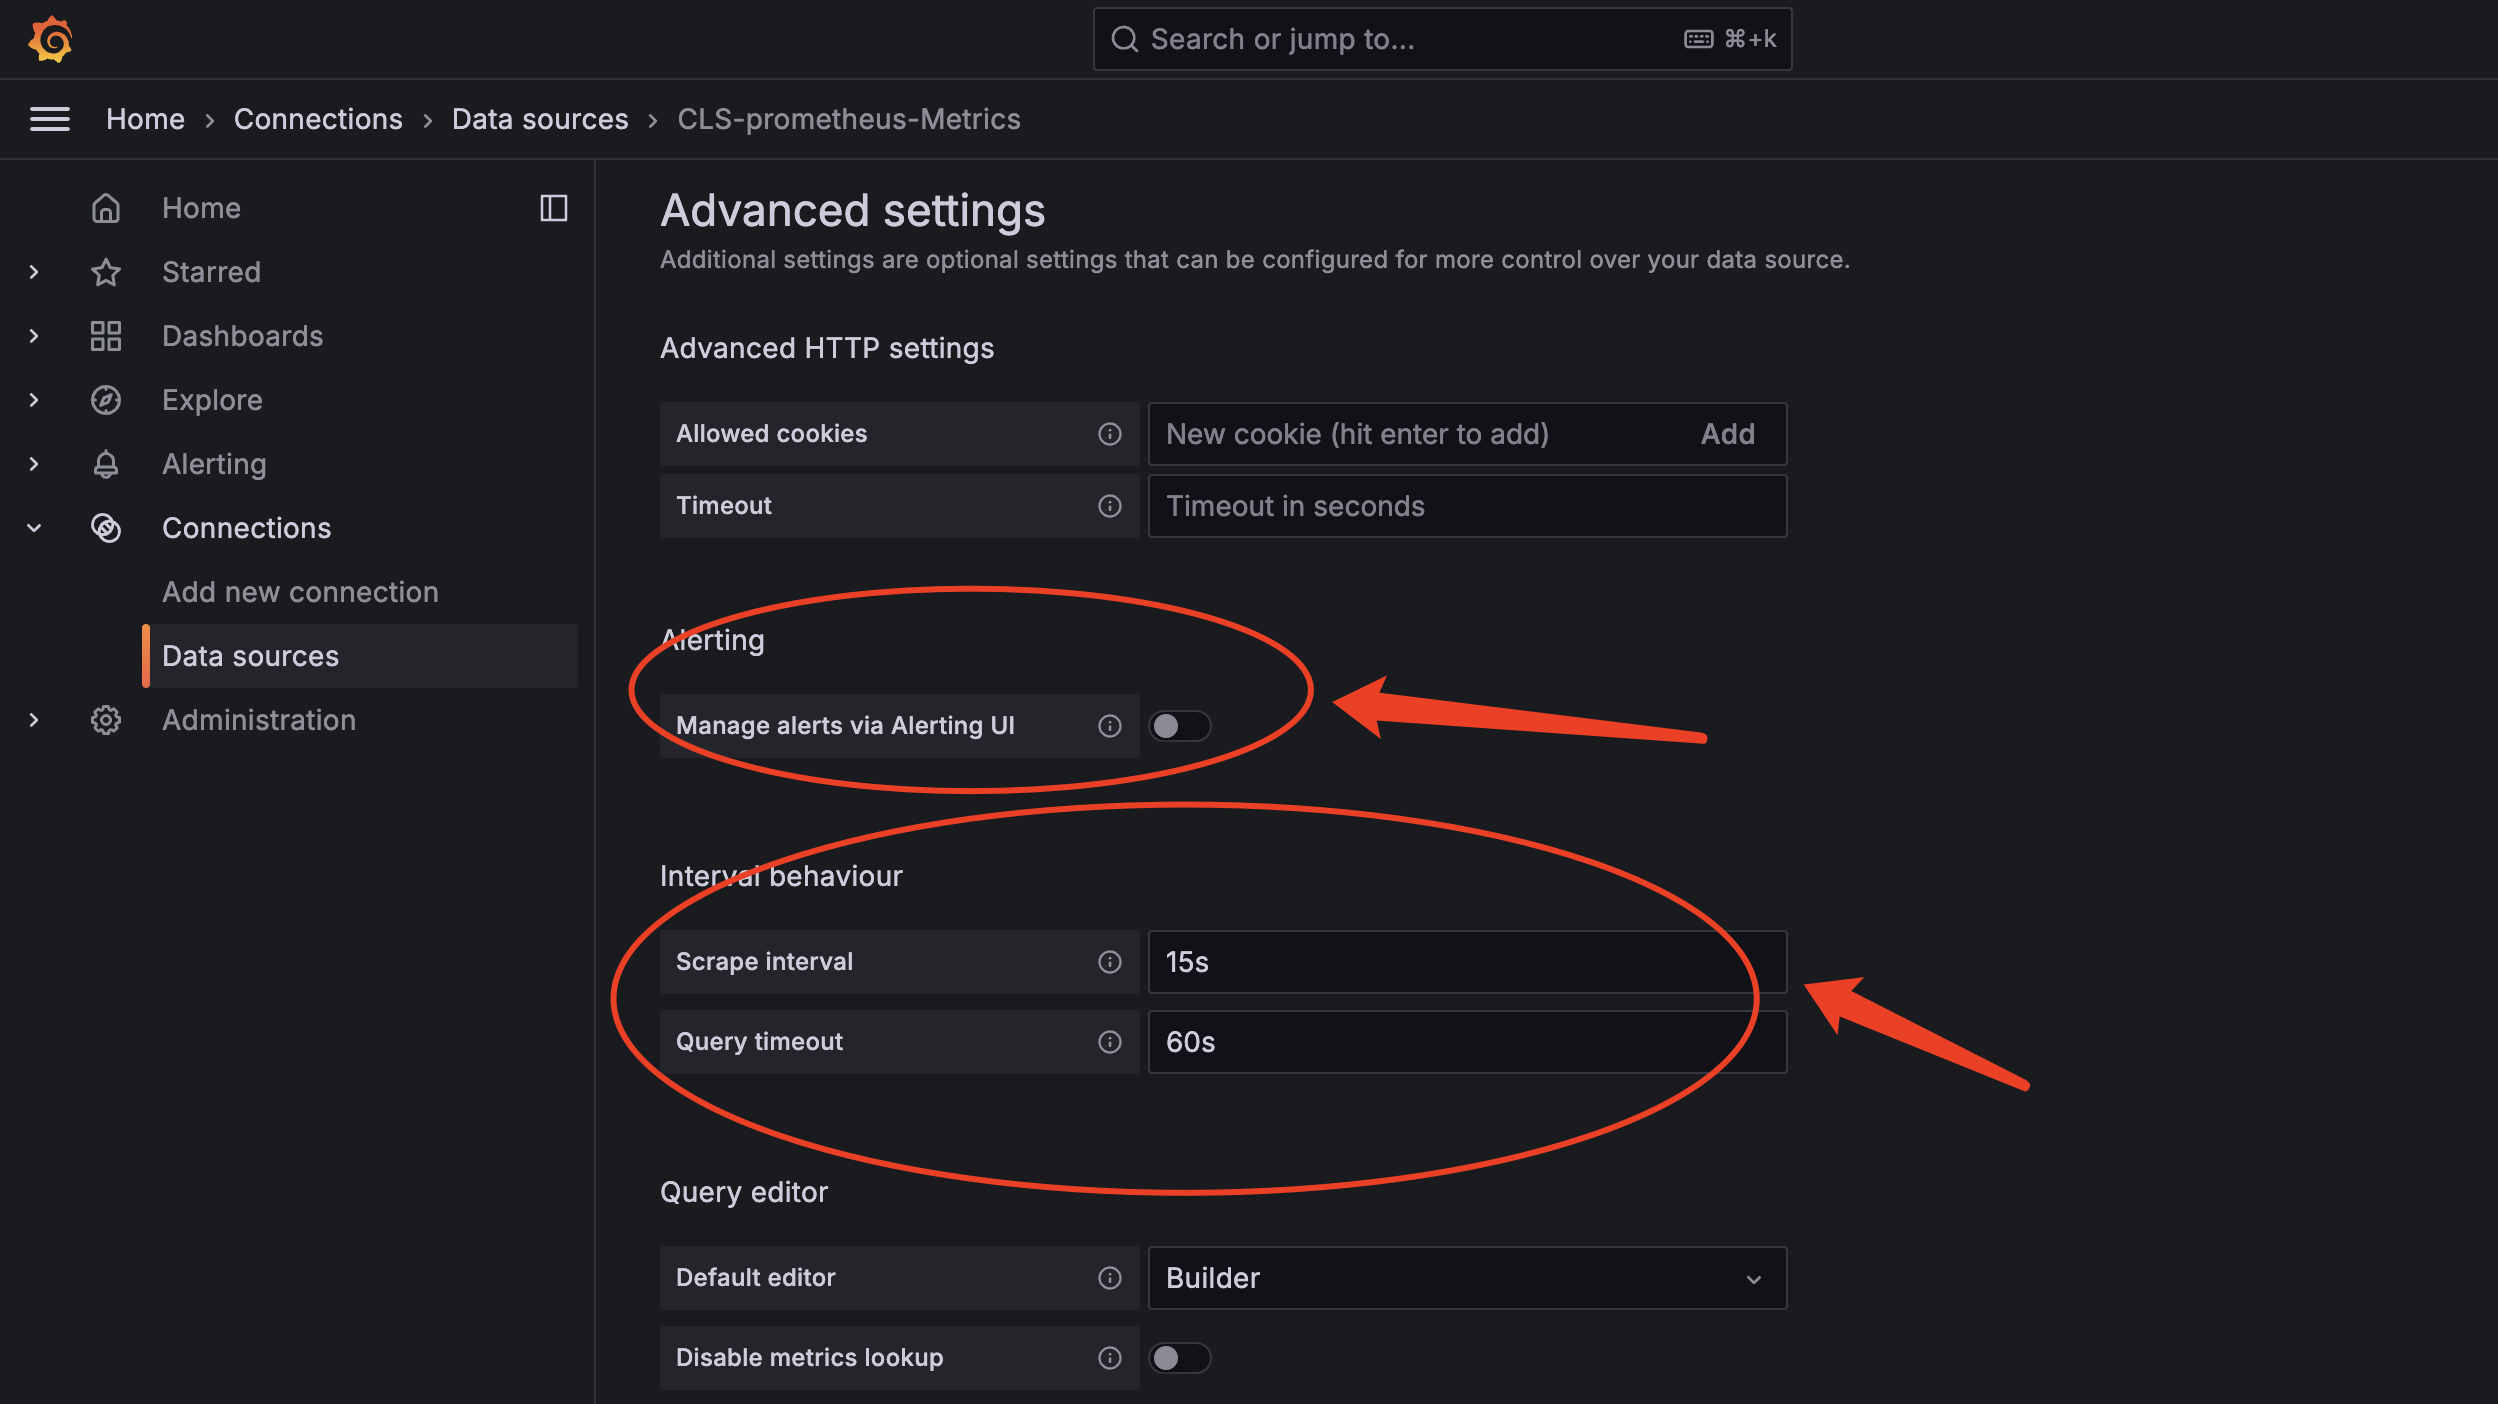
备注:
✓ 关闭Mange aliter via Alterting UI
✓ Scrape Interval 填充为15s,也是最新版本默认值,这个主要影响Grafana的interval的值生成判断
✓ Query timeout 填充为60s,也是最新版本默认值,CLS默认55s超时
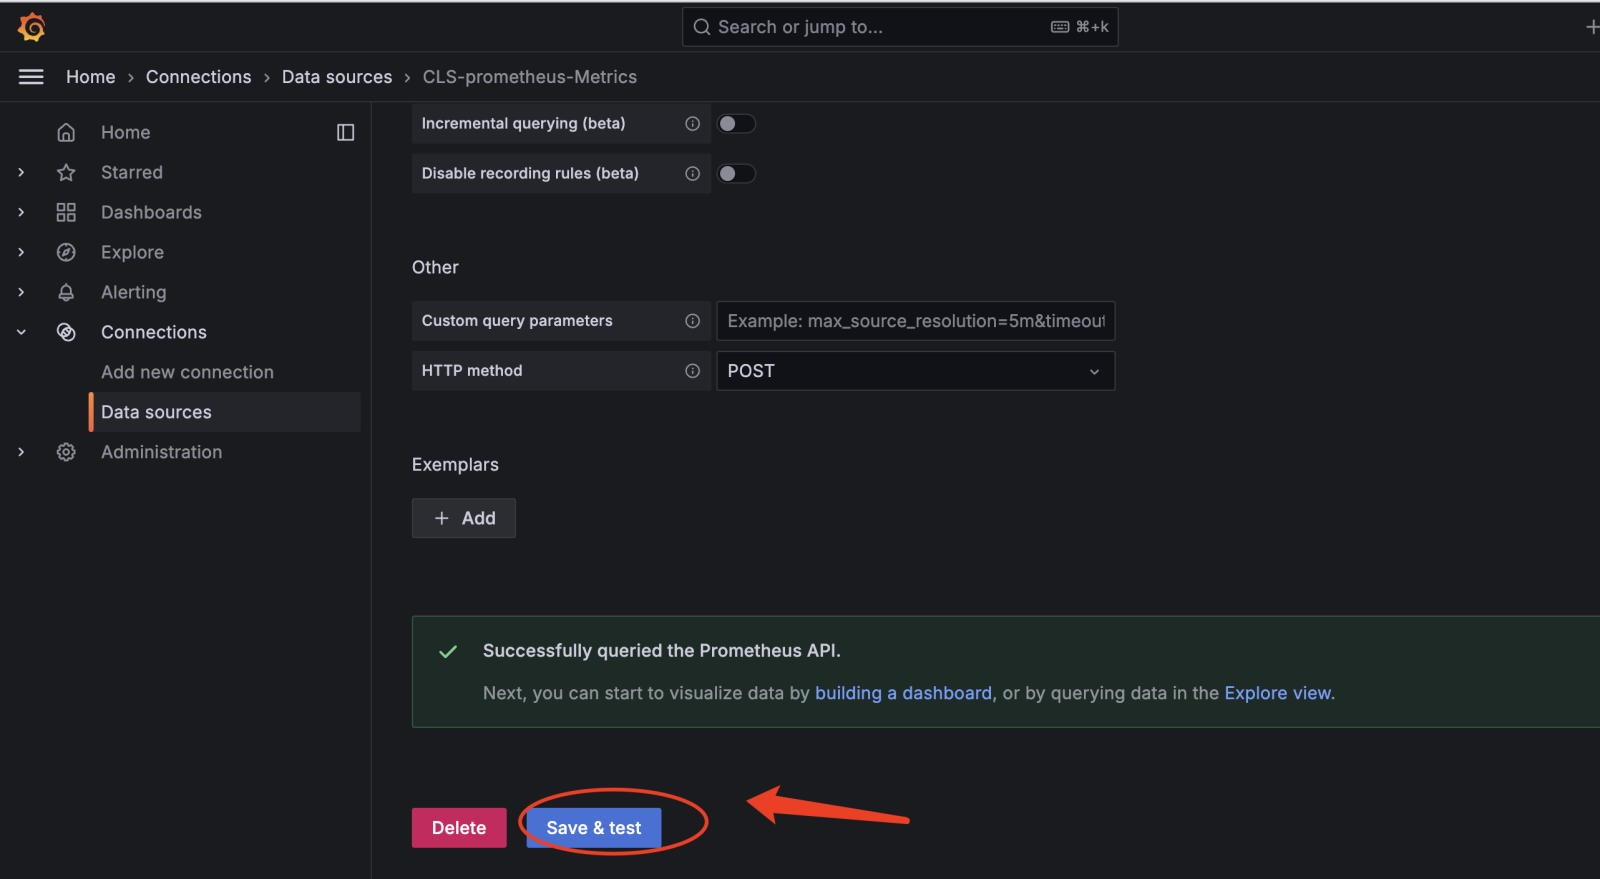
备注:Save&test 如果报错,如400等大多原因是SecretID、SecretKey不对,或者权限设置不对
3. 配置Node_exporters 仪表盘
● 创建新的文件夹,按个人习惯创建命名

● 下载Node_exporters仪表盘(本文档是按照Json下载再导入的方式)
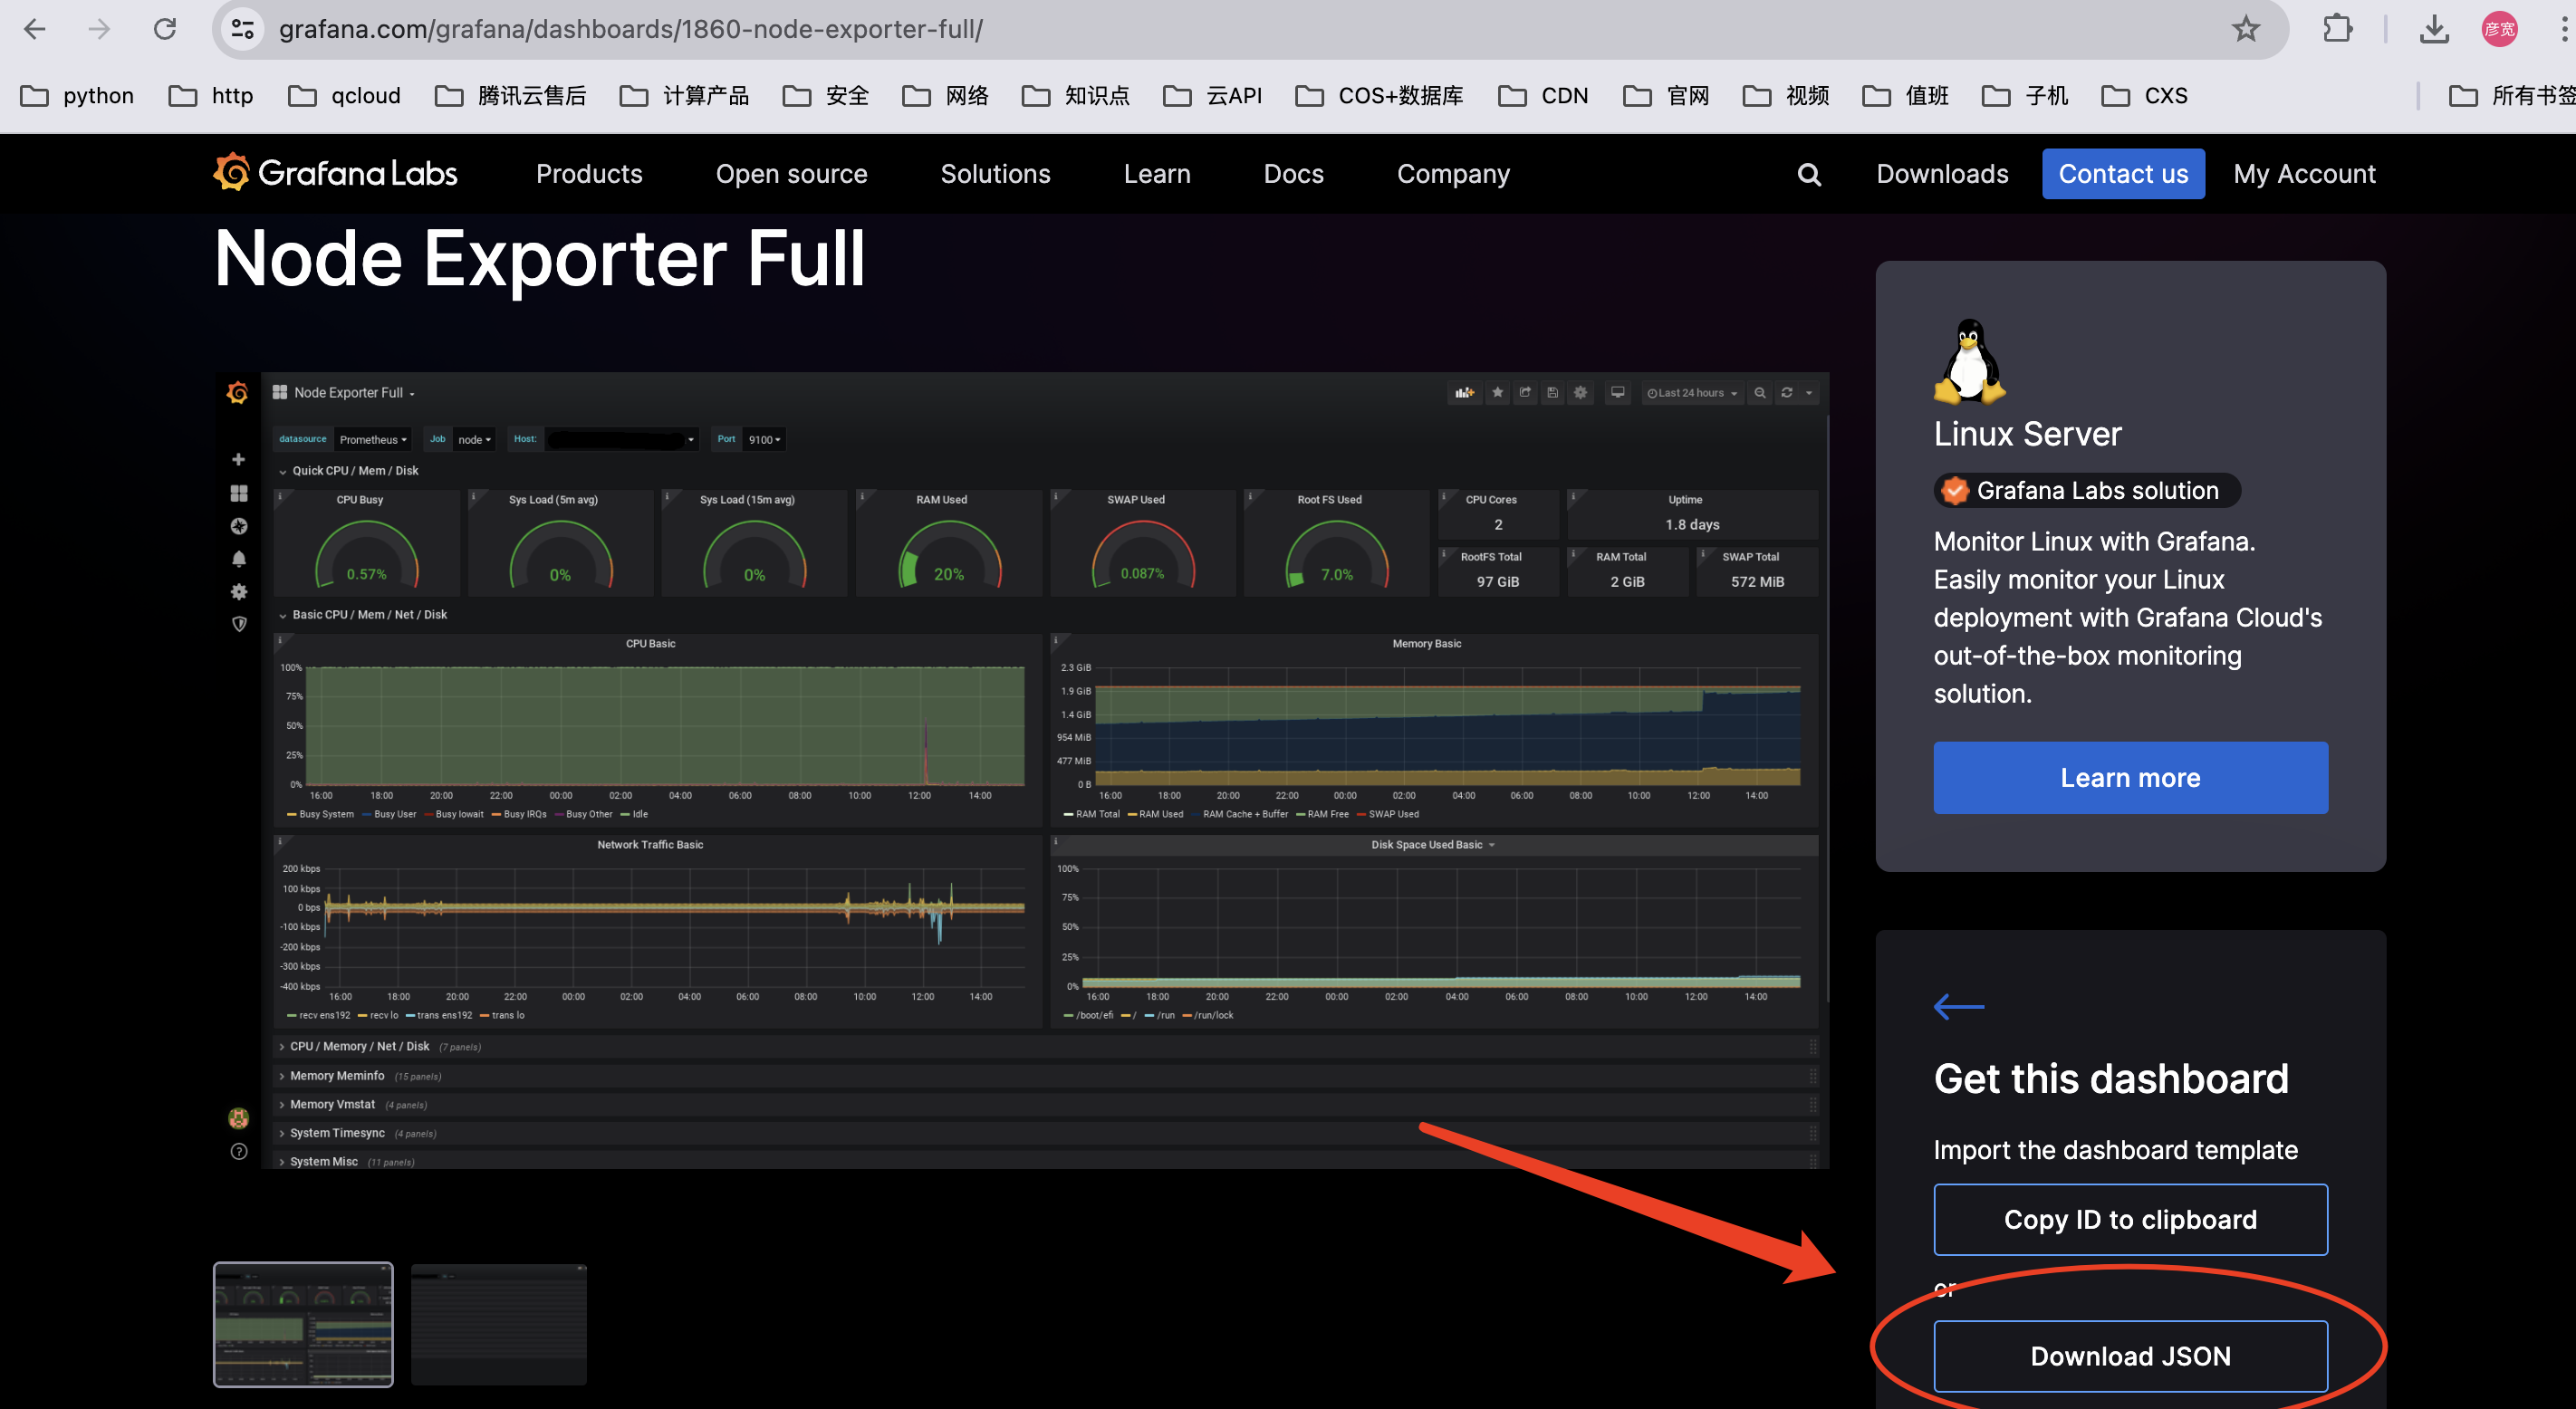
备注:对应下载链接参考:Node Exporter Full | Grafana Labs
● 导入对应仪表盘Json文件
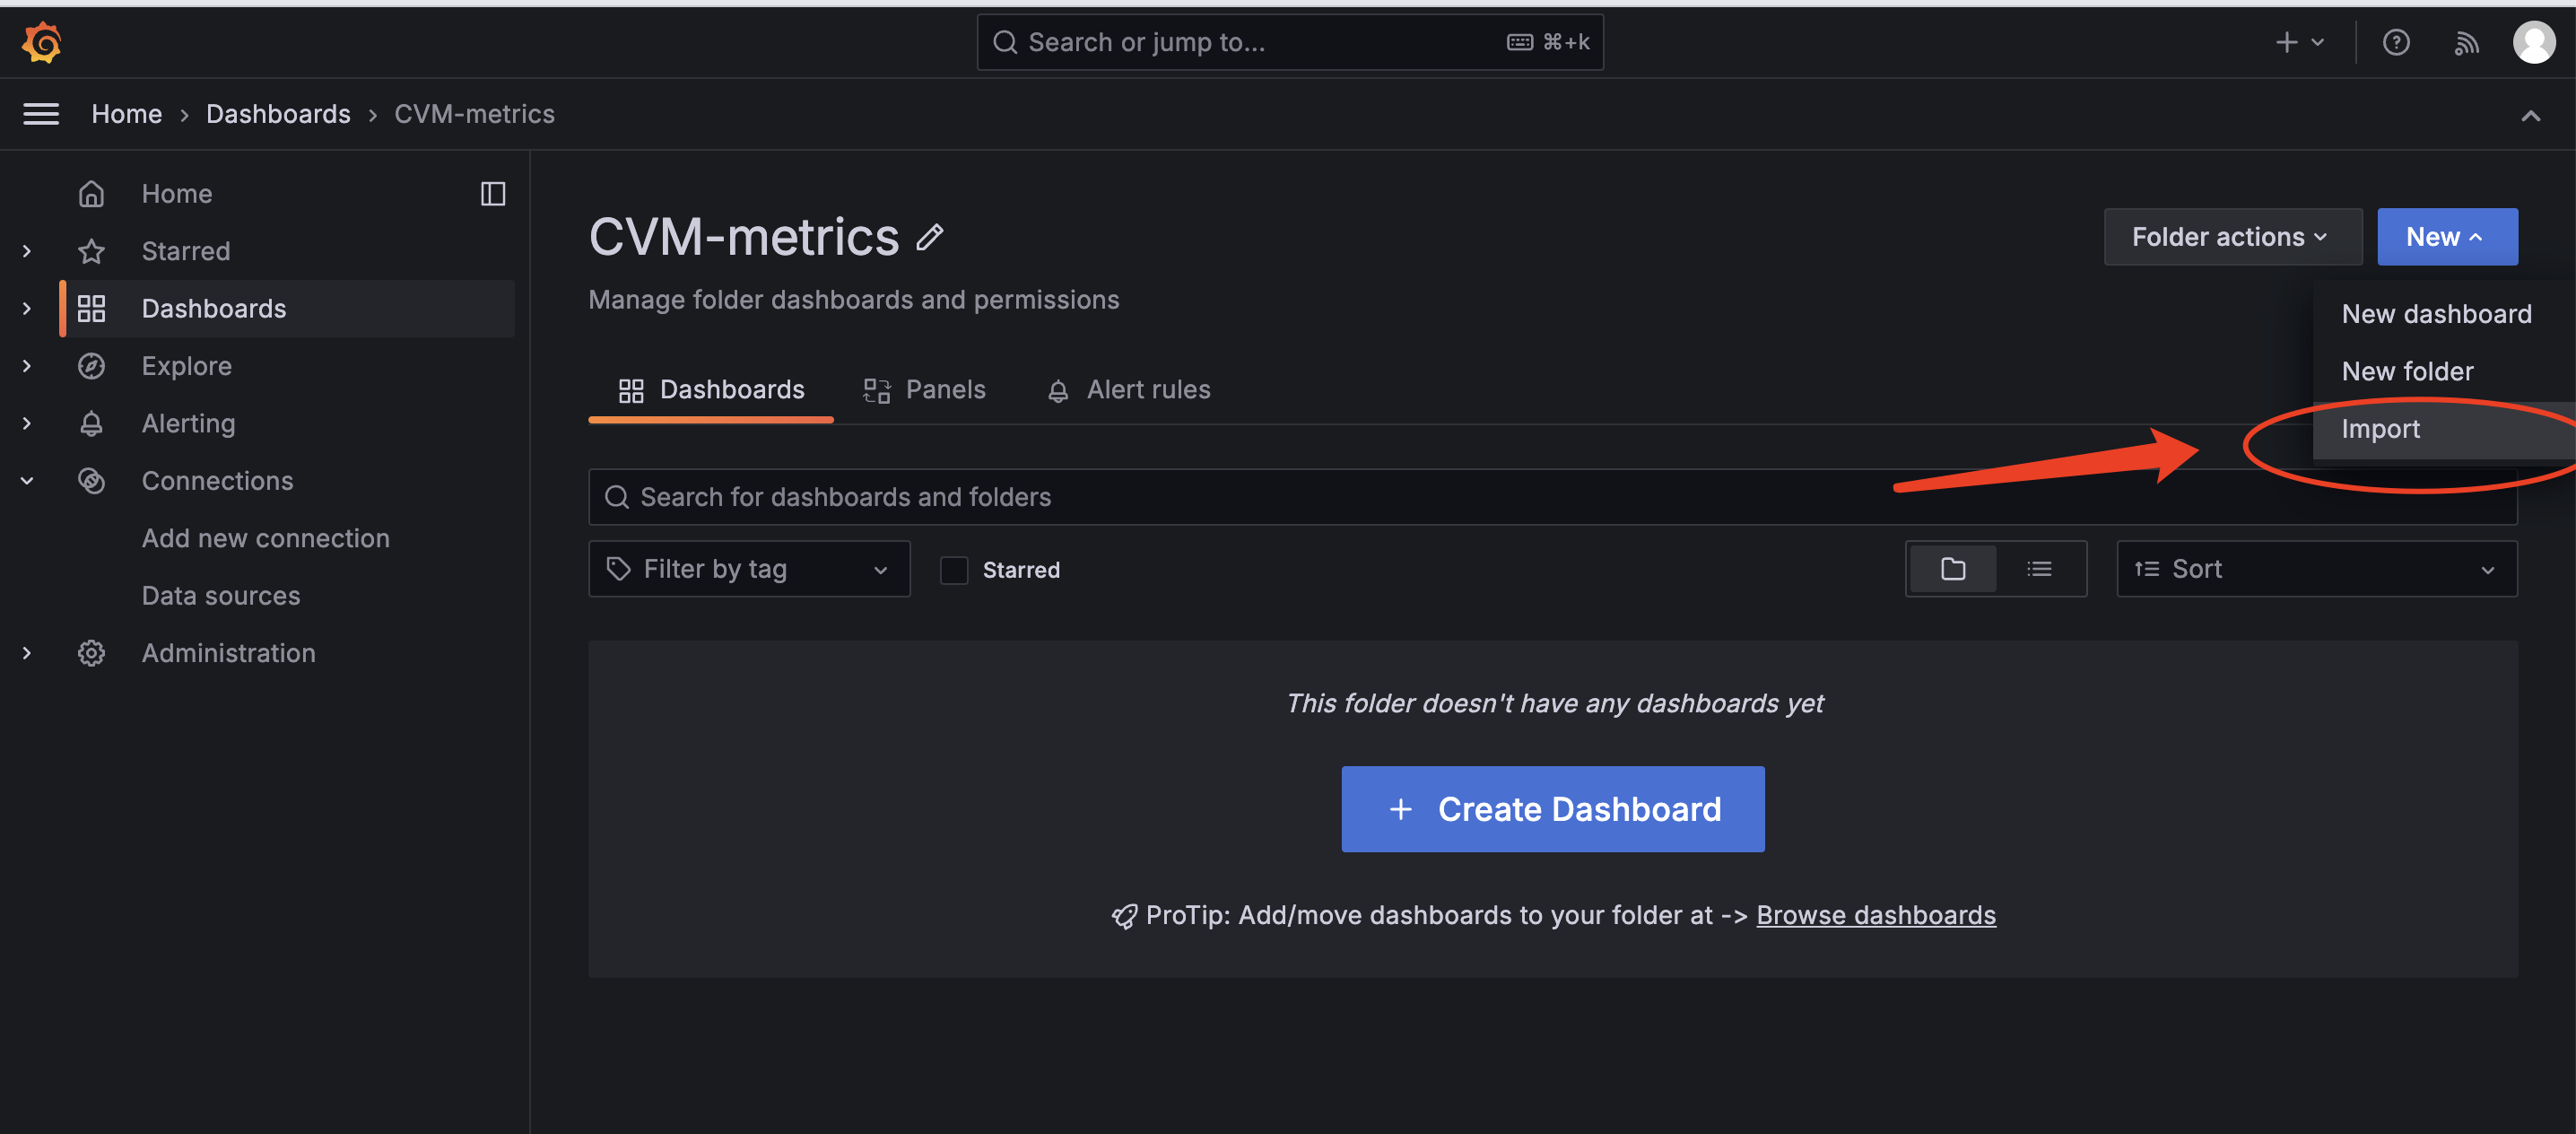
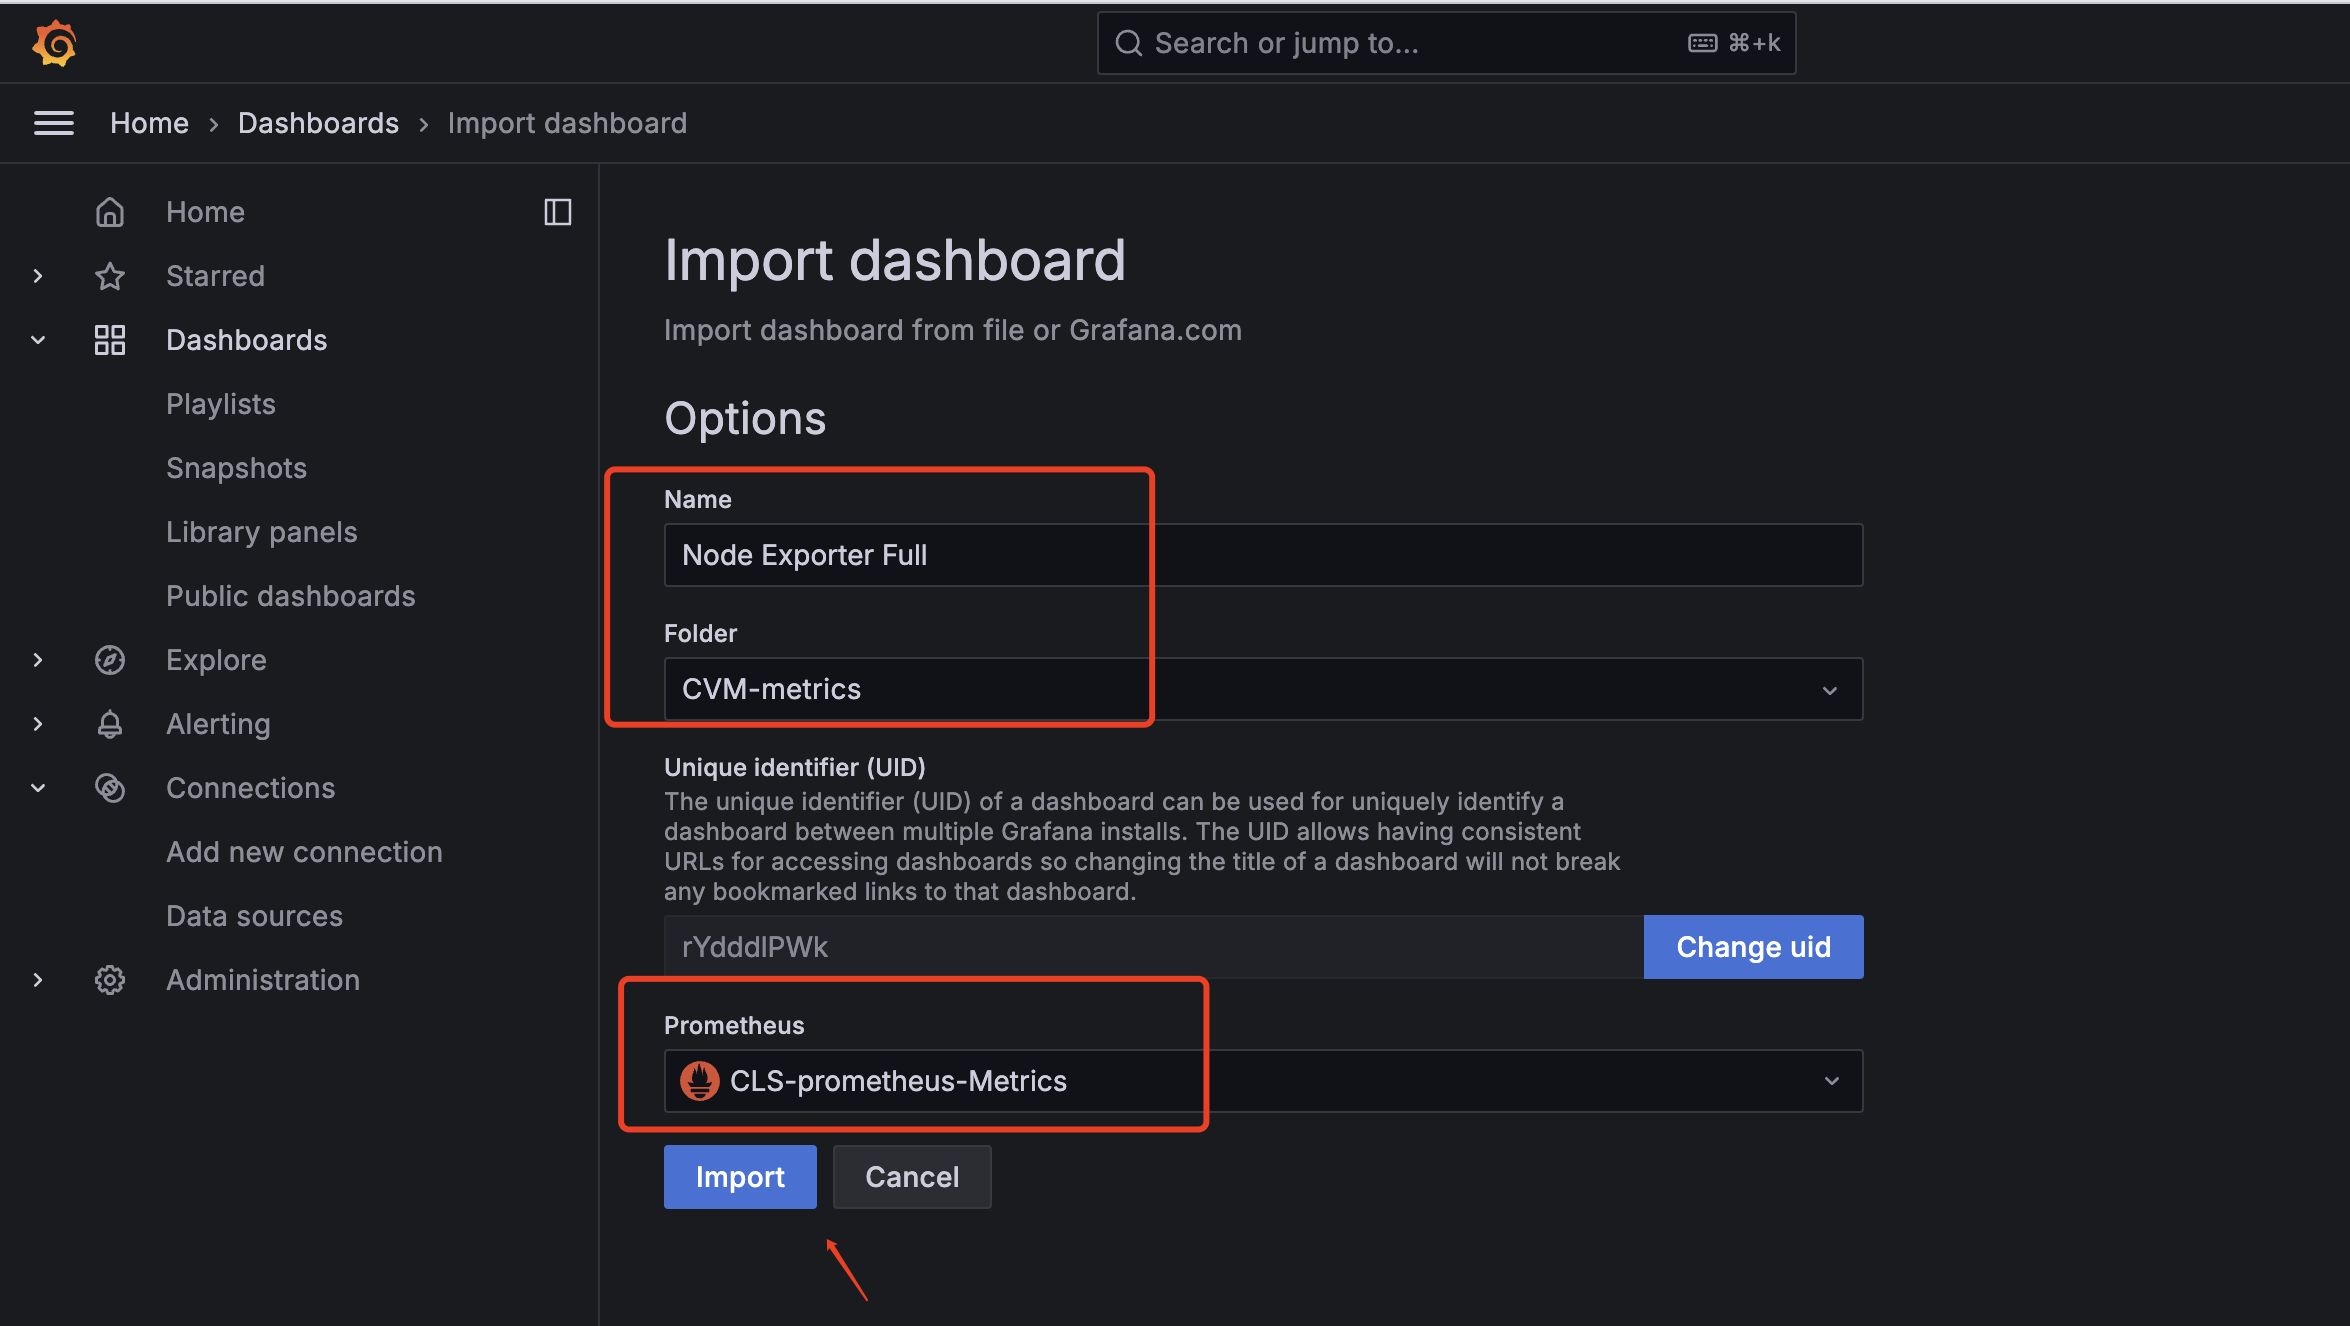
备注:选择刚创建的Prometheus数据源即可,Import后即如下所示
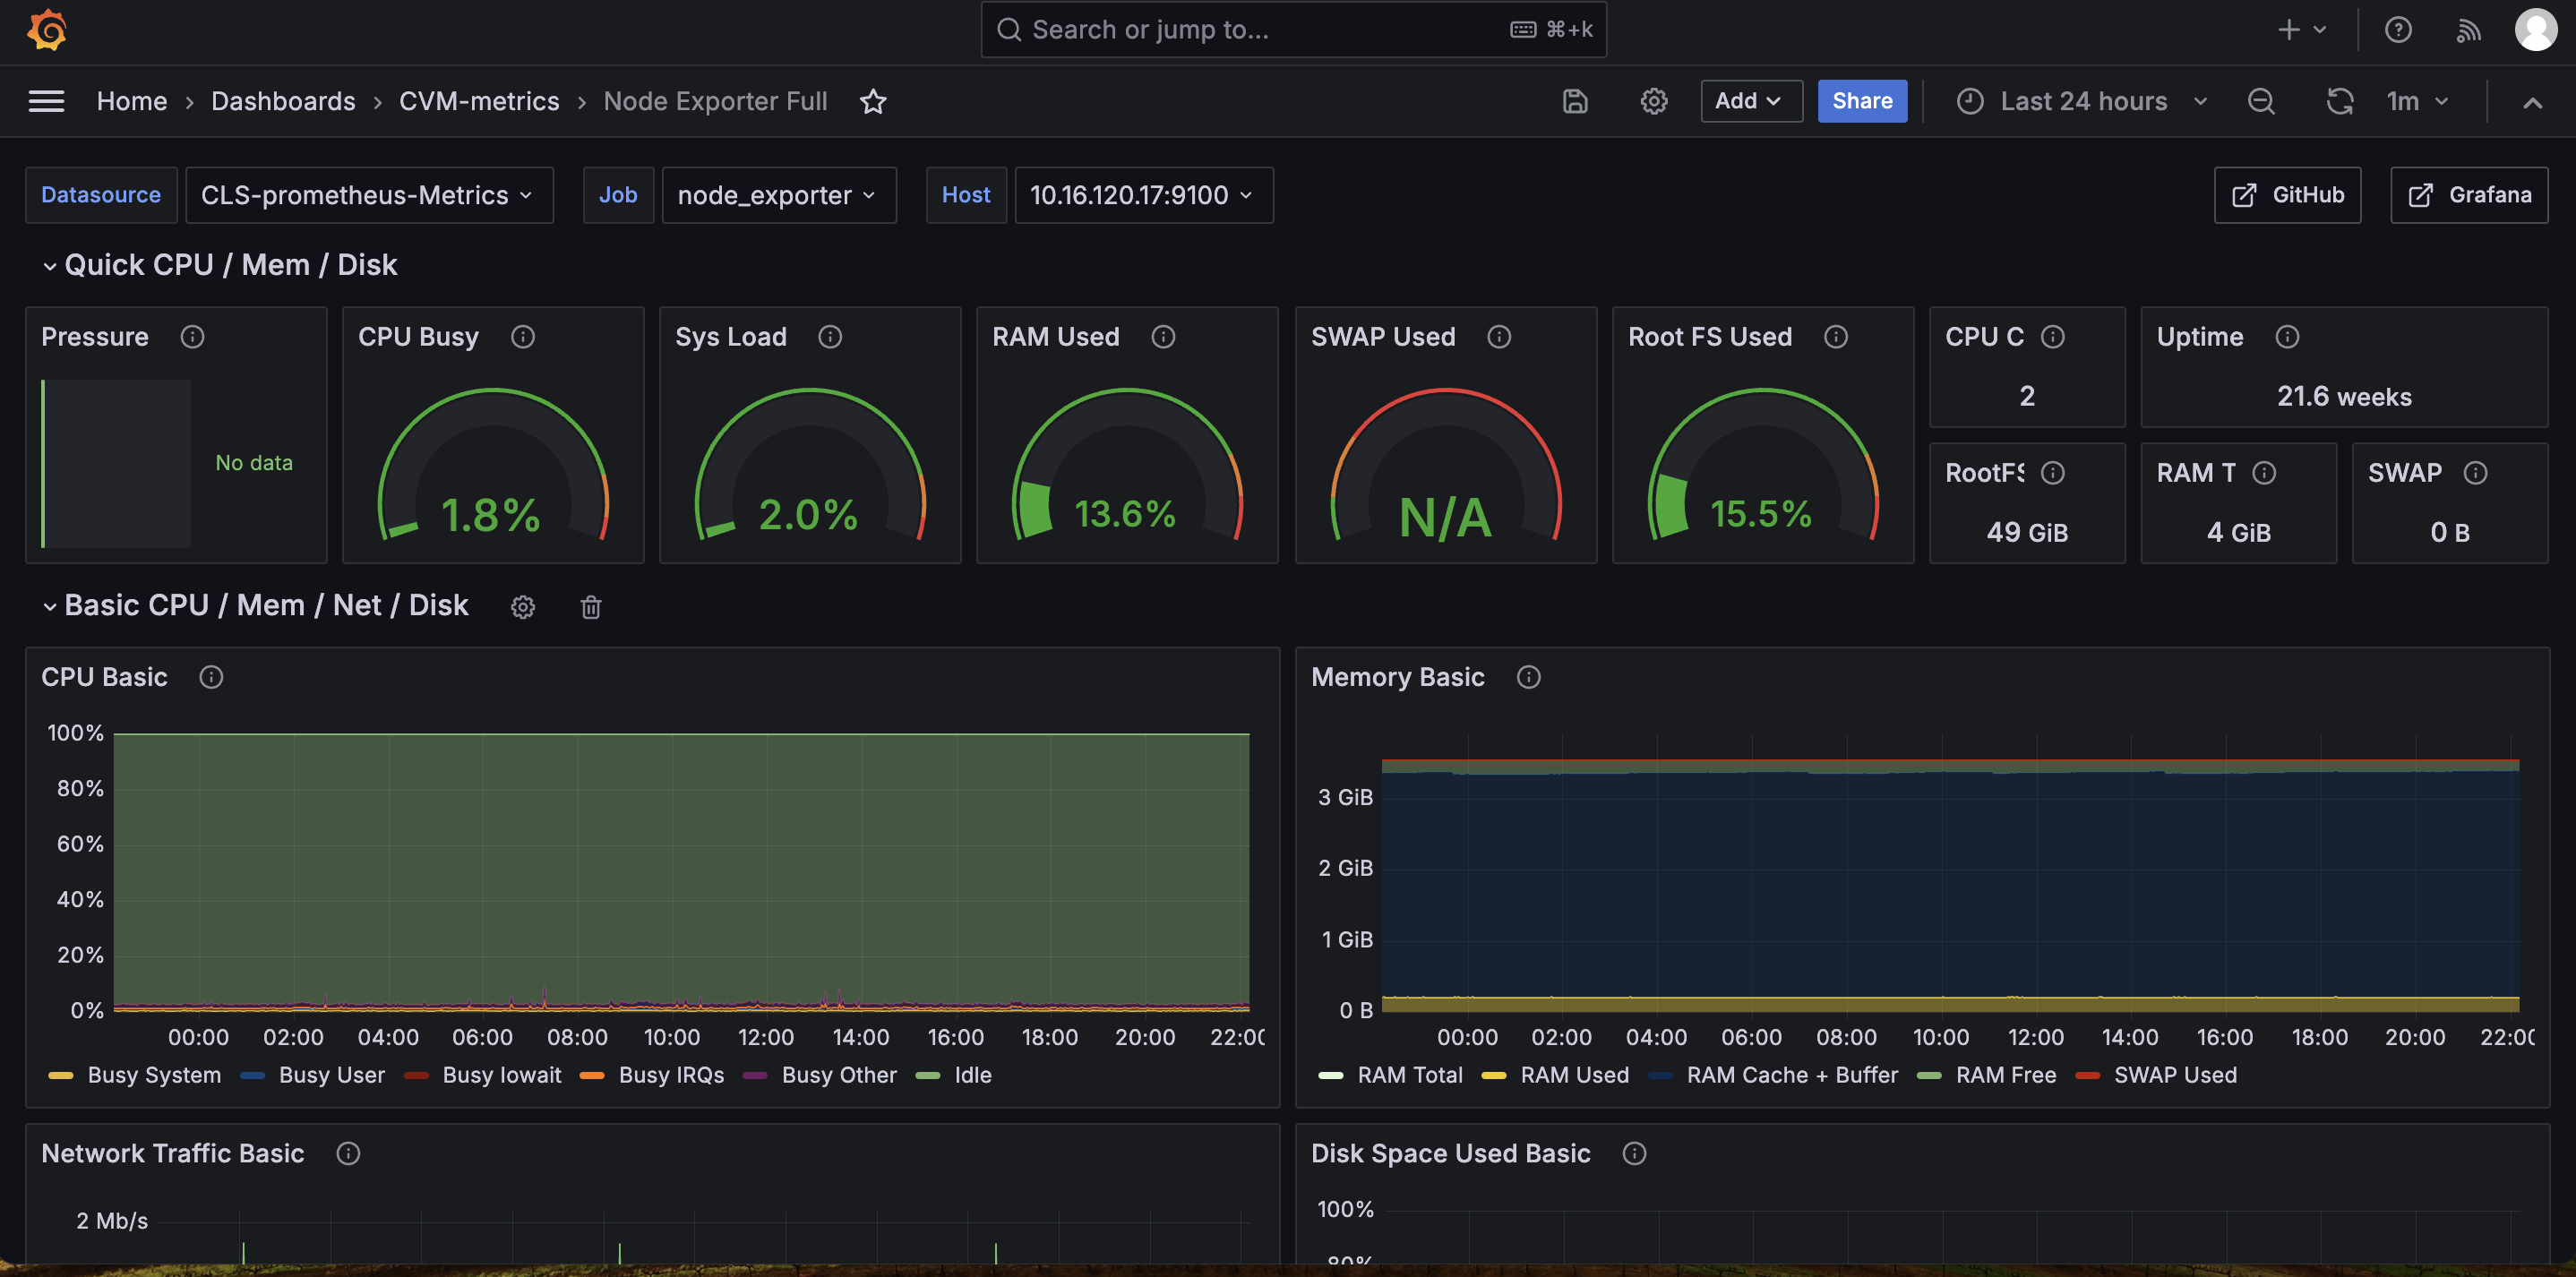
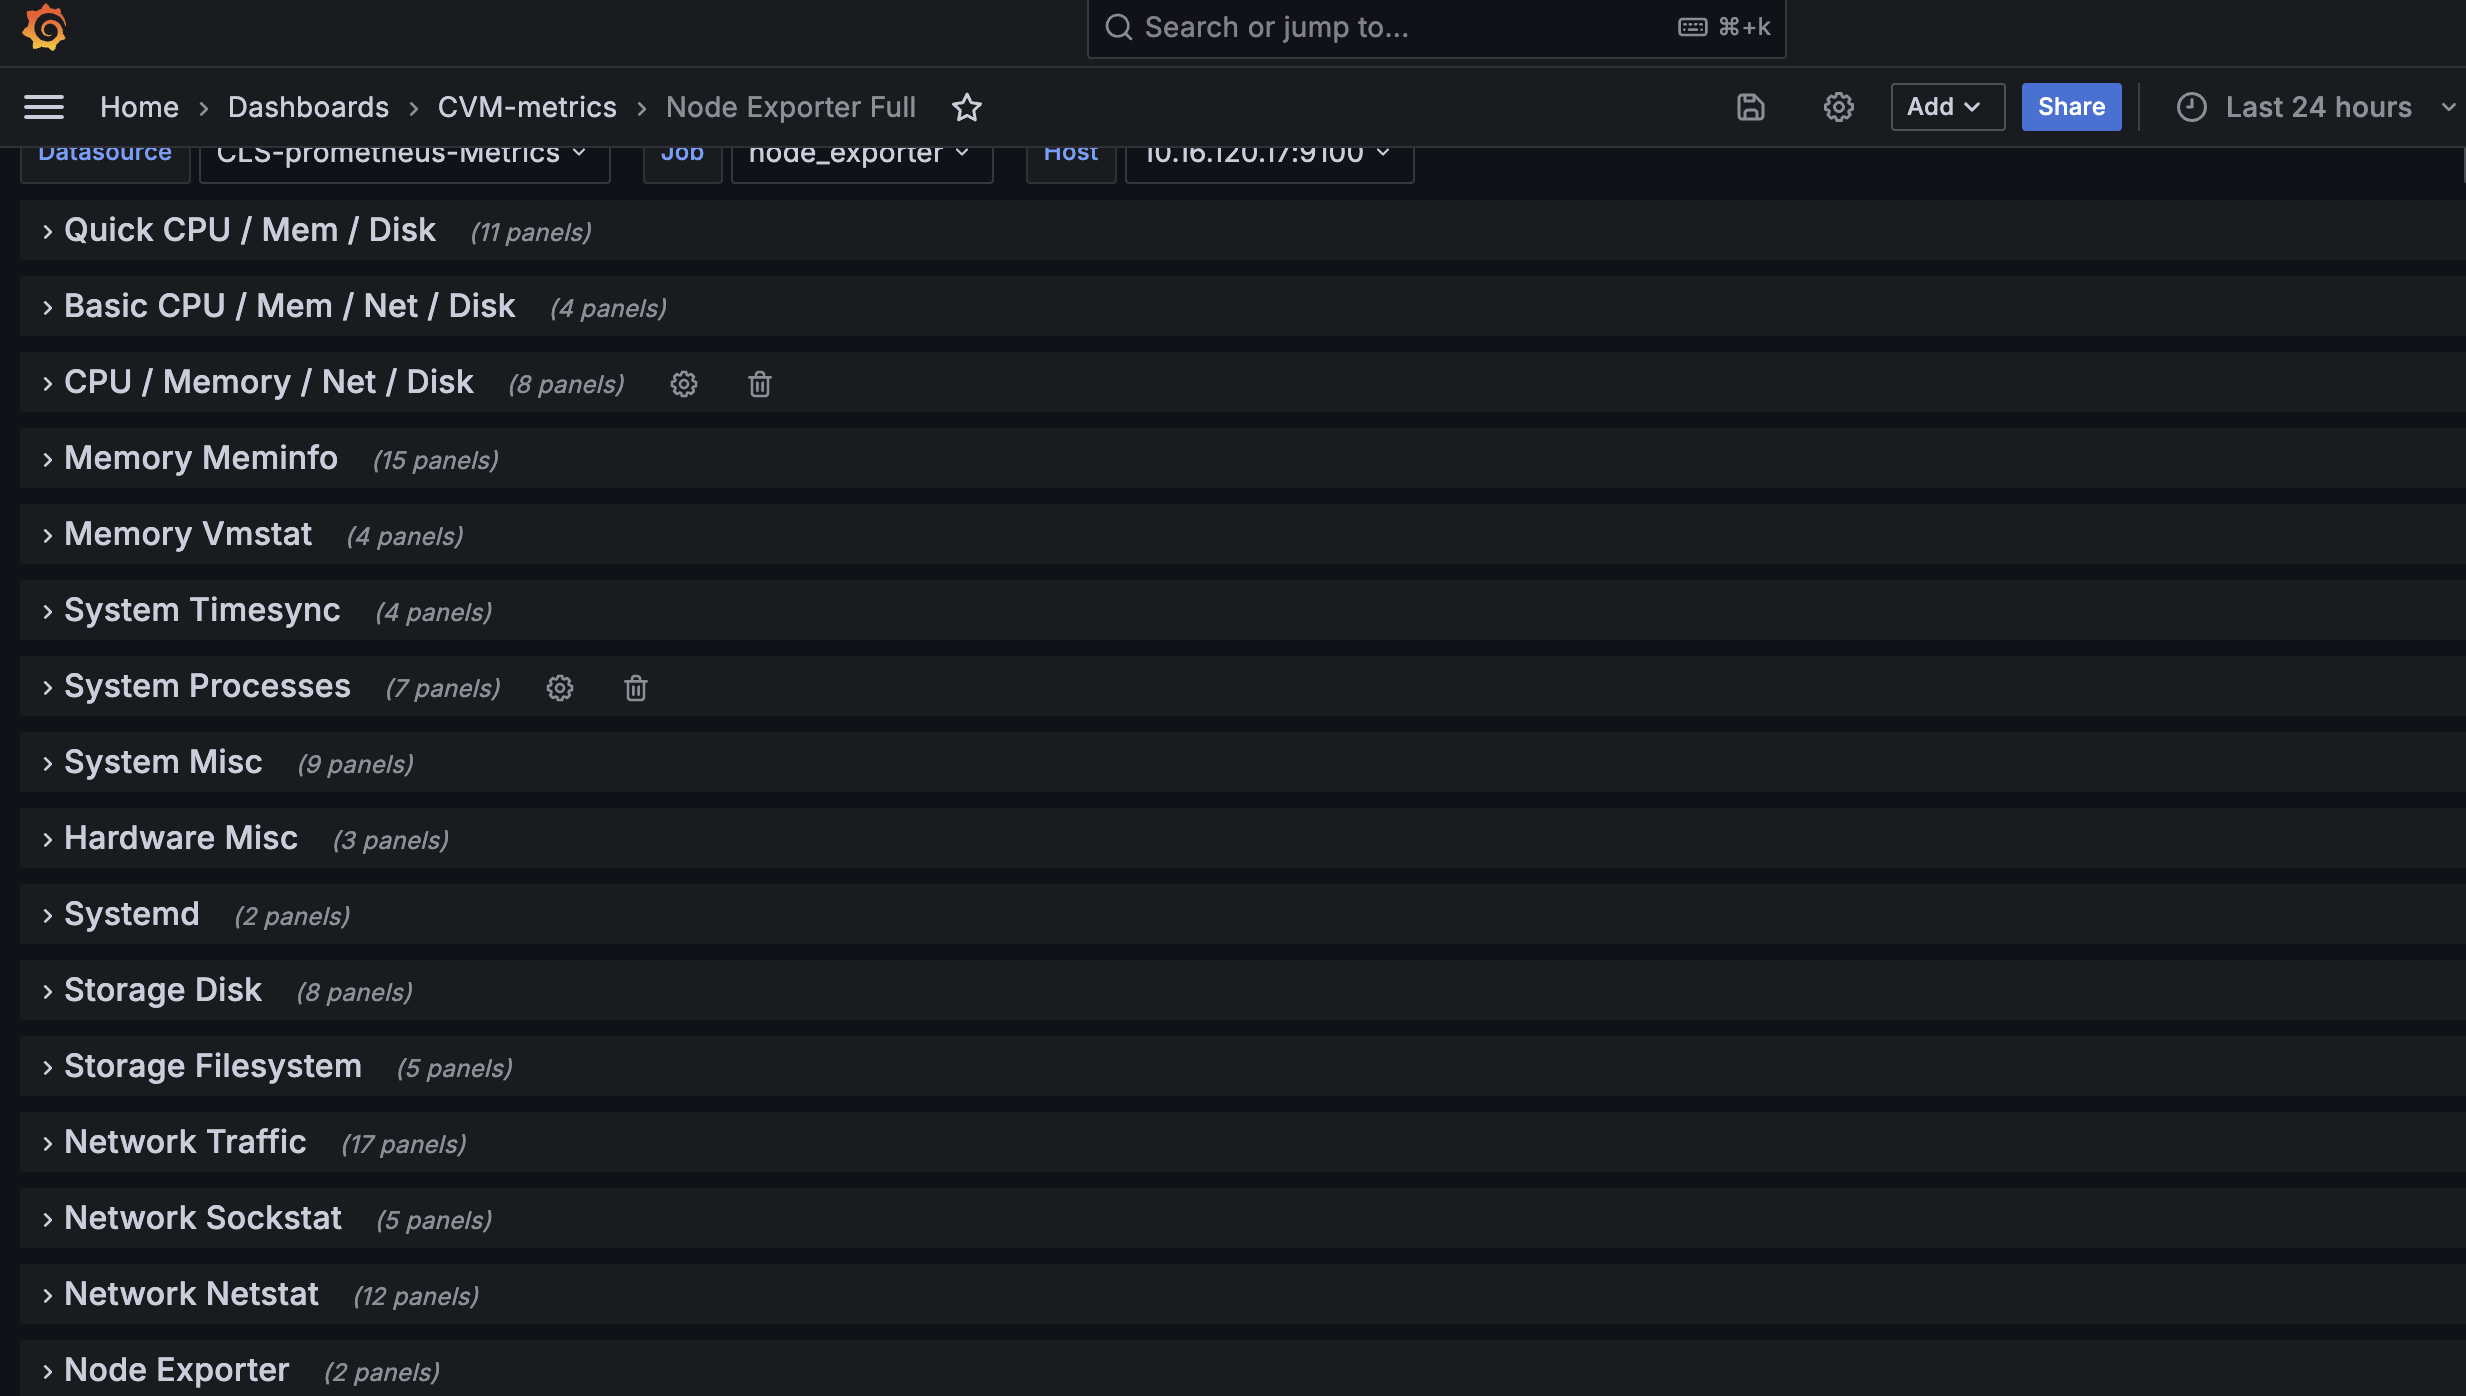
备注:有个别少的pannel可能没有值,因有些是云上环境限制(如Hardware部分),有些因为不是默认Nodeexporters采集指标(比如TCP stat),调整其采集指标需谨慎评估。
4. 配置告警
○ 创建机器人
备注:
✓ 本次简单上手教程,选择企业微信作为告警接收端
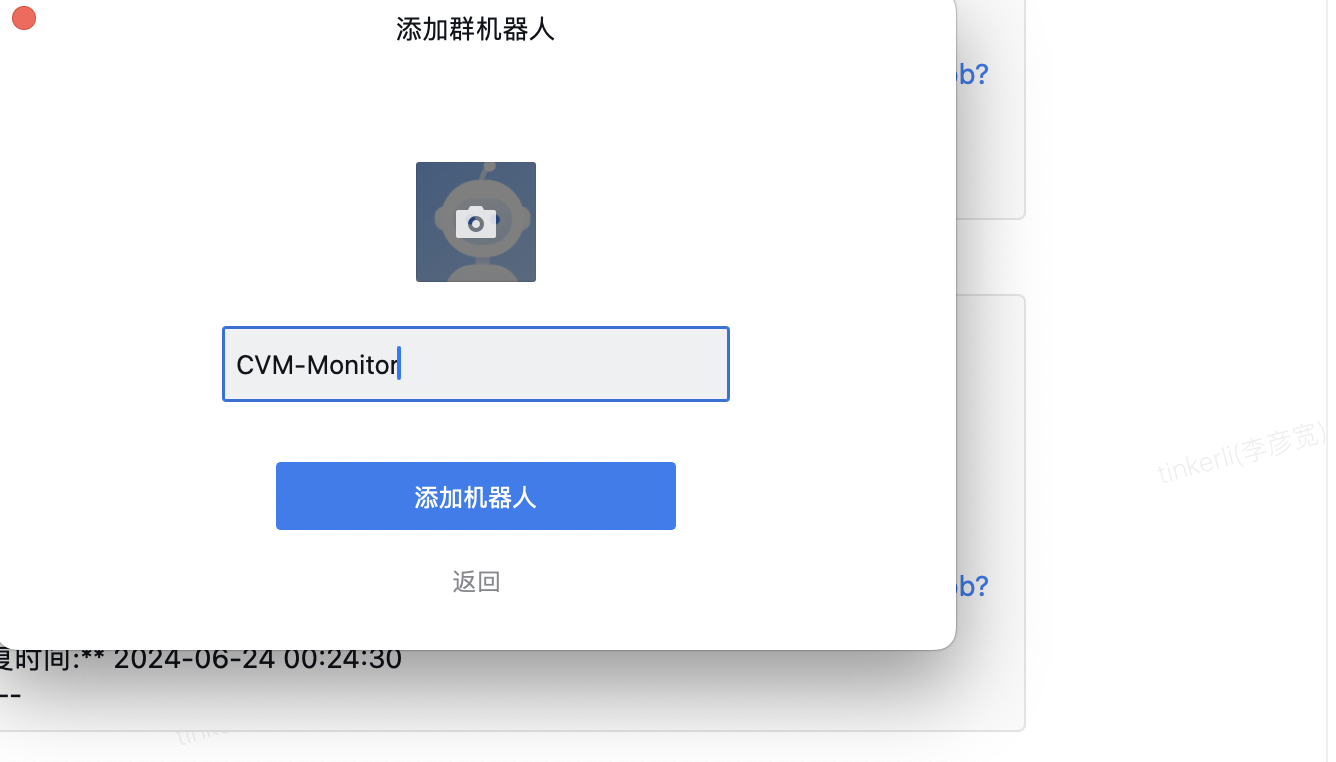
● 创建企业微信机器人
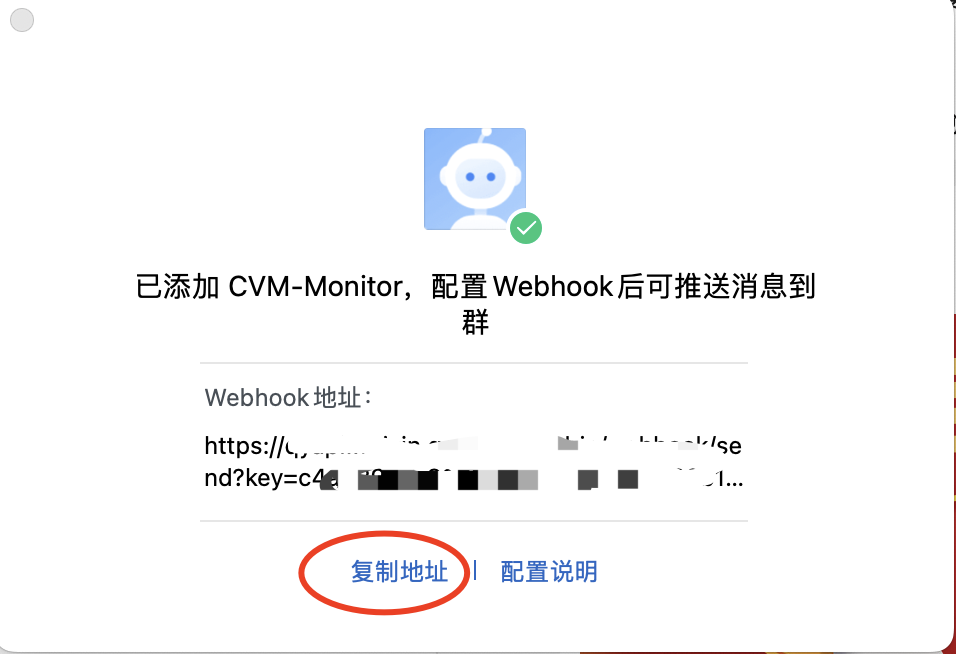
● 获取对应的Webhook地址:
○ 创建contact points
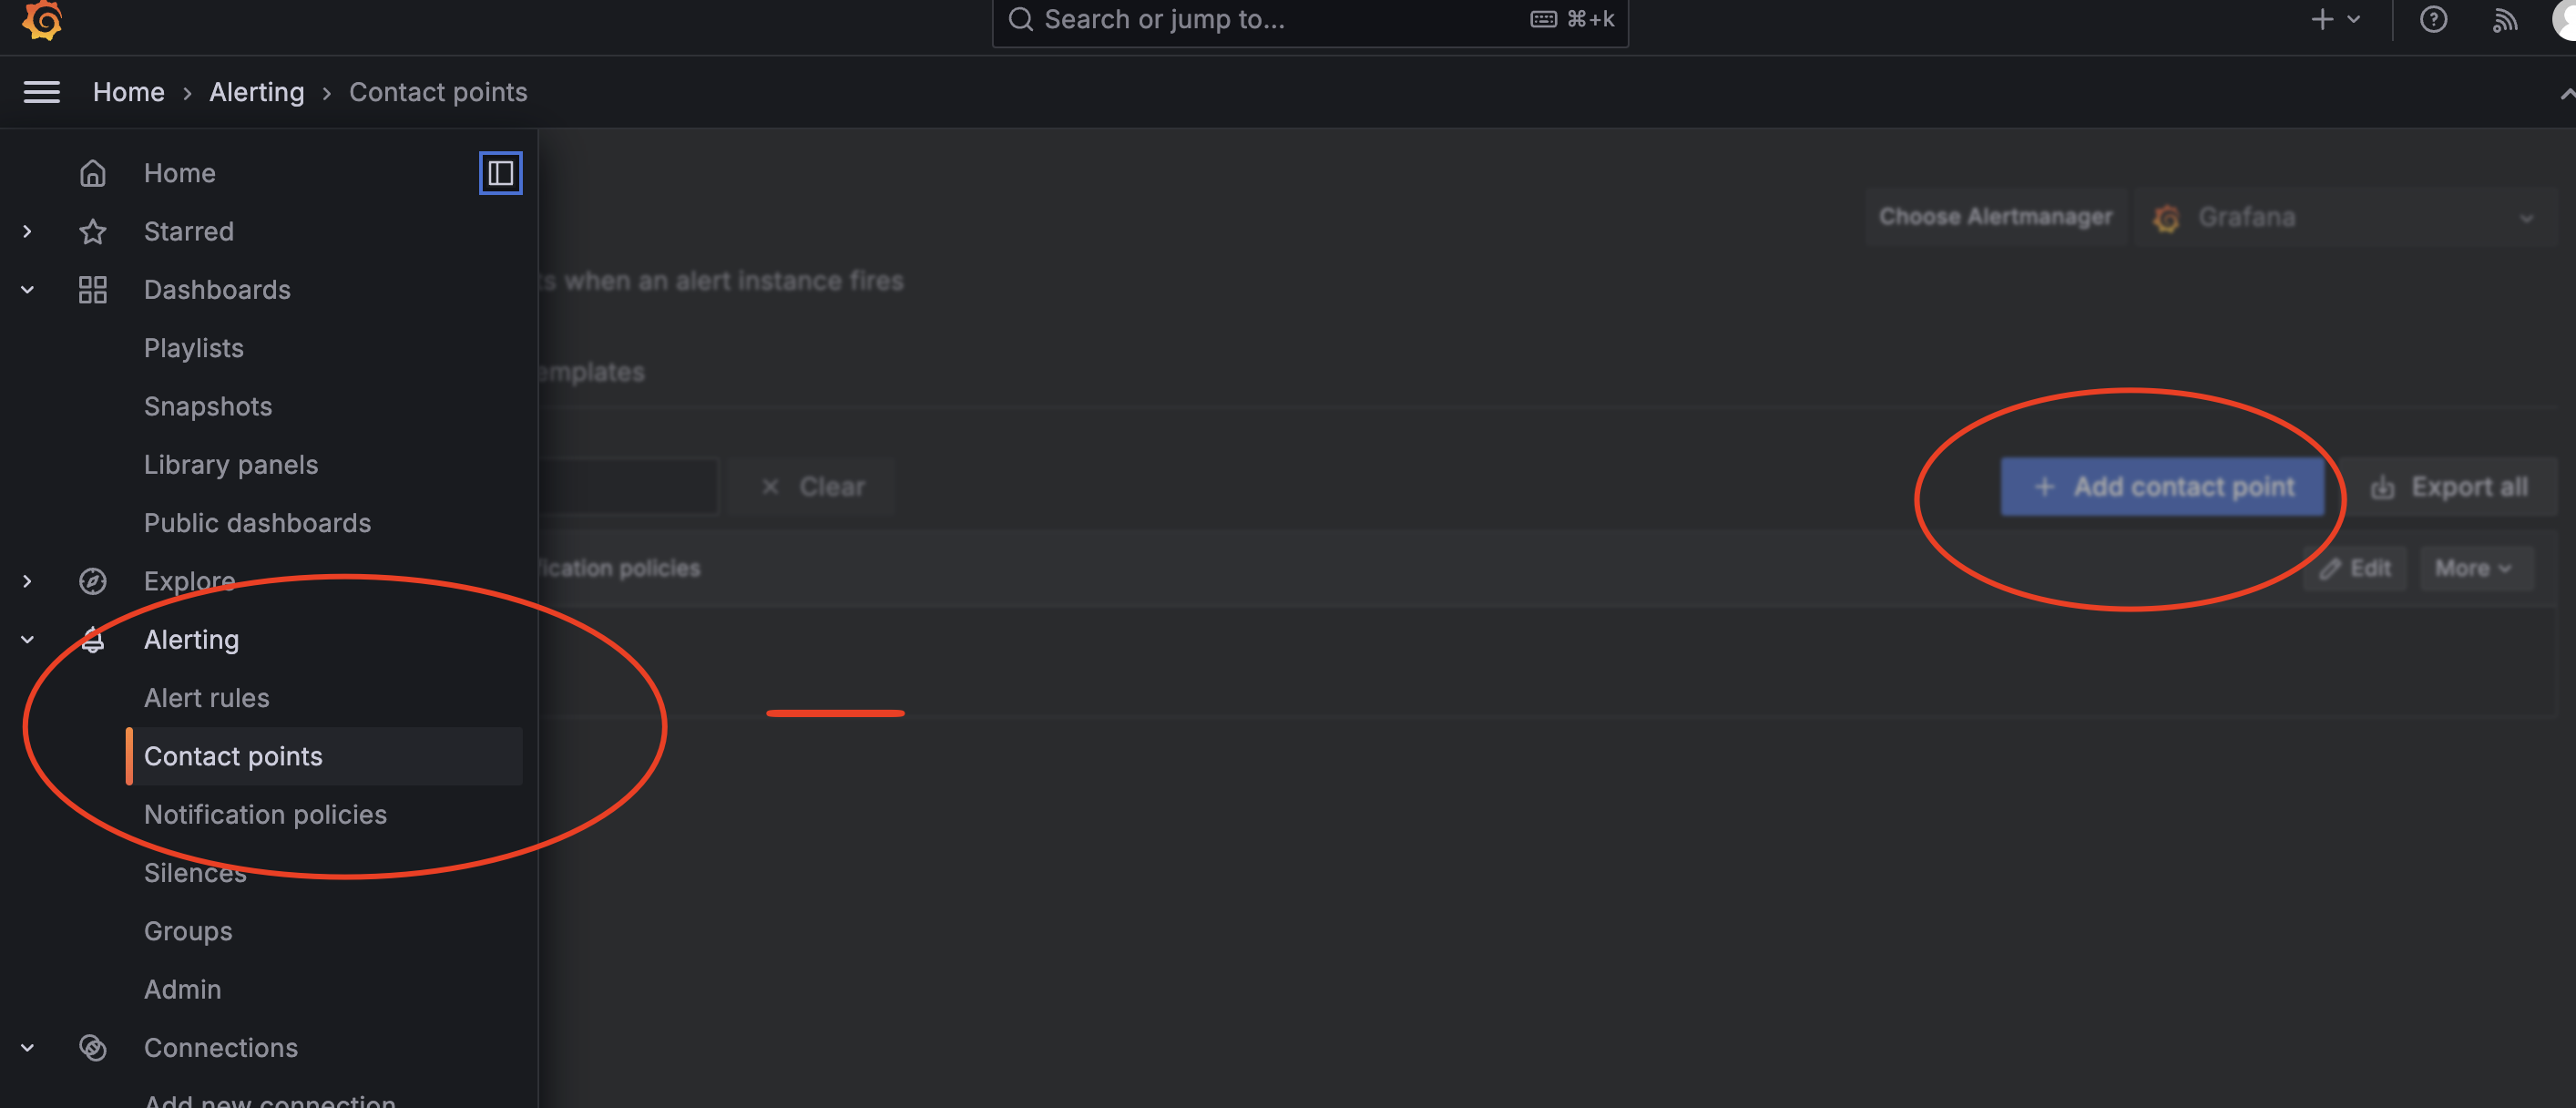
● 打开Grafana页面导航栏选择Alterting模块下Contact points,新建一个
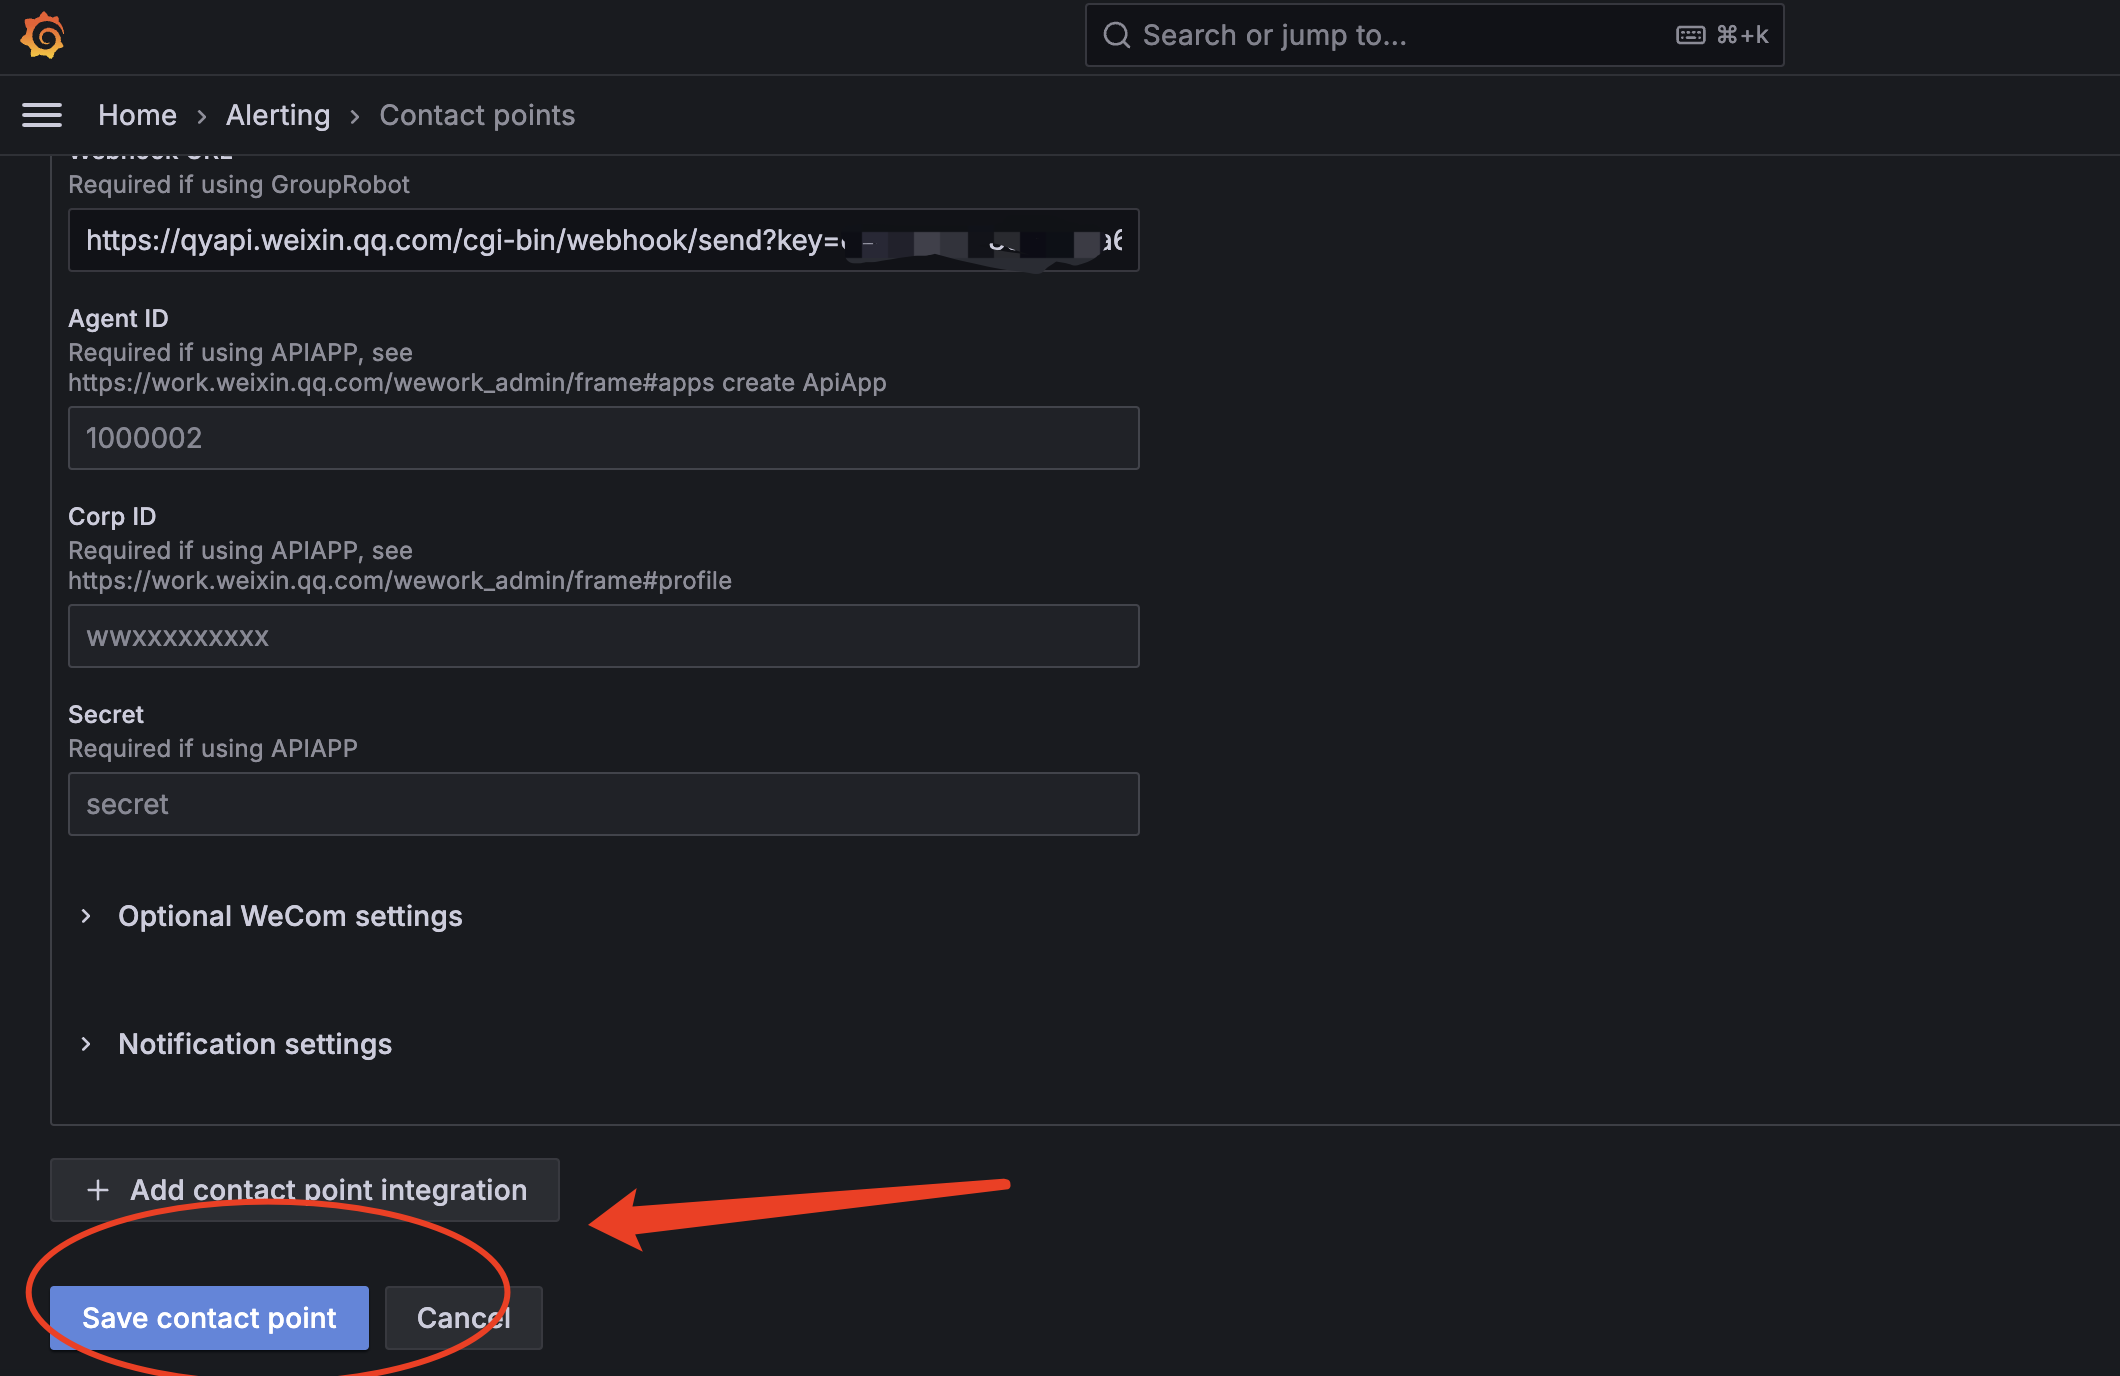
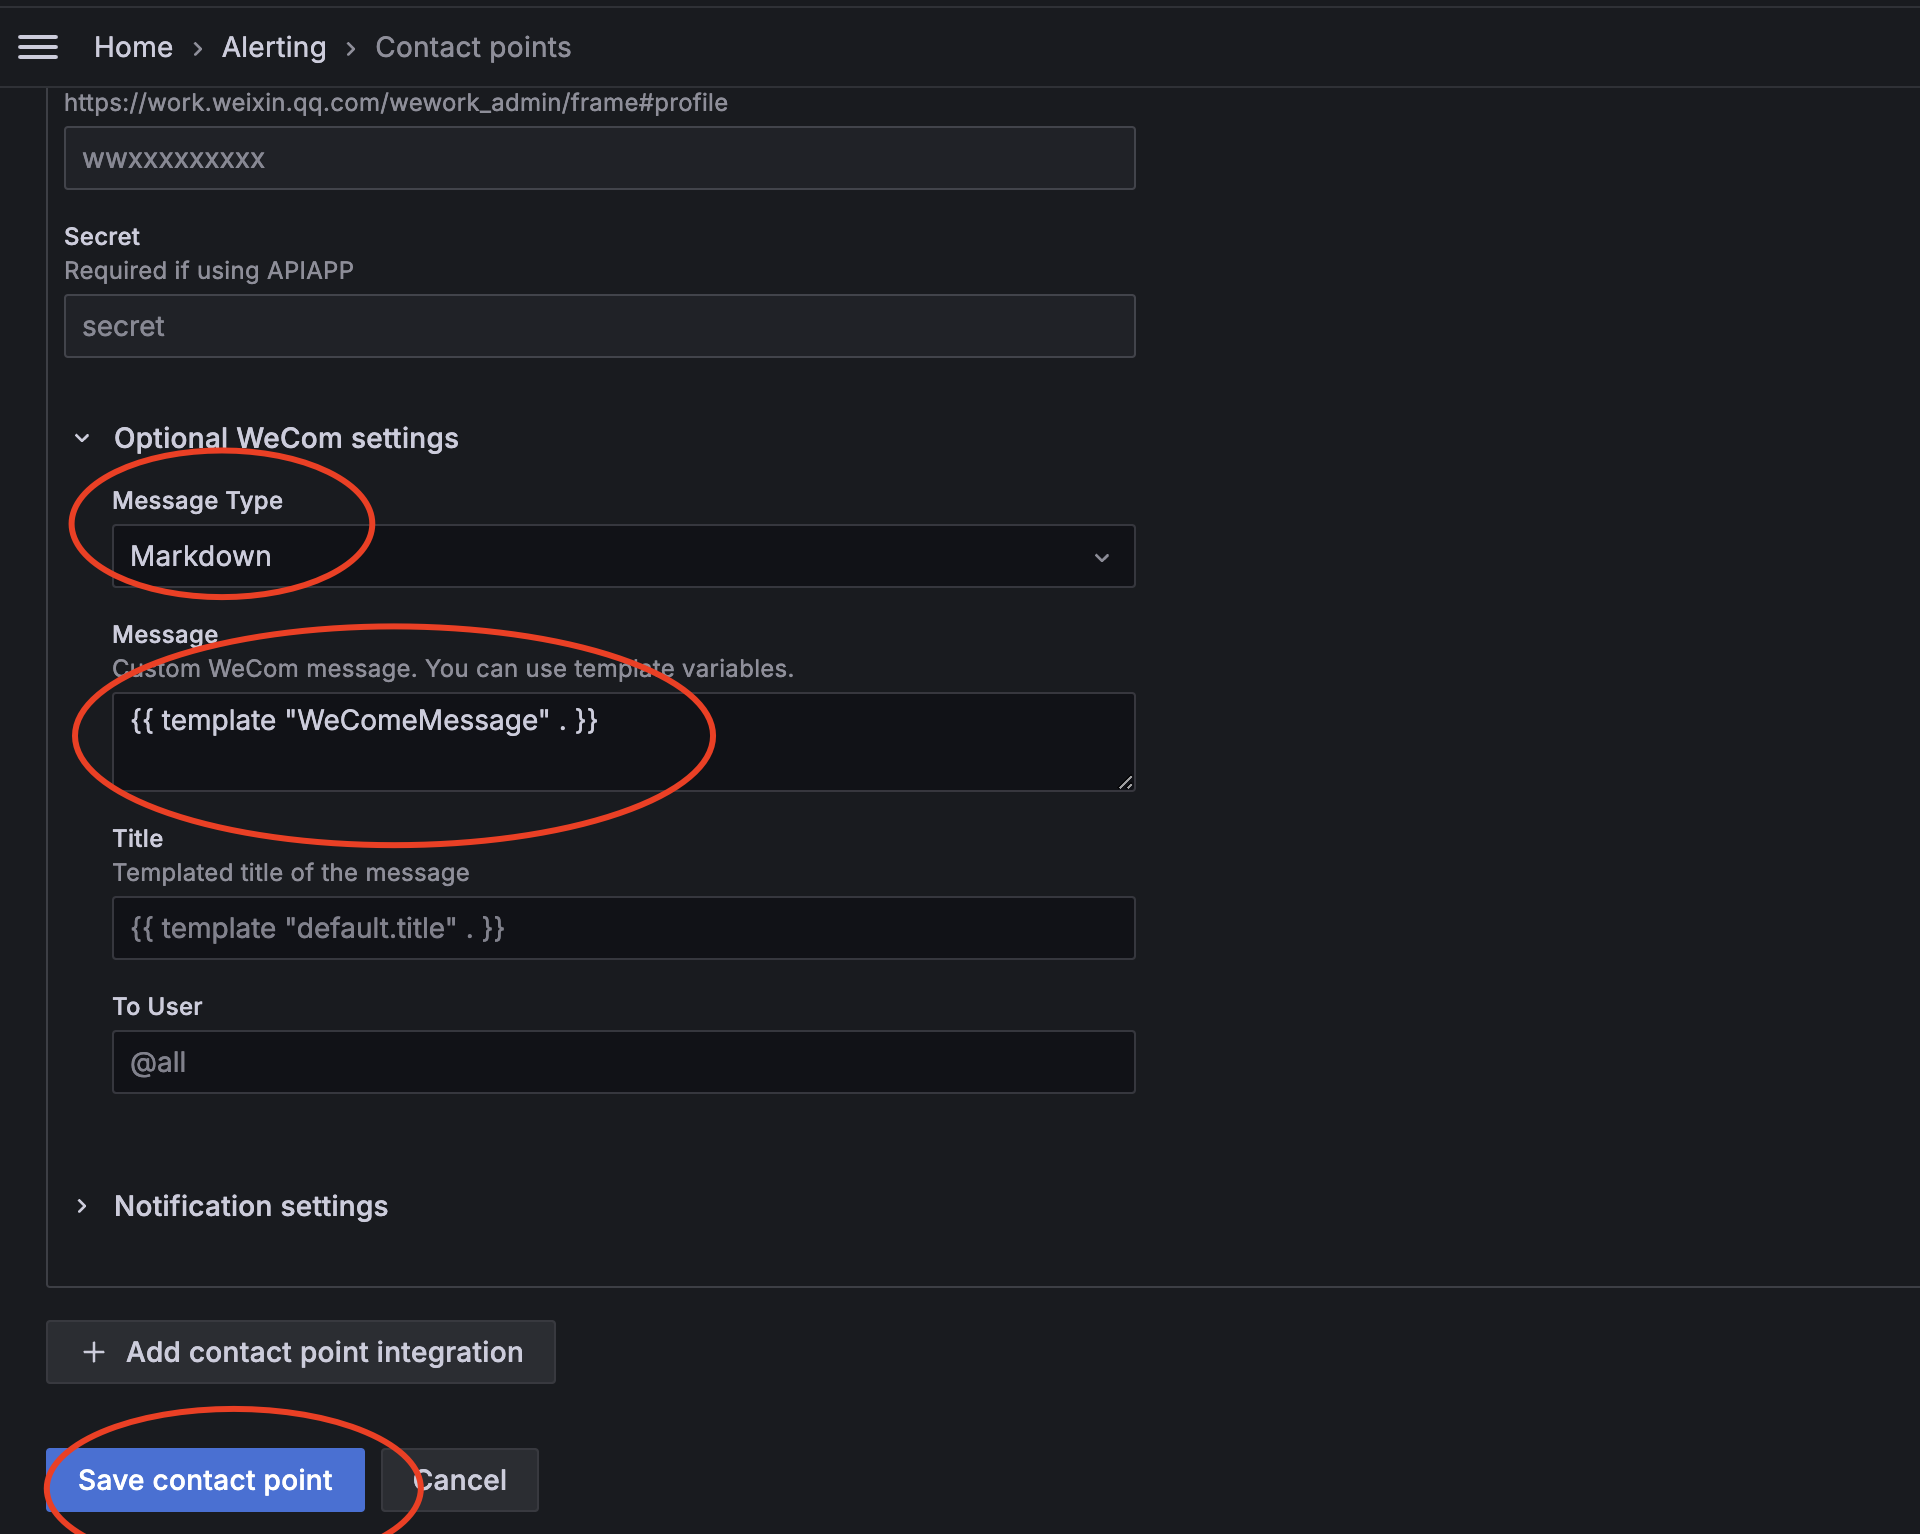
● 填充相关信息
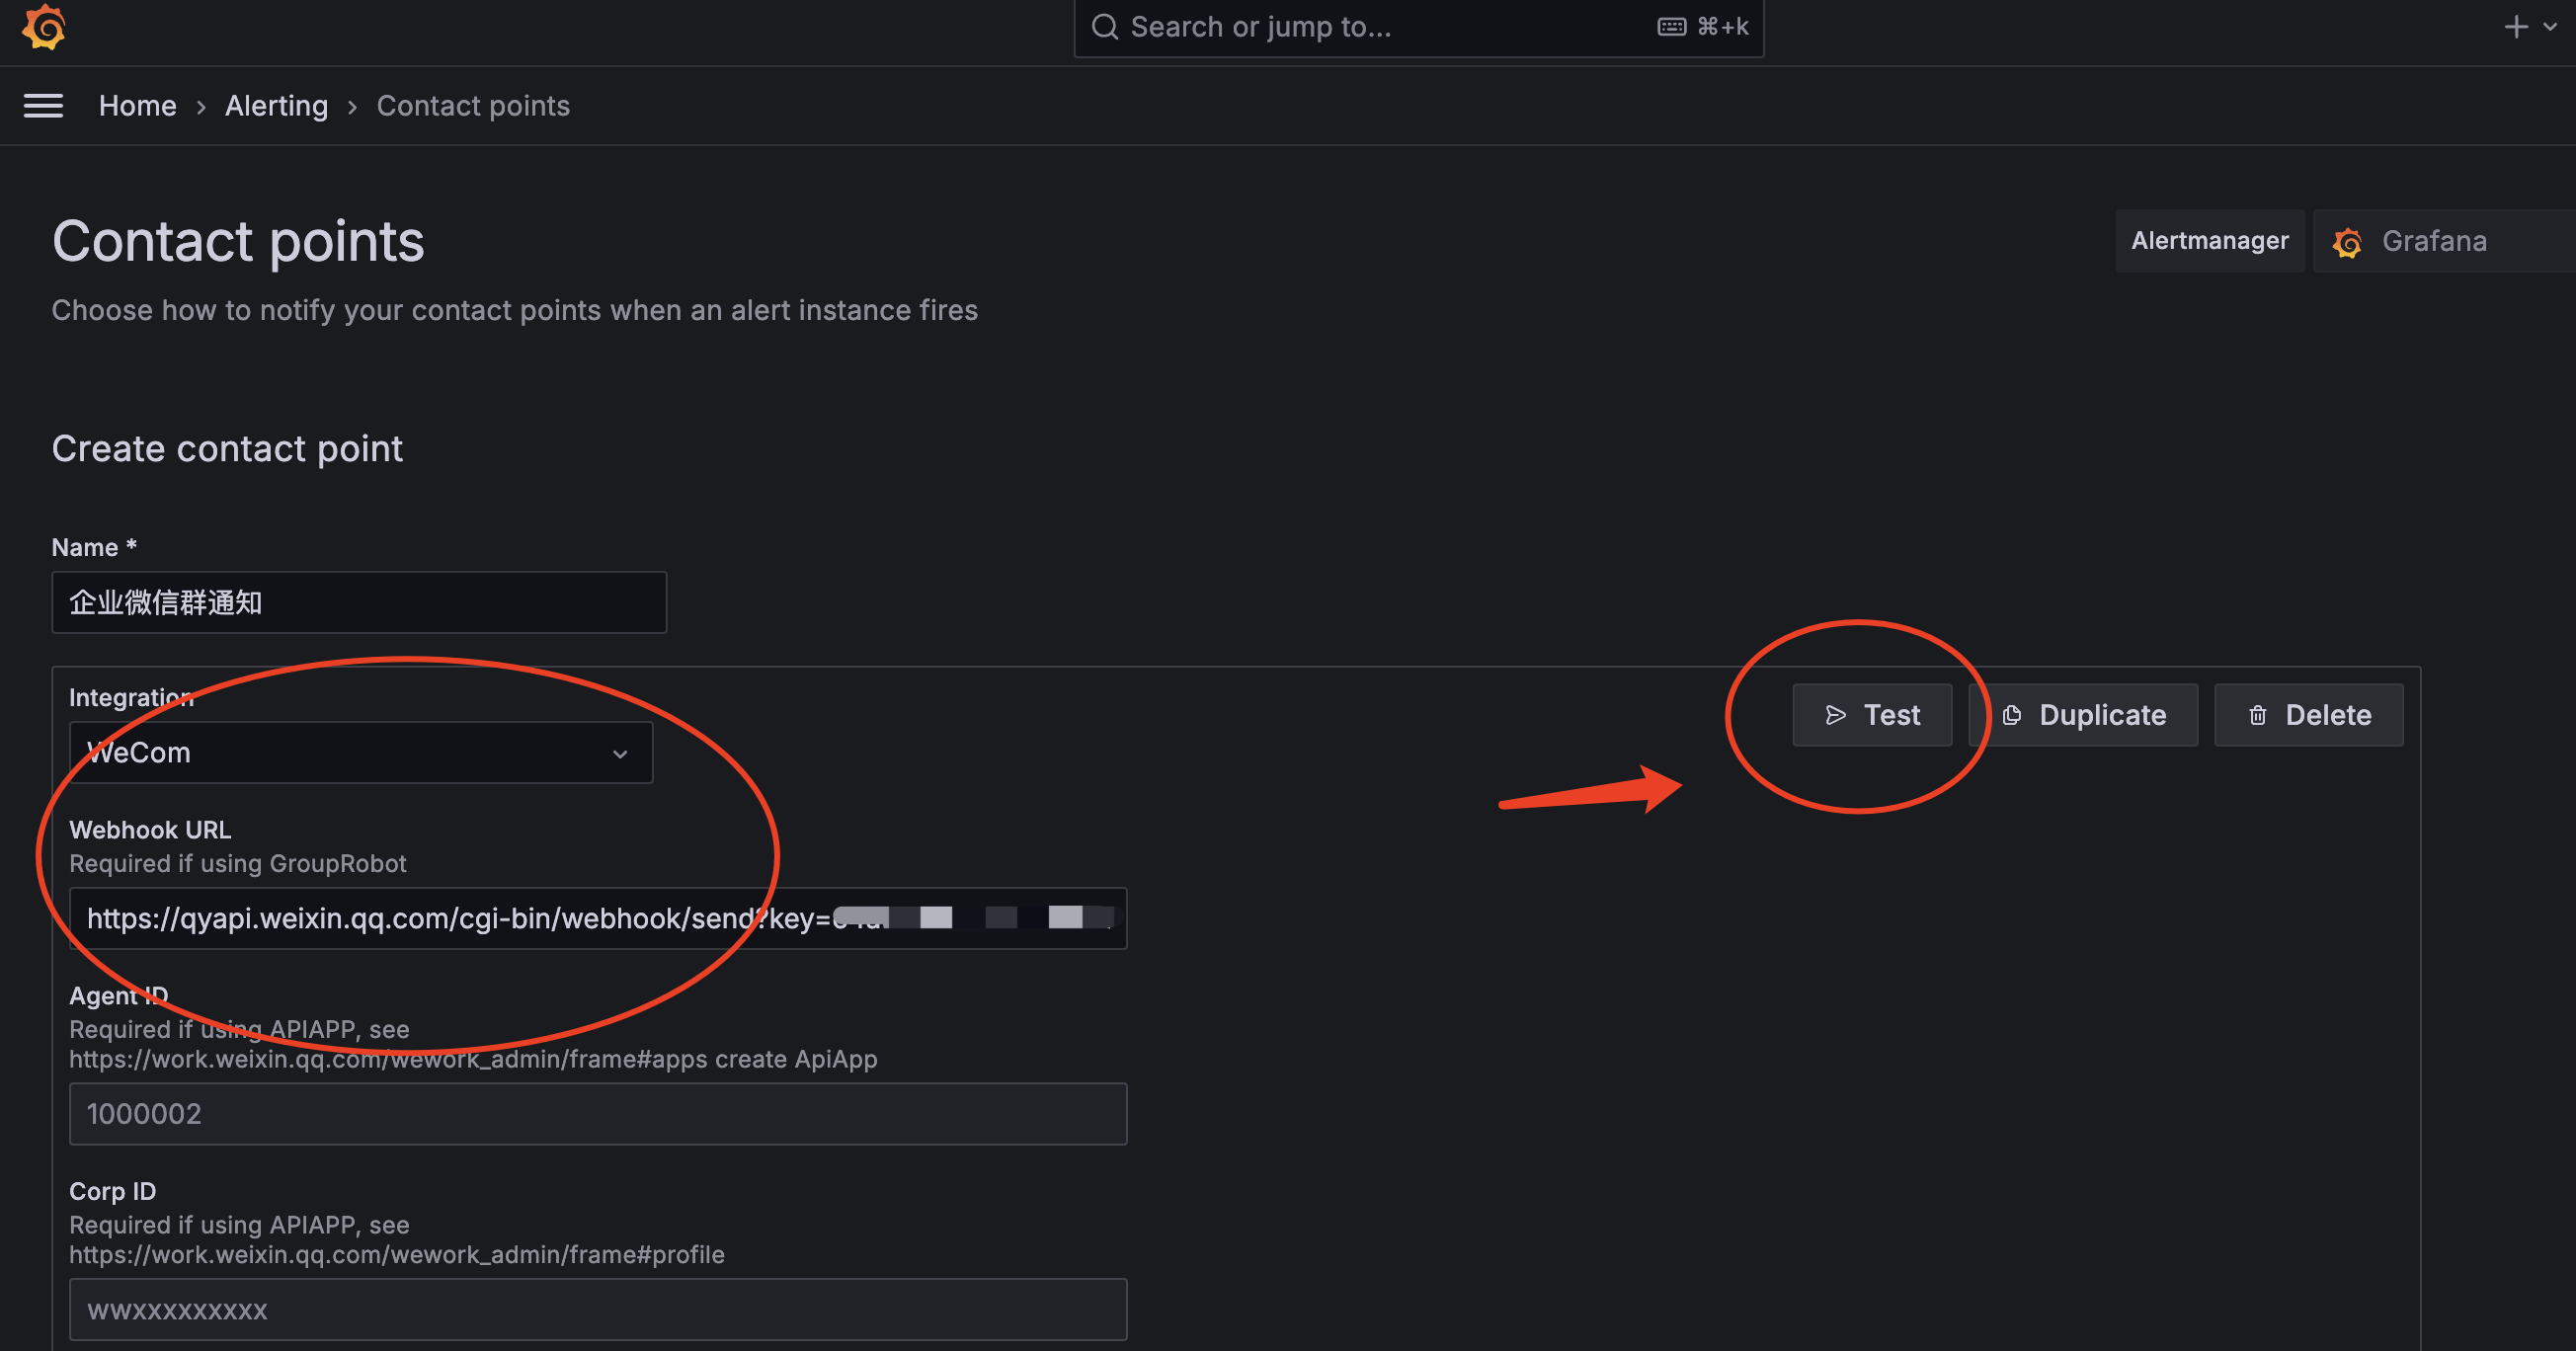
备注:
✓ Integration:选择WeCom
✓ Webhook URL:即刚刚创建机器人分配的webhook地址
● 点击Test查看是否正常通信
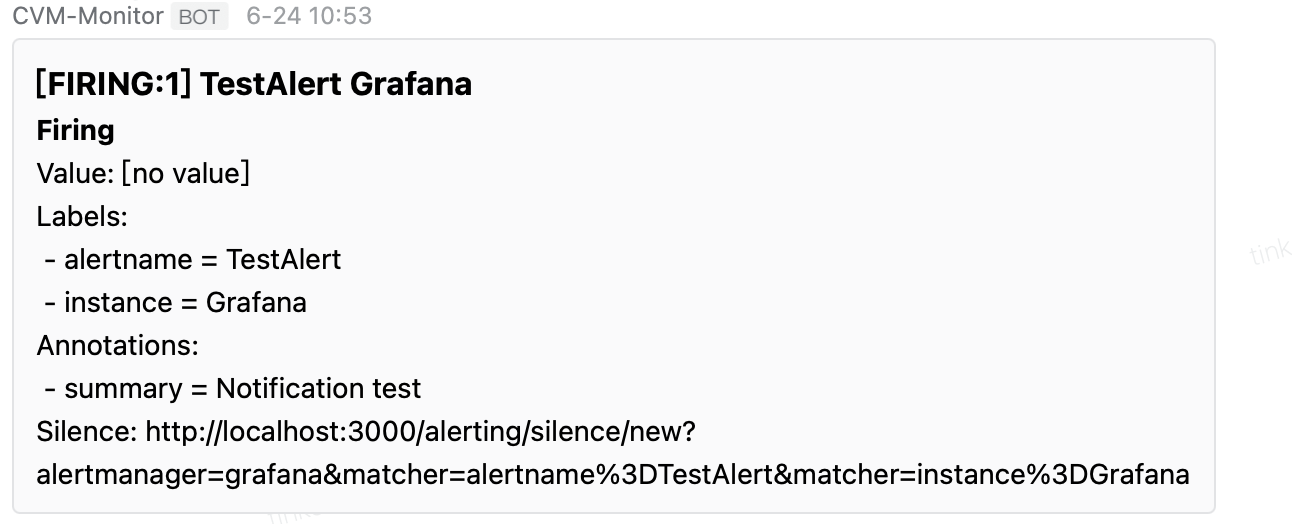
● 保存相关配置即可
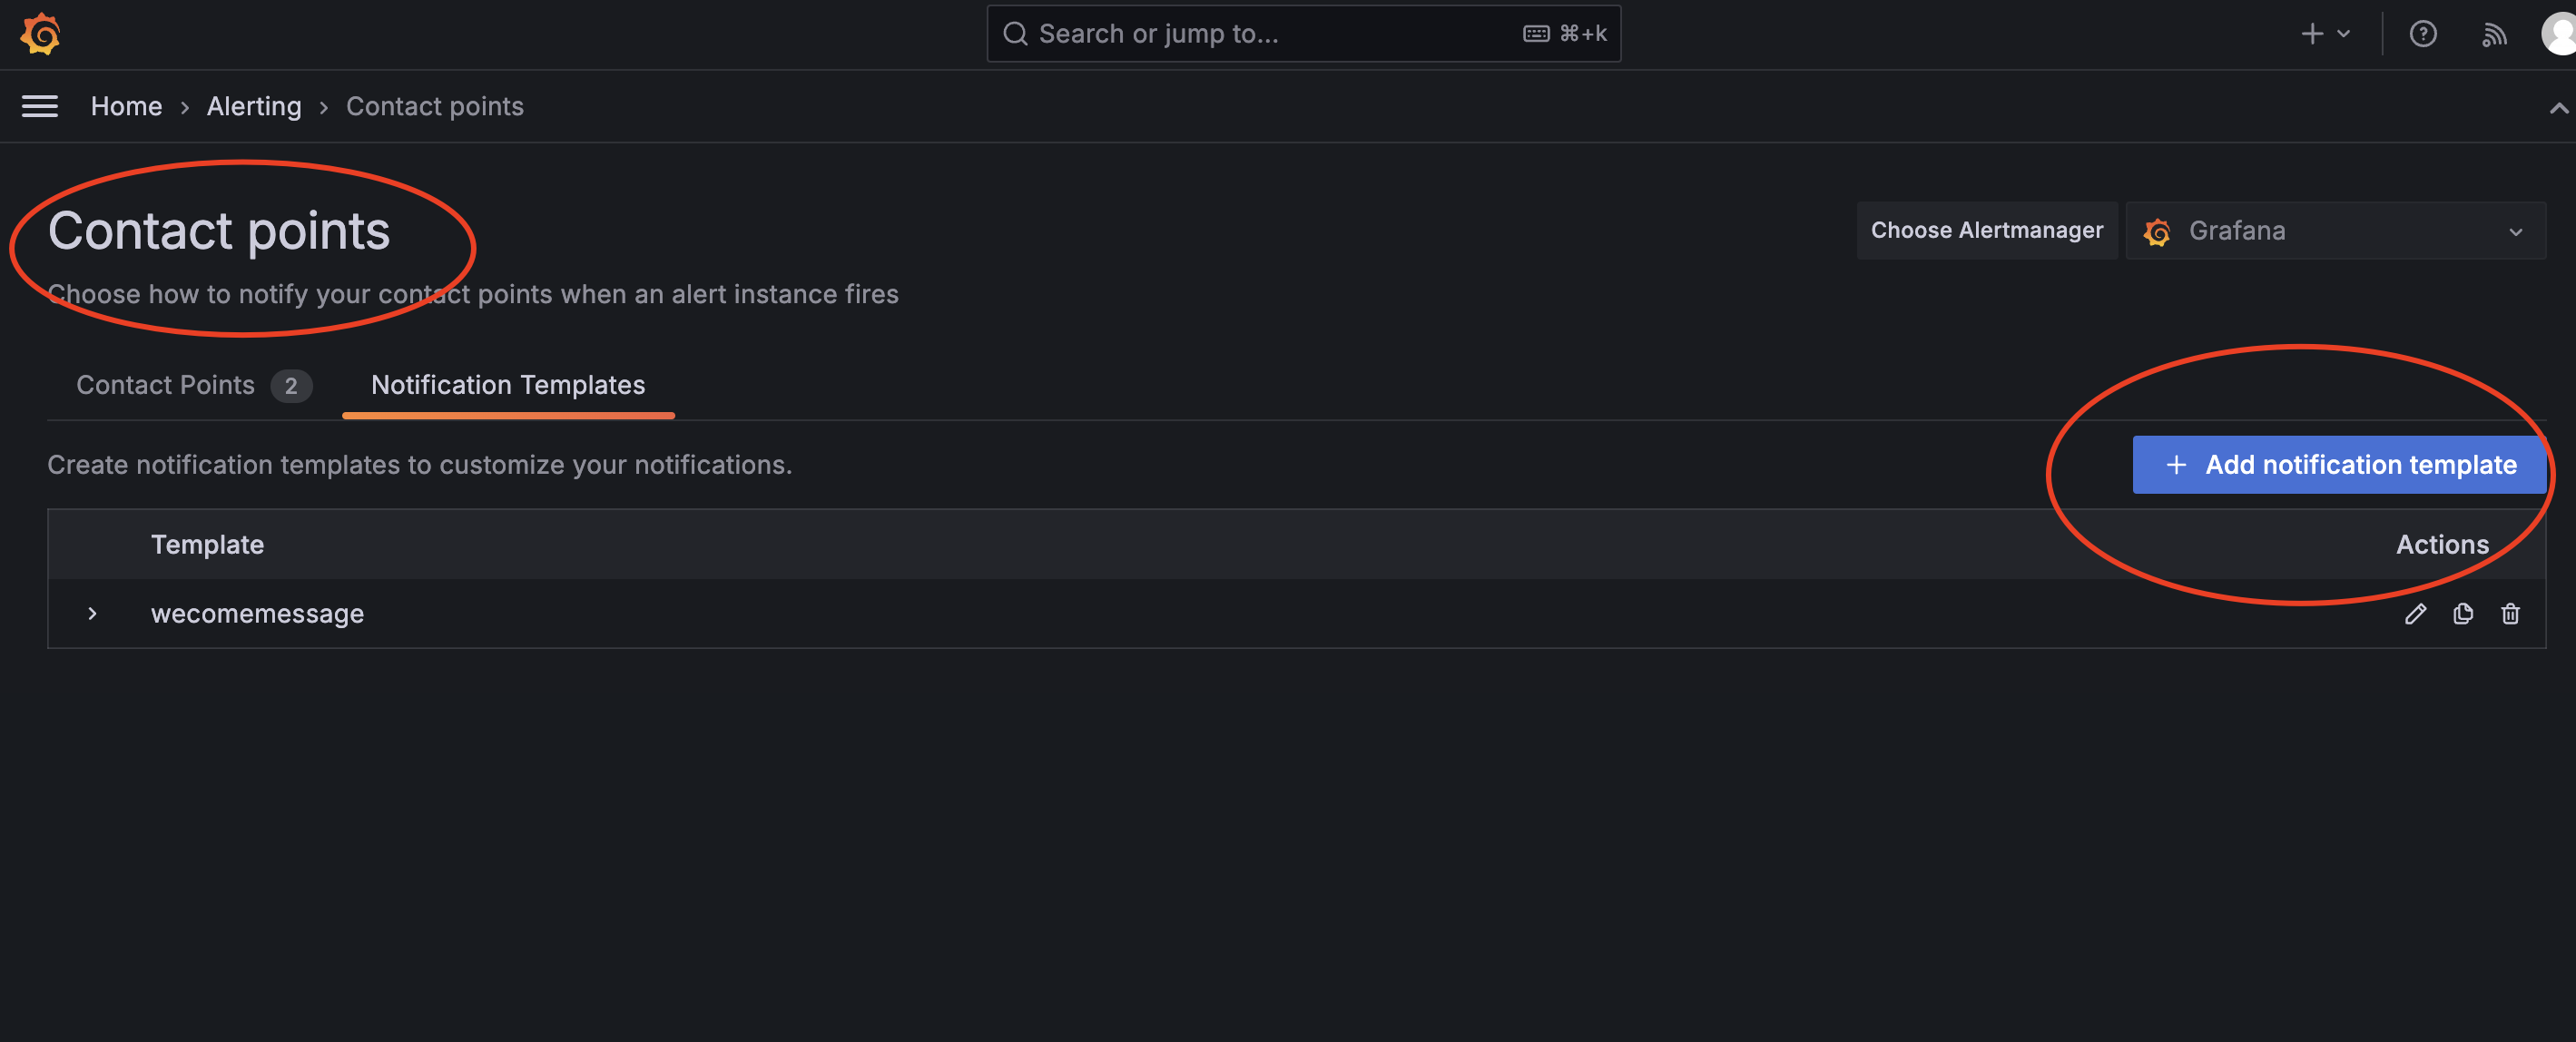
○ 创建消息模版并关联connect points
● 点击Add template
{{ define "WeComeMessage" }}
{{ range k,v:=.Alerts }}
{{if eq $v.Status "resolved"}}[CVM主机-恢复信息]
> <font color="info">告警名称</font>: [{{$v.Labels.alertname}}]
> <font color="info">告警级别</font>: {{$v.Labels.severity}}
> <font color="info">开始时间</font>: {{ ($v.StartsAt).Format "2006-01-02 15:04:05" }}
> <font color="info">结束时间</font>: {{ ($v.EndsAt).Format "2006-01-02 15:04:05" }}
> <font color="info">实例地址</font>: {{ $v.Labels.instance }}
> <font color="info">链接地址</font>: [查看链接]({{ $v.PanelURL }})
{{$v.Annotations.description}}
{{$v.Annotations.summary}}
{{else}}[CVM主机-告警信息]
> <font color="#FF0000">告警名称</font>: [{{$v.Labels.alertname}}]
> <font color="#FF0000">告警级别</font>: {{$v.Labels.severity}}
> <font color="#FF0000">开始时间</font>: {{ ($v.StartsAt).Format "2006-01-02 15:04:05" }}
> <font color="#FF0000">结束时间</font>: {{ ($v.EndsAt).Format "2006-01-02 15:04:05" }}
> <font color="#FF0000">实例地址</font>: {{ $v.Labels.instance }}
> <font color="#FF0000">链接地址</font>: [查看链接]({{ $v.PanelURL }})
{{$v.Annotations.description}}
{{$v.Annotations.summary}}
{{end}}
{{ end }}
{{ end }}
● 填充消息模版
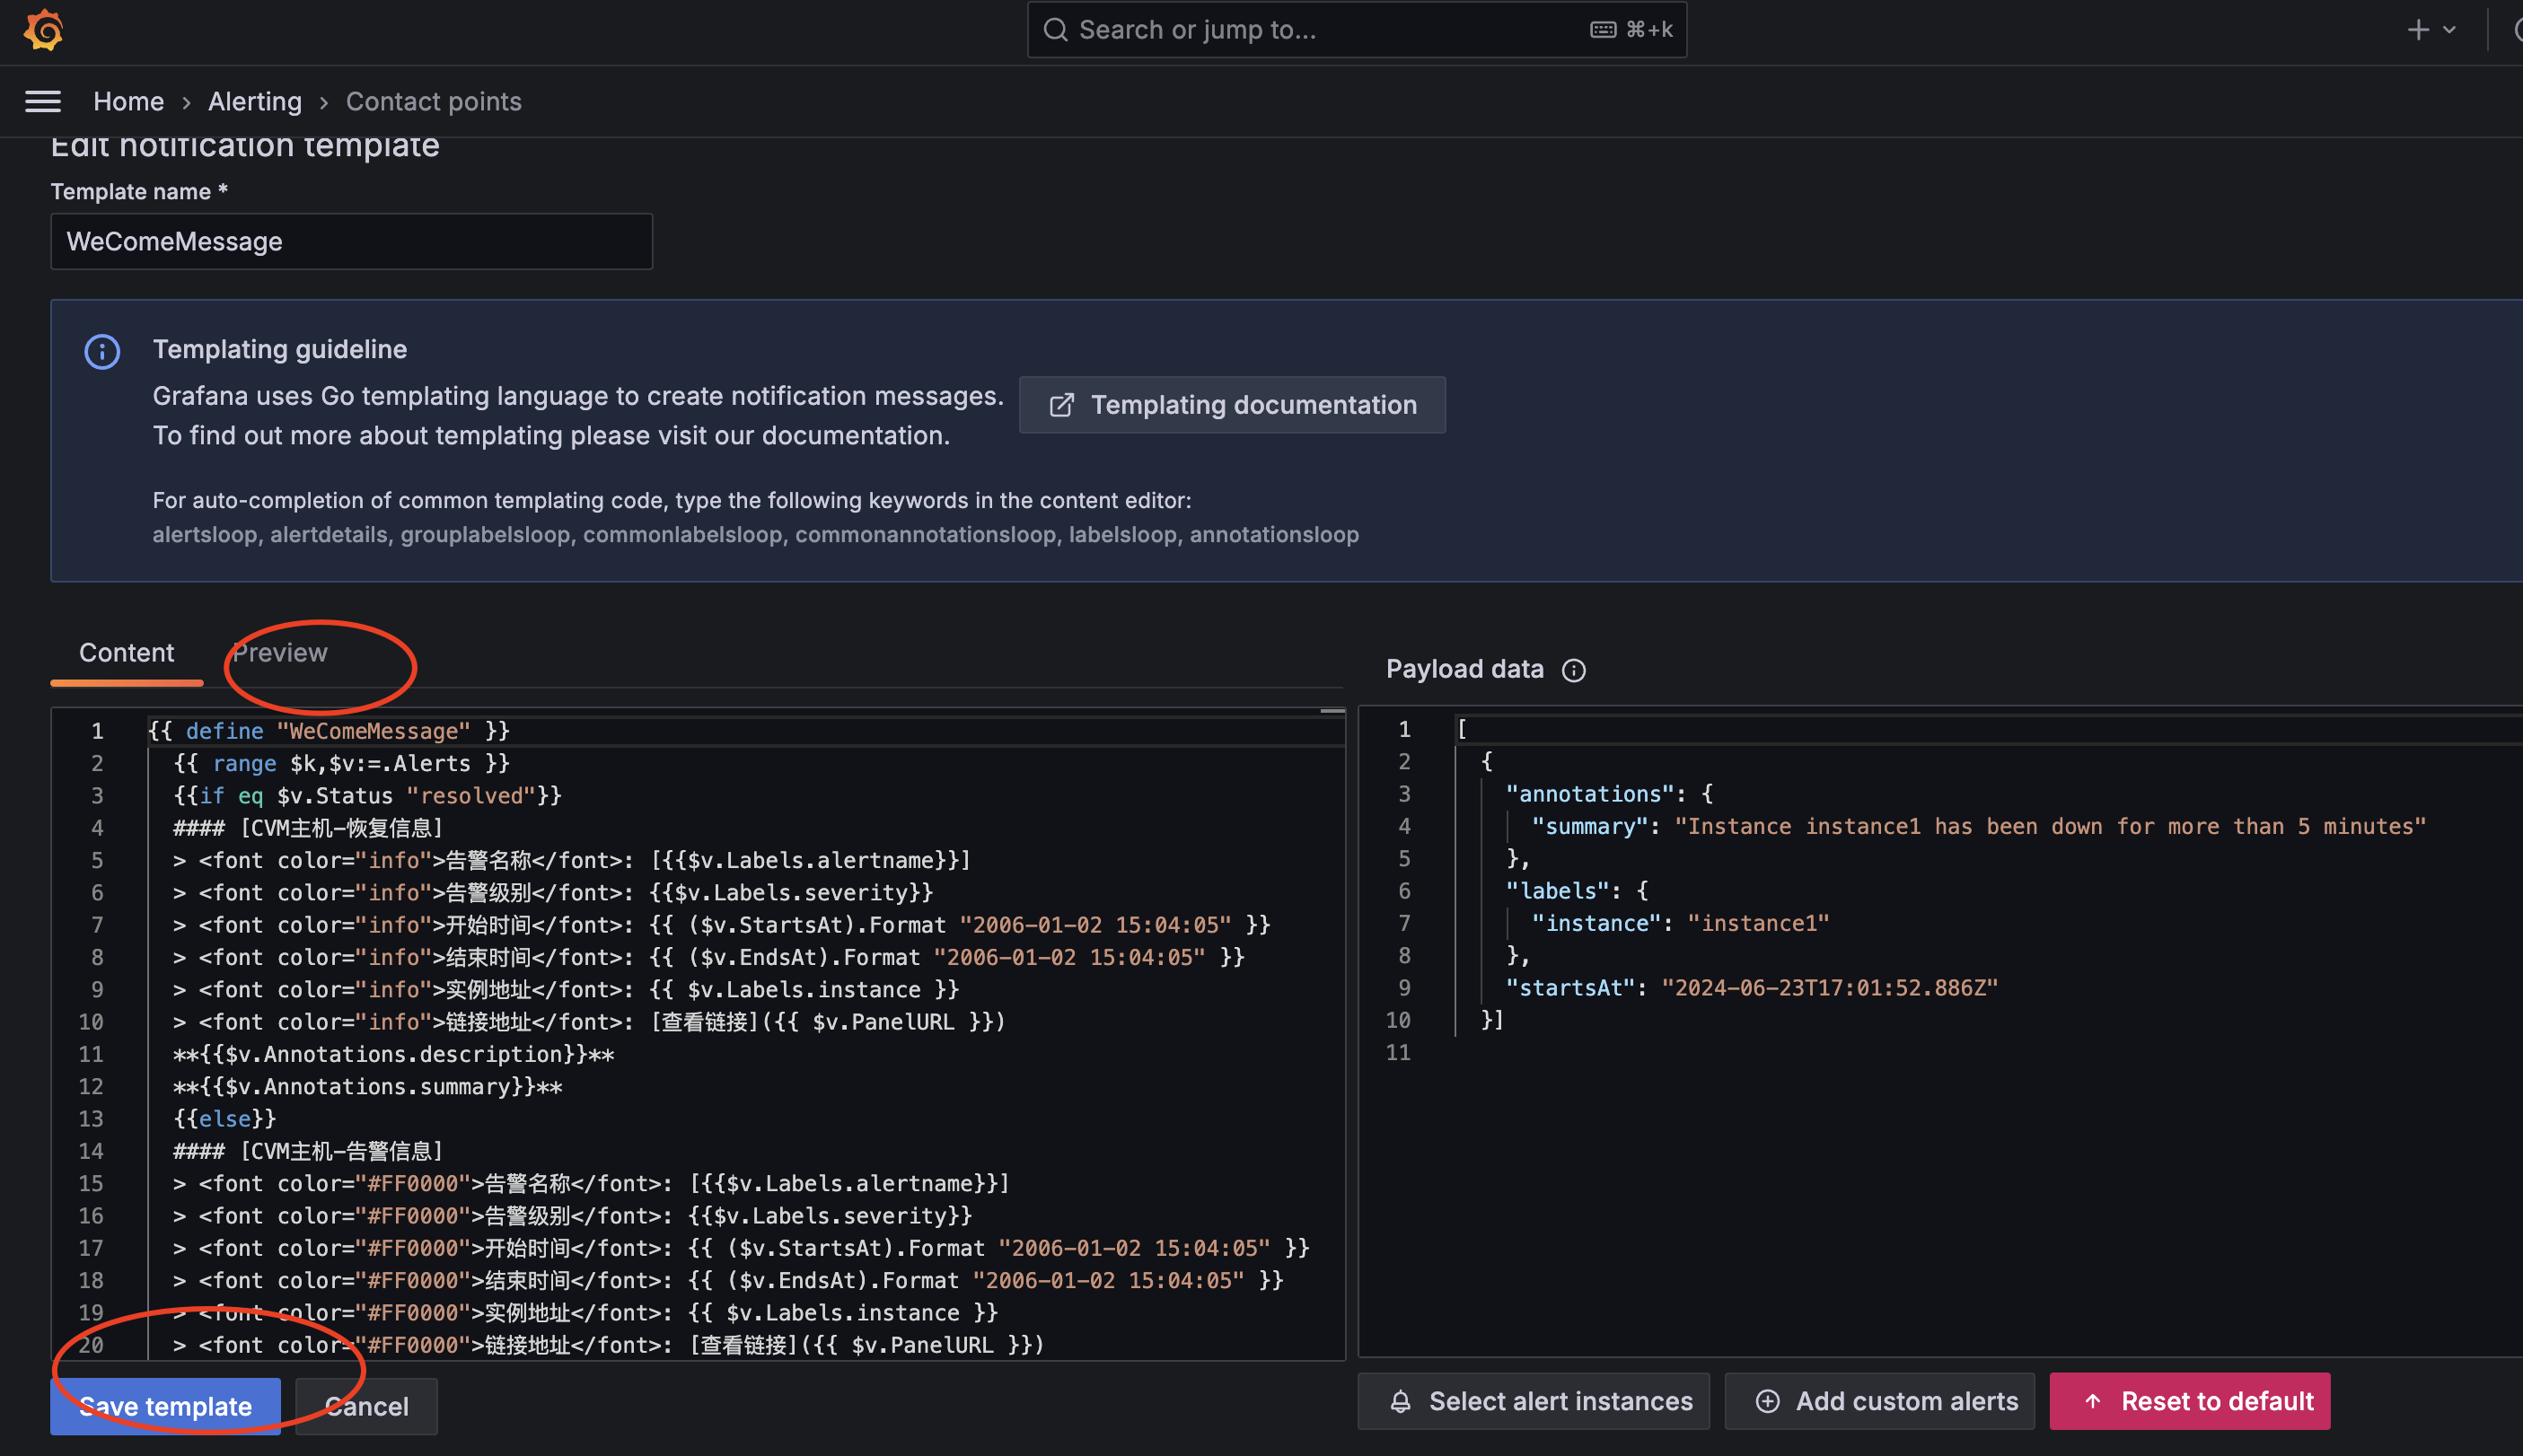
备注:
✓ 消息模版支持go template的语法
✓ 可以通过Preview调试渲染是否有异常报错
✓ 可以参考Reference | Grafana documentation
● 更新connect points
○ 定义告警规则
● 点击新增告警规则

● 填充名称&Promql
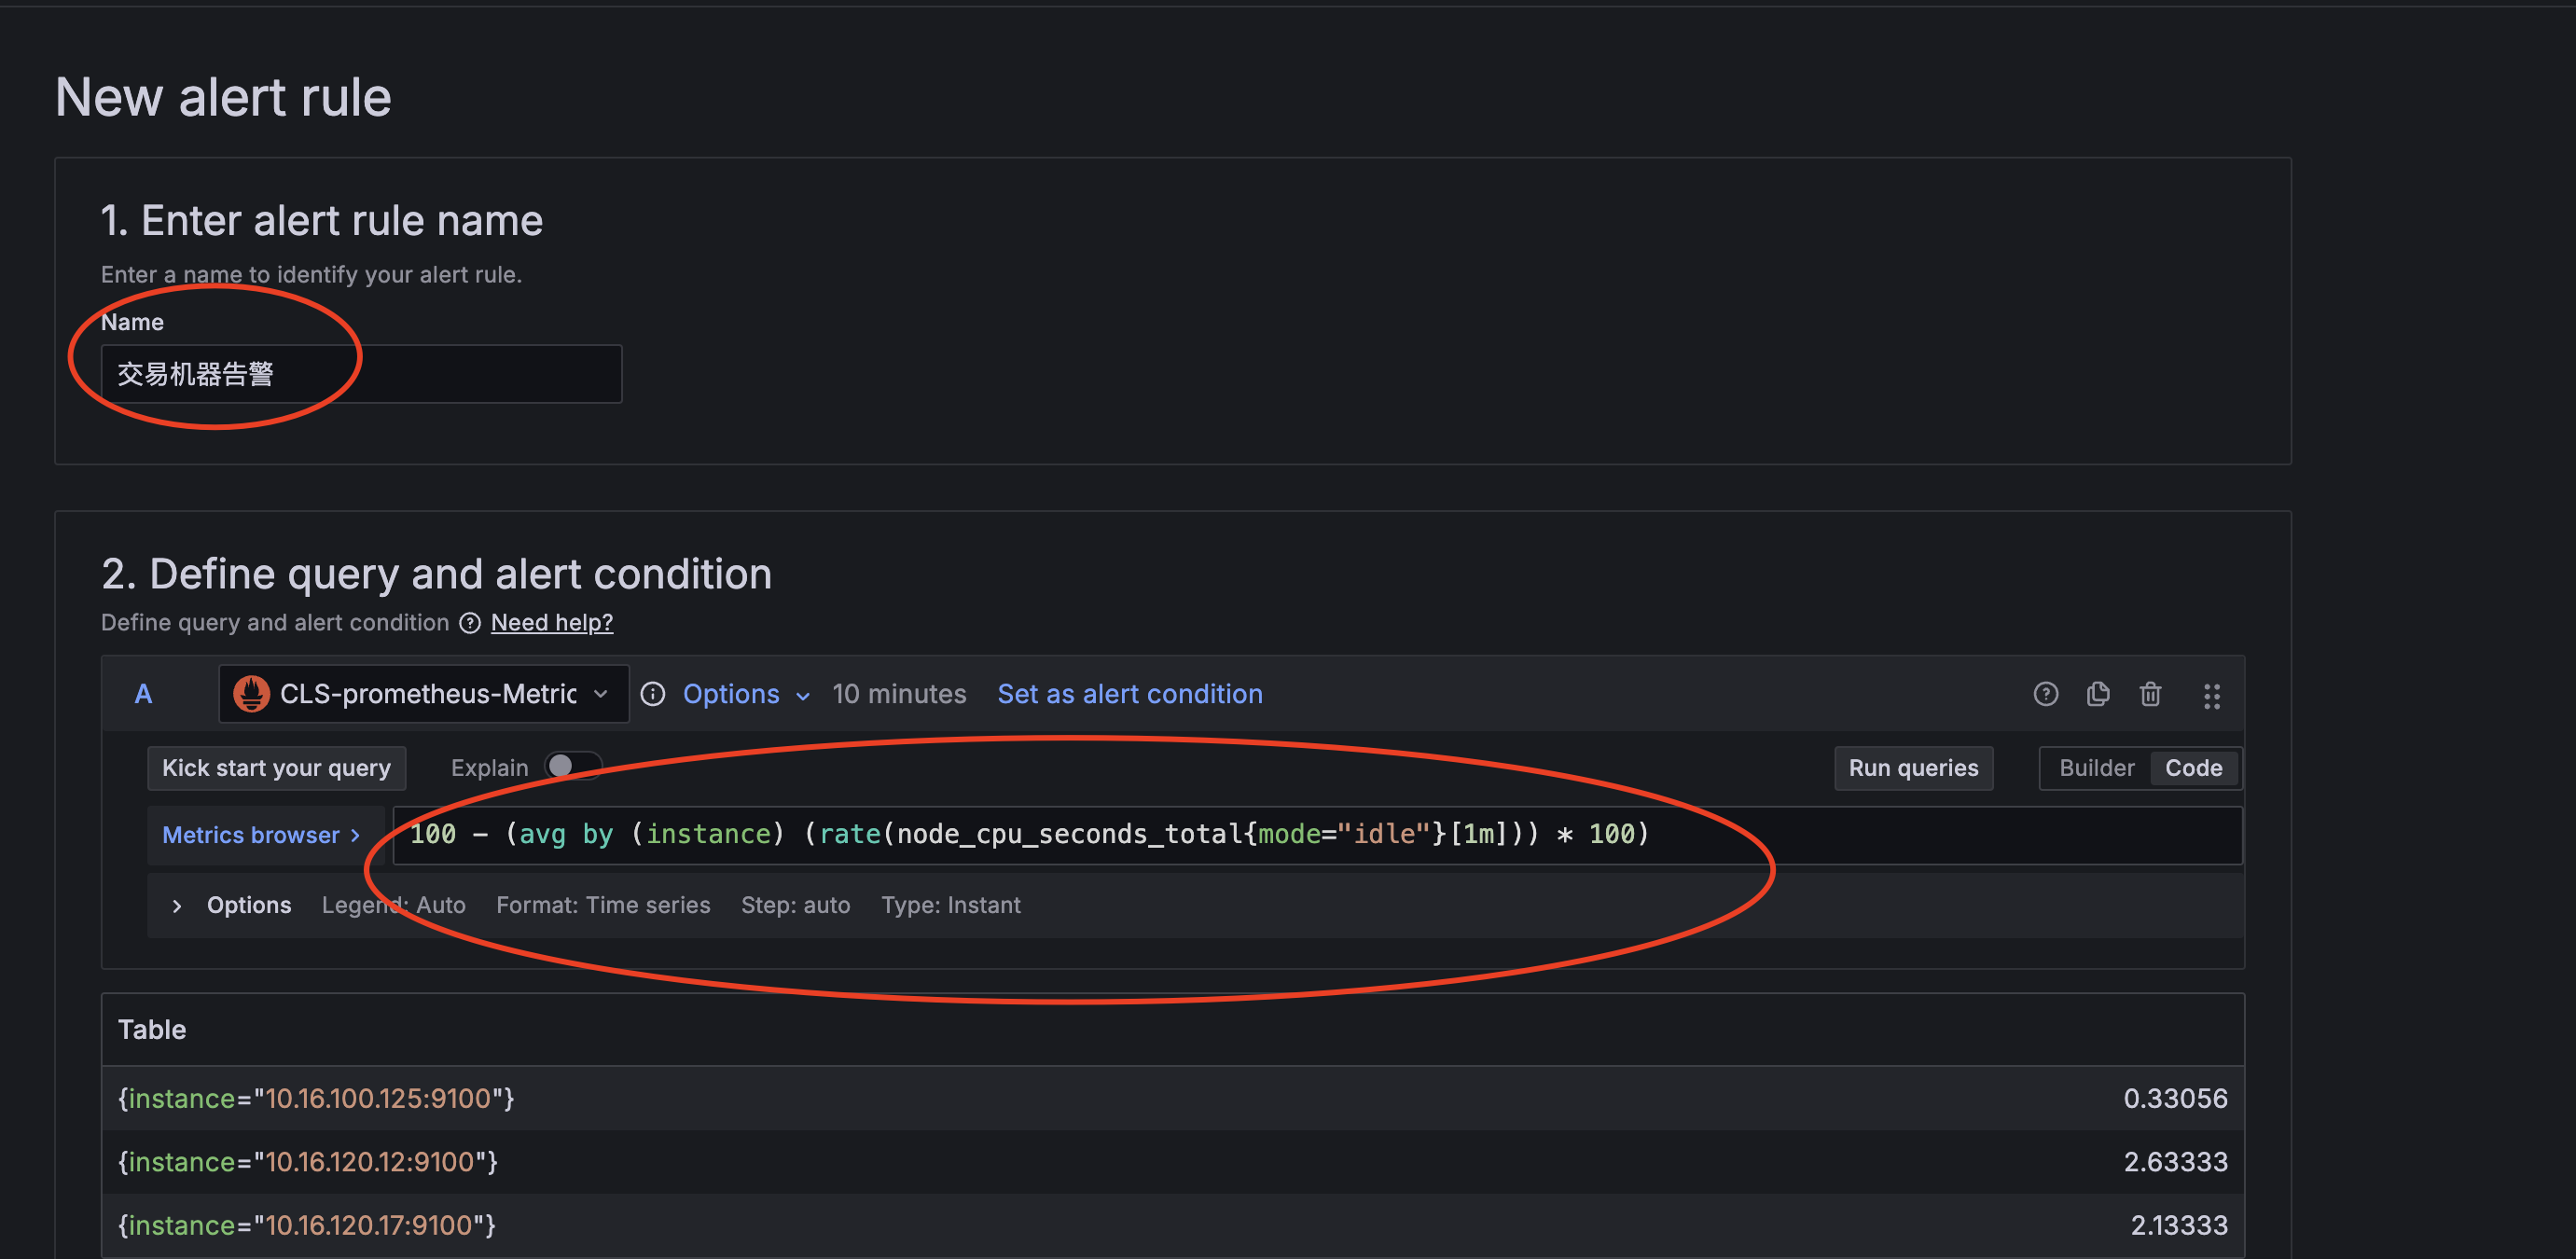
备注:这里Promql简单定义一个CPU利用率的使用率
● 添加告警阈值
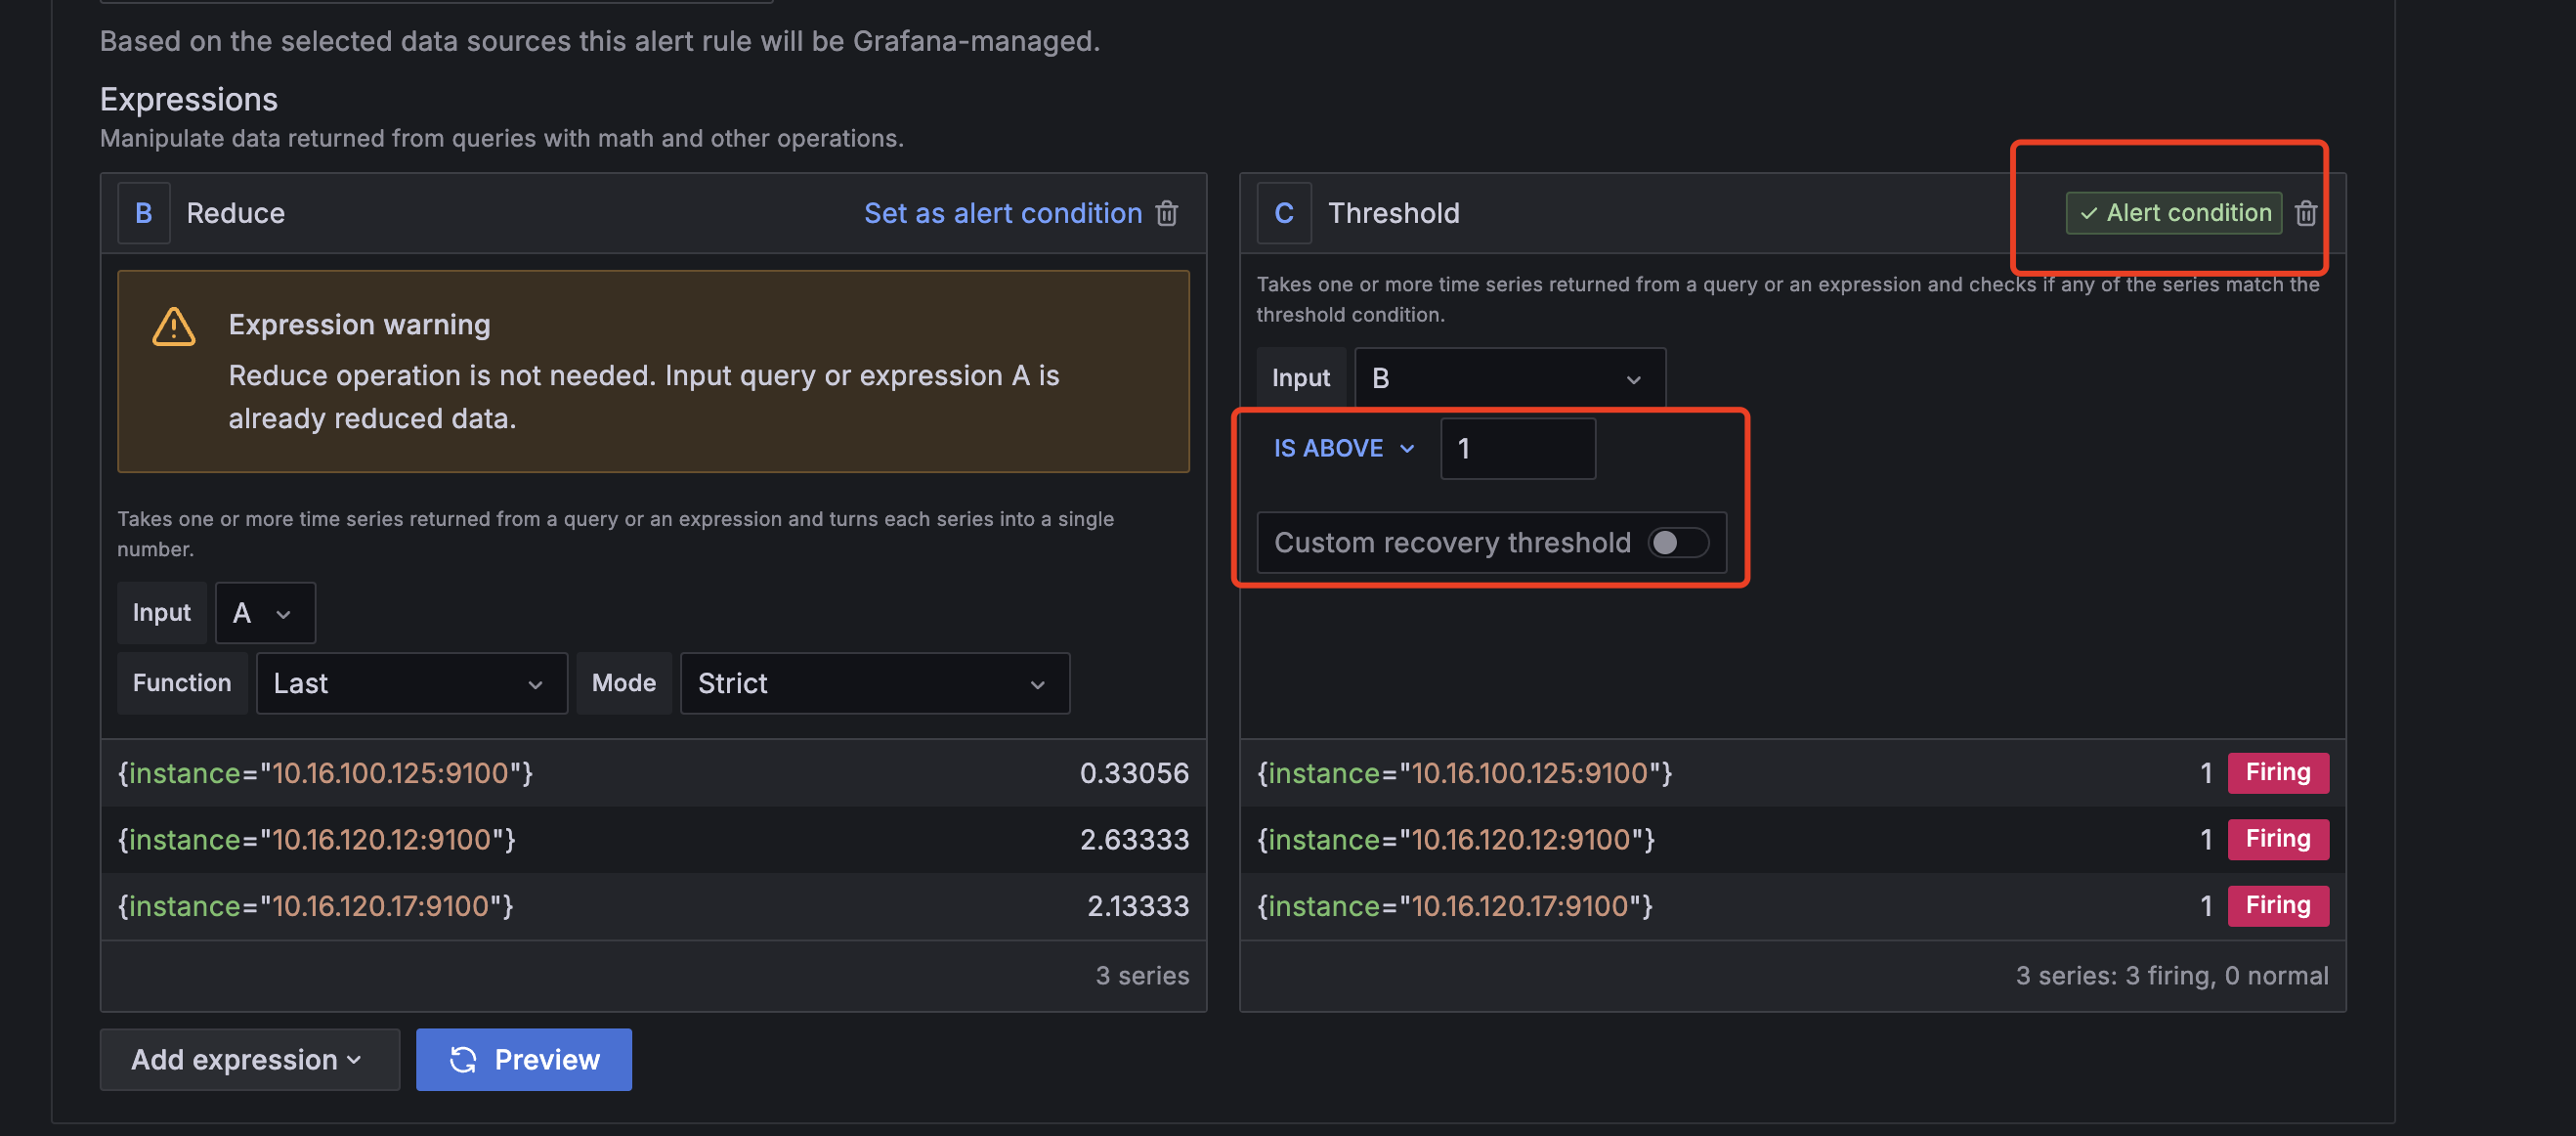
备注:
这里为了测试简单定义Threshold阈值是1
● 选择或者新建评估组
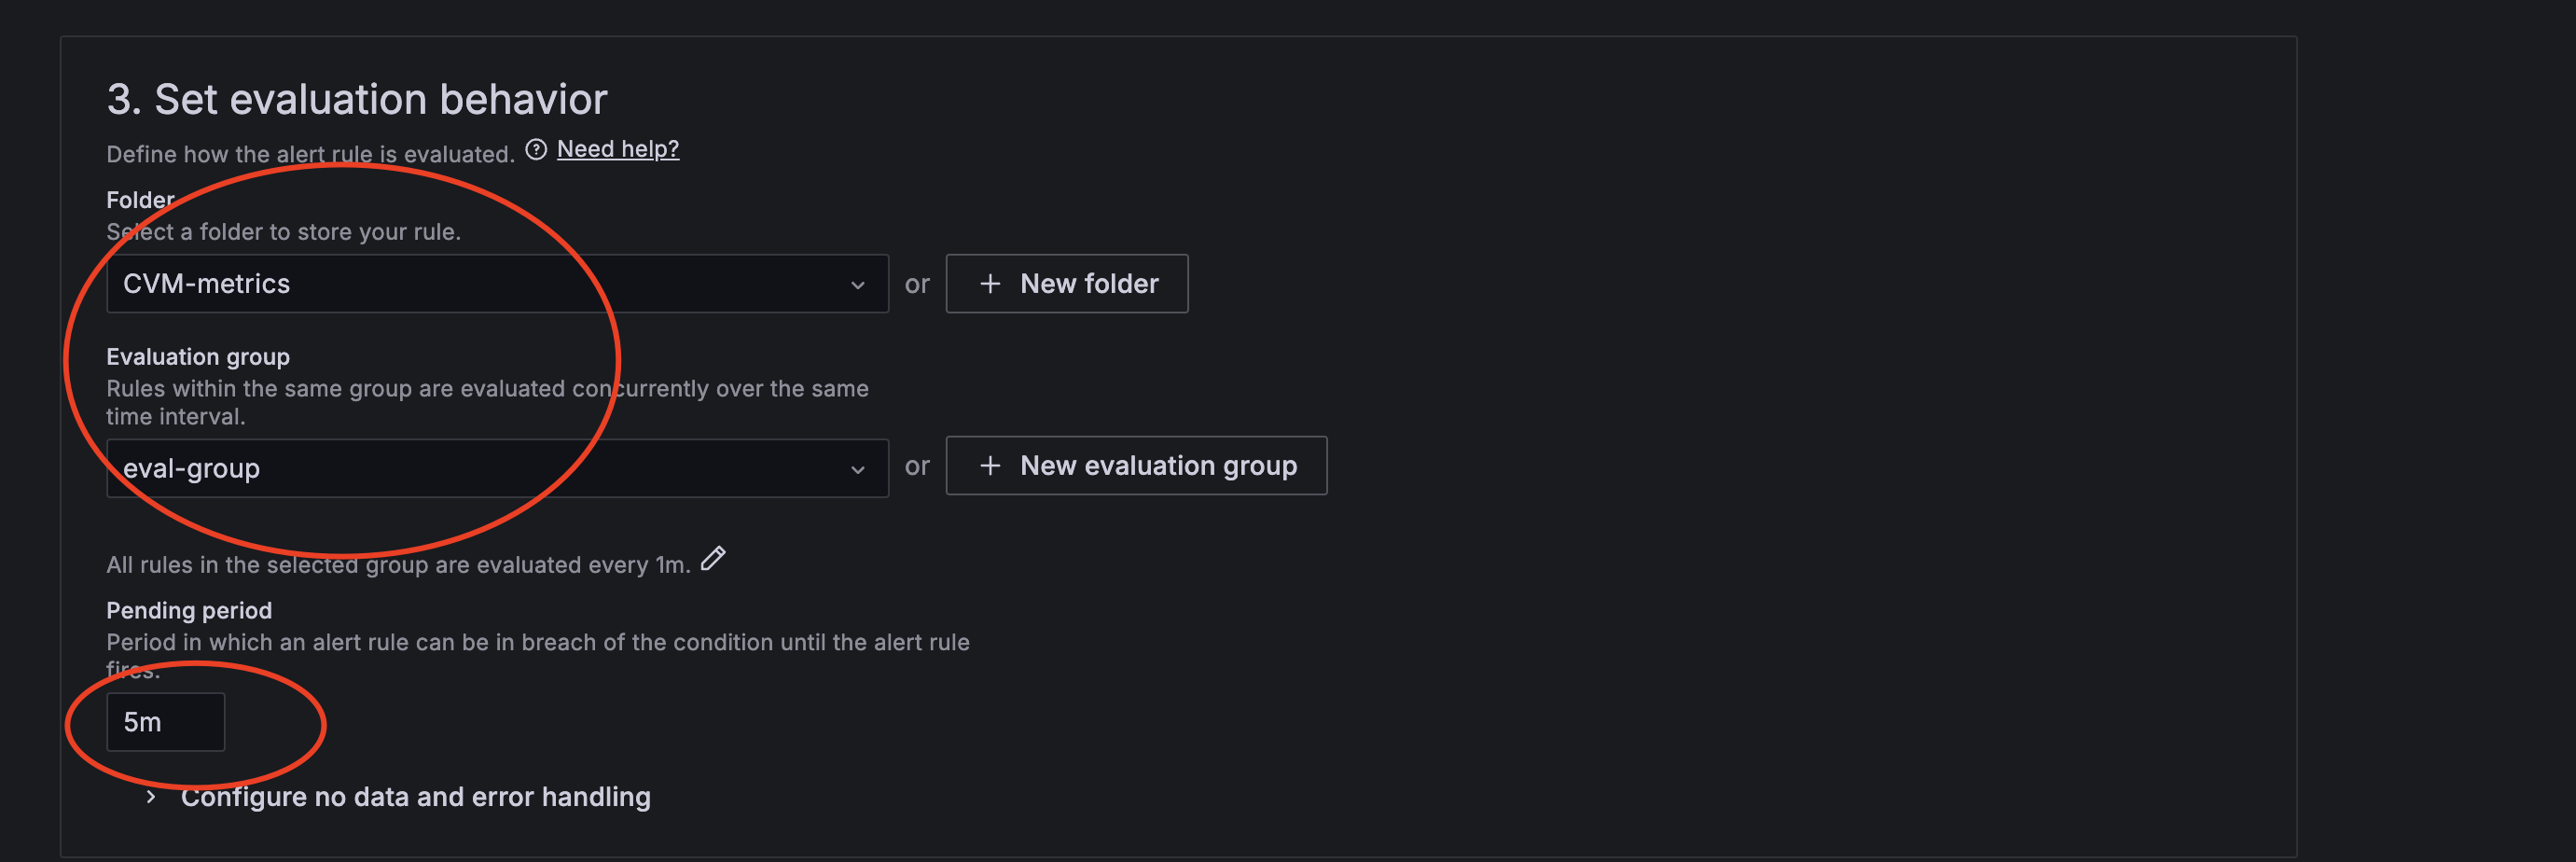
备注:
✓ 评估组的interval决定了PromQL多久运行一次
✓ Pending period决定了pending的周期
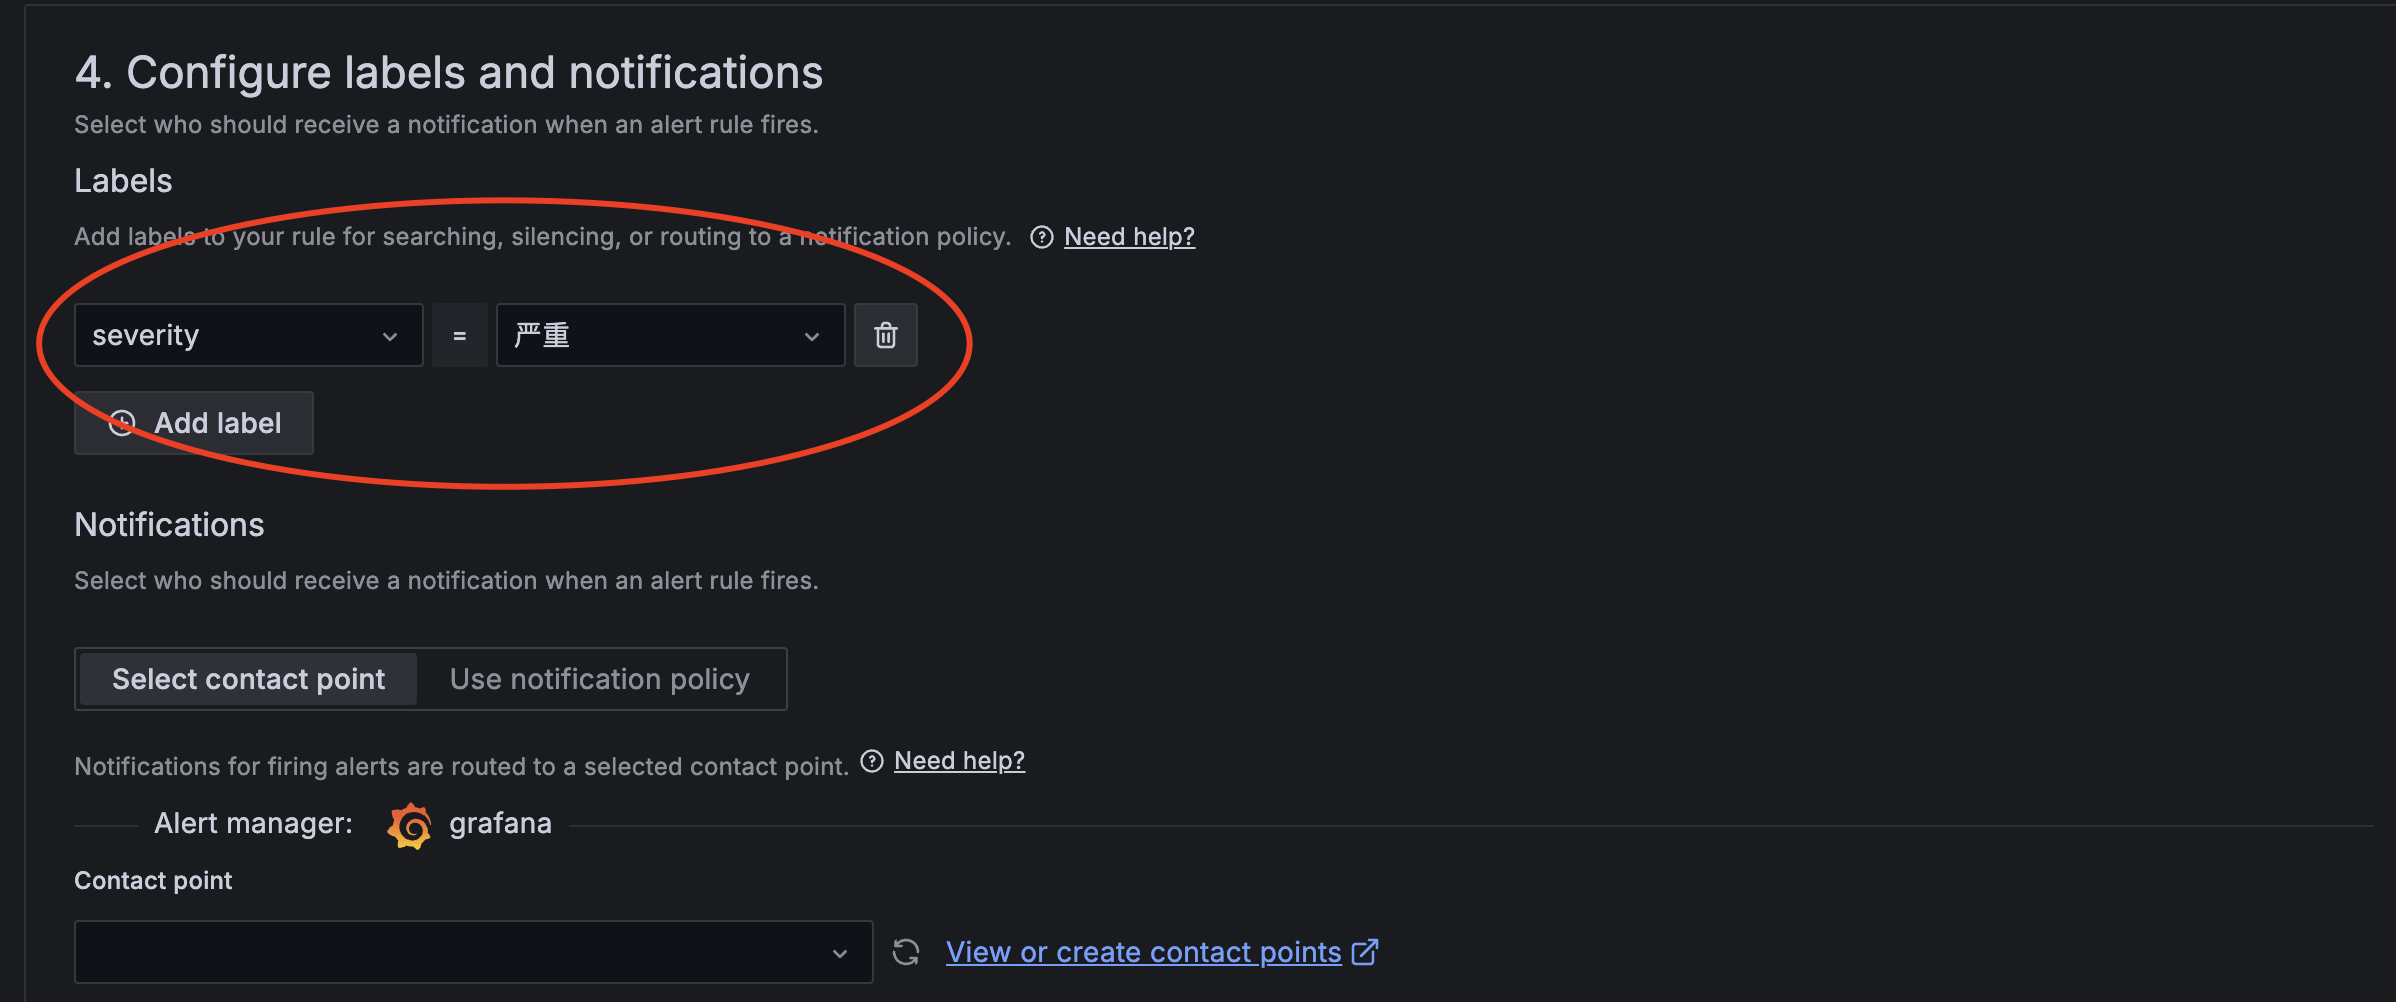
● 添加告警label
备注:
✓ 这个label要么存在,直接下拉选择,要么手动输入,手动输入的UI设计比较难捕捉
● 通知渠道选择刚创建的connect points

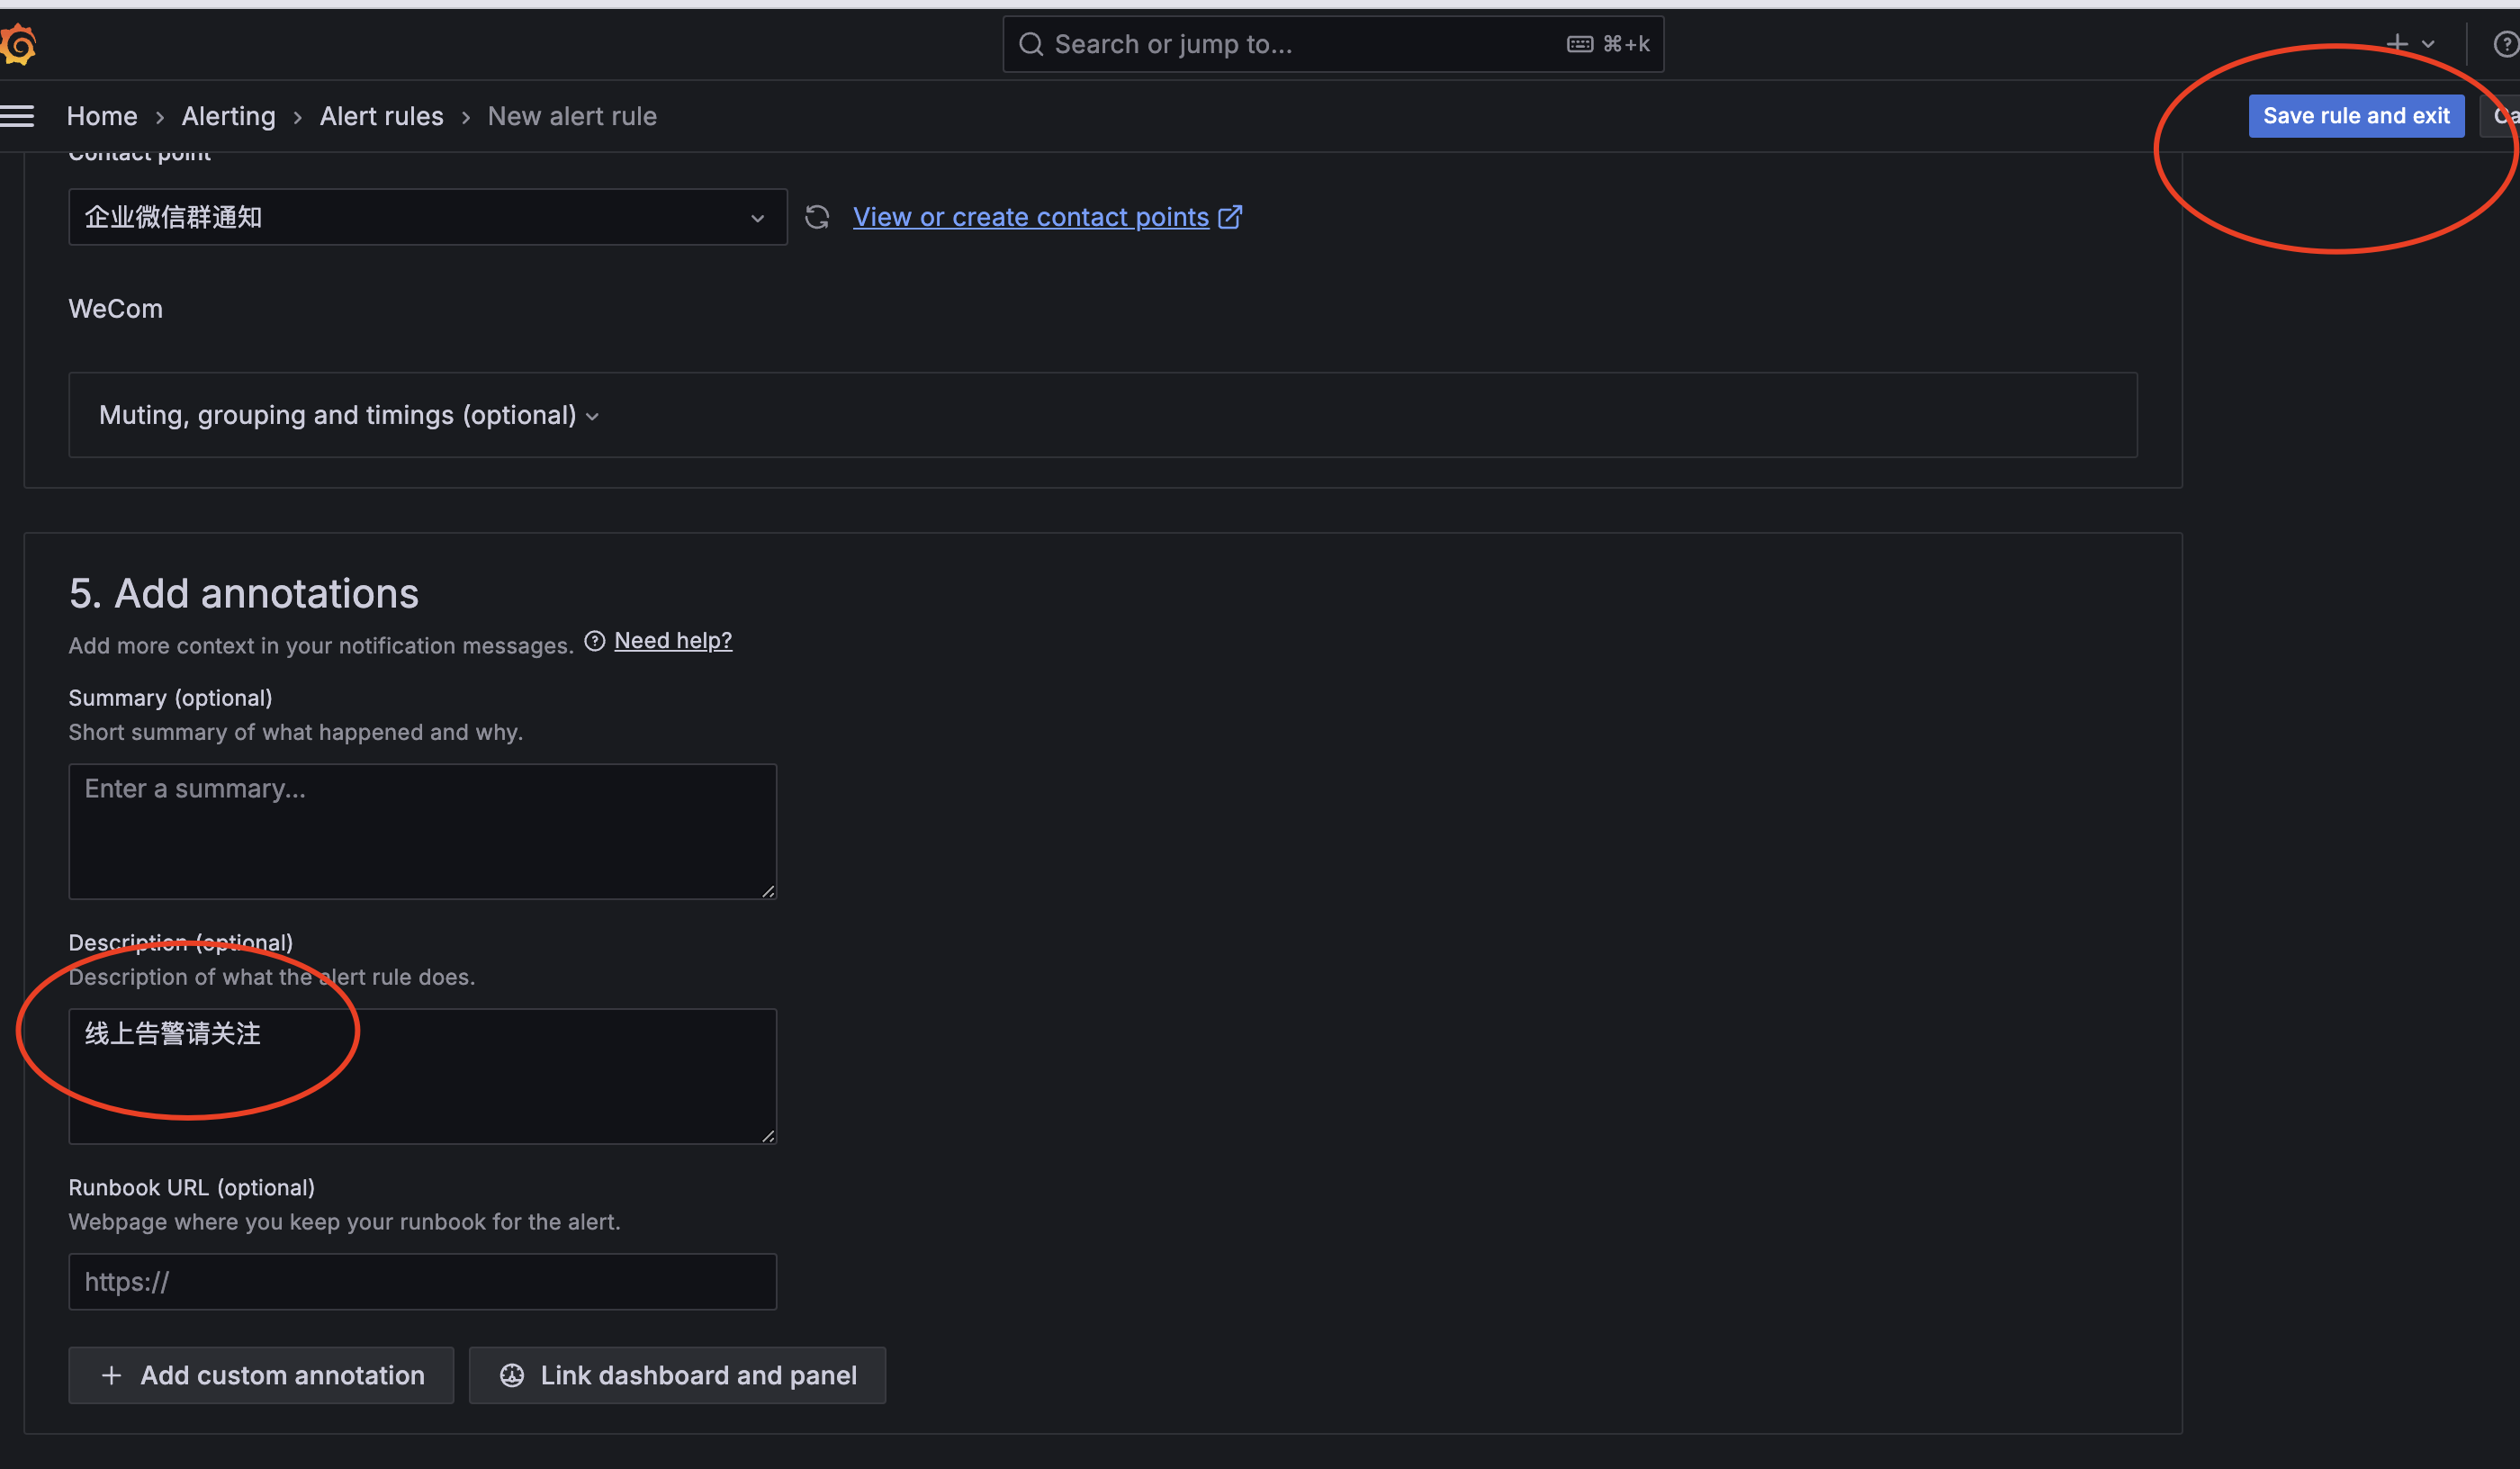
● 添加summary和description
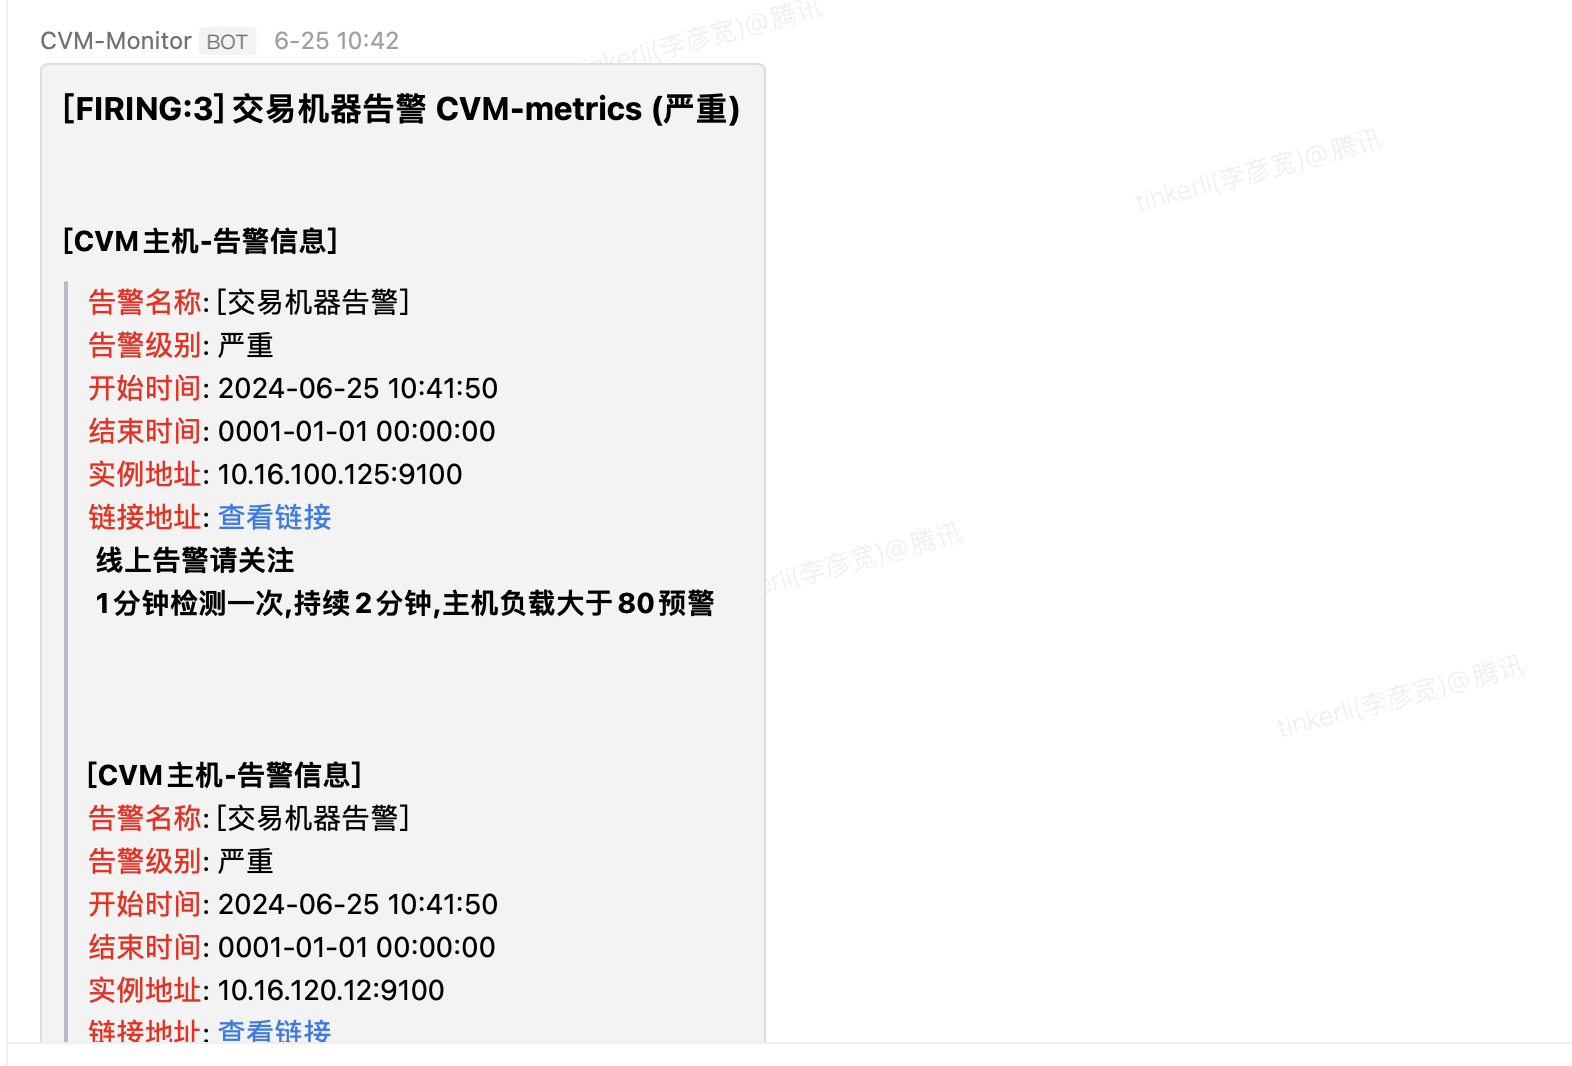
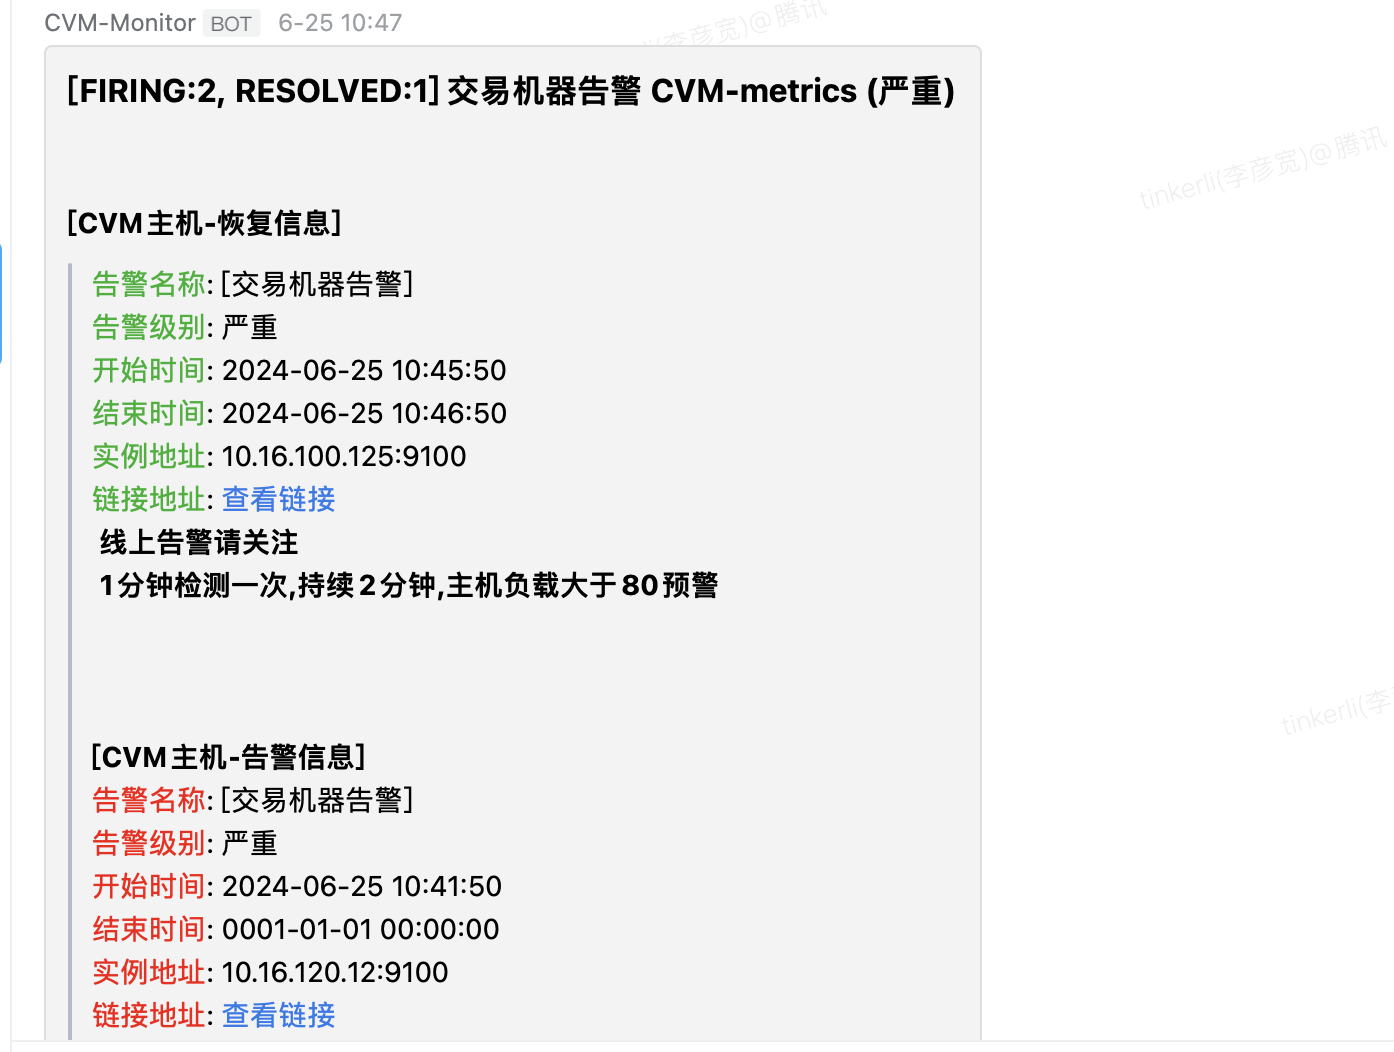
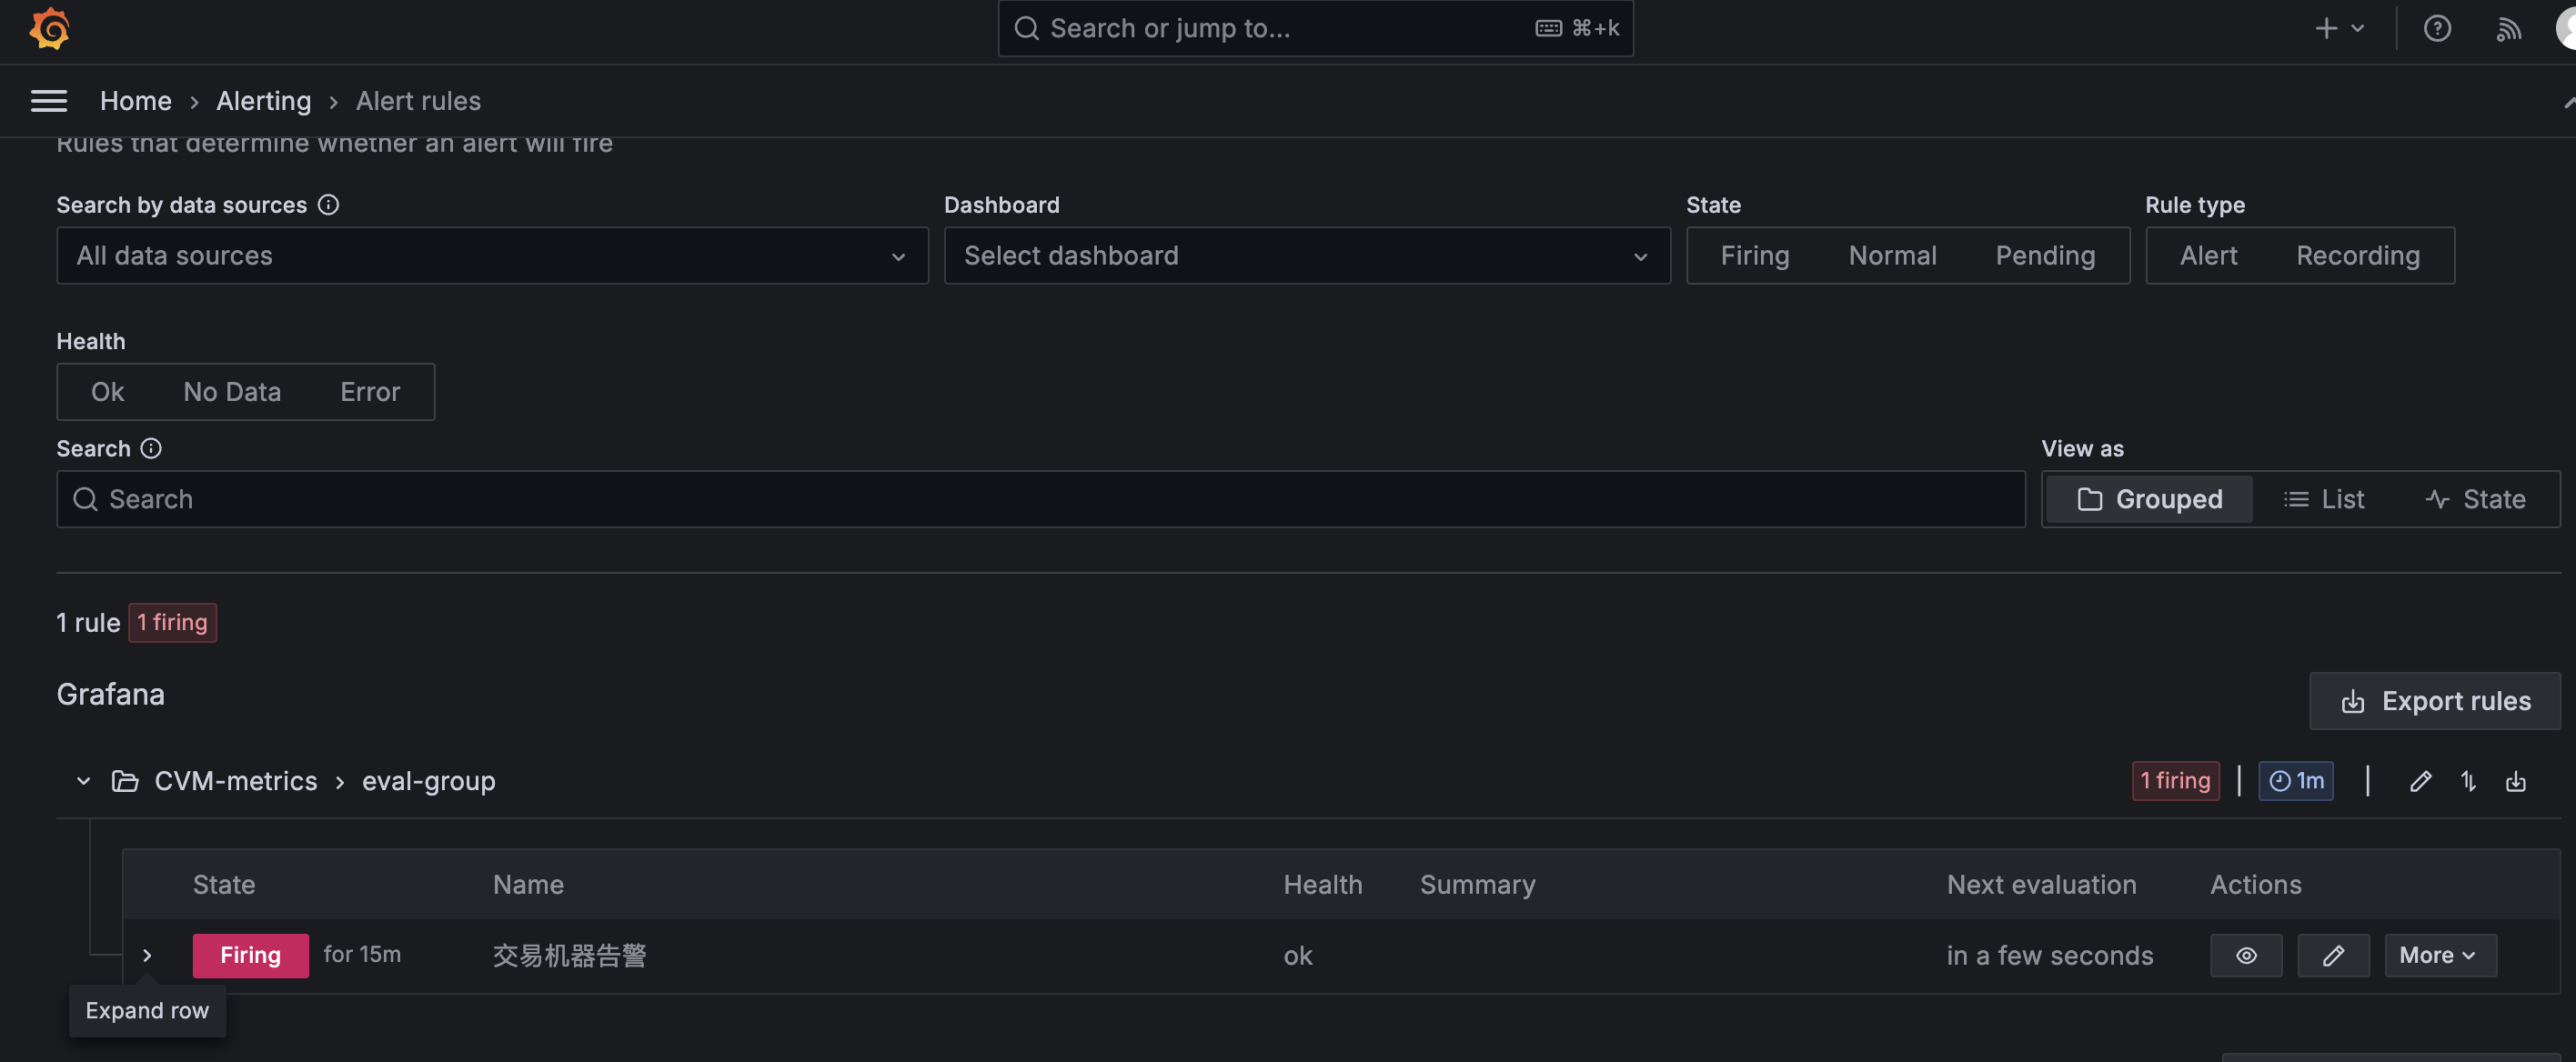
○ 查看告警信息
● 企业微信查看
● Grafana面板查看
六:链路运维
1. vmagent自身监控
● 采集自身指标
备注:vmagent自身也暴漏了自身的metrics,本文采用最简方式,自己采集自己,只需要在config配置加上其自身监控job即可,如:
[root@VM-120-17-centos ~]# cat /etc/vmagent/vmagent.yaml

scrape_configs:
-
job_name: 'node_exporter'
scrape_interval: 15s
file_sd_configs:- files:
- '/etc/vmagent/targets/*.json'
relabel_configs:
- '/etc/vmagent/targets/*.json'
- source_labels: [__meta_filepath]
regex: './(.).json'
target_label: env
- files:
job_name: 'vmagent_self_exporter'   #自己监控自己

scrape_interval: 15s

static_configs:
targets: ['localhost:8088'] #假定vmagent监听端口为8088
● 添加Grafana的vmagent专属Dashboard
默认引用Grafana官方推荐的即可,链接VictoriaMetrics - vmagent | Grafana Labs,如通过Download Json再导入自己的Grafana即可,效果如下:
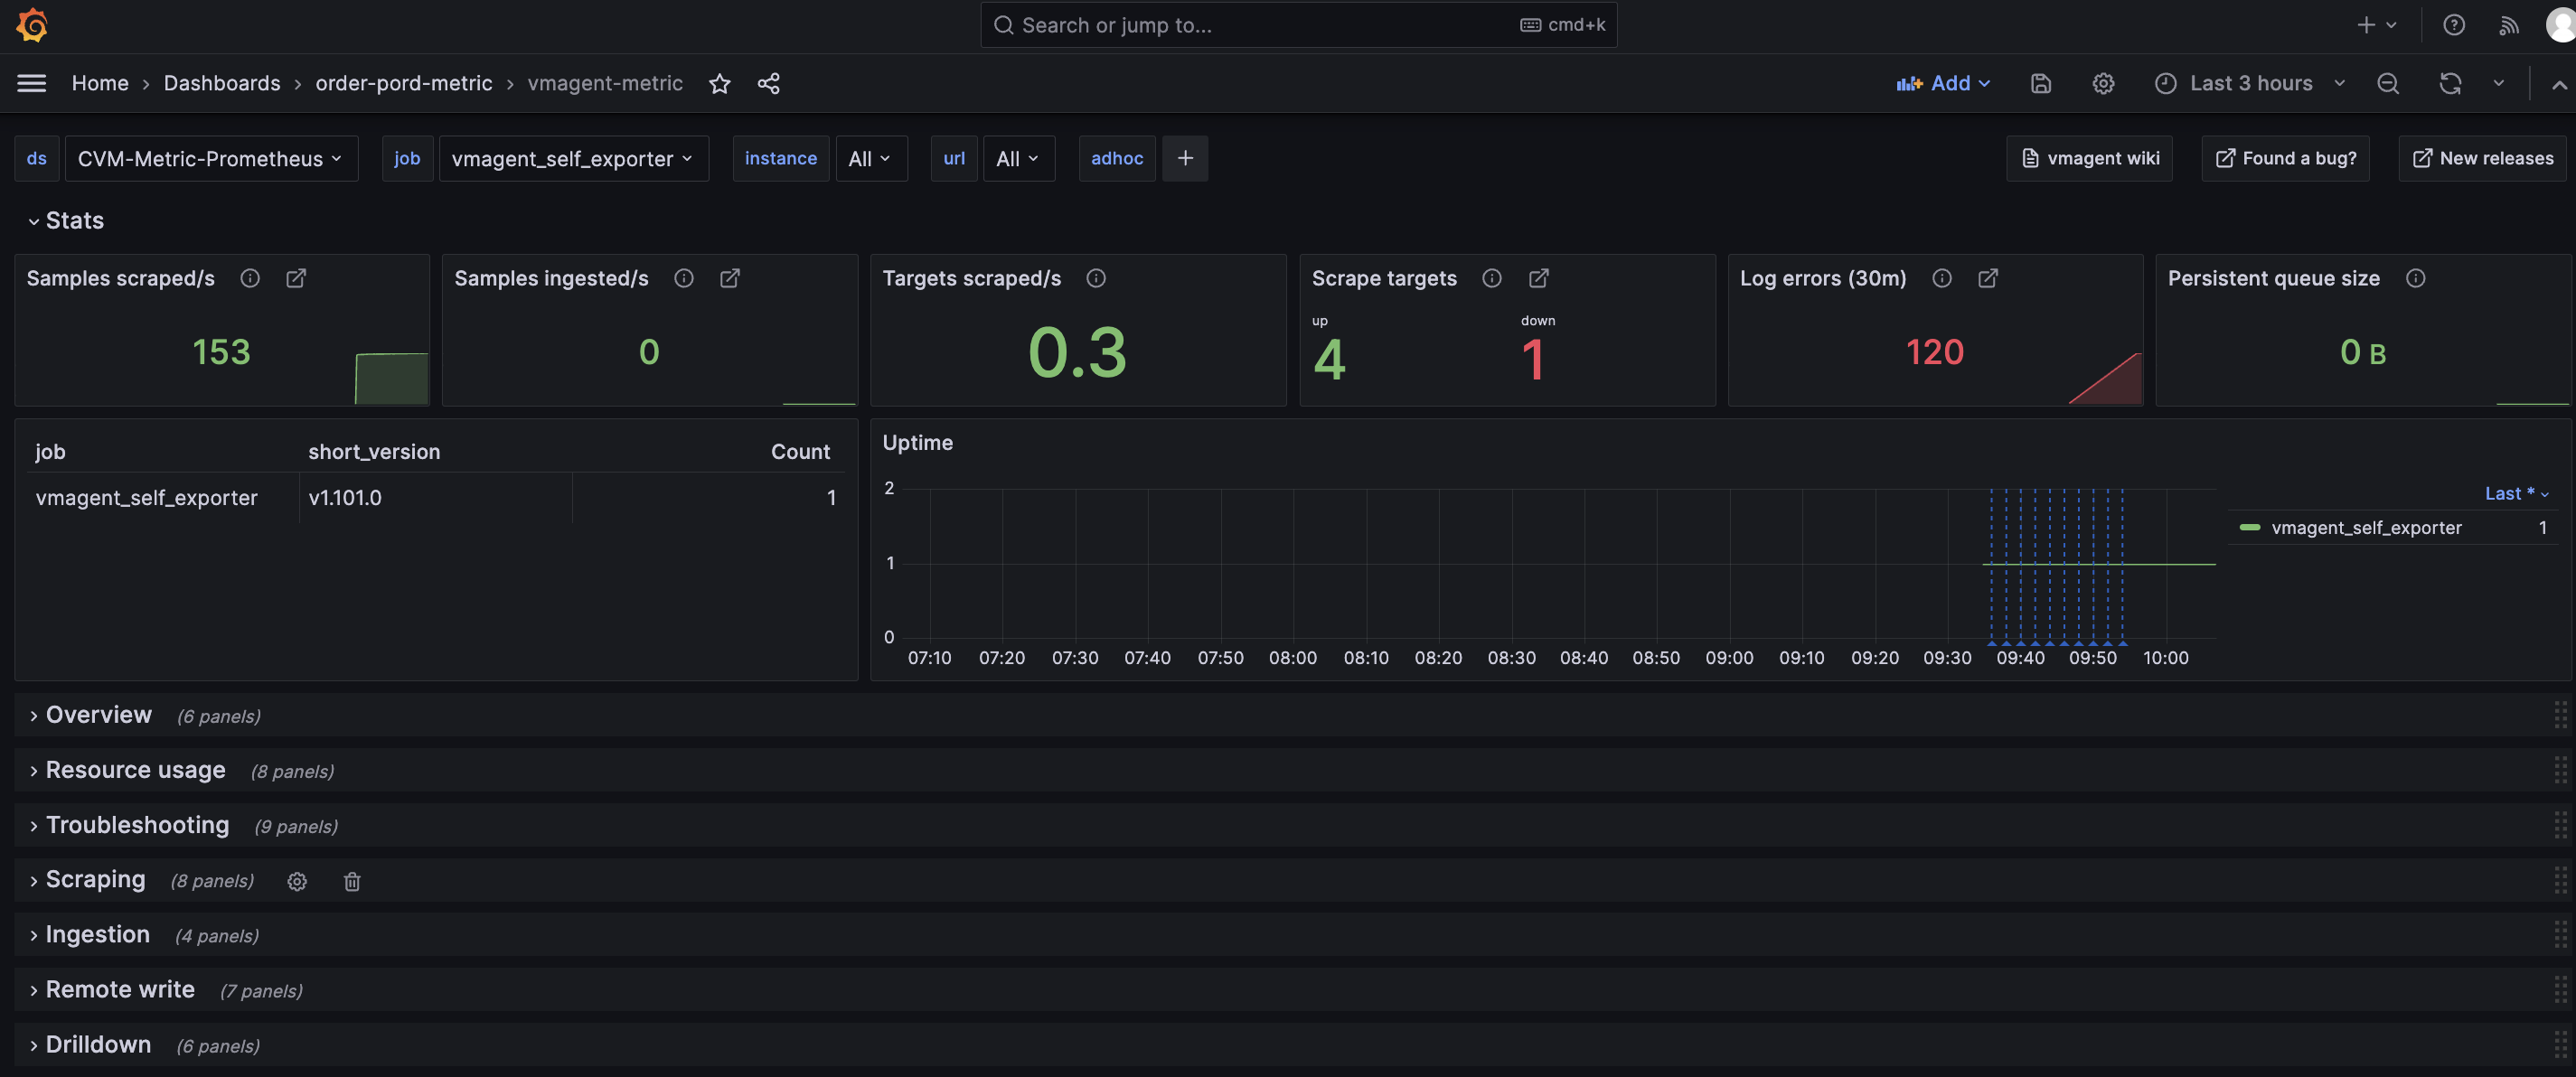
非常全面的自监控的指标了,比如看到vmagent出现log errors,接下来继续查看下具体log errors是什么原因
2. 查看vmagent自身的日志
备注:查看vmagent日志主要取决于部署方式,因本文是systemd管理的vmagent,可以通过journalctl查看其相关日志
● 查看实时日志
[root@VM-120-17-centos ~]# journalctl -u vmagent -f

-- Logs begin at 日 2024-05-19 16:54:42 CST. --

6月 23 09:48:39 VM-120-17-centos vmagent[23194]: 2024-06-23T01:48:39.528Z        warn        VictoriaMetrics/lib/promscrape/scrapework.go:382        cannot scrape target "http://test-node2:9100/metrics" ({env="test",instance="test-node2:9100",job="node_exporter"}) 1 out of 1 times during -promscrape.suppressScrapeErrorsDelay=0s; the last error: cannot perform request to "http://test-node2:9100/metrics": Get "http://test-node2:9100/metrics": dial tcp4: lookup test-node2 on 183.60.83.19:53: no such host; try -enableTCP6 command-line flag if you scrape ipv6 addresses
● 查看特定时间段日志
[root@VM-120-17-centos ~]#  journalctl -u vmagent --since "2024-06-23 00:00:00" --until "2024-06-23 00:59:59"

-- Logs begin at 日 2024-05-19 16:54:42 CST, end at 日 2024-06-23 09:55:09 CST. --

6月 23 00:00:09 VM-120-17-centos vmagent[11980]: 2024-06-22T16:00:09.527Z        warn        VictoriaMetrics/lib/promscrape/scrapework.go:382        cannot scrape target "http://test-node2:9100/m

6月 23 00:00:24 VM-120-17-centos vmagent[11980]: 2024-06-22T16:00:24.528Z        warn        VictoriaMetrics/lib/promscrape/scrapework.go:382        cannot scrape target "http://test-node2:9100/m
● 查看最近日志
[root@VM-120-17-centos ~]# journalctl -u vmagent -n 100

-- Logs begin at 日 2024-05-19 16:54:42 CST, end at 日 2024-06-23 09:57:09 CST. --

6月 23 09:33:09 VM-120-17-centos vmagent[23194]: 2024-06-23T01:33:09.527Z        warn        VictoriaMetrics/lib/promscrape/scrapework.go:382        cannot scrape target "http://test-node2:9100/m

6月 23 09:33:24 VM-120-17-centos vmagent[23194]: 2024-06-23T01:33:24.527Z        warn        VictoriaMetrics/lib/promscrape/scrapework.go:382        cannot scrape target "http://test-node2:9100/m

6月 23 09:33:25 VM-120-17-centos vmagent[23194]: 2024-06-23T01:33:25.803Z        error        VictoriaMetrics/lib/promscrape/scraper.go:180        cannot read "/etc/vmagent/vmagent.yaml": cannot
可以看到vmagent log errors是配置的探测目标不通,可以忽略;以及cannot read config file的错误,主要是人为把配置文件改错了
3. grafana推送告警链接问题
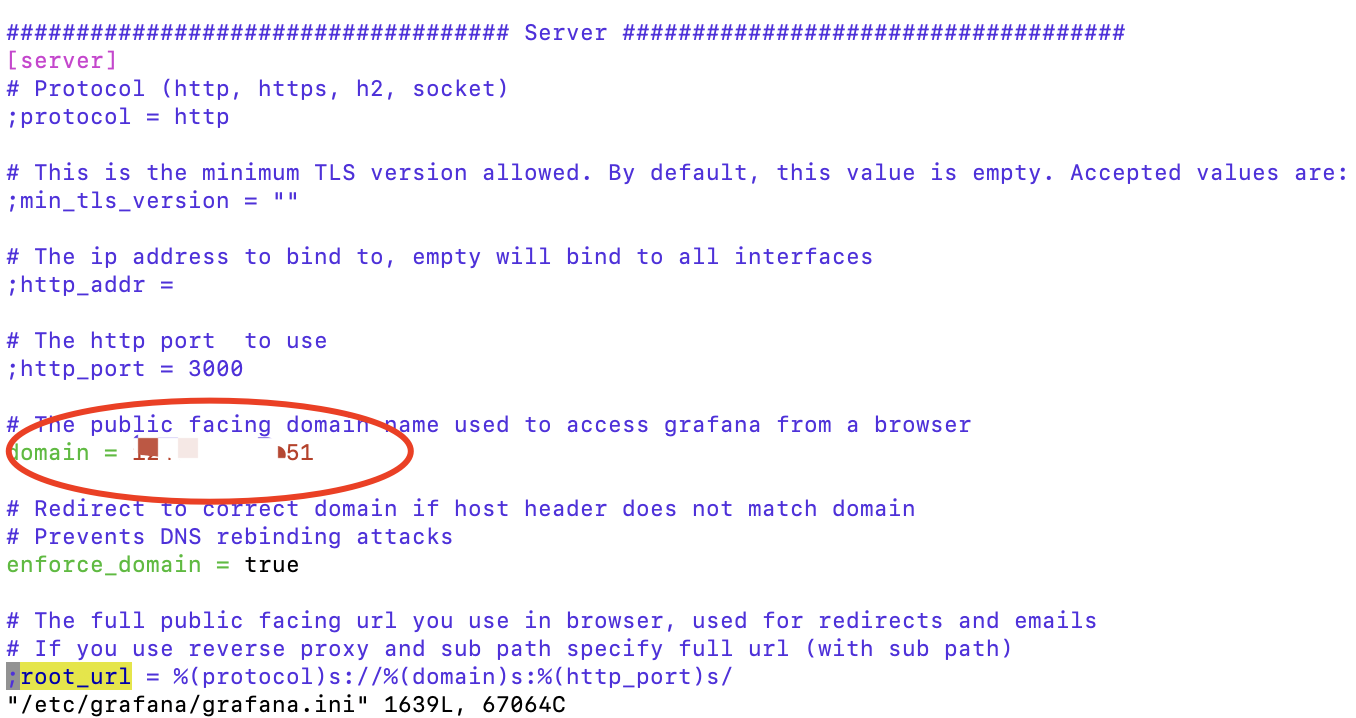
备注:grafana告警默认PanelURL 的地址携带的domain 是localhost,如:localhost:3000/xxxx的格式,导致推送企业微信里,直接点击链接打不开或者浏览器报错。
● 修改grafana配置文件
备注:
✓ 即修改domain为你的IP地址或者域名即可;
✓ 重启grafana server。
Node Exporter | OPSaid
How to change localhost to hostname in alerts? - #5 by denzel2 - Alerting - Grafana Labs Community Forums
New in Grafana 7.2: $__rate_interval for Prometheus rate queries that just work | Grafana Labs
【博客555】prometheus的step,durations,rate interval,scrape interval对数据查询结果的影响_prometheus step-CSDN博客
VictoriaMetrics - vmagent | Grafana Labs
Prometheus template variables | Grafana Cloud documentation
Add variables | Grafana documentation
Node Exporter Full | Grafana Labs
通用自定义模版专用:欢迎共享大家的自定义模版,方便其他人也可以直接使用 · Issue #30 · feiyu563/PrometheusAlert · GitHub