🎶 文章简介:木字楠后台管理系统开发(5):Vue登陆界面编写以及与后台联调测试 💡 创作目的:为了带大家完整的体验木字楠后台管理系统模版的开发流程 ☀️ 今日天气:愿冷空气冷藏你的烦恼,让快乐永驻。 📝 每日一言:即使无法掌握未来,也请不要忘了明天。
🍕 1、登陆界面编写
🍔 1-1、代码以及样式编写
我们来编写登录界面(具体的样式不再做具体解释)

<template> <div class="main-container" :style="`background: url(${Backstage}) center center / cover no-repeat;`"> <!-- 登录部分 --> <div class="login-container"> <!-- 登录界面 --> <div class="login-box"> <!-- 标题部分 --> <div class="title-span"> <img class="logo" :src="Logo"> <span class="title">木字楠后台管理系统</span> </div> <!-- 登录表单 --> <a-form-model class="login" ref="ruleForm" @submit="login('ruleForm')" @submit.native.prevent :model="loginForm" :rules="rules"> <a-form-model-item prop="username"> <a-input v-model="loginForm.username" placeholder="请输入用户名..."/> </a-form-model-item> <a-form-model-item prop="password"> <a-input-password v-model="loginForm.password" placeholder="请输入密码..."/> </a-form-model-item> <div class="remember-me"> <a-checkbox dio>记住我</a-checkbox> <a href="#">忘记密码</a> </div> <a-form-model-item> <a-button block class="login-button" type="primary" html-type="submit" @submit.native.prevent :disabled="loginForm.username === '' || loginForm.password === ''" > <a-icon type="login"/> 登陆 </a-button> </a-form-model-item> </a-form-model> <!--第三方登陆--> <a-divider style="margin: -15px 0 10px 0">第三方登陆</a-divider> <div class="three-box"> <a-button type="primary" shape="circle" icon="qq"></a-button> <a-button type="primary" shape="circle" icon="alipay" style="margin-left: 10px"></a-button> </div> </div> <!-- 页脚部分 --> <div class="footer-span"> <a-divider> Copyright © 2022 by ~ 木字楠</a-divider> </div> </div> <!-- 其他部分 --> <div class="other-container"> <!-- 网站标题 --> <div class="website-detail-title"> <span>木 字 楠 后 台 管 理 平 台</span> </div> <!-- 网站标语 --> <div class="website-desc"> <span>——— 要努力呀,为了想要的生活,为了人间烟火,为了今天的风和月 ———</span> </div> </div> </div> </template><script>
import Backstage from "@/assets/images/backstage.jpg";
import Logo from "@/assets/images/logo/logo.png";export default {
name: "Login",
data() {
return {
//============== 初始化 ===============
rules: {
username: [{required: true, message: '用户名不能为空', trigger: 'blur'}],
password: [{required: true, message: '密码不能为空', trigger: 'blur'}],
},
isPass: false,
//============== 参数对象 ===============
loginForm: {
username: "Visitor",
password: "123456",
},
Backstage: Backstage,
Logo: Logo,
}
},
methods: {//============== 登陆方法 =============== login(formName) { this.$refs[formName].validate(valid => { if (valid) { if (this.isPass) { } else { this.$message.error("未通过滑块验证"); } } }); }}
}
</script><style lang="scss" scoped>
.main-container {
width: 100%;
height: 100%;
display: flex;
justify-content: space-between;.login-container {
position: relative;
width: 26%;
height: 100%;
opacity: 0.95;
background: white;
border-right: 1px solid gray;
border-radius: 10px;
box-shadow: 2px 10px 20px gray;.login-box { position: absolute; width: 100%; height: auto; padding: 10px 0 20px 0; margin: 0 auto; top: 15%; .title-span { display: flex; justify-content: center; margin-bottom: 40px; .logo { user-select: none; width: 38px; height: 38px; margin-right: 10px; border-radius: 50%; } .title { user-select: none; font-size: 24px; font-weight: bolder; } } .login { padding: 0 30px; .remember-me { display: flex; justify-content: space-between; } .login-button { margin-top: 10px; width: 100%; } } .three-box { display: flex; justify-content: center; } } .footer-span { user-select: none; position: absolute; bottom: 1%; left: 0; right: 0; }}
.other-container {
width: 74%;
position: relative;.website-detail-title { position: absolute; width: 100%; text-align: center; top: 10%; span { user-select: none; font-weight: bolder; color: #40403a; font-size: 40px; } } .website-desc { position: absolute; width: 100%; text-align: center; bottom: 5%; span { user-select: none; font-size: 20px; color: white; } }}
}
</style>
🍟 1-2、路由信息修改
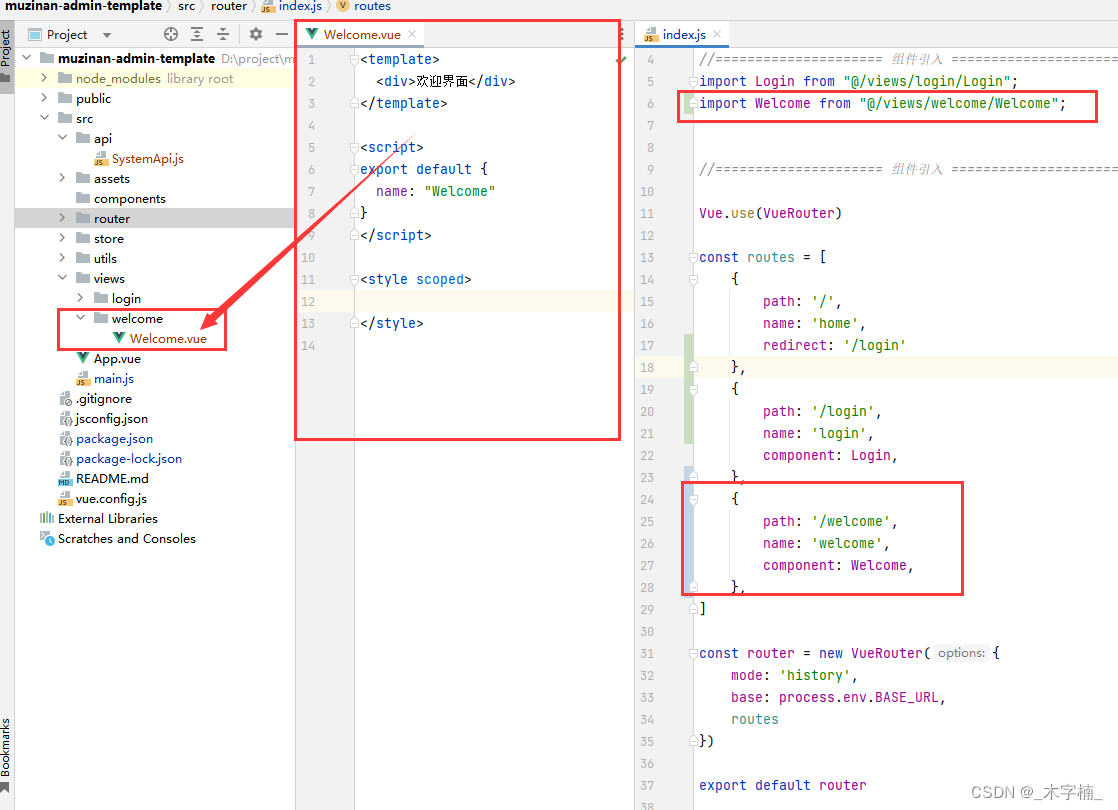
引入代码,启动项目之后我们会发现页面空白。
这是因为我们没有给登陆页面配制路由,当然不会进行跳转。
登陆界面是作为我们网站的默认界面,所以我们在请求/的时候默认重定向至/login界面。


🌭 1-3、滑动验证码引入
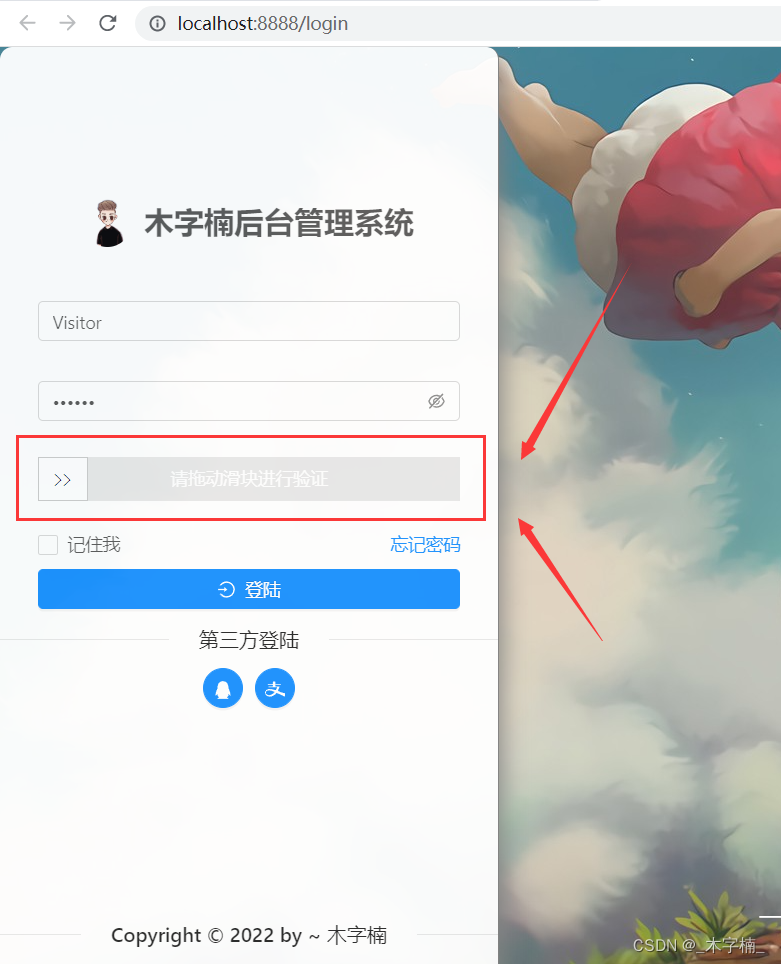
登陆一般会设置验证码,这样可以有效的防止登陆的暴力破解以及登陆请求被恶意使用。 我们这里采用
滑动验证码块的方式做登录验证。 项目中使用的为 slider-verification-code

首先我们在控制台中执行
npm i slider-verification-code下载依赖

- 在
main.js中进行插件的引入 - 在
Login.vue中使用滑块验证码


          <!-- 滑块验证码 -->
          <a-form-model-item prop="captcha">
            <SliderVerificationCode height="35px"
                                    content="请拖动滑块进行验证"
                                    inactiveValue="未验证"
                                    activeValue="已验证"
                                    v-model="isPass"/>
          </a-form-model-item>

🍿 2、请求后端接口
🥓 2-1、编写请求方法
- 在src目录下新建一个
api文件夹用于存放api请求方法 - 由于本项目中使用的是SpringSecurity默认的登陆逻辑,根据源码我们可以得知,登陆请求是
Post请求 且 参数是通过请求头携带(eg: localhost:9999/user/login?username=a&password=b) Login.vue中通过滑块验证之后调用登陆方法,发起网络请求。


调用接口方法,请求成功之后跳转至
欢迎界面

    //==============   登陆方法   ===============
    login(formName) {
      this.$refs[formName].validate(valid => {
        if (valid) {
          if (this.isPass) {
            userLogin().then(res => {
              if (res.success){
              this.$notification.success({message: res.message});
                this.$router.replace('/welcome');
              } else {
                this.$message.error(res.data.message);
              }
            });
          } else {
            this.$message.error("未通过滑块验证");
          }
        }
      });
    }
我们发送网络请求之后发现发生了
跨域问题

🥗 2-2、跨域问题解决
跨域问题的解决方案有很多种: 以下是最常用的几种,本项目中使用后端代理的方式来进行配制。
- nodejs中间件代理跨域
- nginx代理跨域
- 跨域资源共享(CORS)
- 服务端跨域配制
- …
我们在
config包下新建WebMvcConfiguration配制类来解决跨域问题

@Configuration public class WebMvcConfiguration implements WebMvcConfigurer {@Override public void addCorsMappings(CorsRegistry registry) { registry.addMapping("/**") .allowedHeaders("*") .allowedMethods("PUT", "POST", "GET", "HEAD", "DELETE", "OPTIONS") .allowedOriginPatterns("*") .maxAge(3600) .allowCredentials(true);
}
但是由于我们是用了SpringSecurity框架,我们需要额外去SpringSecurity配置类中进行跨域的配置。

        //region 跨域配置开启 和 csrf关闭
        http.cors()
                .and()
                .csrf().disable();
        //endregion
🥙 2-3、重试并设置响应拦截器
重启后端项目之后,我们再次发送登陆请求。 因为数据库中没有数据,未查询到对应信息,默认提示
用户名或密码错误

但是我们会发现接口请求失败一般都会将返回信息提示出来,而提示信息的操作也比较单一,所以我们可以在
axios 的 response拦截器中进行处理。

//=======================  响应(Response)拦截器  ===========================
axios.interceptors.response.use(
    config => {
        if (config.data.message === "用户未登陆,请登陆!") {
            router.replace('/login');
            return;
        }
        if (!config.data.success) {
            notification.error({message: config.data.message});
        }
        return config.data;
    }, error => {
        if (error.response.code === 404 || error.response.code === 504) {
            message.error({message: '服务器被怪兽吃掉了 gg'})
        } else if (error.response.code === 401) {
            message.error({message: '尚未登陆,请登陆!'})
            router.replace('/');
        } else if (error.response.code === 403) {
            message.error({message: '没有权限,请联系管理员!'})
        }
    }
);
我们就可以将调用方法时手动执行的弹窗删掉了

🥙 2-4、新增数据测试
- 新增角色信息
- 新增用户基础信息
- 在数据库中新增用户名、密码(密文)
在线加密工具


重新进行登录测试
