相信大家或多或少都在各种网站上使用过新手引导,当网站提供的功能有点复杂时,这是一个对新手非常友好的功能,可以跟随新手引导一步一步了解网站的各种功能,我们要做的只是点击下一步或者上一步,网站就能滚动到指定位置,然后高亮页面的一部分,并且配以一些图文介绍。
目前有很多帮你实现这种功能的开源库,当然,自己实现一个也不难,而且核心就是一个简单的css样式,不信你接着往下看。
基本思路
假设我们的新手引导库是一个类,名为NoviceGuide,我们可以这样使用它:
new NoviceGuide({
    steps: [
        {
            element: '',// 页面上的元素,可以是节点,也可以是节点的选择器
            text: '我是第一步',
            img: '我是第一步的图片'
        },
        {
            element: '',
            text: '我是第二步'
        }
    ]
}).start()
我们稍微思考一下就会发现,实现原理其实很简单,只要找到某一步指定节点的位置和宽高,然后将页面滚动到该节点的位置,最后高亮它,并且在旁边显示信息即可。
我们的类基本结构如下:
class NoviceGuide { constructor(options) { this.options = options // 步骤数据 this.steps = [] // 当前所在步骤 this.currentStepIndex = -1 // 处理步骤数据 this.initSteps() }initSteps() {
this.options.steps.forEach((step) => {
this.steps.push({
...step,
element:
typeof step.element === "string"
? document.querySelector(step.element)
: step.element,
})
})
}start() {
this.next()
}
next() {}
}
滚动到目标元素
获取到当前步骤的元素,然后再获取它的位置,最后再滚动页面,让目标元素居中即可。
class NoviceGuide {
next() {
// 已经是最后一步,那么结束引导
if (this.currentStepIndex + 1 >= this.steps.length) {
return this.done()
}
this.currentStepIndex++
this.to()
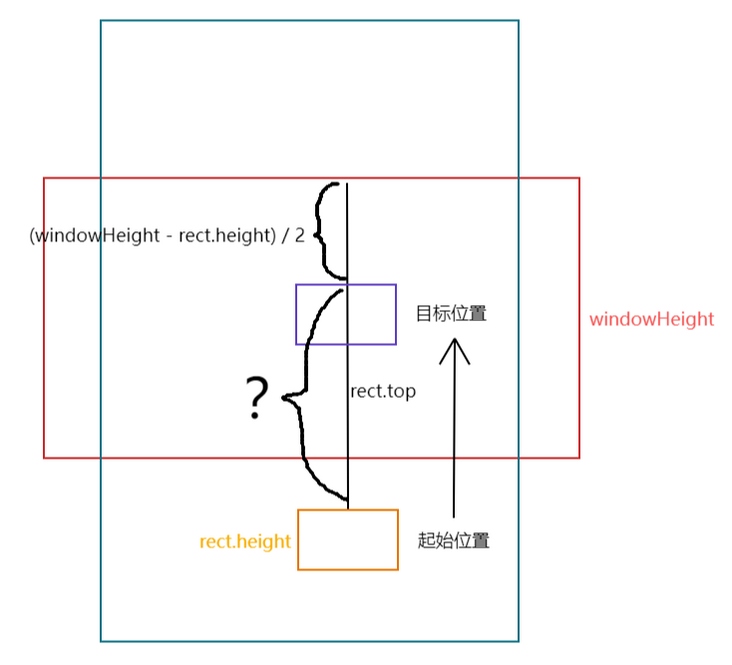
}to() { // 当前步骤 const currentStep = this.steps[this.currentStepIndex] // 当前步骤元素的尺寸和位置信息 const rect = currentStep.element.getBoundingClientRect() const windowHeight = window.innerHeight // 浏览器窗口滚动到元素所在位置 window.scrollBy(0, rect.top - (windowHeight / 2 - rect.height / 2)) } done() {}
}
使用window.scrollBy滚动相对距离,距离的计算可以参考下图:
不过如果元素已经在可视窗口内,其实不需要将它居中,否则如果多个步骤都在一个窗口内,那么切换步骤会频繁的滚动页面,体验反而不好,所以先判断一下元素是否在视口内:
class NoviceGuide {
to() {
const currentStep = this.steps[this.currentStepIndex]
const rect = currentStep.element.getBoundingClientRect()
const windowHeight = window.innerHeight
if (!this.elementIsInView(currentStep.element)) {
window.scrollBy(0, rect.top - (windowHeight - rect.height) / 2)
}
}elementIsInView(el) { const rect = el.getBoundingClientRect() return ( rect.top >= 0 && rect.left >= 0 && rect.bottom <= window.innerHeight && rect.right <= window.innerWidth ) }
}
高亮元素
目标元素可见了,接下来要做的是高亮它,具体的效果就是页面上只有目标元素是亮的,其他地方都是暗的,这个实现方式我考虑过使用svg、canvas等,比如canvas实现:
class NoviceGuide {
to() {
// ...
this.highlightElement(currentStep.element)
}highlightElement(el) { const rect = el.getBoundingClientRect(); const canvas = document.createElement('canvas') document.body.appendChild(canvas) const ctx = canvas.getContext('2d') canvas.width = window.innerWidth canvas.height = window.innerHeight canvas.style.cssText = ` position: fixed; left: 0; top: 0; z-index: 99999999; ` ctx.fillStyle = 'rgba(0, 0, 0, 0.5)' ctx.fillRect(0, 0, window.innerWidth, window.innerHeight) ctx.clearRect(rect.left, rect.top, rect.width, rect.height) }
}
原理很简单,创建一个和窗口一样大的canvas,然后全部填充成半透明,最后再清除掉目标元素所在位置的绘制,就达到了高亮的效果:
不过这种方式想要效果更好一点比较麻烦,后来在其他库中看到一个很简单的实现,使用一个box-shadow属性即可:
class NoviceGuide {

highlightElement(el) {

const rect = el.getBoundingClientRect()

if (!this.highlightEl) {

this.highlightEl = document.createElement("div")

this.highlightEl.style.cssText = position: absolute; box-shadow: 0 0 0 5000px rgba(0, 0, 0, 0.5); z-index: 99999999; border-radius: 5px; transition: all 0.3s ease-out;

document.body.appendChild(this.highlightEl)

}

this.highlightEl.style.left = rect.left + window.pageXOffset + "px"

this.highlightEl.style.top = rect.top + window.pageYOffset + "px"

this.highlightEl.style.width = rect.width + "px"

this.highlightEl.style.height = rect.height + "px"

}

}核心就是box-shadow: 0 0 0 5000px rgba(0, 0, 0, 0.5);这一行样式,创建一个和目标元素一样大小的元素,然后盖在它上面,然后把这个元素的阴影大小设置成非常大,这样除了这个元素的内部,页面其他地方都是它的阴影,就达到了高亮的效果,果然是css学的好,每天下班早。
使用DOM简单很多,修改样式比较方便,另外只要设置transition,就能轻松实现切换步骤时高亮的过渡动画效果。
另外为什么这里没有使用固定定位,而是使用绝对定位,其实是因为如果使用固定定位,页面可以滚动,但是高亮框并不会滚动,那么就对不上了。
切换步骤
接下来,我们创建一个新元素用来存放信息和上一步下一步的按钮:
class NoviceGuide {
constructor(options) {
// ...
this.infoEl = null
}to() { // ... this.showStepInfo(currentStep) } showStepInfo(step) { if (!this.infoEl) { this.infoEl = document.createElement("div") this.infoEl.style.cssText = ` position: absolute; z-index: 99999999; background-color: #fff; border-radius: 5px; ` document.body.appendChild(this.infoEl) // 绑定单击事件 this.infoEl.addEventListener("click", (e) => { let type = e.target.getAttribute("data-type") if (type) { if (type === "prev") { this.prev() } if (type === "next") { this.next() } } }) } this.infoEl.innerHTML = ` <div> ${ step.img ? `<div> <img src="${step.img}" style="width: 250px" /> </div>` : '' } <div>${step.text}</div> </div> <div> <button data-type="prev">上一步</button> <button data-type="next">下一步</button> </div> ` const rect = step.element.getBoundingClientRect() this.infoEl.style.left = rect.left + window.pageXOffset + "px" this.infoEl.style.top = rect.bottom + window.pageXOffset + "px" }
}
很简单,同样是创建一个绝对定位的元素,里面存放信息、图片、按钮,然后监听一下点击事件,判断点击的是上一步还是下一步,补充一下上一步和结束的逻辑:
class NoviceGuide {
prev() {
if (this.currentStepIndex - 1 < 0) {
return
}
this.currentStepIndex--
this.to()
}done() { document.body.removeChild(this.highlightEl) document.body.removeChild(this.infoEl) this.currentStepIndex = -1 }
}
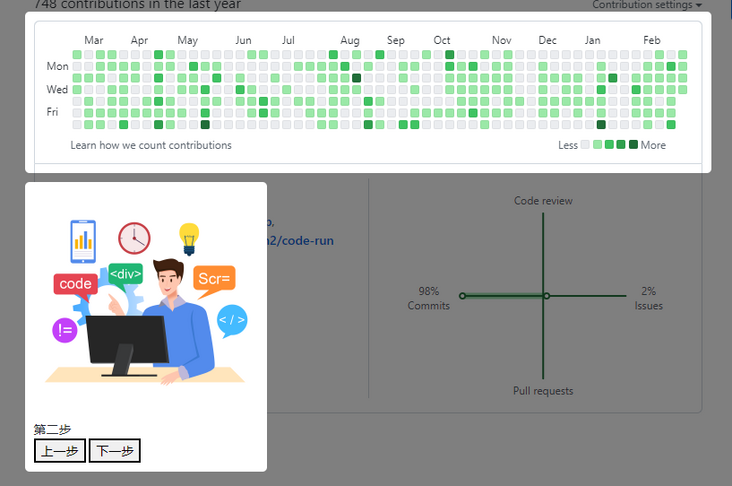
结束的话直接删除创建的两个元素就可以了,看看目前的效果:
优化
加点内边距
目前视觉上不是很好看,高亮框和目标元素大小是完全一样的,高亮框和信息框完全挨着,信息框没有内边距,所以优化一下:
class NoviceGuide {
constructor(options) {
this.options = Object.assign(
{
padding: 10,
margin: 10
},
options
)
}highlightElement(el) { // ... let { padding } = this.options this.highlightEl.style.left = rect.left + window.pageXOffset - padding + "px" this.highlightEl.style.top = rect.top + window.pageYOffset - padding + "px" this.highlightEl.style.width = rect.width + padding * 2 + "px" this.highlightEl.style.height = rect.height + padding * 2 + "px" } showStepInfo(step) { let { padding, margin } = this.options if (!this.infoEl) { this.infoEl.style.cssText = ` padding: ${padding}px; ` } // ... this.infoEl.style.left = rect.left + window.pageXOffset - padding + "px" this.infoEl.style.top = rect.bottom + window.pageYOffset + padding + margin + "px" }
}
支持某个步骤没有元素
某些步骤可能是纯信息,不需要元素,这种情况直接显示在页面中间即可:
class NoviceGuide {
to() {
const currentStep = this.steps[this.currentStepIndex]
if (!currentStep.element) {
// 当前步骤没有元素
this.highlightElement()
this.showStepInfo(currentStep)
return
}
// ...
}highlightElement(el) { // ... if (el) { const rect = el.getBoundingClientRect() let { padding } = this.options // ... // 原有逻辑 } else { // 当前步骤没有元素高亮元素的宽高设置成0,并且直接定位在窗口中间 this.highlightEl.style.left = window.innerWidth / 2 + window.pageXOffset + "px" this.highlightEl.style.top = window.innerHeight / 2 + window.pageYOffset + "px" this.highlightEl.style.width = 0 + "px" this.highlightEl.style.height = 0 + "px" } } showStepInfo(step) { // ... if (step.element) { const rect = step.element.getBoundingClientRect() // ... // 原有逻辑 } else { // 当前步骤没有元素,信息框定位在窗口中间 const rect = this.infoEl.getBoundingClientRect() this.infoEl.style.left = (window.innerWidth - rect.width) / 2 + window.pageXOffset + "px" this.infoEl.style.top = (window.innerHeight - rect.height) / 2 + window.pageYOffset + "px" } }
}
当然,上述实现还是有点问题的,比如网速慢的时候,或者图片比较大时,图片还没加载出来,那么获取到的信息框的大小是不对的,导致定位会出现偏差,这个问题本文就不考虑了。
动态计算信息的位置
目前我们的信息框是默认显示在高亮元素下方的,这样显然是有问题的,比如高亮元素刚好在屏幕底部,或者信息框的高度很高,底部无法完全显示,这种情况,我们就需要改成动态计算的方式,具体来说就是依次判断信息框能否在高亮元素下方、上方、左方、右方四个方向显示,如果都不行的话,还要尝试调整页面滚动的位置使高亮框和信息框都能显示。
class NoviceGuide {

showStepInfo(step) {

// ...

if (step.element) {

this.computeInfoPosition(step)

} else {

// ...

}

}

}
计算的逻辑我们放到一个新函数里:
class NoviceGuide {

computeInfoPosition(step) {

const { padding, margin } = this.options

const windowWidth = window.innerWidth

const windowHeight = window.innerHeight

const windowPageXOffset = window.pageXOffset

const windowPageYOffset = window.pageYOffset

const rect = step.element.getBoundingClientRect()

const infoRect = this.infoEl.getBoundingClientRect()

// ...

}

}
获取和保存一些基本信息,继续:
class NoviceGuide {

computeInfoPosition(step) {

let left = 0

let top = 0

const adjustLeft = () => {

// 优先和高亮框左对齐

if (windowWidth - rect.left - padding >= infoRect.width) {

return rect.left - padding + windowPageXOffset

} else {

// 否则水平居中显示

return (windowWidth - infoRect.width) / 2 + windowPageXOffset

}

};

if (

rect.bottom + padding + margin + infoRect.height <= windowHeight && // 下方宽度可以容纳

infoRect.width <= windowWidth // 信息框宽度比浏览器窗口小

) {

// 可以在下方显示

left = adjustLeft()

top = rect.bottom + padding + margin + windowPageYOffset

} else if (

rect.top - padding - margin >= infoRect.height &&

infoRect.width <= windowWidth

) {

// 可以在上方显示

left = adjustLeft()

top = rect.top - padding - margin - infoRect.height + windowPageYOffset

}

// 省略后续两个判断

}

}
判断高亮框的下方和上方的剩余空间能否容纳信息框,另外还要判断一下信息框的宽度是否比浏览器窗口小。
对于信息框的水平位置,我们优先让它和高亮框左对齐,如果空间不够,那么就让信息框在浏览器窗口水平居中。
对于左侧和右侧的判断也是类似的,完整代码可以去文末的仓库里查看。
当上下左右四个方向都无法满足条件时,我们还可以再检查一种情况,也就是高亮框和信息框的总高度是否比浏览器窗口高度小,是的话我们可以通过滚动页面位置来达到完整显示的目的:
class NoviceGuide {

computeInfoPosition(step) {

// ...

else {

// 否则检查高亮框高度+信息框高度是否小于窗口高度

let totalHeightLessThenWindow =

rect.height + padding * 2 + margin + infoRect.height <= windowHeight

if (

totalHeightLessThenWindow &&

Math.max(rect.width + padding * 2, infoRect.width) <= windowWidth

) {

// 上下排列可以放置

// 滚动页面,居中显示两者整体

let newTop =

(windowHeight -

(rect.height + padding * 2 + margin + infoRect.height)) /

2

window.scrollBy(0, rect.top - newTop)

} else {

// 恕我无能为力

// 回到默认位置

}

left = adjustLeft()

top = rect.bottom + padding + margin + windowPageYOffset

}

this.infoEl.style.left = left + "px"

this.infoEl.style.top = top + "px"

}

}
如果总高度小于窗口高度,那么可以调整页面滚动位置,否则就不做任何处理,这两种情况对于信息框来说,都是显示在高亮框下方。
如果目标元素位于可滚动元素内
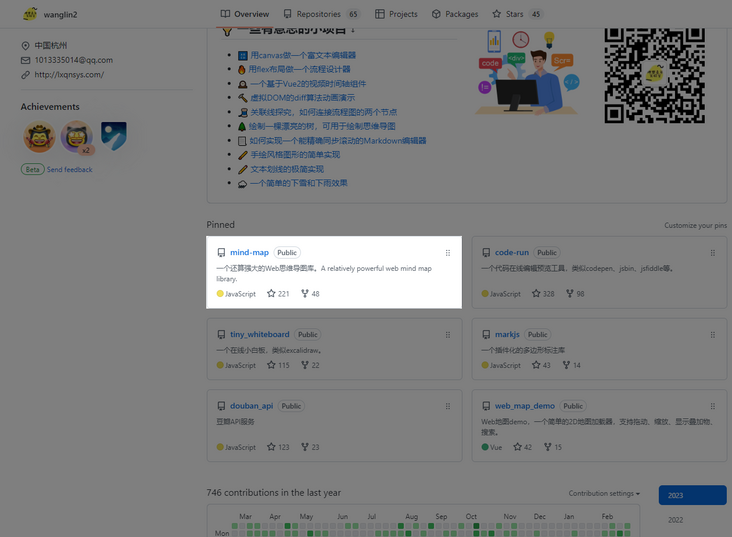
这个问题是什么意思呢,比如我们想高亮下图中红框内的元素:
它所在的可滚动父元素并不是document.body,事实上这个页面body元素压根无法滚动,宽高是和窗口宽高一致的,而我们的实现逻辑是通过滚动body来使元素可见的,那么我们就做不到让这个元素出现在视口。
解决这个问题可以这么考虑,我们先找到目标元素的最近的可滚动的祖先元素,如果元素不在该祖先元素的可视区域内,那么就滚动父元素让元素可见,当然这样还没完,因为该祖先元素也可能存在一个可滚动的祖先元素,它也不一定是在它的祖先元素内可见,所以还得判断和让它可见,很明显,这是一个向上递归的过程,一直检查到body元素为止。
先来写一个获取最近的可滚动祖先元素的方法:
class NoviceGuide {

getScrollAncestor(el) {

let style = window.getComputedStyle(el)

const isAbsolute = style.position === 'absolute'

const isFixed = style.position === 'fixed'

const reg = /(auto|scroll)/

// 如果元素是固定定位,那么可滚动祖先元素为body

if (isFixed) return document.body

let parent = el.parentElement

while (parent) {

style = window.getComputedStyle(parent)

// 如果是绝对定位,那么可滚动的祖先元素必须是有定位的才行

if (!(isAbsolute && style.position === 'static')) {

// 如果某个祖先元素的overflow属性为auto或scroll则代表是可滚动的

if (reg.test(style.overflow + style.overflowX + style.overflowY)) {

return parent

}

}

parent = parent.parentElement

}

return document.body

}

}就是不断向上递归,接下来修改一下to方法,在获取目标元素尺寸位置信息之前先让它可见:
class NoviceGuide {
to() {
// ...
this.scrollAncestorToElement(currentStep.element)
const rect = currentStep.element.getBoundingClientRect()
// ...
}scrollAncestorToElement(element) { // 获取可滚动的祖先元素 const parent = this.getScrollAncestor(element) if (parent === document.body) return // 祖先元素和目标元素的尺寸位置信息 let parentRect = parent.getBoundingClientRect() let rect = element.getBoundingClientRect() // 滚动祖先元素,让目标元素可见 parent.scrollTop = parent.scrollTop + rect.top - parentRect.top // 继续向上递归 this.scrollAncestorToElement(parent) }
}
结尾
本文详细的介绍了如何实现一个新手引导的功能,可能还有没有考虑到的问题或者实现上的缺陷,欢迎留言指出。